2014 MERCEDES-BENZ SLK-CLASS ROADSTER display
[x] Cancel search: displayPage 64 of 356

ETS traction control is part of ESP
®
.
ETS brakes the drive wheels individually if
they spin. This enables you to pull away and
accelerate on slippery surfaces, for example
if the road surface is slippery on one side. In
addition, more drive torque is transferred to
the wheel or wheels with traction.
ETS remains active when you deactivate
ESP ®
.
i AMG vehicles: your vehicle may be
equipped with 20-inch tires on the rear
axle. If replaced with a 19-inch tire, ETS
may intervene noticeably sooner for the
first few kilometers. After approximately
10 km ETS will function as usual again.
Information on the dimensions and types of
wheels and tires for your vehicle can be
found in the "Wheel/tire combinations"
section ( Ypage 333).
Important safety notes G
WARNING
If ESP ®
is malfunctioning, ESP ®
is unable to
stabilize the vehicle. Additionally, further
driving safety systems are deactivated. This
increases the risk of skidding and an accident.
Drive on carefully. Have ESP ®
checked at a
qualified specialist workshop.
! When testing the electric parking brake
on a braking dynamometer, switch off the
ignition. Application of the brakes by
ESP ®
may otherwise destroy the brake
system.
When towing the vehicle with the rear axle
raised, observe the notes on
ESP ®
(Y page 302).
ESP ®
is deactivated if the åwarning lamp
in the instrument cluster lights up
continuously when the engine is running.
If the ÷ warning lamp and the å
warning lamp are lit continuously, ESP ®
is not
available due to a malfunction. Observe the information on warning lamps
(Y
page 244) and display messages which
may be shown in the instrument cluster
(Y page 211).
i Only use wheels with the recommended
tire sizes. Only then will ESP ®
function
properly.
Characteristics of ESP ® General information
If the
÷ ESP warning lamp goes out before
beginning the journey, ESP ®
is automatically
active.
If ESP ®
intervenes, the ÷ESP®
warning
lamp flashes in the instrument cluster.
If ESP ®
intervenes:
X Do not deactivate ESP ®
under any
circumstances.
X Only depress the accelerator pedal as far
as necessary when pulling away.
X Adapt your driving style to suit the
prevailing road and weather conditions.
ECO start/stop function
The ECO start/stop function switches the
engine off automatically when the vehicle
stops moving. The engine starts
automatically when the driver wants to pull
away again. ESP ®
remains in its previously
selected status. Example:if ESP®
was
deactivated before the engine was switched
off, ESP ®
remains deactivated when the
engine is switched on again.
Deactivating/activating ESP ®
(except
AMG vehicles) Important safety notes
i
Observe the "Important safety notes"
section ( Ypage 59). 62
Driving safety systemsSafety
Page 66 of 356
In the following situations, it may be better to
activate SPORT handling mode or deactivate
ESP ®
:
R when using snow chains
R in deep snow
R on sand or gravel
R on designated roads when the vehicle's
own oversteering and understeering
characteristics are desired
Driving in SPORT handling mode or without
ESP ®
requires an extremely qualified and
experienced driver.
i Activate ESP ®
as soon as the situations
described above no longer apply. ESP ®
will
otherwise not be able to stabilize the
vehicle if the vehicle starts to skid or a
wheel starts to spin.
! Avoid spinning the driven wheels for an
extended period with ESP ®
deactivated.
You could otherwise damage the drivetrain.
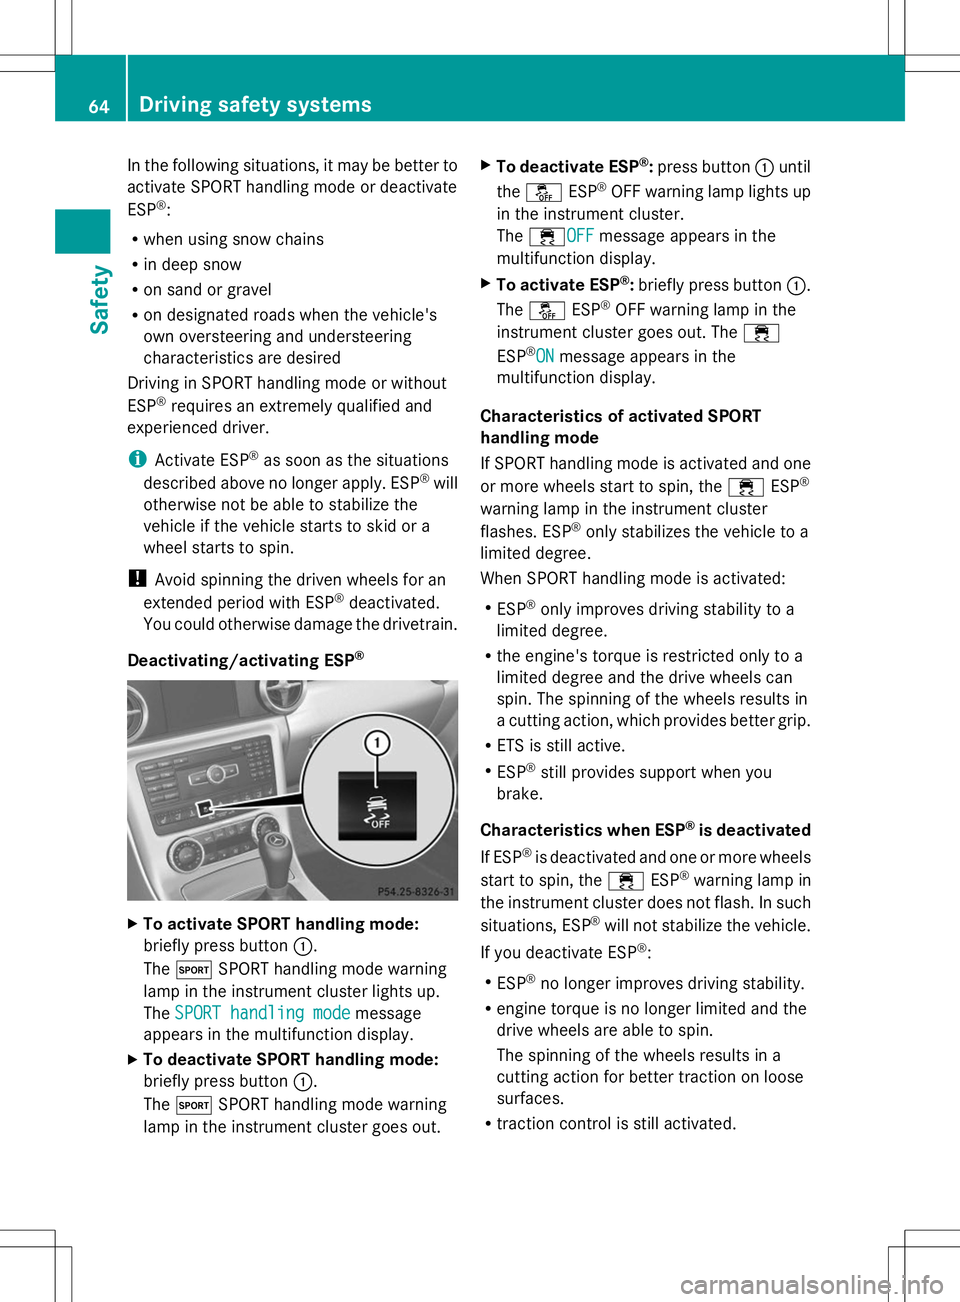
Deactivating/activating ESP ®X
To activate SPORT handling mode:
briefly press button :.
The M SPORT handling mode warning
lamp in the instrument cluster lights up.
The SPORT handling mode
SPORT handling mode message
appears in the multifunction display.
X To deactivate SPORT handling mode:
briefly press button :.
The M SPORT handling mode warning
lamp in the instrument cluster goes out. X
To deactivate ESP ®
:press button :until
the å ESP®
OFF warning lamp lights up
in the instrument cluster.
The ÷OFF OFFmessage appears in the
multifunction display.
X To activate ESP ®
:briefly press button :.
The å ESP®
OFF warning lamp in the
instrument cluster goes out. The ÷
ESP ®
ON ON message appears in the
multifunction display.
Characteristics of activated SPORT
handling mode
If SPORT handling mode is activated and one
or more wheels start to spin, the ÷ESP®
warning lamp in the instrument cluster
flashes. ESP ®
only stabilizes the vehicle to a
limited degree.
When SPORT handling mode is activated:
R ESP ®
only improves driving stability to a
limited degree.
R the engine's torque is restricted only to a
limited degree and the drive wheels can
spin. The spinning of the wheels results in
a cutting action, which provides better grip.
R ETS is still active.
R ESP ®
still provides support when you
brake.
Characteristics when ESP ®
is deactivated
If ESP ®
is deactivated and one or more wheels
start to spin, the ÷ESP®
warning lamp in
the instrument cluster does not flash. In such
situations, ESP ®
will not stabilize the vehicle.
If you deactivate ESP ®
:
R ESP ®
no longer improves driving stability.
R engine torque is no longer limited and the
drive wheels are able to spin.
The spinning of the wheels results in a
cutting action for better traction on loose
surfaces.
R traction control is still activated. 64
Driving safety systemsSafety
Page 67 of 356
R
PRE-SAFE ®
is no longer available, nor is it
activated if you brake firmly and ESP ®
intervenes.
R PRE-SAFE ®
Brake is no longer available, it
is also not activated if you brake firmly and
ESP ®
intervenes.
R ESP ®
still provides support when you
brake. EBD (electronic brake force
distribution)
General information EBD monitors and controls the brake
pressure on the rear wheels to improve
driving stability while braking.
Important safety notes
i
Observe the "Important safety notes"
section for driving safety systems
(Y page 59). G
WARNING
If EBD has malfunctioned, the rear wheels can
still lock, e.g. under full braking. This
increases the risk of skidding and an accident.
You should therefore adapt your driving style
to the different handling characteristics. Have
the brake system checked at a qualified
specialist workshop.
Observe information regarding indicator and
warning lamps ( Ypage 242) as well as
display messages (Y page 213). ADAPTIVE BRAKE
ADAPTIVE BRAKE enhances braking safety
and offers increased braking comfort. In
addition to the braking function, ADAPTIVE
BRAKE also has the HOLD function
(Y page 179) and hill start assist
(Y page 143). PRE-SAFE
®
Brake
General information i
Observe the "Important safety notes"
section (Y page 59).
PRE-SAFE ®
Brake is only available in vehicles
with DISTRONIC PLUS.
For PRE-SAFE ®
Brake to assist you when
driving, the radar sensor system must be
operational.
With the help of the radar sensor system,
PRE-SAFE ®
Brake can detect obstacles that
are in front of your vehicle for an extended
period of time.
PRE-SAFE ®
Brake can help you to minimize
the risk of a collision with a vehicle ahead, and
reduce the effects of such a collision. If PRE-
SAFE ®
Brake has detected a risk of collision,
you will be warned visually and acoustically
as well as by automatic braking. PRE-SAFE ®
Brake cannot prevent a collision without your
intervention.
Important safety notes G
WARNING
PRE-SAFE ®
Brake will initially brake your
vehicle by a partial application of the brakes
if a danger of collision is detected. There may
be a collision unless you also brake.
Automatic emergency braking cannot prevent
a collision. There is a risk of an accident.
Always apply the brakes yourself and try to
take evasive action. G
WARNING
PRE-SAFE ®
Brake cannot always clearly
identify objects and complex traffic
conditions.
In these cases, PRE-SAFE ®
Brake may:
R give an unnecessary warning and then
brake the vehicle
R not give a warning or intervene
There is a risk of an accident. Driving safety systems
65Safety
Z
Page 68 of 356
Always pay particular attention to the traffic
situation and be ready to brake, especially if
PRE-SAFE ®
Brake warns you. Terminate the
intervention in a non-critical driving situation.
In order to maintain the appropriate distance
to the vehicle in front and thus prevent a
collision, you must apply the brakes yourself. G
WARNING
PRE-SAFE ®
Brake does not react:
R to people or animals
R to oncoming vehicles
R to crossing traffic
R when cornering
As a result, PRE-SAFE ®
Brake may neither
give warnings nor intervene in all critical
situations. There is a risk of an accident.
Always pay careful attention to the traffic
situation and be ready to brake.
In the event of snowfall or heavy rain, the
recognition can be impaired.
Recognition by the radar sensor system is
also impaired in the event of:
R dirt on the sensors or anything else
covering the sensors
R interference by other radar sources
R there are strong radar reflections, for
example in parking garages
R a narrow vehicle traveling in front, e.g. a
motorbike
R a vehicle traveling in front on a different line
relative to the center of your vehicle
Following damage to the front end of the
vehicle, have the configuration and operation
of the radar sensors checked at a qualified
specialist workshop. This also applies to
collisions at low speeds where there is no
visible damage to the front of the vehicle. Function X
To activate/deactivate: activate or
deactivate PRE-SAFE ®
Brake in the on-
board computer (Y page 201).
When PRE-SAFE ®
Brake is deactivated, the
assistance graphic shows the æsymbol
in the multifunction display.
Starting at a speed of around 4 mph
(7 km/h), this function warns you if you
rapidly approach a vehicle in front. An
intermittent warning tone will then sound and
the · distance warning lamp will light up
in the instrument cluster.
X Brake immediately to defuse the situation.
or
X Take evasive action provided it is safe to do
so.
PRE-SAFE ®
Brake can also brake the vehicle
automatically under the following conditions:
R the driver and front-passenger have their
seat belts fastened
and
R the vehicle speed is between
approximately 4 mph (7 km/h) and
124 mph (200 km/h)
At speeds of up to approximately 40 mph
(70 km/h) PRE-SAFE ®
Brake can also detect
stationary objects. Examples of stationary
objects are stopped or parked vehicles.
i If there is an increased risk of collision,
preventive passenger protection measures
(PRE-SAFE ®
) are activated.
If the risk of collision with the vehicle in front
remains and you do not brake, take evasive
action or accelerate significantly, the vehicle
may perform automatic emergency braking,
up to the point of full brake application.
Automatic emergency braking is not
performed until immediately prior to an
imminent accident. 66
Driving safety systemsSafety
Page 89 of 356
R
there is sufficient clearance, as the roof
swings upwards.
R there is sufficient clearance behind the
vehicle, as the trunk lid swings
backwards beyond the bumper.
R the trunk is only loaded to below the
trunk partition.
R the trunk partition is not pushed up by
the load.
R the trunk partition is closed.
R the trunk lid is closed.
R the outside temperature is above 5 ‡
(Ò15 †).
You could otherwise damage the roof,
trunk and other parts of the vehicle.
i The vehicle's dimensions when opening/
closing the roof (Y page 350).
i Make sure that the roof and rear window
are clean and dry before opening the roof.
Otherwise, water or dirt could enter the
vehicle interior or trunk. Opening and closing using the roof
switch
Important safety notes G
WARNING
When opening or closing the roof, body parts
could be trapped by, for example, the roof
mechanism, trunk lid or side windows. There
is a risk of injury.
When raising or lowering the roof, make sure
that no body parts are in the vicinity of moving
components. If someone becomes trapped,
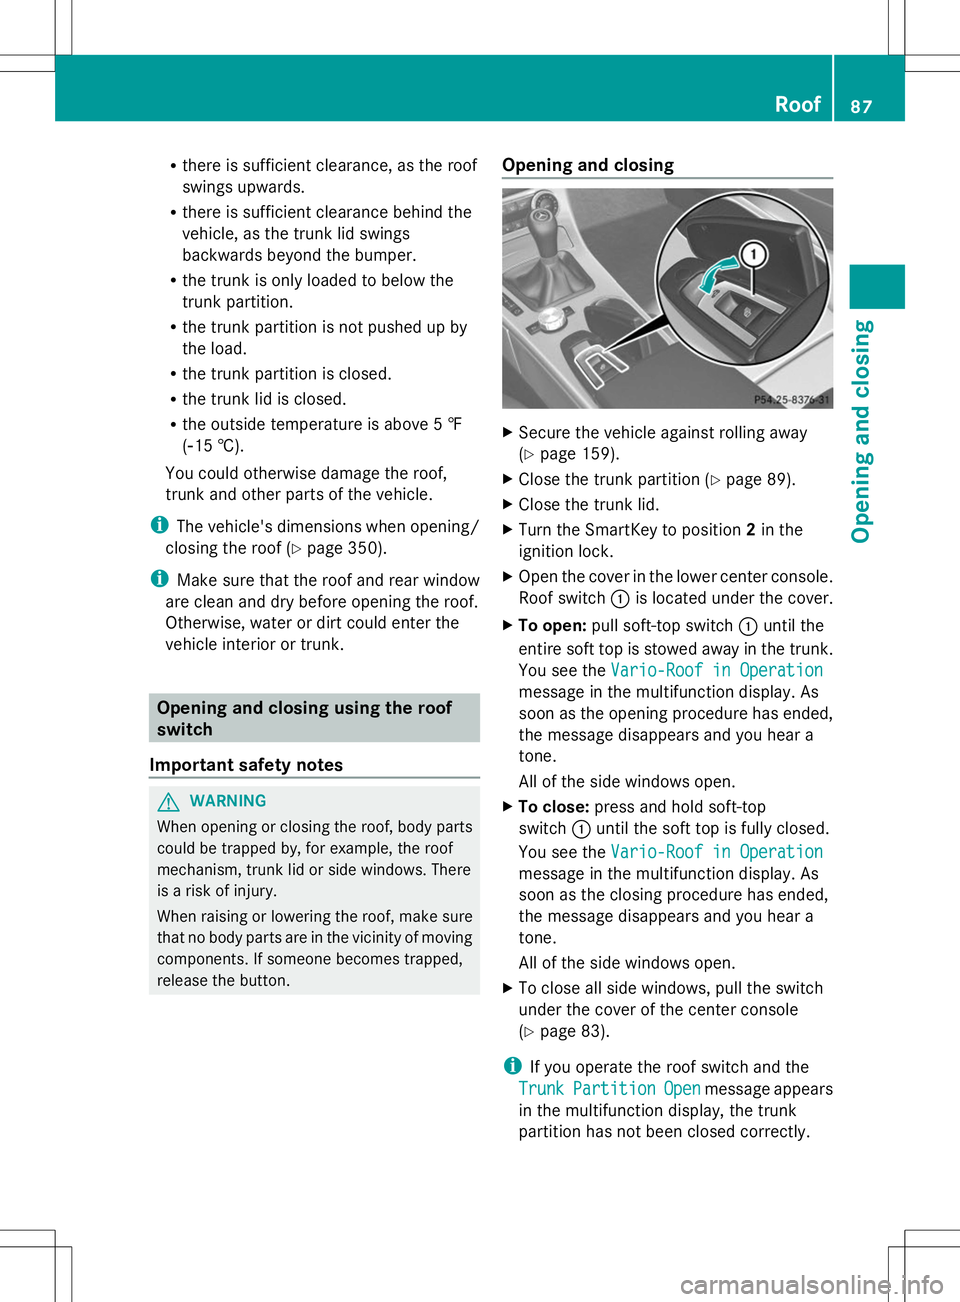
release the button. Opening and closing X
Secure the vehicle against rolling away
(Y page 159).
X Close the trunk partition (Y page 89).
X Close the trunk lid.
X Turn the SmartKey to position 2in the
ignition lock.
X Open the cover in the lower center console.
Roof switch :is located under the cover.
X To open: pull soft-top switch :until the
entire soft top is stowed away in the trunk.
You see the Vario-Roof in Operation Vario-Roof in Operation
message in the multifunction display. As
soon as the opening procedure has ended,
the message disappears and you hear a
tone.
All of the side windows open.
X To close: press and hold soft-top
switch :until the soft top is fully closed.
You see the Vario-Roof in Operation Vario-Roof in Operation
message in the multifunction display. As
soon as the closing procedure has ended,
the message disappears and you hear a
tone.
All of the side windows open.
X To close all side windows, pull the switch
under the cover of the center console
(Y page 83).
i If you operate the roof switch and the
Trunk Trunk Partition
Partition Open
Openmessage appears
in the multifunction display, the trunk
partition has not been closed correctly. Roof
87Opening and closing Z
Page 90 of 356
Opening and closing using the
SmartKey
Important safety notes G
WARNING
When opening or closing the roof, body parts
could be trapped by, for example, the roof
mechanism, trunk lid or side windows. There
is a risk of injury.
When raising or lowering the roof, make sure
that no body parts are in the vicinity of moving
components. If someone becomes trapped,
release the button.
Opening and closing X
Close the trunk partition (Y page 88).
X Close the trunk lid (Y page 79).
X Vehicles without KEYLESS-GO: point the
tip of the SmartKey at the door handle on
the driver's door.
X Vehicles with KEYLESS-GO: the
SmartKey must be within 6 ft (2 m) of the
vehicle.
X To open: press and hold the %button
on the SmartKey until the roof is fully
opened.
The roof and the rear side windows open.
The front side windows close.
X To interrupt the opening procedure:
release the %button.
X To open the front side windows: press
and hold the %button on the SmartKey
again.
X To close: press and hold the &button
on the SmartKey until the roof is fully
closed.
The roof and the side windows close.
X To interrupt the closing procedure:
release the &button.
i When the roof is closed and the trunk
partition is open, the roof cannot be
opened using the SmartKey functions.
Instead, all of the side windows open or
close simultaneously (Y page 83).Additionally, the
Trunk Partition Open Trunk Partition Open
message appears in the multifunction
display. Locking the roof again
Important safety notes G
WARNING
If you do not fully open/close the soft top, the
soft-top hydraulics depressurize after a short
time. This causes the soft top to lower
unexpectedly and may cause you or others to
be trapped. There is a risk of injury.
Always open or close the soft top completely.
The roof is not locked if:
R the K symbol and the Vario-Roof Vario-Roofin
in
Operation
Operation message appear in the
multifunction display.
R the K symbol and the Open/Close
Open/Close
Vario-Roof Completely
Vario-Roof Completely message
appear and you hear a warning tone.
R you hear a warning tone for up to
10 seconds when pulling away or while
driving.
Locking You can lock the roof again if it is not locked
fully.
X
Pull over and stop the vehicle safely as soon
as possible, paying attention to road and
traffic conditions.
X Make sure that the SmartKey is in position
2in the ignition lock.
X Press the roof switch (Y page 87). Trunk partition
General notes !
To avoid damaging the roof or luggage
when folding back the roof, you should: 88
RoofOpening and closing
Page 98 of 356
Useful information
i This Operator's Manual describes all
models and all standard and optional
equipment of your vehicle available at the
time of publication of the Operator's
Manual. Country-specific differences are
possible. Please note that your vehicle may
not be equipped with all features
described. This also applies to safety-
related systems and functions.
i Read the information on qualified
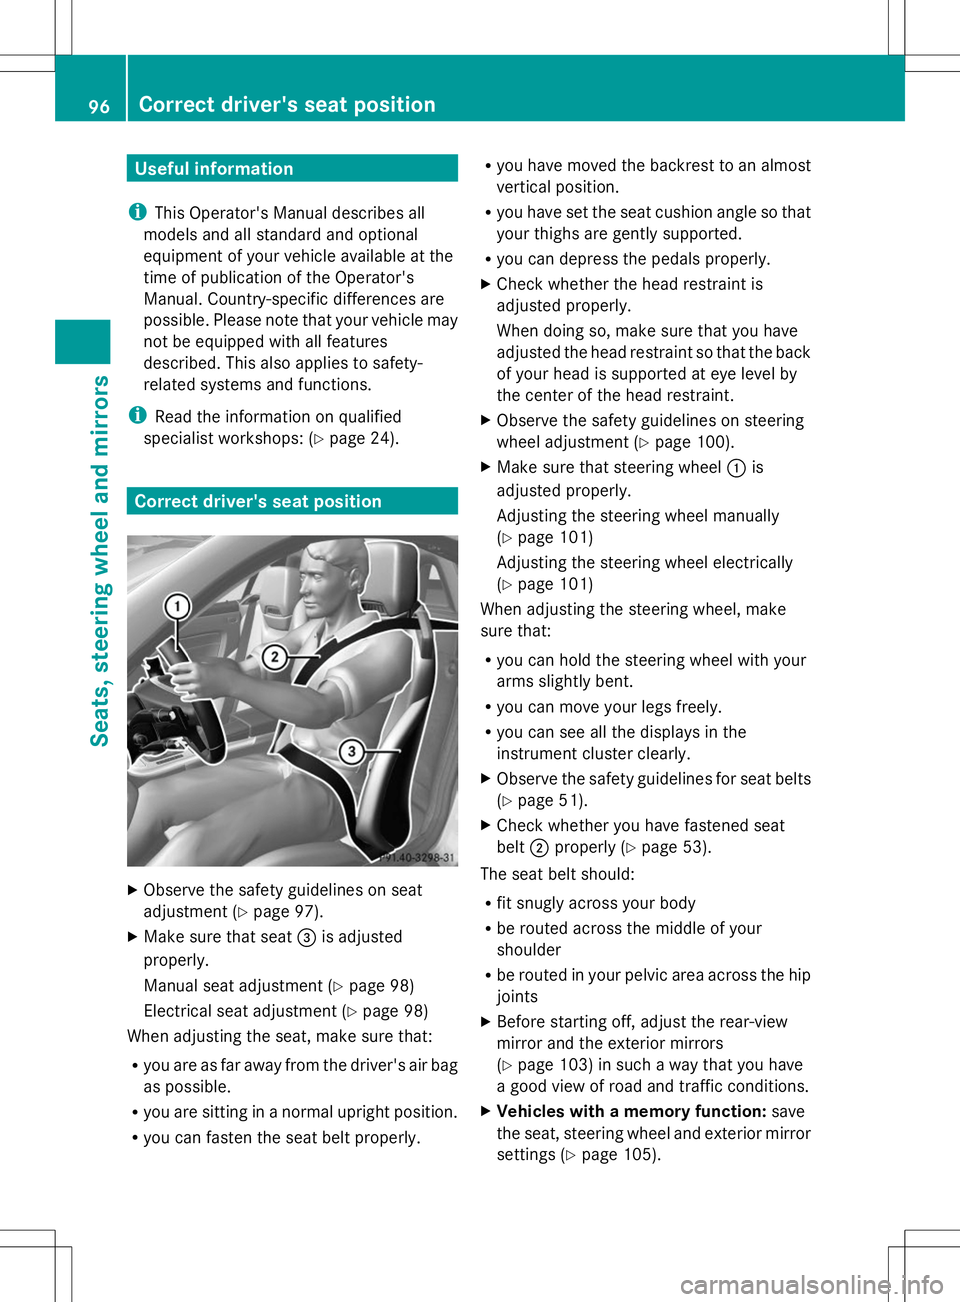
specialist workshops: (Y page 24).Correct driver's seat position
X
Observe the safety guidelines on seat
adjustment (Y page 97).
X Make sure that seat =is adjusted
properly.
Manual seat adjustment (Y page 98)
Electrical seat adjustment (Y page 98)
When adjusting the seat, make sure that:
R you are as far away from the driver's air bag
as possible.
R you are sitting in a normal upright position.
R you can fasten the seat belt properly. R
you have moved the backrest to an almost
vertical position.
R you have set the seat cushion angle so that
your thighs are gently supported.
R you can depress the pedals properly.
X Check whether the head restraint is
adjusted properly.
When doing so, make sure that you have
adjusted the head restraint so that the back
of your head is supported at eye level by
the center of the head restraint.
X Observe the safety guidelines on steering
wheel adjustment (Y page 100).
X Make sure that steering wheel :is
adjusted properly.
Adjusting the steering wheel manually
(Y page 101)
Adjusting the steering wheel electrically
(Y page 101)
When adjusting the steering wheel, make
sure that:
R you can hold the steering wheel with your
arms slightly bent.
R you can move your legs freely.
R you can see all the displays in the
instrument cluster clearly.
X Observe the safety guidelines for seat belts
(Y page 51).
X Check whether you have fastened seat
belt ;properly (Y page 53).
The seat belt should:
R fit snugly across your body
R be routed across the middle of your
shoulder
R be routed in your pelvic area across the hip
joints
X Before starting off, adjust the rear-view
mirror and the exterior mirrors
(Y page 103) in such a way that you have
a good view of road and traffic conditions.
X Vehicles with a memory function: save
the seat, steering wheel and exterior mirror
settings (Y page 105). 96
Correct driver's seat positionSeats, steering wheel and mirrors
Page 115 of 356
distance to the other vehicle. Once the
system no longer detects any other vehicles,
it reactivates the high-beam headlamps.
The system's optical sensor is located behind
the windshield near the overhead control
panel.
Switching Adaptive Highbeam Assist
on/off X
To activate: activate the Adaptive
Highbeam Assist function using the on-
board computer (Y page 203).
X Turn the light switch to Ã.
X Press the combination switch beyond the
pressure point in the direction of arrow :
(Y page 110).
The _ indicator lamp in the
multifunction display lights up if it is dark
and the light sensor activates the low-beam
headlamps.
If you are driving at speeds above
approximately 28 mph (45 km/h):
The headlamp range is set automatically
depending on the distance between the
vehicle and other road users.
If you are driving at speeds above
approximately 35 mph (55 km/h) and no
other road users have been detected:
The high-beam headlamps are switched on
automatically. The Kindicator lamp in
the instrument cluster also lights up.
If you are driving at speeds below
approximately 30 mph (45 km/h) or other
road users have been detected or the roads
are adequately lit:
The high-beam headlamps are switched off
automatically. The Kindicator lamp in
the instrument cluster goes out. The _
indicator lamp in the multifunction display
remains lit.
X To deactivate: move the combination
switch back to its normal position.
The _ indicator lamp in the instrument
cluster goes out. Headlamps fogged up on the inside
The headlamps may fog up on the inside if
there is high atmospheric humidity.
X Switch on the lights and drive off.
The level of fogging diminishes, depending
on the length of the journey and the
weather conditions (humidity and
temperature).
If the level of fogging does not diminish:
X Have the headlamps checked at a qualified
specialist workshop. Interior lighting
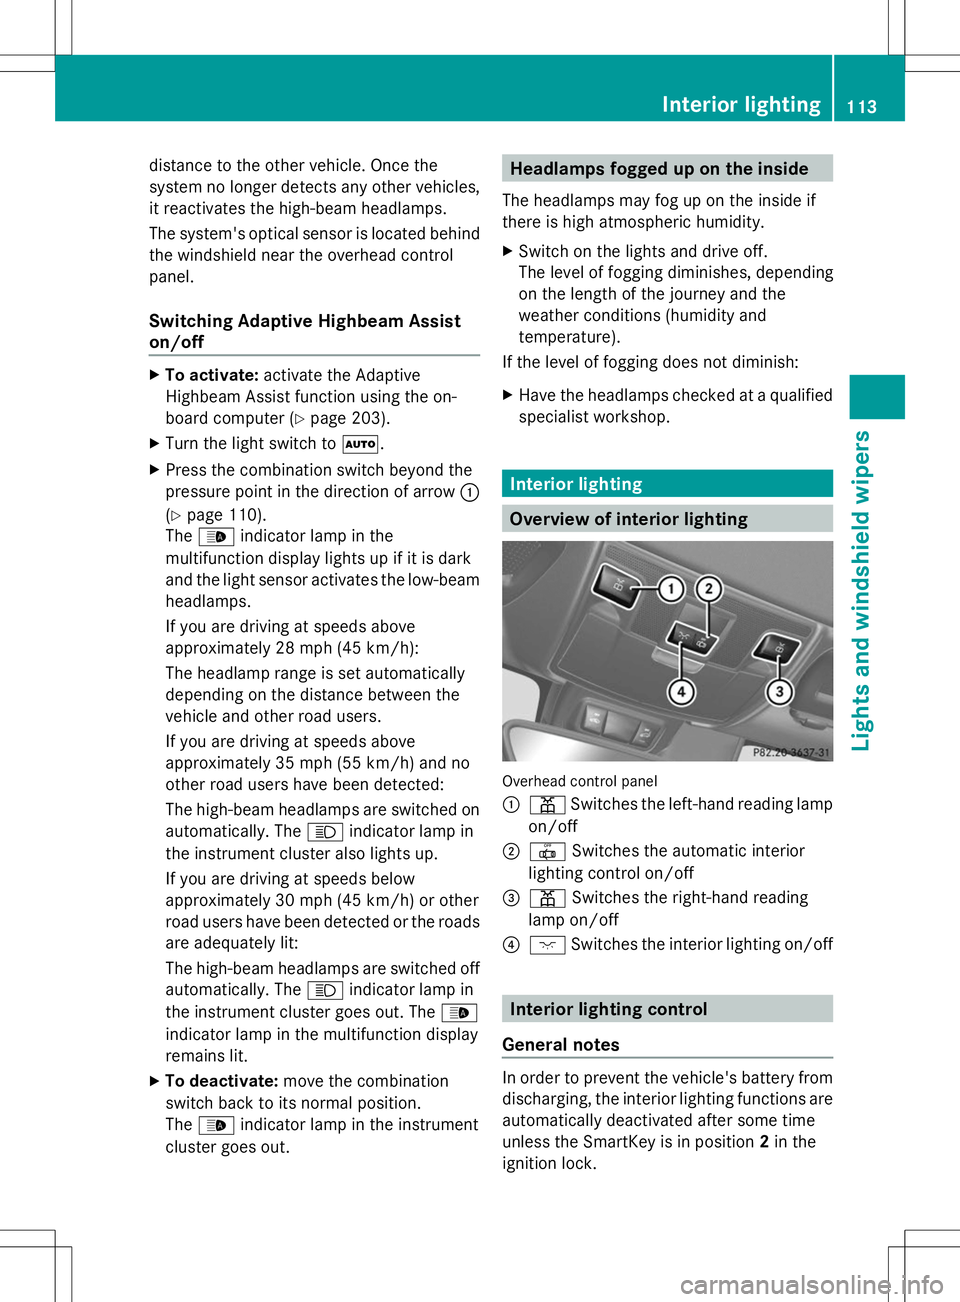
Overview of interior lighting
Overhead control panel
:
p Switches the left-hand reading lamp
on/off
; | Switches the automatic interior
lighting control on/off
= p Switches the right-hand reading
lamp on/off
? c Switches the interior lighting on/off Interior lighting control
General notes In order to prevent the vehicle's battery from
discharging, the interior lighting functions are
automatically deactivated after some time
unless the SmartKey is in position
2in the
ignition lock. Interior lighting
113Lights and windshield wipers Z