2014 MERCEDES-BENZ SLK-CLASS ROADSTER buttons
[x] Cancel search: buttonsPage 108 of 356
Only use the memory function on the driver's
side when the vehicle is stationary. G
WARNING
When the memory function adjusts the seat
or steering wheel, you and other vehicle
occupants – particularly children – could
become trapped. There is a risk of injury.
While the memory function is making
adjustments, make sure that no one has any
body parts in the sweep of the seat or steering
wheel. If somebody becomes trapped,
immediately release the memory function
position button. The adjustment process is
stopped. G
WARNING
When the memory function adjusts the seat,
you and other vehicle occupants – particularly
children – could become trapped. There is a
risk of injury.
While the memory function is making
adjustments, make sure that no one has any
body parts in the sweep of the seat. If
somebody becomes trapped, immediately
release the memory function position button.
The adjustment process is stopped. G
WARNING
Children could become trapped if they
activate the memory function, particularly
when unattended. There is a risk of injury.
When leaving the vehicle, always take the
SmartKey with you and lock the vehicle. Never
leave children unsupervised in the vehicle. X
Adjust the seat electrically (Y page 98).
X On the driver's side, adjust the steering
wheel (Y page 101) and the exterior mirrors
(Y page 103).
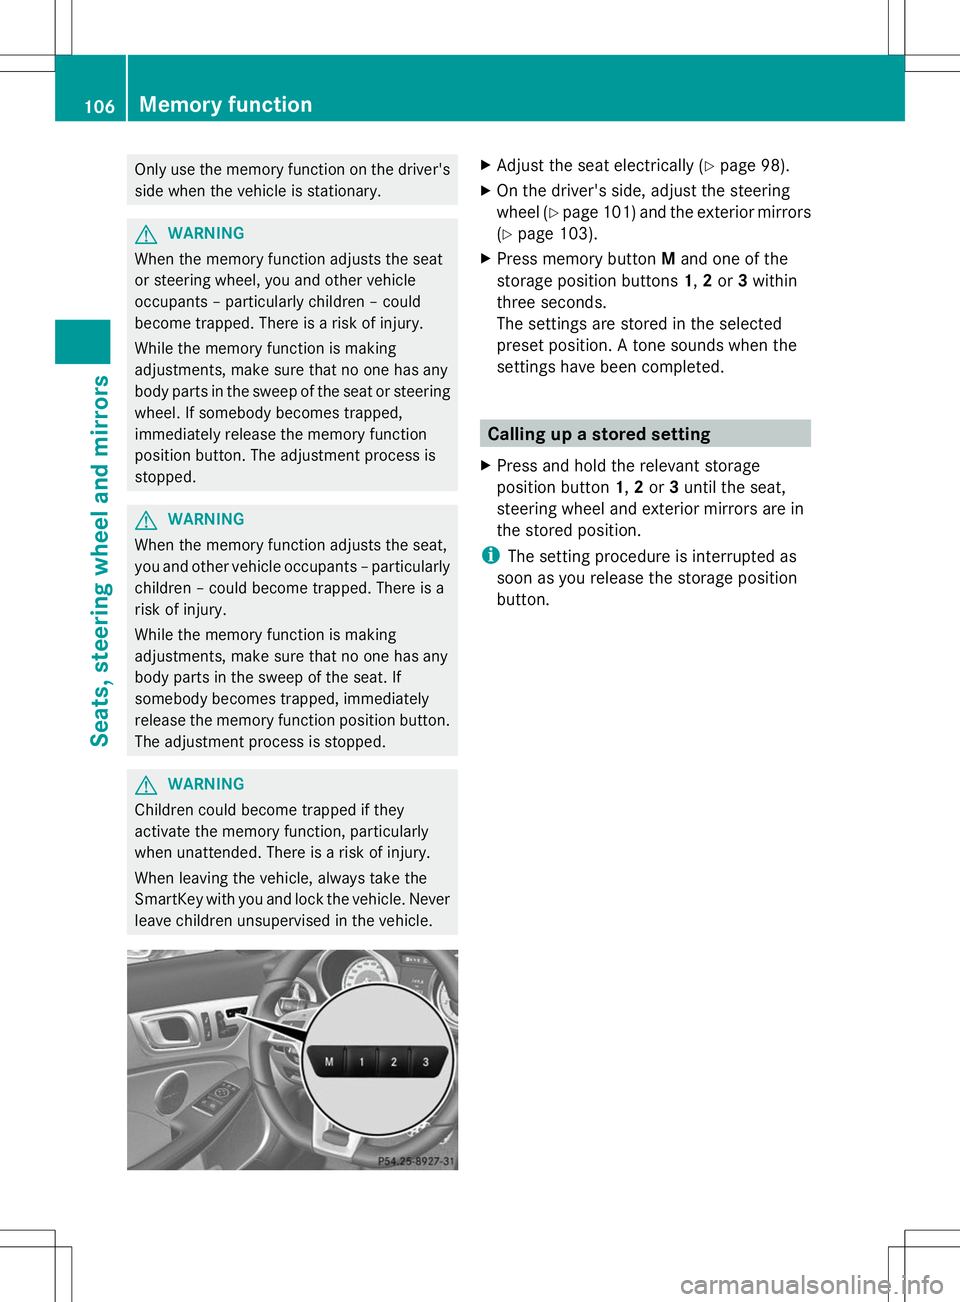
X Press memory button Mand one of the
storage position buttons 1,2or 3within
three seconds.
The settings are stored in the selected
preset position. A tone sounds when the
settings have been completed. Calling up a stored setting
X Press and hold the relevant storage
position button 1,2or 3until the seat,
steering wheel and exterior mirrors are in
the stored position.
i The setting procedure is interrupted as
soon as you release the storage position
button. 106
Memory functionSeats, steering wheel and mirrors
Page 128 of 356
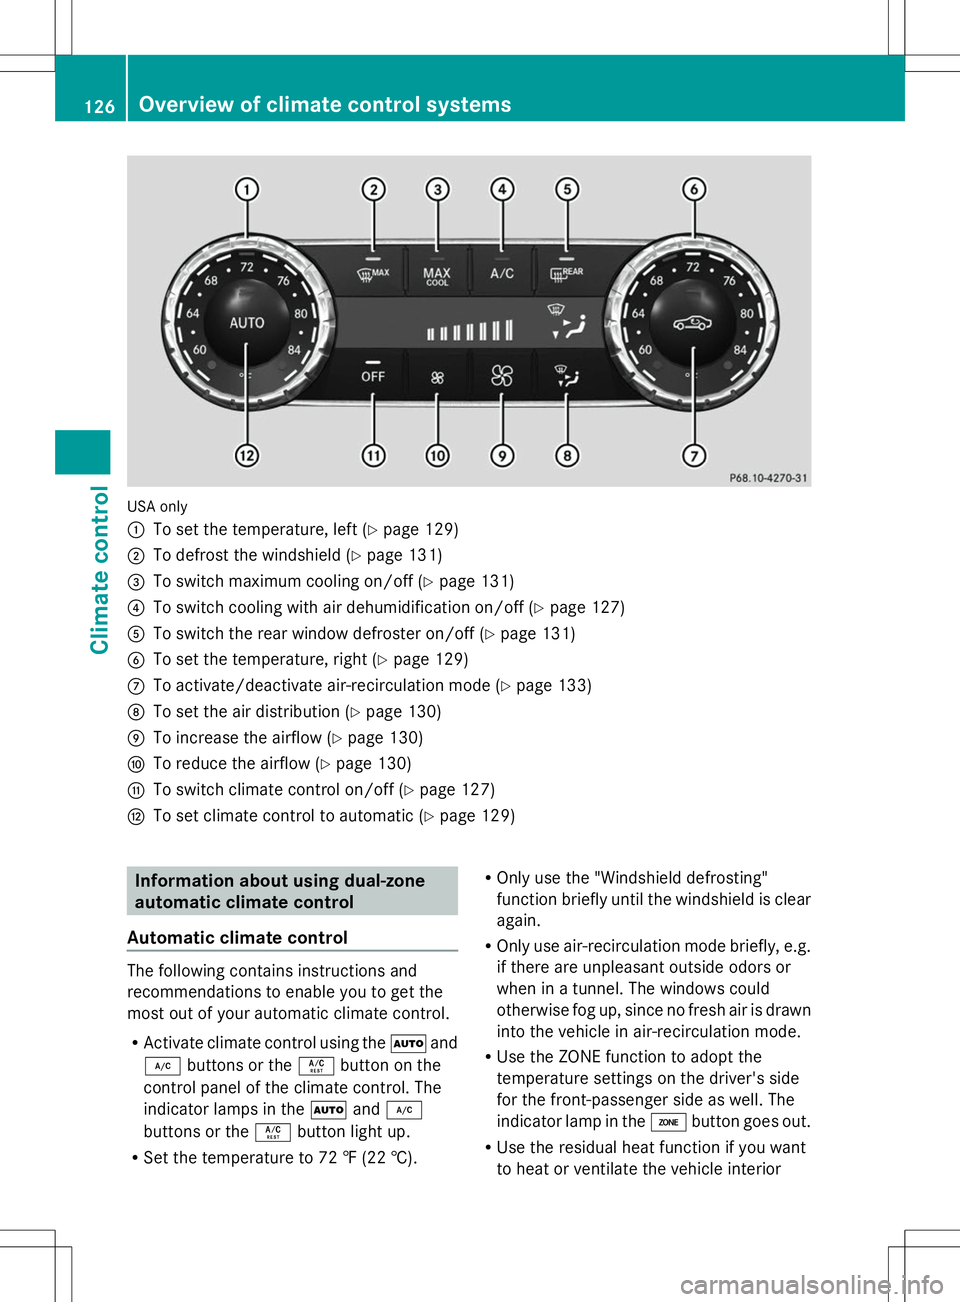
USA only
:
To set the temperature, left (Y page 129)
; To defrost the windshield (Y page 131)
= To switch maximum cooling on/off (Y page 131)
? To switch cooling with air dehumidification on/off (Y page 127)
A To switch the rear window defroster on/off (Y page 131)
B To set the temperature, right (Y page 129)
C To activate/deactivate air-recirculation mode (Y page 133)
D To set the air distribution (Y page 130)
E To increase the airflow (Y page 130)
F To reduce the airflow (Y page 130)
G To switch climate control on/off (Y page 127)
H To set climate control to automatic (Y page 129)Information about using dual-zone
automatic climate control
Automatic climate control The following contains instructions and
recommendations to enable you to get the
most out of your automatic climate control.
R Activate climate control using the Ãand
¿ buttons or the Ábutton on the
control panel of the climate control. The
indicator lamps in the Ãand¿
buttons or the Ábutton light up.
R Set the temperature to 72 ‡ (22 †). R
Only use the "Windshield defrosting"
function briefly until the windshield is clear
again.
R Only use air-recirculation mode briefly, e.g.
if there are unpleasant outside odors or
when in a tunnel. The windows could
otherwise fog up, since no fresh air is drawn
into the vehicle in air-recirculation mode.
R Use the ZONE function to adopt the
temperature settings on the driver's side
for the front-passenger side as well. The
indicator lamp in the ábutton goes out.
R Use the residual heat function if you want
to heat or ventilate the vehicle interior 126
Overview of climate control systemsClimate control
Page 132 of 356

Setting the air distribution
Air-conditioning system X
Turn the SmartKey to position 2in the
ignition lock (Y page 139).
X Press one or more of the P,O,
¯ buttons.
The corresponding indicator lamp lights up
briefly.
The following air distribution settings can be
selected:
¯ Directs air through the defroster vents
O Directs air through the footwell air
vents
P Directs air through the center and side
air vents
i You can also activate several air
distribution settings simultaneously. To do
this, press multiple air distribution buttons.
The air is then directed through various
vents.
Dual-zone automatic climate control X
Turn the SmartKey to position 2in the
ignition lock (Y page 139).
X Press the _button repeatedly until the
desired symbol appears in the display.
The following air distribution settings can be
selected:
P Directs air through the center and side
air vents
O Directs air through the footwell air
vents
S Directs air through the center, side and
footwell vents
¯ Directs air through the defroster vents
b Directs the airflow through the
defroster, center and side air vents 2a
Directs air through the defroster and
footwell vents
_ Directs the airflow through the
defroster, center, side and footwell air
vents3
i Regardless of the air distribution setting,
airflow is always directed through the side
air vents. You can only close the side air
vents, by fully closing the adjuster on the
side air vents (Y page 135). Setting the airflow
Air-conditioning system X
Turn the SmartKey to position 2in the
ignition lock (Y page 139).
X To increase/reduce: turn controlC
clockwise or counter-clockwise
(Y page 123).
Dual-zone automatic climate control X
Turn the SmartKey to position 2in the
ignition lock (Y page 139).
X To increase/reduce: press theKor
I button. Switching the ZONE function on/off
This function is only available with dual-zone
automatic climate control on vehicles for
Canada.
X To switch on: press theábutton.
The indicator lamp in the ábutton lights
up. The temperature setting for the driver's
side is not adopted for the front-passenger
side.
X To switch off: press buttoná.
The indicator lamp in the ábutton goes
out. The temperature setting for the
2 Canada only.
3 Canada only. 130
Operating the climate control systemsClimate control
Page 195 of 356
If the coolant temperature is over
248 ‡(120 †), do not continue driving. The
engine will otherwise be damaged.
The coolant temperature gauge is in the
instrument cluster on the right-hand side
(Y page 29).
Under normal operating conditions and with
the specified coolant level, the coolant
temperature may rise to 248 ‡ (120 †). Tachometer
! Do not drive in the overrevving range, as
this could damage the engine.
The red band in the tachometer indicates the
engine's overrevving range.
The fuel supply is interrupted to protect the
engine when the red band is reached. Outside temperature display
You should pay special attention to road
conditions when temperatures are around
freezing point.
The outside temperature display is in the
multifunction display (Y page 194).
Changes in the outside temperature are
displayed after a short delay. Speedometer with segments
The segments in the speedometer indicate
which speed range is available.
R Cruise control activated (Y page 167):
The segments light up from the stored
speed to the maximum speed.
R DISTRONIC PLUS activated (Y page 169):
One or two segments in the set speed
range light up.
R DISTRONIC PLUS detects a vehicle in front:
The segments between the speed of the
vehicle in front and the stored speed light
up. Operating the on-board computer
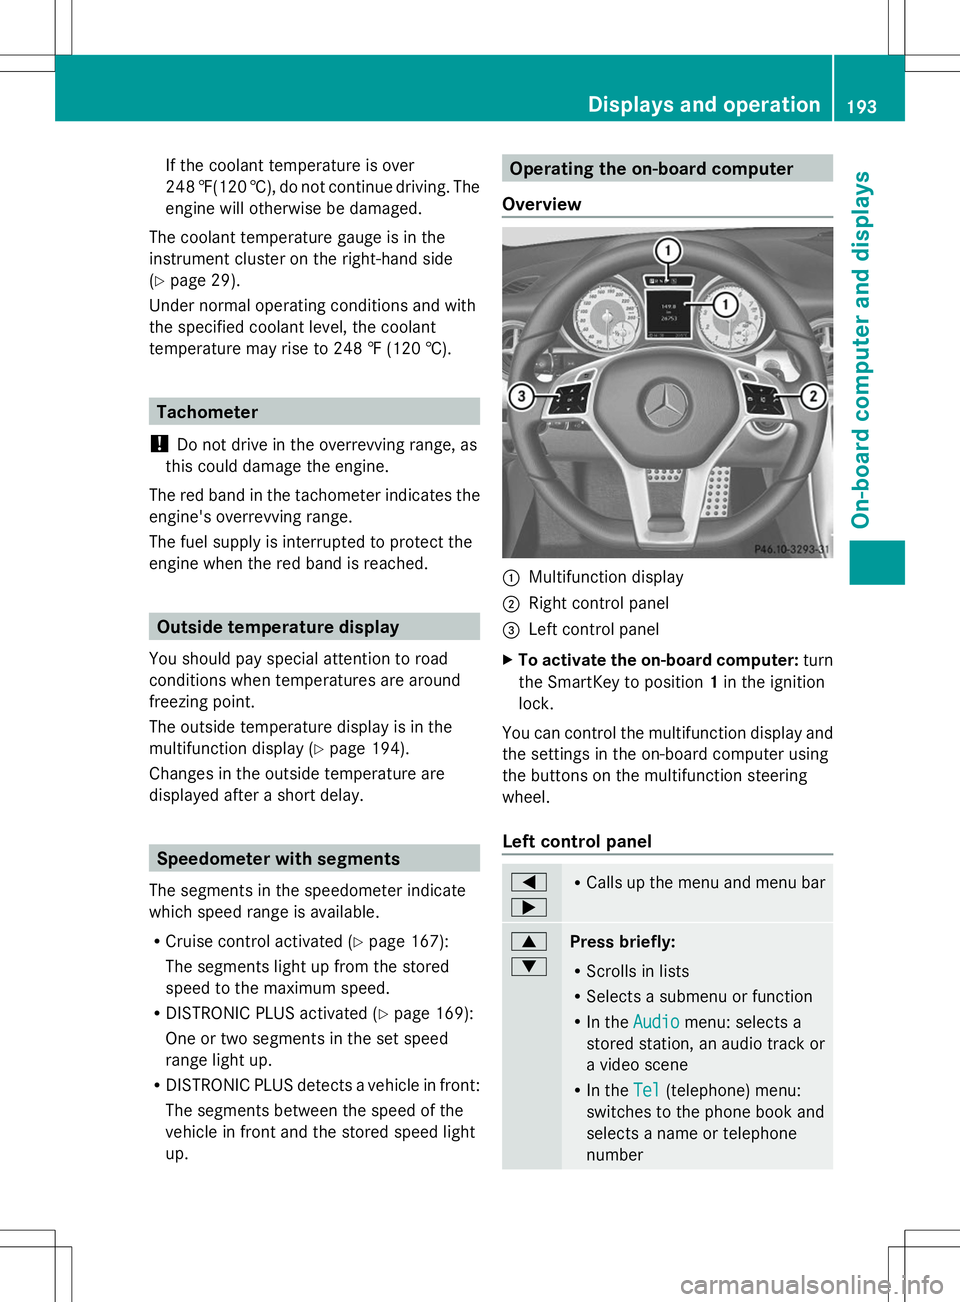
Overview :
Multifunction display
; Right control panel
= Left control panel
X To activate the on-board computer: turn
the SmartKey to position 1in the ignition
lock.
You can control the multifunction display and
the settings in the on-board computer using
the buttons on the multifunction steering
wheel.
Left control panel =
; R
Calls up the menu and menu bar 9
:
Press briefly:
R
Scrolls in lists
R Selects a submenu or function
R In the Audio
Audio menu: selects a
stored station, an audio track or
a video scene
R In the Tel Tel(telephone) menu:
switches to the phone book and
selects a name or telephone
number Displays and operation
193On-board computer and displays Z
Page 208 of 356
If somebody becomes trapped:
R
press one of the memory function position
buttons, or
R move the switch for steering wheel
adjustment in the opposite direction to that
in which the steering wheel is moving.
The adjustment process is stopped.
X Press the =or; button on the
steering wheel to select the Sett
Sett menu.
X Press the :or9 button to select the
Convenience
Convenience submenu.
X Press ato confirm.
X Press the :or9 button to select the
Easy Entry/Exit
Easy Entry/Exit function.
If the Easy Entry/Exit Easy Entry/Exit function is
activated, the vehicle steering wheel is
displayed in orange in the multifunction
display.
X Press the abutton to save the setting.
Further information on the EASY-ENTRY/EXIT
feature (Y page 101).
Switching the belt adjustment on/off
X Press the =or; button on the
steering wheel to select the Sett
Sett menu.
X Press the :or9 button to select the
Convenience
Convenience submenu.
X Press ato confirm.
X Press the :or9 button to select the
Belt Adjustment
Belt Adjustment function.
When the Belt Adjustment Belt Adjustment function is
activated, the vehicle seat belt is displayed
in orange in the multifunction display.
X Press the abutton to save the setting.
For further information on belt adjustment,
see (Y page 53).
Switching the fold-in mirrors with the
locking feature on/off
This function is only available on vehicles with
the memory function (Y page 105).When you activate the
Auto. Mirror
Auto. Mirror
Folding Folding function, the exterior mirrors are
folded in when the vehicle is locked.
If you unlock the vehicle and then open a
door, the exterior mirrors fold out again.
If you have switched on the Auto. Mirror
Auto. Mirror
Folding Folding function and you fold in the exterior
mirrors using the button on the door
(Y page 104), they will not fold out
automatically. The exterior mirrors can then
only be folded out using the button on the
door.
X Press the =or; button on the
steering wheel to select the Sett
Sett menu.
X Press the :or9 button to select the
Convenience Convenience submenu.
X Press ato confirm.
X Press :or9 to select the Auto.
Auto.
Mirror Folding
Mirror Folding function.
If the Auto. Mirror Folding
Auto. Mirror Folding function is
activated, the vehicle's exterior mirror is
displayed in orange in the multifunction
display.
X Press the abutton to save the setting. AMG menu in AMG vehicles
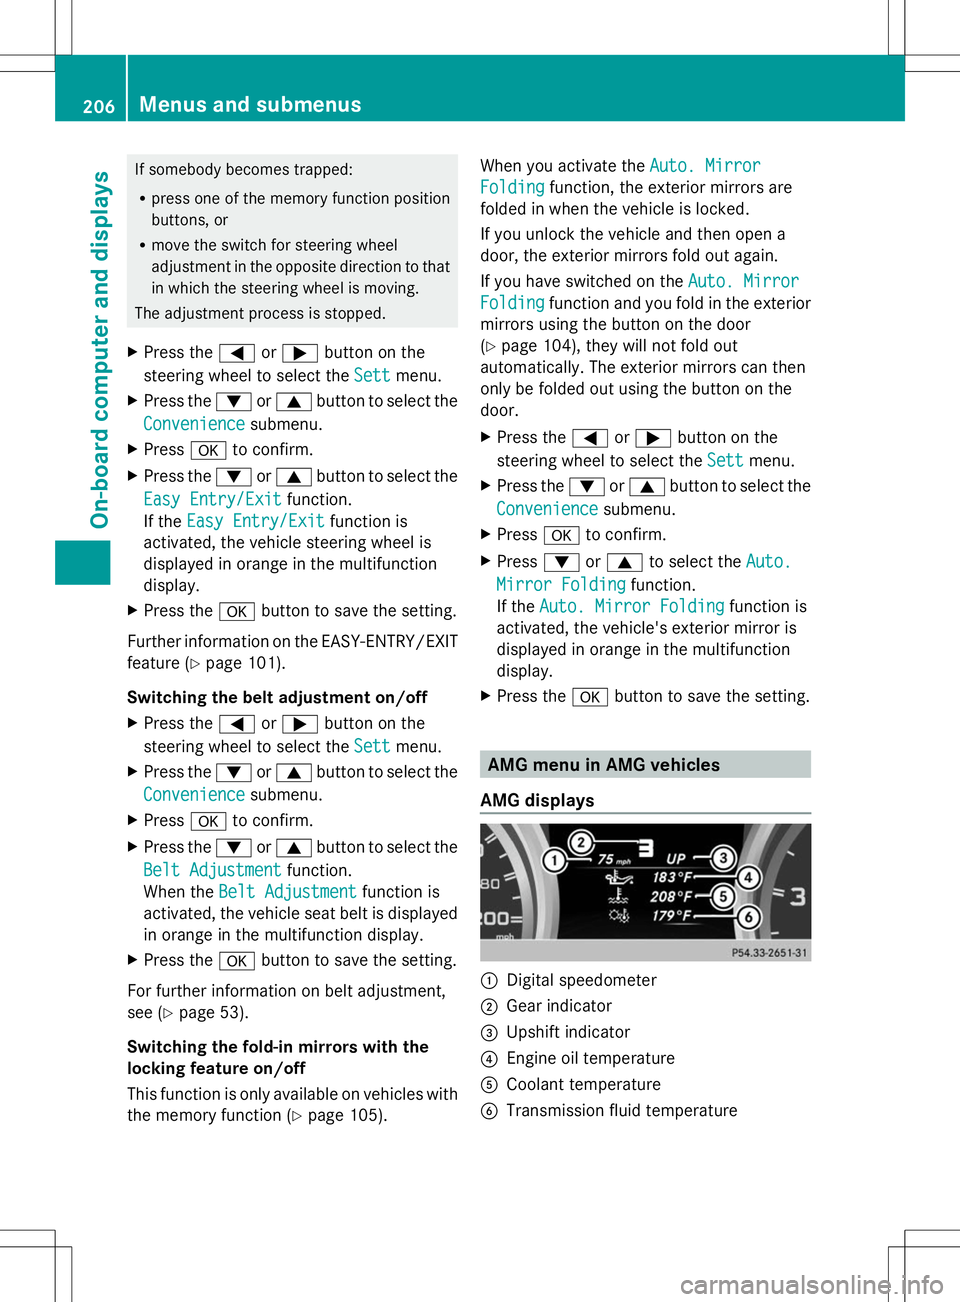
AMG displays :
Digital speedometer
; Gear indicator
= Upshift indicator
? Engine oil temperature
A Coolant temperature
B Transmission fluid temperature 206
Menus and submenusOn-board computer and displays
Page 262 of 356
The mbrace system
To adjust the volume during a call, proceed
as follows:
X Press the WorX button on the
multifunction steering wheel.
or
X Use the volume controller of the audio
system/COMAND.
The system offers various services, e.g:
R Automatic and manual emergency call
R Roadside Assistance call
R MB Info call
USA only: you can find information and a
description of all available features under
"Owners Online" at http://www.mbusa.com.
System self-test After you have switched on the ignition, the
system carries out a self-diagnosis.
A malfunction in the system has been
detected if one of the following occurs:
R The indicator lamp in the SOS button does
not come on during the system self-test.
R The indicator lamp in the FRoadside
Assistance button does not light up during
self-diagnosis of the system.
R The indicator lamp in the ïMB Info call
button does not light up during self-
diagnosis of the system.
R The indicator lamp in one or more of the
following buttons continues to light up red
after the system self-diagnosis:
- SOS button
- F Roadside Assistance call button
- ï MB Info call button
R After the system self-diagnosis, the
Inoperative
Inoperative orService Not Service Not
Activated
Activated message appears in the
multifunction display.
If a malfunction is indicated as outlined
above, the system may not operate as expected. In the event of an emergency, help
will have to be summoned by other means.
Have the system checked at the nearest
authorized Mercedes-Benz Center or contact
the following service hotlines:
R
USA: Mercedes-Benz Customer Assistance
Center at
1-800-FOR-MERCedes (1-800-367-6372)
or 1-866-990-9007
R Canada: Customer Service at
1-888-923-8367
Emergency call Important safety notes
G
WARNING
It can be dangerous to remain in the vehicle,
even if you have pressed the SOS button in an
emergency if:
R you see smoke inside or outside of the
vehicle, e.g. if there is a fire after an
accident
R the vehicle is on a dangerous section of
road
R the vehicle is not visible or cannot easily be
seen by other road users, particularly when
dark or in poor visibility conditions
There is a risk of an accident and injury.
Leave the vehicle immediately in this or
similar situations as soon as it is safe to do
so. Move to a safe location along with other
vehicle occupants. In such situations, secure
the vehicle in accordance with national
regulations, e. g. with a warning triangle.
You must have a license agreement to
activate the mbrace service. Make sure that
your system is activated and operational. To
register, press the ïMB Info call button.
If any of the steps mentioned are not carried
out, the system may not be activated. 260
FeaturesSto
wage an d features
Page 266 of 356
You are prompted to confirm route guidance
to the address entered.
X Select Yes Yeswith the =or; buttons
on the COMAND system.
X Confirm with the 9button on the
COMAND system.
The system calculates the route and
subsequently starts the route guidance with
the address entered.
i If you select No
No , the address can be saved
in the address book.
i The destination download function is
available if the relevant mobile phone
network is available and data transfer is
possible.
i The destination download function can
only be used if the vehicle is equipped with
a navigation system.
Route Assistance
This service is part of the mbrace PLUS
Package and cannot be purchased
separately.
i You can also use the Route Assistance
function if your vehicle is not equipped with
a navigation system.
Within the framework of this service, you
receive a professional and reliable form of
navigation support without having to leave
your vehicle.
The customer service representative finds a
suitable route depending on your vehicle's
current position and the desired destination.
You will then be guided live through the
current route section.
Search and Send General notes
i
To use "Search & Send", your vehicle
must be equipped with mbrace and a
navigation system. Additionally, an mbrace
service subscription must be completed. "Search & Send" is a destination entry
service. A destination address which is found
on Google Maps
®
can be transferred via
mbrace directly to your vehicle's navigation
system.
Specifying and sending the destination
address
X Go to the website http://
www.maps.google.com and enter a
destination address into the entry field.
X To send the destination address to the
e-mail address of your mbrace
account: click on the corresponding
button on the website.
i Example:
If you select 'Send to vehicle' and then
'Mercedes-Benz', the destination address
will be sent to your vehicle.
X When the "Send" dialog window appears:
Enter the e-mail address you specified
when setting up your mbrace account into
the corresponding field.
X Click "Send".
i Information on specific commands such
as "Address entry" or "Send" can be found
on the website.
Calling up destination addresses
X Switch on the ignition.
The destination address is loaded into the
vehicle's navigation system.
A display message appears, asking
whether navigation should be started.
X Select Yes
Yes by turning cVdor sliding
XVY the COMAND controller and press
W to confirm.
The system calculates the route and
subsequently starts the route guidance
with the address entered.
i If you select No No, the address can be saved
in the address book. 264
FeaturesStowage and features
Page 270 of 356
Triggering the vehicle alarm
With this function, you can trigger the
vehicle's panic alarm via text message. An
alarm sounds and the exterior lighting
flashes. Depending on the setting, the panic
alarm lasts five or ten seconds. Afterwards,
the alarm switches off. Garage door opener
Important safety notes G
WARNING
When you operate or program the garage door
with the integrated garage door opener,
persons in the range of movement of the
garage door can become trapped or struck by
the garage door. There is a risk of injury.
When using the integrated garage door
opener, always make sure that nobody is
within the range of movement of the garage
door. G
WARNING
Combustion engines emit poisonous exhaust
gases such as carbon monoxide. Inhaling
these exhaust gases leads to poisoning. There
is a risk of fatal injury. Therefore never leave
the engine running in enclosed spaces
without sufficient ventilation.
The HomeLink ®
garage door opener
integrated in the rear-view mirror allows you
to operate up to three different door and gate
systems.
Use the integrated garage door opener only
on garage doors that:
R have safety stop and reverse features and
R meet current U.S. federal safety standards
When programming a garage door opener,
park the vehicle outside the garage.
i Certain garage door drives are
incompatible with the integrated garage
door opener. If you have difficulty
programming the integrated garage door opener, contact an authorized Mercedes-
Benz Center.
Alternatively, you can call the following
telephone assistance services:
R
USA: Mercedes-Benz Customer
Assistance Center at
1-800-FOR-MERCedes
R Canada: Customer Service at
1-800-387-0100
R HomeLink ®
hotline 1-800-355-3515
(free of charge)
More information on HomeLink ®
and/or
compatible products is also available
online at http://www.homelink.co m.
i Notes on the declaration of conformity
(Y page 24).
USA: FCC ID: CB2HMIHL4
Canada: IC: 279B-HMIHL4
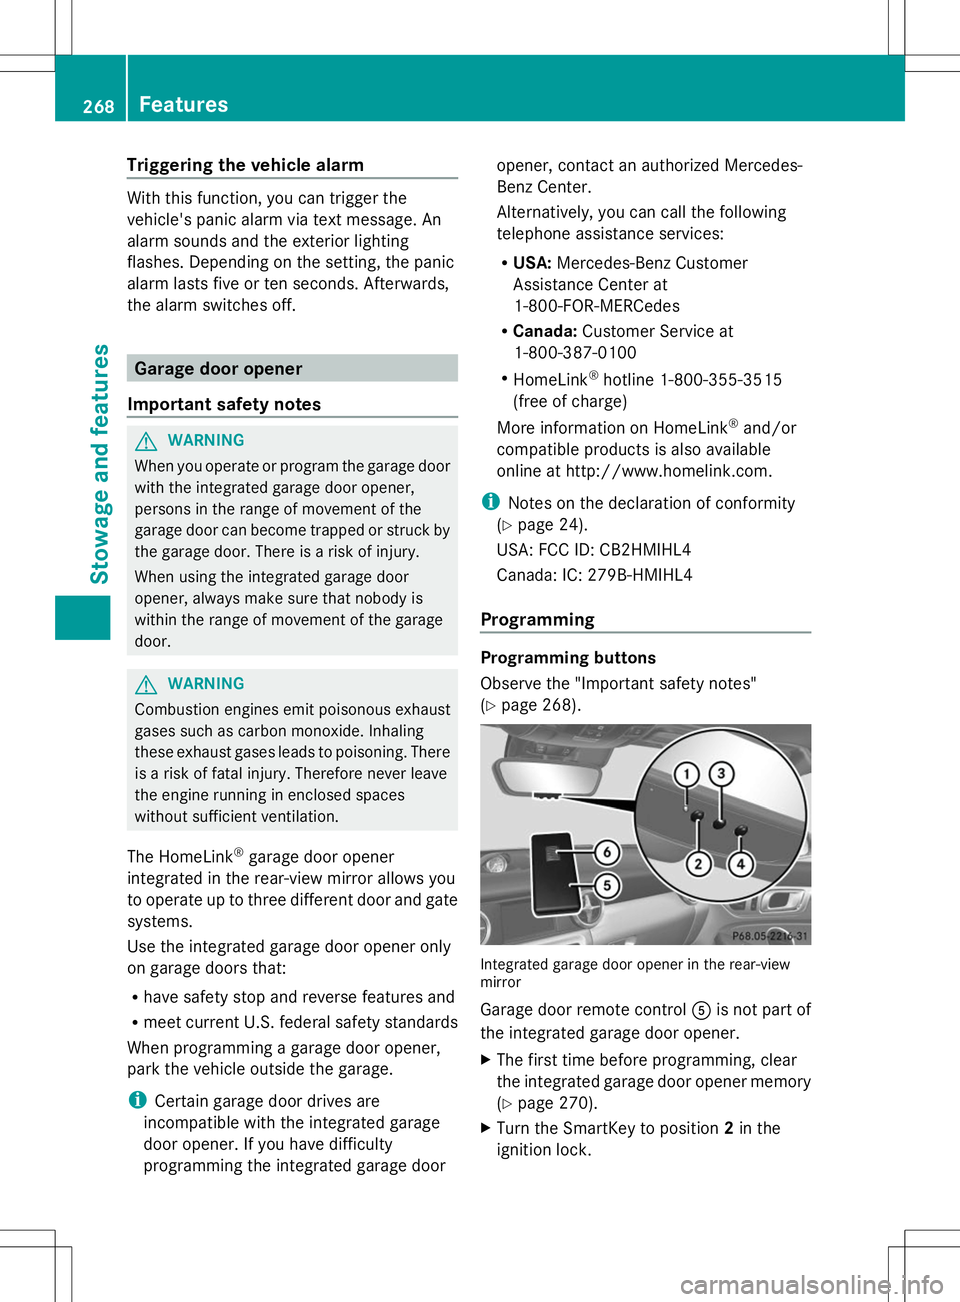
Programming Programming buttons
Observe the "Important safety notes"
(Y
page 268). Integrated garage door opener in the rear-view
mirror
Garage door remote control
Ais not part of
the integrated garage door opener.
X The first time before programming, clear
the integrated garage door opener memory
(Y page 270).
X Turn the SmartKey to position 2in the
ignition lock. 268
FeaturesSto
wage an d features