2014 MERCEDES-BENZ SLK-CLASS ROADSTER display
[x] Cancel search: displayPage 266 of 356
You are prompted to confirm route guidance
to the address entered.
X Select Yes Yeswith the =or; buttons
on the COMAND system.
X Confirm with the 9button on the
COMAND system.
The system calculates the route and
subsequently starts the route guidance with
the address entered.
i If you select No
No , the address can be saved
in the address book.
i The destination download function is
available if the relevant mobile phone
network is available and data transfer is
possible.
i The destination download function can
only be used if the vehicle is equipped with
a navigation system.
Route Assistance
This service is part of the mbrace PLUS
Package and cannot be purchased
separately.
i You can also use the Route Assistance
function if your vehicle is not equipped with
a navigation system.
Within the framework of this service, you
receive a professional and reliable form of
navigation support without having to leave
your vehicle.
The customer service representative finds a
suitable route depending on your vehicle's
current position and the desired destination.
You will then be guided live through the
current route section.
Search and Send General notes
i
To use "Search & Send", your vehicle
must be equipped with mbrace and a
navigation system. Additionally, an mbrace
service subscription must be completed. "Search & Send" is a destination entry
service. A destination address which is found
on Google Maps
®
can be transferred via
mbrace directly to your vehicle's navigation
system.
Specifying and sending the destination
address
X Go to the website http://
www.maps.google.com and enter a
destination address into the entry field.
X To send the destination address to the
e-mail address of your mbrace
account: click on the corresponding
button on the website.
i Example:
If you select 'Send to vehicle' and then
'Mercedes-Benz', the destination address
will be sent to your vehicle.
X When the "Send" dialog window appears:
Enter the e-mail address you specified
when setting up your mbrace account into
the corresponding field.
X Click "Send".
i Information on specific commands such
as "Address entry" or "Send" can be found
on the website.
Calling up destination addresses
X Switch on the ignition.
The destination address is loaded into the
vehicle's navigation system.
A display message appears, asking
whether navigation should be started.
X Select Yes
Yes by turning cVdor sliding
XVY the COMAND controller and press
W to confirm.
The system calculates the route and
subsequently starts the route guidance
with the address entered.
i If you select No No, the address can be saved
in the address book. 264
FeaturesStowage and features
Page 267 of 356
i
If you have sent more than one
destination address, each individual
destination must be confirmed separately.
i Destination addresses are loaded in the
same order as the order in which they were
sent.
If you own multiple Mercedes-Benz
vehicles with mbrace and activated mbrace
accounts:
If multiple vehicles are registered under the
same e-mail address, the destination will
be sent to all the vehicles.
Vehicle remote opening You can use the vehicle remote opening if you
have unintentionally locked your vehicle and
a replacement SmartKey is not available.
The vehicle can be opened by the Mercedes-
Benz Customer Assistance Center.
The vehicle can be immediately opened
remotely within four days of the ignition being
turned off. After this time, the remote
unlocking may be delayed by 15 to
60 minutes. After 30 days, the vehicle can no
longer be opened remotely.
X Contact the following service hotlines:
R
USA: Mercedes-Benz Customer
Assistance Center at
1-800-FOR-MERCedes
(1-800-367-6372) or 1-866-990-9007
R Canada: Customer Service at
1-888-923-8367
You will be asked for your password.
X Return to your vehicle at the time agreed
upon with the Mercedes-Benz Customer
Assistance Center.
USA only: alternatively, the vehicle can be
opened via:
R the Internet, under the "Owners Online"
section
R the telephone application (e.g. iPhone ®
,
Blackberry)
To do this, you will need your identification
number and password. i
Vehicle remote opening is only possible if
the corresponding mobile phone network
is accessible.
Vehicle remote closing The remote closing feature can be used when
you have forgotten to lock the vehicle and you
are no longer nearby.
The vehicle can then be locked by the
Mercedes-Benz Customer Assistance Center.
The vehicle can be immediately remotely
locked within four days of the ignition being
turned off. After this time, the remote closing
may be delayed by 15 to 60 minutes. After
30 days the vehicle can no longer be closed
remotely.
X
Contact the following service hotlines:
R
USA: Mercedes-Benz Customer
Assistance Center at
1-800-FOR-MERCedes
(1-800-367-6372) or 1-866-990-9007
R Canada: Customer Service at
1-888-923-8367
You will be asked for your password.
The next time you are inside the vehicle and
you switch on the ignition, the Doors Doors
Locked Remotely
Locked Remotely message appears in the
multifunction display.
USA only: alternatively, the vehicle can be
locked via:
R the Internet, under the "Owners Online"
section
R the telephone application (e.g. iPhone ®
,
Blackberry)
To do this, you will need your identification
number and password.
i The vehicle remote closing feature is
available when the relevant mobile phone
network is available and data connection is
possible. Features
265Stowage and features Z
Page 268 of 356
Stolen vehicle recovery service
If your vehicle has been stolen:
X
Notify the police.
The police will issue a numbered incident
report.
X This number will be forwarded to the
Mercedes-Benz Customer Assistance
Center together with your PIN.
The Mercedes-Benz Customer Assistance
Center then tries to locate the system. The
Mercedes-Benz Customer Assistance
Center contacts you and the local law
enforcement agency if the vehicle is
located.
However, only the law enforcement agency
is informed of the location of the vehicle.
i If the anti-theft alarm system is activated
for longer than 30 seconds, the Mercedes-
Benz Customer Assistance Center is
automatically informed.
Vehicle remote malfunction diagnosis With the vehicle remote malfunction
diagnosis (Vehicle Health Check), the
Customer Assistance center can provide
improved support for problems with your
vehicle. During an existing call, vehicle data
is transferred to the Customer Assistance
center. The customer service representative
can use the received data to decide what kind
of assistance is required. You are then, for
example, guided to the nearest authorized
Mercedes-Benz Center or a recovery vehicle
is called.
If vehicle data needs to be transferred during
an MB Info call or a Roadside Assistance call,
this is initiated by the Customer Assistance
center. You will see the Roadside
Roadside
Assistance Connected Assistance Connected message in the
COMAND display. If the vehicle remote
malfunction diagnosis can be started, the
Request for vehicle diagnosis Request for vehicle diagnosis
received. Start vehicle diagnosis? received. Start vehicle diagnosis?
message appears in the display. X
Confirm the message with Yes Yes.
X When the Vehicle Diagnosis Please
Vehicle Diagnosis Please
start ignition
start ignition message appears, turn
the SmartKey to position 2in the ignition
lock (Y page 139).
X When the Please follow the
Please follow the
instructions
instructions received
receivedby
byphone
phone and
and
move your vehicle to a safe
move your vehicle to a safe
position. position. message appears, follow the
customer service representative's
instructions.
The message in the display disappears.
If you select Cancel Cancel, the vehicle remote
malfunction diagnosis is canceled
completely.
The vehicle operating state check begins.
You will see the Vehicle diagnosis Vehicle diagnosis
activated.
activated. message.
When the diagnosis is completed, the Send
Send
vehicle diagnostics data//(Voice
vehicle diagnostics data//(Voice
connection may be//interrupted connection may be//interrupted
during during data
datatransfer)
transfer) message appears.
The vehicle data can now be sent to the
Customer Assistance center.
X Press OK OKto confirm the message.
The voice connection with the Customer
Assistance center is terminated.
You will see the Vehicle Diagnosis: Vehicle Diagnosis:
Transferring data...
Transferring data... message.
The vehicle data is sent to the Customer
Assistance center.
Depending on what the customer service
representative agreed with you, the voice
connection is re-established after the transfer
is complete. If necessary, you will be
contacted at a later time by another means,
e.g. by e-mail or phone.
Further functions of the vehicle remote
malfunction diagnosis include, for example:
R transfer of service data to the Customer
Assistance center. If a service is overdue,
the COMAND display shows a message 266
FeaturesStowage and features
Page 269 of 356
about various special offers at your
workshop.
R monthly status information e-mail on oil
level, air pressure, maintenance, brakes,
etc. If applicable, you will receive
information on special offers in the e-mail.
USA only: this information can also be
called up under "Owners Online" at http://
www.mbusa.com.
Information on the data stored in the vehicle
(Y page 26).
Information on Roadside Assistance
(Y page 22).
Downloading routes Downloading routes allows you to transfer
and save predefined routes in the navigation
system. To do this, an SD memory card must
be inserted into the COMAND system. If no
SD memory card is inserted, you must insert
the card into the card slot on the COMAND
system before saving.
A route can be prepared and sent either by a
customer service representative or via the
mbrace portal on the Internet.
Each route can include up to 20 way points.
Once a route has been received by the
navigation system, you will see the
hasbeen
been saved
saved to
tomemory
memory card.
card.
Do you want to start route
Do you want to start route
guidance? guidance? message in the COMAND display.
The route is saved to the SD memory card.
X To start route guidance: selectYes
Yes .
An overview of the route is shown in the
display.
i If you select No
No , the saved route can be
called up later via the navigation menu.
X Select Start
Start .
Route guidance is started.
i Downloaded and saved data can be called
up again in COMAND.
You can find further information in the
separate COMAND Operating Instructions. Speed alert You can define the upper speed limit, which
must not be exceeded by the vehicle.
If this selected speed is exceeded by the
vehicle, a message will be sent to the
Customer Assistance center. The Customer
Assistance center then forwards this
information to you.
You can select the way in which you receive
this information beforehand. Possible options
include text message, e-mail or an automated
call.
The data you receive contains the following
information:
R
the location where the speed limit was
exceeded
R the time at which the speed limit was
exceeded
R the selected speed limit which was
exceeded
Geo fencing Geo fencing allows you to select areas which
the vehicle should not enter or leave. You will
be informed if the vehicle crosses the
boundaries of the selected areas. You can
select the way in which you receive this
information beforehand. Possible options
include text message, e-mail or an automated
call.
The area can be determined as either a circle
or a polygon with a maximum of ten corners.
You can specify up to ten areas
simultaneously. Different settings are
possible for each area.
USA only: these settings can be called up
under "Owners Online" at http://
www.mbusa.com.
Alternatively, you can trigger an MB Info call
and inform the customer service
representative that you wish to activate geo
fencing.
Currently inactive areas can be activated by
text message. Features
267Stowage and features Z
Page 273 of 356
i
Make sure that you clear the memory of
the integrated garage door opener before
selling the vehicle. Compass
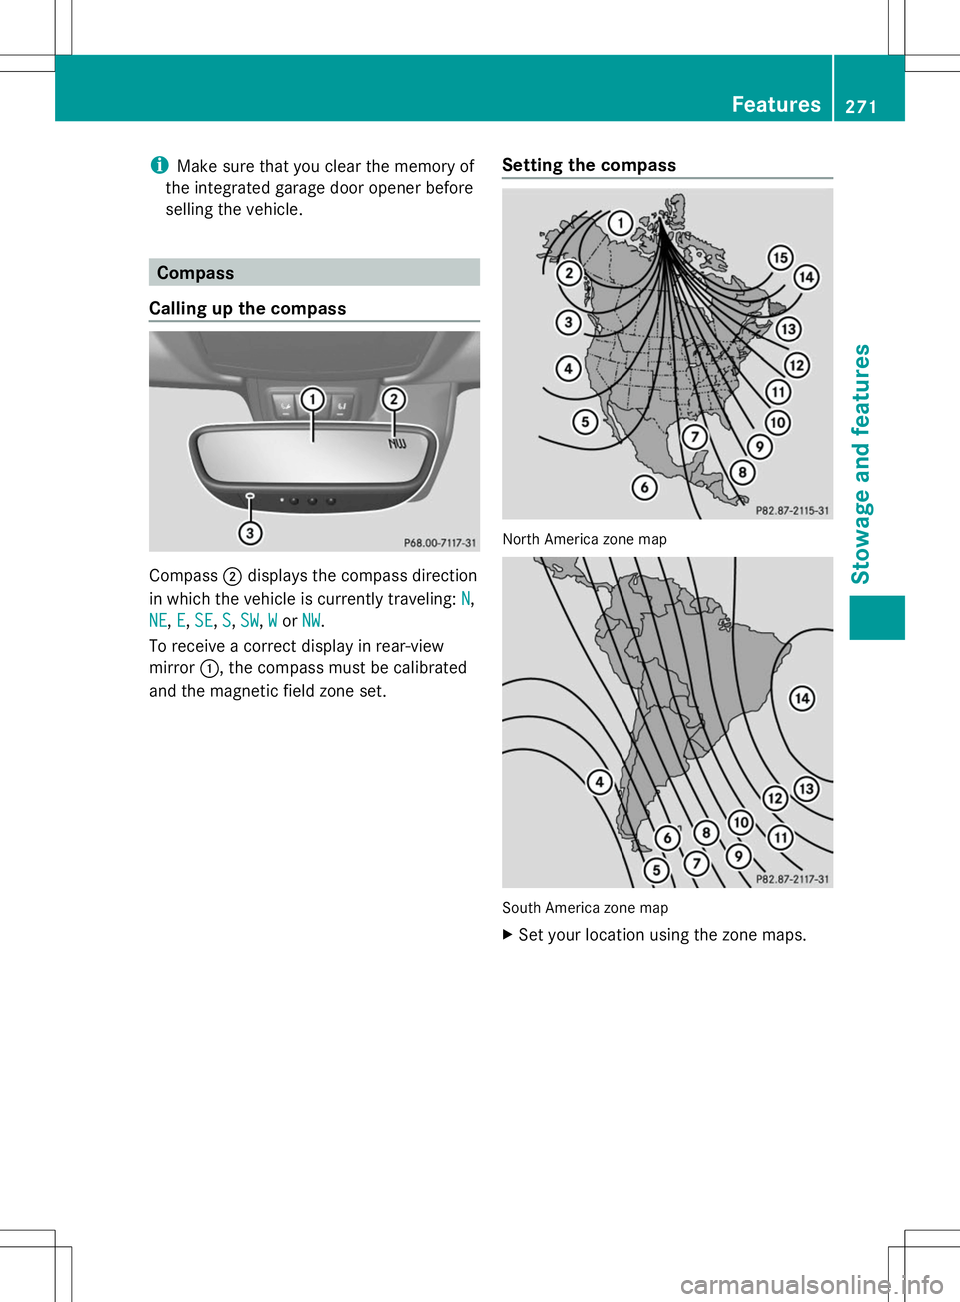
Calling up the compass Compass
;displays the compass direction
in which the vehicle is currently traveling: N N,
NE
NE, E
E,SE
SE, S
S,SW
SW, W
Wor NW
NW.
To receive a correct display in rear-view
mirror :, the compass must be calibrated
and the magnetic field zone set. Setting the compass North America zone map
South America zone map
X
Set your location using the zone maps. Features
271Stowage and features Z
Page 274 of 356
X
Push a round pen into opening
=(Y page 271) for approximately three
seconds.
The zone currently selected appears in
compass display ;(Ypage 271).
X To select the zone: push a round pen into
opening =(Ypage 271) until the desired
zone is selected.
If, after a few seconds, the display in
compass display ;(Ypage 271) changes
direction, the zone has been selected.
Calibrating the compass X
Make sure that there is sufficient space for
you to drive in a circle without impeding
traffic.
In order to calibrate the compass correctly,
do the following:
R calibrate the compass in the open and not
in the vicinity of steel structures or high-
voltage transmission lines.
R switch off electrical consumers such as the
climate control, windshield wipers or rear
window defroster.
R close all doors and the trunk lid.
X Switch on the ignition.
X Push a round pen into opening
=(Y page 271) for approximately six
seconds, until symbol C
C is shown in
compass display ;(Ypage 271).
X Drive your vehicle in a full circle at
approximately 3 mph (5 km/h) to 6 mph
(10 km/h).
When the calibration has successfully been
completed, the current direction is shown
in compass display ;(Ypage 271). Floormats
G
WARNING
Objects in the driver's footwell can restrict the
pedal travel or obstruct a depressed pedal. The operating and road safety of the vehicle
is jeopardized. There is a risk of an accident.
Make sure that all objects in the vehicle are
stowed correctly, and that they cannot enter
the driver's footwell. Install the floormats
securely and as specified in order to ensure
sufficient clearance for the pedals. Do not use
loose floormats and do not place floormats on
top of one another. X
Slide the seat backwards.
X To install: place the floormat in the
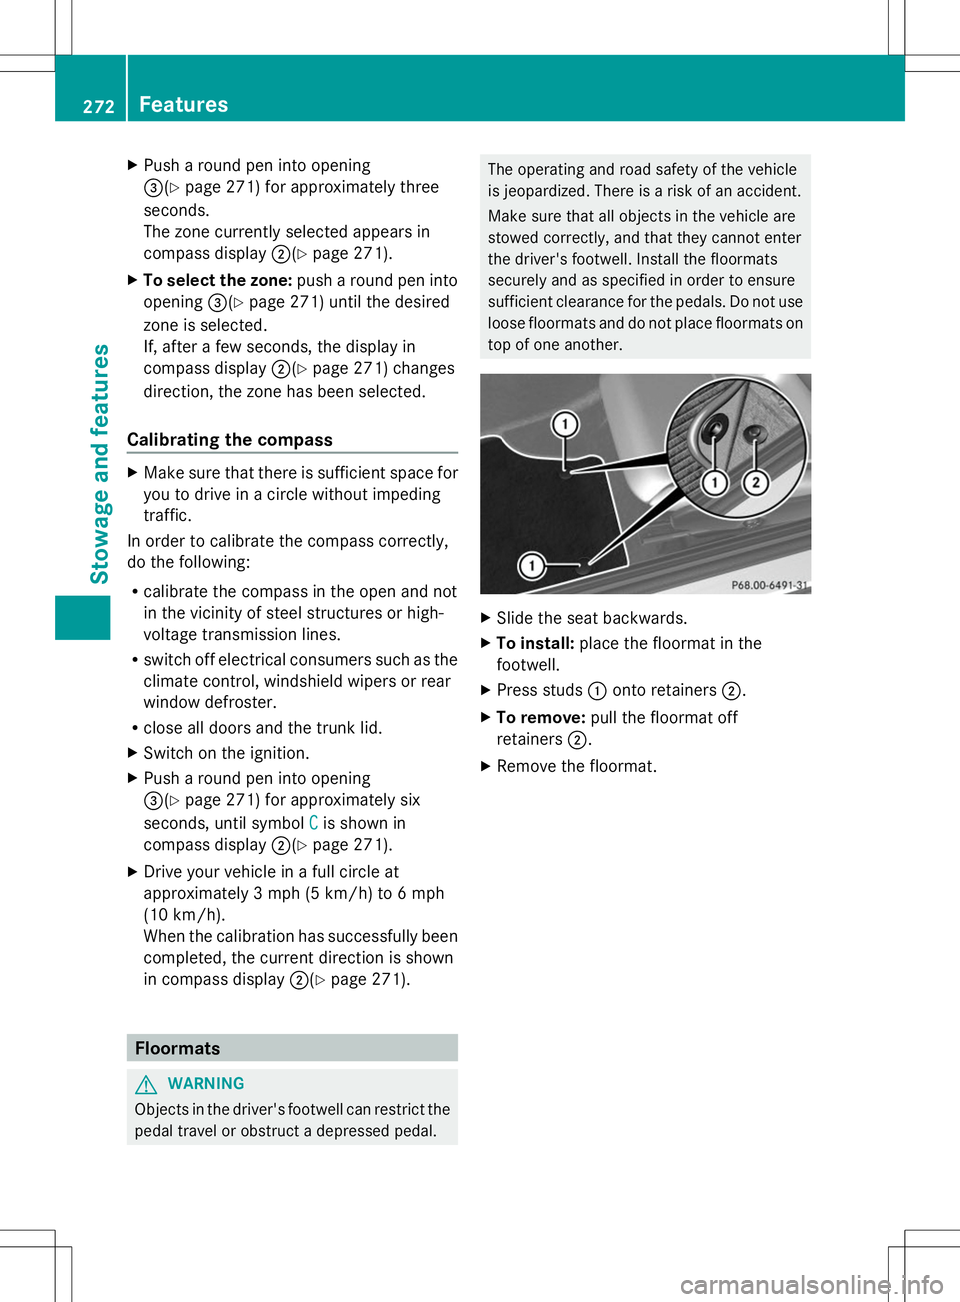
footwell.
X Press studs :onto retainers ;.
X To remove: pull the floormat off
retainers ;.
X Remove the floormat. 272
FeaturesStowage and features
Page 279 of 356
X
Replace cap :on the filler neck and turn
clockwise.
Ensure that the cap locks into place
securely.
X Check the oil level again with the oil
dipstick (Y page 275).
Further information on engine oil
(Y page 346). Checking and adding other service
products
Checking coolant level G
WARNING
Certain components in the engine
compartment, such as the engine, radiator
and parts of the exhaust system, can become
very hot. Working in the engine compartment
poses a risk of injury.
Where possible, let the engine cool down and
touch only the components described in the
following. G
WARNING
The engine cooling system is pressurized,
particularly when the engine is warm. When
opening the cap, you could be scalded by hot
coolant spraying out. There is a risk of injury.
Let the engine cool down before opening the
cap. Wear eye and hand protection when
opening the cap. Open the cap slowly half a
turn to allow pressure to escape. Example X
Park the vehicle on a level surface.
Only check the coolant level when the
vehicle is on a level surface and the engine
has cooled down.
X Turn the SmartKey to position 2in the
ignition lock (Y page 139).
On vehicles with KEYLESS-GO, press the
Start/Stop button twice (Y page 139).
X Check the coolant temperature gauge in
the multifunction display.
The coolant temperature must be below
158 ‡ (70 †).
X Turn the SmartKey to position
0(Y page 139) in the ignition lock.
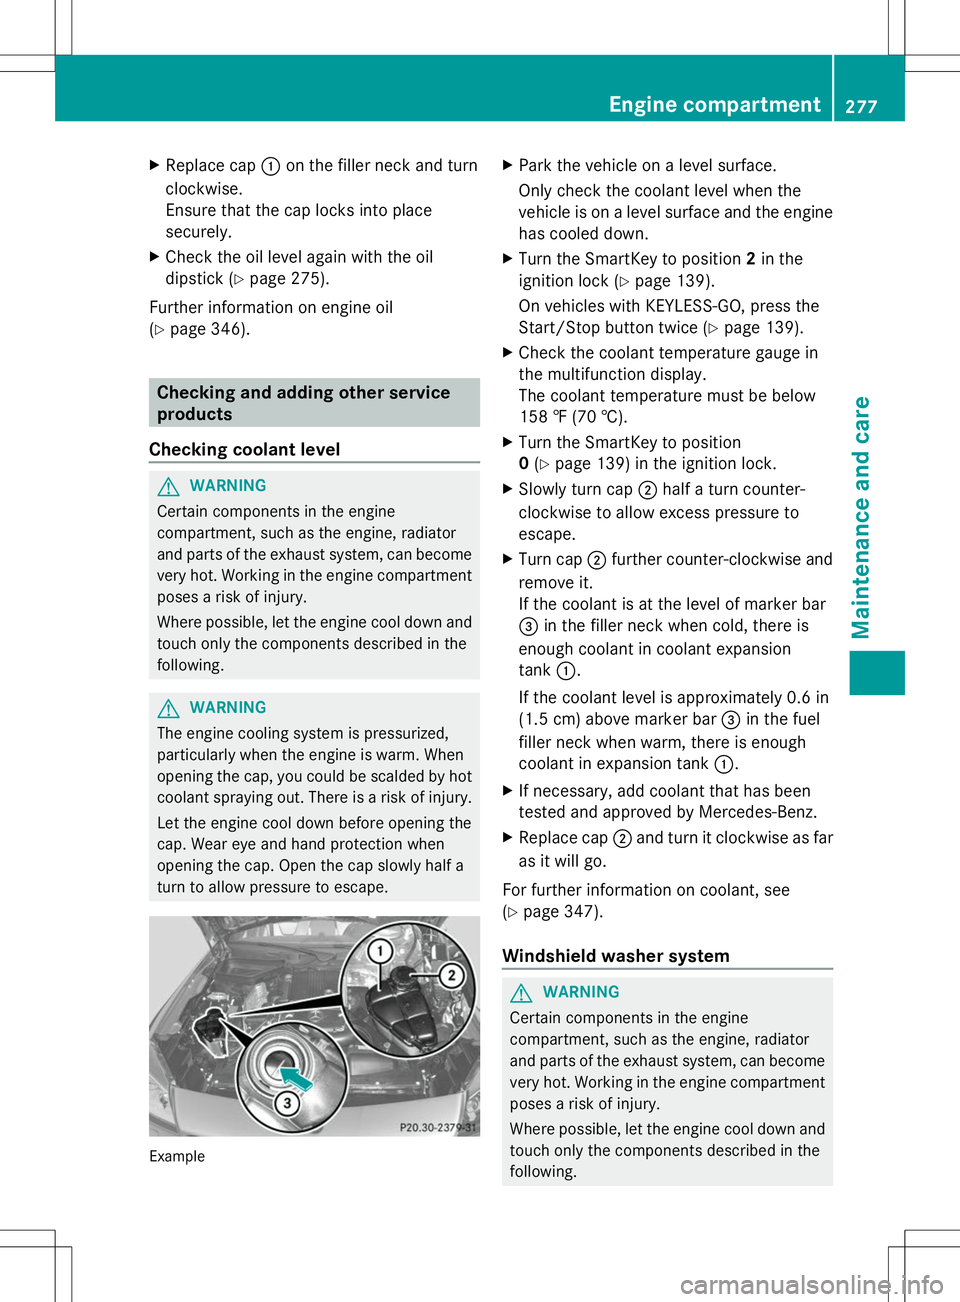
X Slowly turn cap ;half a turn counter-
clockwise to allow excess pressure to
escape.
X Turn cap ;further counter-clockwise and
remove it.
If the coolant is at the level of marker bar
= in the filler neck when cold, there is
enough coolant in coolant expansion
tank :.
If the coolant level is approximately 0.6 in
(1.5 cm) above marker bar =in the fuel
filler neck when warm, there is enough
coolant in expansion tank :.
X If necessary, add coolant that has been
tested and approved by Mercedes-Benz.
X Replace cap ;and turn it clockwise as far
as it will go.
For further information on coolant, see
(Y page 347).
Windshield washer system G
WARNING
Certain components in the engine
compartment, such as the engine, radiator
and parts of the exhaust system, can become
very hot. Working in the engine compartment
poses a risk of injury.
Where possible, let the engine cool down and
touch only the components described in the
following. Engine compartment
277Maintenance and care Z
Page 280 of 356
G
WARNING
Windshield washer concentrate is highly
flammable. If it comes into contact with hot
engine components or the exhaust system it
could ignite. There is a risk of fire and injury.
Make sure that no windshield washer
concentrate is spilled next to the filler neck. Example
X
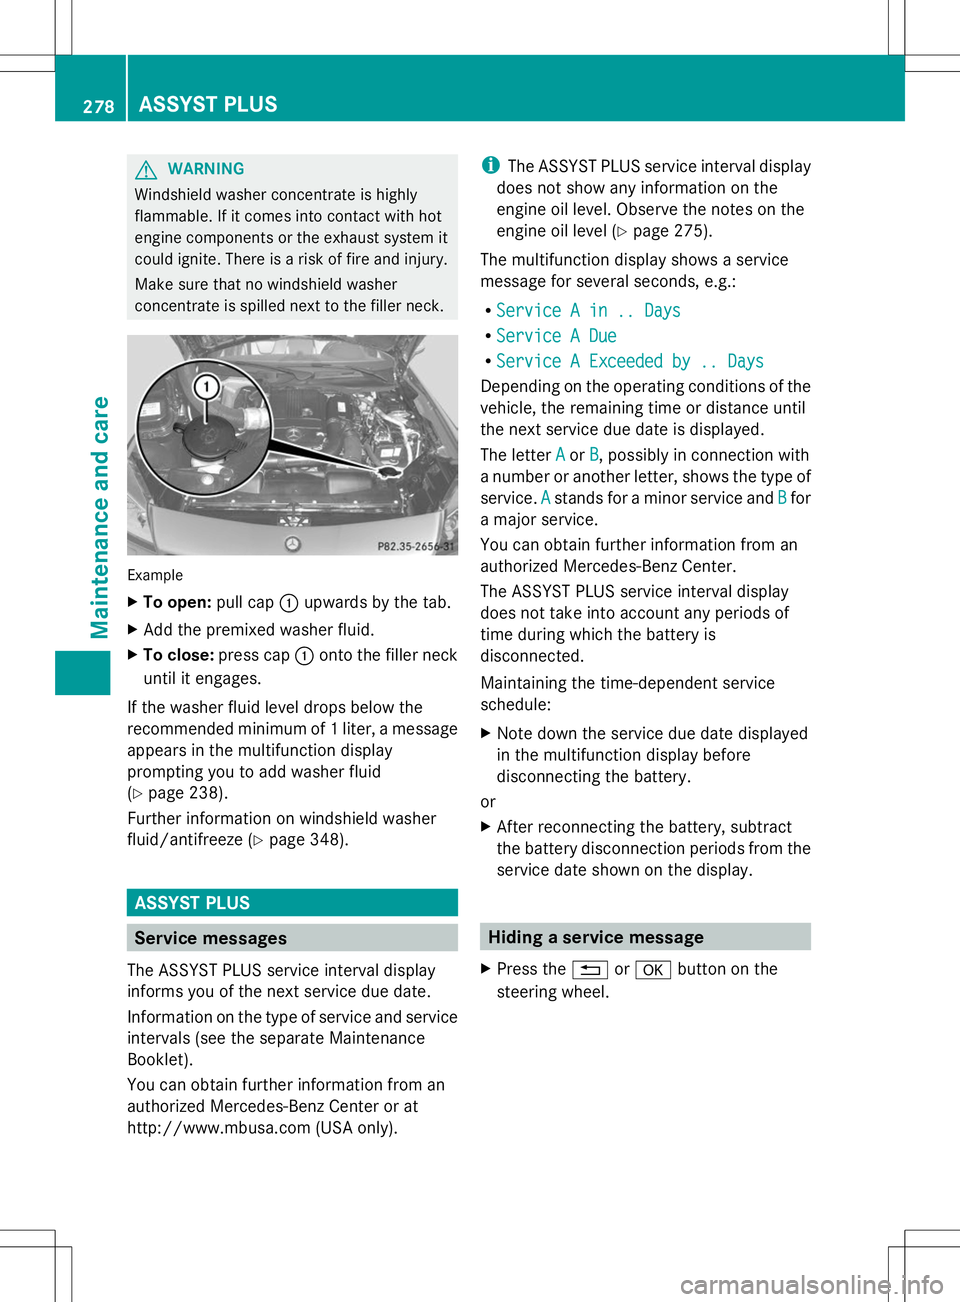
To open: pull cap:upwards by the tab.
X Add the premixed washer fluid.
X To close: press cap :onto the filler neck
until it engages.
If the washer fluid level drops below the
recommended minimum of 1 liter, a message
appears in the multifunction display
prompting you to add washer fluid
(Y page 238).
Further information on windshield washer
fluid/antifreeze (Y page 348).ASSYST PLUS
Service messages
The ASSYST PLUS service interval display
informs you of the next service due date.
Information on the type of service and service
intervals (see the separate Maintenance
Booklet).
You can obtain further information from an
authorized Mercedes-Benz Center or at
http://www.mbusa.com (USA only). i
The ASSYST PLUS service interval display
does not show any information on the
engine oil level. Observe the notes on the
engine oil level (Y page 275).
The multifunction display shows a service
message for several seconds, e.g.:
R Service A in .. Days
Service A in .. Days
R Service A Due Service A Due
R Service A Exceeded by .. Days
Service A Exceeded by .. Days
Depending on the operating conditions of the
vehicle, the remaining time or distance until
the next service due date is displayed.
The letter A Aor B
B, possibly in connection with
a number or another letter, shows the type of
service. A Astands for a minor service and B
Bfor
a major service.
You can obtain further information from an
authorized Mercedes-Benz Center.
The ASSYST PLUS service interval display
does not take into account any periods of
time during which the battery is
disconnected.
Maintaining the time-dependent service
schedule:
X Note down the service due date displayed
in the multifunction display before
disconnecting the battery.
or
X After reconnecting the battery, subtract
the battery disconnection periods from the
service date shown on the display. Hiding a service message
X Press the %ora button on the
steering wheel. 278
ASSYST PLUSMaintenance and care