2014 MERCEDES-BENZ SLK-Class bulb
[x] Cancel search: bulbPage 116 of 354

The color and brightness of the ambient
lighting may be set using the on-board
computer (Y
page 203).
Automatic interior lighting control X
To activate/deactivate: press the0033
button.
When the automatic interior lighting
control is activated, the button is flush with
the overhead control panel.
The interior lighting automatically switches
on if you:
R unlock the vehicle
R open a door
R remove the SmartKey from the ignition lock
The interior light is activated for a short while
when the SmartKey is removed from the
ignition lock. You can activate this delayed
switch-off using the on-board computer
(Y page 204).
Manual interior lighting control X
To switch the interior lighting on/off:
press the 004Abutton.
X To switch the reading lamps on/off:
press the 003Dbutton. Crash-responsive emergency lighting
The interior lighting is activated automatically
if the vehicle is involved in an accident.
X To switch off the crash-responsive
emergency lighting: press the hazard
warning lamp button.
or
X Lock and then unlock the vehicle using the
SmartKey. Replacing bulbs
Important safety notes
Xenon bulbs G
DANGER
Xenon bulbs carry a high voltage. You can get
an electric shock if you remove the cover of
the Xenon bulb and touch the electrical
contacts. There is a risk of fatal injury.
Never touch the parts or the electrical
contacts of the Xenon bulb. Always have work
on the Xenon bulbs carried out at a qualified
specialist workshop.
If your vehicle is equipped with Xenon bulbs,
you can recognize this by the following: the
cone of light from the Xenon bulbs moves
from the top to the bottom and back again
when you start the engine. For this to be
observed, the lights must be switched on
before starting the engine.
Bulbs and lamps are an important aspect of
vehicle safety. You must therefore make sure
that these function correctly at all times.
Have the headlamp setting checked regularly.
Other bulbs G
WARNING
Bulbs, lamps and connectors can get very hot
when operating. If you change a bulb, you
could burn yourself on these components.
There is a risk of injury.
Allow these components to cool down before
changing a bulb.
Do not use a bulb that has been dropped or if
its glass tube has been scratched.
The bulb may explode if:
R you touch it
R it is hot
R you drop it
R you scratch it
Only operate bulbs in enclosed lamps
designed for that purpose. Only install spare 114
Replacing bulbsLights and windshield wipers
Page 117 of 354

bulbs of the same type and the specified
voltage.
Marks on the glass tube reduce the service
life of the bulbs. Do not touch the glass tube
with your bare hands. If necessary, clean the
glass tube when cold with alcohol or spirit and
rub it off with a lint-free cloth.
Protect bulbs from moisture during
operation. Do not allow bulbs to come into
contact with liquids.
There are bulbs other than the Xenon bulbs
that you cannot replace. Replace only the
bulbs listed (Y page 115). Have the bulbs that
you cannot replace yourself changed at a
qualified specialist workshop.
If you require assistance changing bulbs,
consult a qualified specialist workshop.
If the new bulb still does not light up, consult
a qualified specialist workshop.
Bulbs and lamps are an important aspect of
vehicle safety. You must therefore make sure
that these function correctly at all times.
Have the headlamp setting checked regularly. Overview: changing bulbs/bulb types
Halogen headlamps
0043
Low-beam headlamp: H7 55 W
0044 High-beam headlamp: H7 55 W
0087 Turn signal lamp: PY 21 W Bi-Xenon headlamps
0043
Cornering lamp: H7 55 W Tail lamp
0043
Backup lamp: W 16 W Changing the front bulbs
Removing/mounting the cover in the
front wheel housing X
To remove: switch off the lights.
X Turn the front wheels inwards. Replacing bulbs
115Lights and windshield wipers Z
Page 118 of 354

X
Slide cover 0043up and remove it.
X To install: insert cover 0043again and slide
down until it engages.
Low-beam headlamps (halogen
headlamps) X
Remove the cover in the front wheel
housing (Y page 115).
X Turn housing cover 0043counter-clockwise
and pull it out.
X Press retainer 0044up.
X Remove connector 0087with the bulb.
X Pull the bulb out of connector 0087.
X Insert the new bulb into connector 0087and
into bracket for retainer 0044.
Make sure the bulb is positioned correctly.
X Press retainer 0044down.
X Attach housing cover 0043and turn it
clockwise until it engages.
X Replace the cover in the front wheel
housing (Y page 115). High-beam headlamps (halogen
headlamps)/cornering lamps (Bi-Xenon
headlamps) X
Switch off the lights.
X Open the hood.
X Turn housing cover 0043counter-clockwise
and pull it out.
X At the bulb holder, push the bulb upwards,
disconnect it and pull it out of bulb
holder 0044.
X Insert the new bulb into bulb holder 0044,
push it down and secure it in place.
X Attach housing cover 0043and turn it
clockwise until it engages.
Side marker lamps (halogen
headlamps) Due to their location, have the bulbs in the
side marker lamp changed at a qualified
specialist workshop.116
Replacing bulbsLights and windshield wipers
Page 119 of 354

Turn signals (halogen headlamps)
X
Switch off the lights.
X Open the hood.
X Turn bulb holder 0043counter-clockwise and
pull it out.
X Take the bulb out of bulb holder 0043.
X Insert the new bulb into bulb holder 0043.
X Insert bulb holder 0043and turn it clockwise
until it engages. Changing the rear bulbs
Backup Light X
Switch off the lights.
X Make sure that the roof is closed.
X Open the trunk.
X Turn and pull out buffer stop 0044.
X Unclip catch 0043for side paneling 0087. X
Reach upwards into side paneling 0087,
loosen and pull downwards until
holder 0085of the backup lamp is easily
accessible.
X Pull out bulb holder 0085.
X Pull out the bulb.
X Insert the new bulb into bulb holder 0085.
X Insert holder 0085until it engages.
X re-install side paneling 0087precisely.
X Clip in catch 0043for side paneling 0087.
X Push in and tighten buffer stop 0044. Windshield wipers
Switching the windshield wipers on/
off
! Do not operate the windshield wipers
when the windshield is dry, as this could
damage the wiper blades. Moreover, dust
that has collected on the windshield can
scratch the glass if wiping takes place when
the windshield is dry.
If it is necessary to switch on the windshield
wipers in dry weather conditions, always
use washer fluid when operating the
windshield wipers.
! If the windshield wipers leave smears on
the windshield after the vehicle has been
washed in an automatic car wash, wax or
other residues may be the reason for this.
Clean the windshield using washer fluid
after washing the vehicle in an automatic
car wash. Windshield
wipers
117Lights and windshield wipers Z
Page 223 of 354

Display messages Possible causes/consequences and
0050
0050Solutions Operator's Manual
Operator's Manual
display messages must not be shown in
the multifunction display.
X Wait for a period of at least 60 seconds until the necessary
system checks have been completed.
X Make sure that the display messages do not appear in the
multifunction display.
If these conditions are fulfilled, the front-passenger seat can be
occupied again. Whether the PASSENGER AIR BAG OFF indicator
lamp remains lit or goes out depends on how OCS classifies the
occupant.
If the conditions are not fulfilled, the system is not operating
correctly.
X Visit a qualified specialist workshop immediately.
For further information about the Occupant Classification System,
see (Y page 45). Lights
i Display messages about LEDs:
This display message will only appear if all LEDs have failed. Display messages Possible causes/consequences and
0050 0050Solutions 0049
Check Left Check Left
Cornering Light Cornering Light
or
Check Right Check Right
Cornering Light
Cornering Light The left or right-hand cornering light is defective.
X
Check whether you are permitted to replace the bulb yourself
(Y page 115).
or
X Visit a qualified specialist workshop. 0049
Check Left Low Check Left Low
Beam Beam
orCheck
Check
Right Low Beam
Right Low Beam The left or right-hand low-beam headlamp is defective.
X
Check whether you are permitted to replace the bulb yourself
(Y page 115).
or
X Visit a qualified specialist workshop. 0049
Check Rear Left Check Rear Left
Turn Signal Turn Signal
or
Check Rear Right
Check Rear Right
Turn Signal Turn Signal The rear left-hand or rear right-hand turn signal is defective.
X
Check whether you are permitted to replace the bulb yourself
(Y page 115).
or
X Visit a qualified specialist workshop. Display
messages
221On-board computer and displays Z
Page 224 of 354
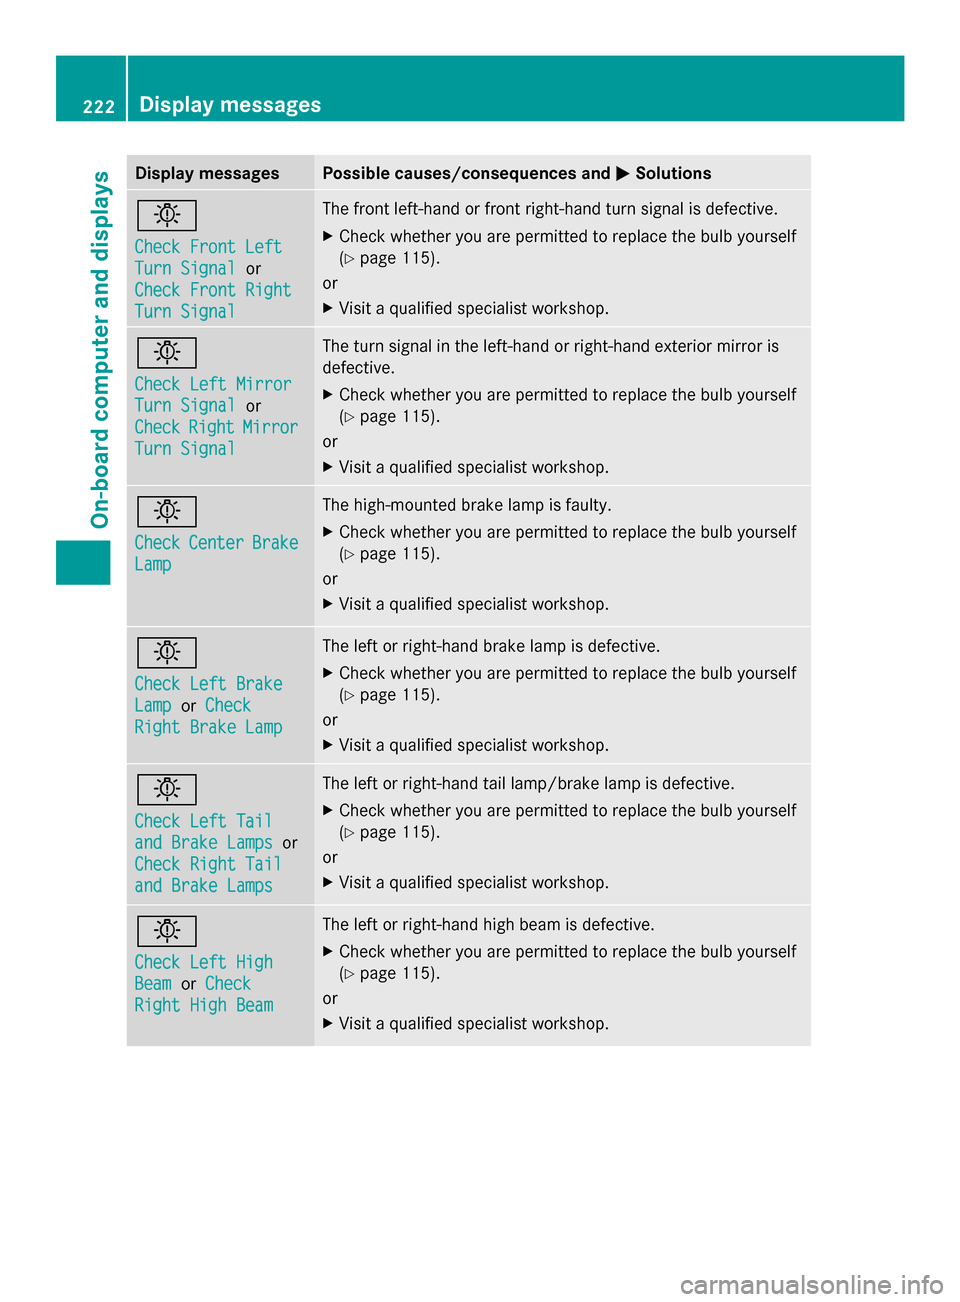
Display messages Possible causes/consequences and
0050
0050Solutions 0049
Check Front Left Check Front Left
Turn Signal Turn Signal
or
Check Front Right
Check Front Right
Turn Signal Turn Signal The front left-hand or front right-hand turn signal is defective.
X
Check whether you are permitted to replace the bulb yourself
(Y page 115).
or
X Visit a qualified specialist workshop. 0049
Check Left Mirror Check Left Mirror
Turn Signal Turn Signal
or
Check
Check Right
RightMirror
Mirror
Turn Signal
Turn Signal The turn signal in the left-hand or right-hand exterior mirror is
defective.
X
Check whether you are permitted to replace the bulb yourself
(Y page 115).
or
X Visit a qualified specialist workshop. 0049
Check Check
Center
Center Brake
Brake
Lamp
Lamp The high-mounted brake lamp is faulty.
X
Check whether you are permitted to replace the bulb yourself
(Y page 115).
or
X Visit a qualified specialist workshop. 0049
Check Left Brake Check Left Brake
Lamp Lamp
orCheck
Check
Right Brake Lamp
Right Brake Lamp The left or right-hand brake lamp is defective.
X
Check whether you are permitted to replace the bulb yourself
(Y page 115).
or
X Visit a qualified specialist workshop. 0049
Check Left Tail Check Left Tail
and Brake Lamps and Brake Lamps
or
Check Right Tail
Check Right Tail
and Brake Lamps and Brake Lamps The left or right-hand tail lamp/brake lamp is defective.
X
Check whether you are permitted to replace the bulb yourself
(Y page 115).
or
X Visit a qualified specialist workshop. 0049
Check Left High Check Left High
Beam Beam
orCheck
Check
Right High Beam
Right High Beam The left or right-hand high beam is defective.
X
Check whether you are permitted to replace the bulb yourself
(Y page 115).
or
X Visit a qualified specialist workshop. 222
Display
messagesOn-board computer and displays
Page 225 of 354

Display messages Possible causes/consequences and
0050
0050Solutions 0049
License Plate Lamp License Plate Lamp The left or right-hand license plate lamp is defective.
X
Check whether you are permitted to replace the bulb yourself
(Y page 115).
or
X Visit a qualified specialist workshop. 0049
Check Left Fog Check Left Fog
Lamp LamporCheck Right
Check Right
Fog Lamp
Fog Lamp The left-hand or right-hand front fog lamp is defective.
X
Check whether you are permitted to replace the bulb yourself
(Y page 115).
or
X Visit a qualified specialist workshop. 0049
Rear Fog Lamp Rear Fog Lamp The rear fog lamp is defective.
X
Check whether you are permitted to replace the bulb yourself
(Y page 115).
or
X Visit a qualified specialist workshop. 0049
Check Front Left Check Front Left
Parking Lamp Parking Lamp
or
Check Front Right
Check Front Right
Parking Lamp Parking Lamp The front left or front right parking or standing lamp is defective.
X
Check whether you are permitted to replace the bulb yourself
(Y page 115).
or
X Visit a qualified specialist workshop. 0049
Backup Light Backup Light The backup lamp is defective.
X
Check whether you are permitted to replace the bulb yourself
(Y page 115).
or
X Visit a qualified specialist workshop. 0049
Check Front Left Check Front Left
Sidemarker Lamp Sidemarker Lamp
or
Check Front Right
Check Front Right
Sidemarker Lamp Sidemarker Lamp The left or right front side marker lamp is defective.
X
Check whether you are permitted to replace the bulb yourself
(Y page 115).
or
X Visit a qualified specialist workshop. 0049
Check Rear Left Check Rear Left
Sidemarker Lamp Sidemarker Lamp
or
Check Rear Right
Check Rear Right
Sidemarker Lamp Sidemarker Lamp The rear left or right side marker lamp is defective.
X
Check whether you are permitted to replace the bulb yourself
(Y page 115).
or
X Visit a qualified specialist workshop. Display
messages
223On-board computer and displays Z
Page 226 of 354

Display messages Possible causes/consequences and
0050
0050Solutions 0049
Check Check
Left
LeftDaytime
Daytime
Running Light
Running Light or
Check Right
Check Right
Daytime Running Daytime Running
Light Light The left-hand or right-hand daytime running lamp is faulty.
X
Check whether you are permitted to replace the bulb yourself
(Y page 115).
or
X Visit a qualified specialist workshop. 0049
Active Headlamps Active Headlamps
Inoperative Inoperative The active light function is defective.
X
Visit a qualified specialist workshop. 0049
Malfunction See Malfunction See
Operator's Manual Operator's Manual The exterior lighting is defective.
X
Visit a qualified specialist workshop. 0049
Auto Auto
Lamp
LampFunction
Function
Inoperative
Inoperative The light sensor is defective.
X
Visit a qualified specialist workshop. 0049
Switch Off Lights Switch Off Lights The lights are still switched on when you leave the vehicle. A
warning tone also sounds.
X
Turn the light switch to 0058.Adaptive Highbeam Adaptive Highbeam
Assist Inoperative Assist Inoperative Adaptive Highbeam Assist is faulty.
X
Visit a qualified specialist workshop. Adaptive Highbeam Adaptive Highbeam
Assist Currently Assist Currently
Unavailable See Unavailable See
Operator's Manual Operator's Manual Adaptive Highbeam Assist is deactivated and temporarily
inoperative. Possible causes are:
R
the windshield in the camera's field of vision is dirty.
R visibility is impaired due to heavy rain, snow or fog.
X Clean the windshield.
If the system detects that the camera is fully operational again,
the Adaptive Highbeam Assist Now Available Adaptive Highbeam Assist Now Available message is
displayed.
Adaptive Highbeam Assist is operational again. 224
Display
messagesOn-board computer and displays