2014 MERCEDES-BENZ SL-CLASS ROADSTER mirror
[x] Cancel search: mirrorPage 157 of 284

Due to the nature of the system:
R
warnings may be issued in error when
driving close to crash barriers or similar
solid lane borders.
R warnings may be interrupted when driving
alongside particularly long vehicles, e.g.
trucks, for a prolonged time.
Indicator and warning display :
Yellow indicator lamp/red warning lamp
Active Blind Spot Assist is not active at
speeds below approximately 20 mph
(30 km/h). Vehicles in the monitoring range
are then not indicated.
When Active Blind Spot Assist is activated,
indicator lamp :in the exterior mirrors lights
up yellow at speeds of up to
20 mph(30 km/h). At speeds above 20 mph
(30 km/h), the indicator lamp goes out and
Active Blind Spot Assist is operational.
If a vehicle is detected within the blind spot
monitoring range at speeds above 20 mph
(30 km/h), warning lamp :on the
corresponding side lights up red. This warning
is always given when a vehicle enters the
blind spot monitoring range from behind or
from the side. When you overtake a vehicle,
the warning only occurs if the difference in
speed is less than 7 mph (12 km/h).
The yellow indicator lamp goes out if reverse
gear is engaged. In this event, Active Blind
Spot Assist is no longer active.
The brightness of the indicator/warning
lamps is adjusted automatically according to
the ambient light. Visual and acoustic collision warning
When you switch on the turn signals to
change lanes and a vehicle is detected in the
side monitoring range, you receive a visual
and acoustic collision warning. You then hear
a double warning tone and red warning
lamp :flashes. If the turn signal remains on,
detected vehicles are indicated by the
flashing of red warning lamp :. There are no
further warning tones.
Course-correcting brake application G
WARNING
A course-correcting brake application cannot
always prevent a collision. There is a risk of
an accident.
Always steer, brake or accelerate yourself,
especially if Active Blind Spot Assist warns
you or makes a course-correcting brake
application. Always maintain a safe distance
at the sides. If a course-correcting brake application
occurs, red warning lamp
:flashes in the
exterior mirror and a dual warning tone
sounds. In addition, display ;appears in the
multifunction display.
If Active Blind Spot Assist detects a risk of a
lateral collision in the monitoring range, a
course-correcting brake application is carried
out. This is meant to assist you in avoiding a
collision.
The course-correcting brake application is
available in the speed range between
20 mph (30 km/h) and 120 mph (200 km/h). Driving systems
155Driving and parking Z
Page 208 of 284

Problems with the loading aid
Problem Possible causes/consequences and
M
MSolutions It is no longer possible
to lower the stowed
roof in the trunk using
the loading aid. You cannot close the trunk any more.
X
Call a qualified specialist workshop. Stowage well under the trunk floor
X
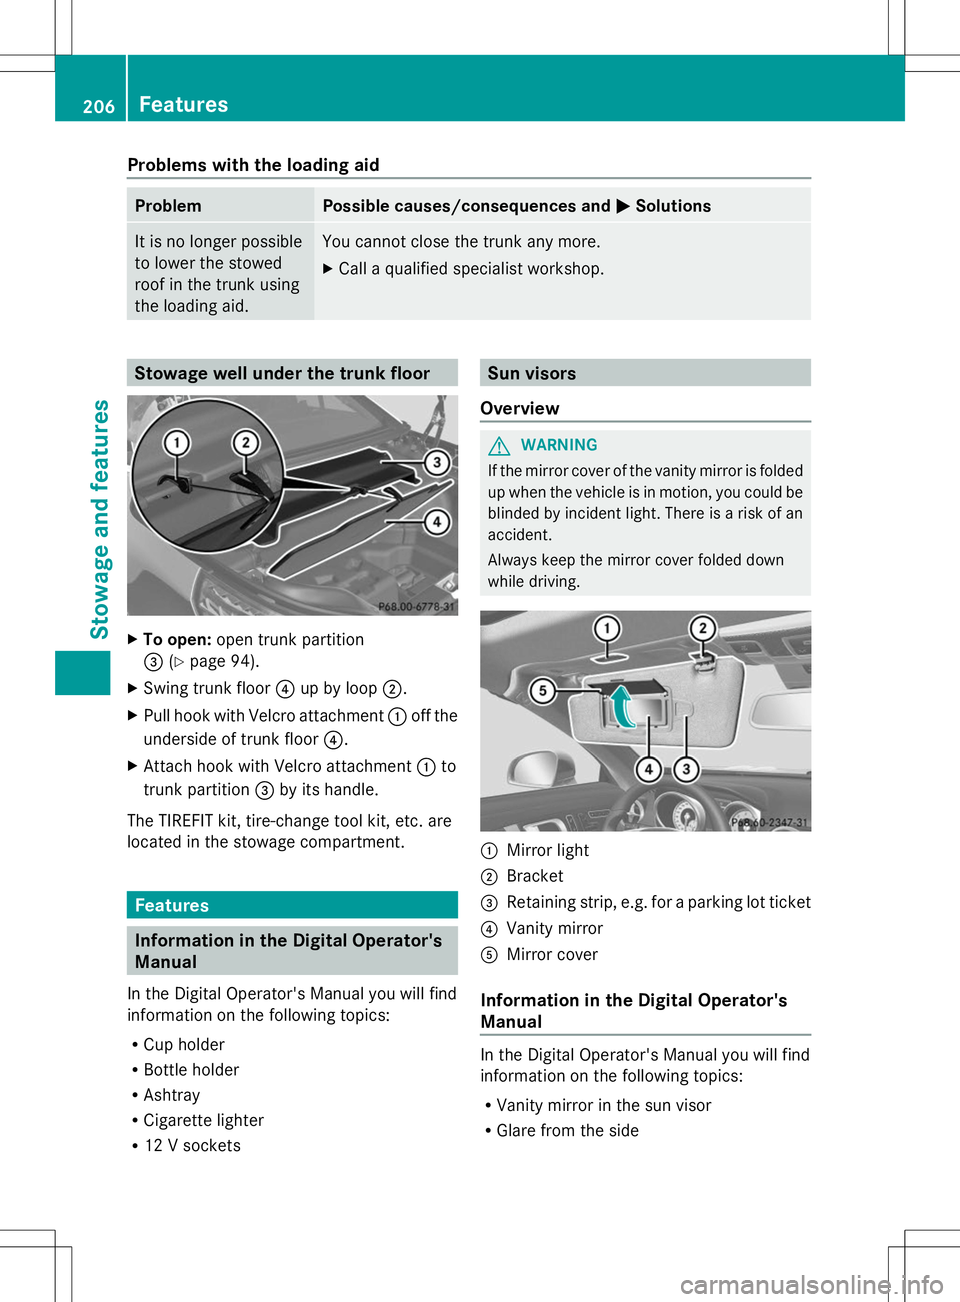
To open: open trunk partition
= (Ypage 94).
X Swing trunk floor ?up by loop ;.
X Pull hook with Velcro attachment :off the
underside of trunk floor ?.
X Attach hook with Velcro attachment :to
trunk partition =by its handle.
The TIREFIT kit, tire-change tool kit, etc. are
located in the stowage compartment. Features
Information in the Digital Operator's
Manual
In the Digital Operator's Manual you will find
information on the following topics:
R Cup holder
R Bottle holder
R Ashtray
R Cigarette lighter
R 12 V sockets Sun visors
Overview G
WARNING
If the mirror cover of the vanity mirror is folded
up when the vehicle is in motion, you could be
blinded by incident light. There is a risk of an
accident.
Always keep the mirror cover folded down
while driving. :
Mirror light
; Bracket
= Retaining strip, e.g. for a parking lot ticket
? Vanity mirror
A Mirror cover
Information in the Digital Operator's
Manual In the Digital Operator's Manual you will find
information on the following topics:
R
Vanity mirror in the sun visor
R Glare from the side 206
FeaturesStowage and features
Page 213 of 284

i
The system has not been able to initiate
an MB Info call, if:
R the indicator lamp in MB Info call
button :is flashing continuously.
R no voice connection to the Mercedes-
Benz Customer Assistance Center was
established.
This can occur if the relevant mobile phone
network is not available, for example.
The Call Failed
Call Failed message appears in the
multifunction display.
X To end a call: press the~button on the
multifunction steering wheel.
or
X Press the corresponding button for ending
a phone call on COMAND.
Call priority When service calls are active, e.g. Roadside
Assistance or MB Info calls, an emergency
call can still be initiated. In this case, an
emergency call will take priority and override
all other active calls.
The indicator lamp of the respective button
flashes until the call is ended.
An emergency call can only be terminated by
the Mercedes-Benz Customer Assistance
Center.
All other calls can be ended by pressing:
R the ~ button on the multifunction
steering wheel
R or the corresponding COMAND button for
ending a telephone call
i When a call is initiated, the audio system
is muted. The mobile phone is no longer
connected to COMAND. However, if you
want to use your mobile phone, do so only
when the vehicle is stationary and in a safe
location. Garage door opener
Important safety notes G
WARNING
When you operate or program the garage door
with the integrated garage door opener,
persons in the range of movement of the
garage door can become trapped or struck by
the garage door. There is a risk of injury.
When using the integrated garage door
opener, always make sure that nobody is
within the range of movement of the garage
door. G
WARNING
Combustion engines emit poisonous exhaust
gases such as carbon monoxide. Inhaling
these exhaust gases leads to poisoning. There
is a risk of fatal injury. Therefore never leave
the engine running in enclosed spaces
without sufficient ventilation.
The HomeLink ®
garage door opener
integrated in the rear-view mirror allows you
to operate up to three different door and gate
systems.
Use the integrated garage door opener only
on garage doors that:
R have safety stop and reverse features and
R meet current U.S. federal safety standards
When programming a garage door opener,
park the vehicle outside the garage.
i Certain garage door drives are
incompatible with the integrated garage
door opener. If you have difficulty
programming the integrated garage door
opener, contact an authorized Mercedes-
Benz Center. Features
211Stowage and features Z
Page 214 of 284

Alternatively, you can call the following
telephone assistance services:
R USA: Mercedes-Benz Customer
Assistance Center at
1-800-FOR-MERCedes
R Canada: Customer Service at
1-800-387-0100
R HomeLink ®
hotline 1-800-355-3515
(free of charge)
More information on HomeLink ®
and/or
compatible products is also available
online at http://www.homelink.com.
i Notes on the declaration of conformity
(Y page 30).
USA: FCC ID: CB2HMIHL4
Canada: IC: 279B-HMIHL4
Programming Programming buttons
Observe the "Important safety notes"
(Y page 211). Integrated garage door opener in the rear-view
mirror
Garage door remote control Ais not part of
the integrated garage door opener.
X The first time before programming, clear
the integrated garage door opener memory
(Y page 214).
X Turn the SmartKey to position 2in the
ignition lock. X
Press and hold one of buttons ;to? on
the integrated garage door opener.
After a short time, indicator lamp :lights
up yellow.
i Indicator lamp :lights up yellow as soon
as button ;,=or? is programmed for
the first time. If the selected button has
already been programmed, indicator
lamp :will only light up yellow after ten
seconds have elapsed.
X Release button ;,=or?. Indicator
lamp :flashes yellow.
X Point garage door remote control A
towards buttons ;to? on the rear-view
mirror at a distance of 2 to 8 inches (5 to
20 cm).
i The required distance between remote
control Aand the integrated garage door
opener depends on the garage door drive
system. Several attempts might be
necessary. You should test every position
for at least 25 seconds before trying
another position.
X Press and hold button Bon remote control
A until indicator lamp :lights up green.
If indicator lamp :lights up green or
flashes, then programming has been
successful.
X Release button Bon remote control Afor
the garage door drive system.
X If indicator lamp :lights up red: repeat
the programming procedure for the
corresponding button on the rear-view
mirror. When doing so, vary the distance
between remote control Aand the rear-
view mirror.
i If the indicator lamp flashes green after
successful programming, the garage door
system is using a rolling code. After
programming, you must synchronize the
garage door opener integrated in the rear-
view mirror with the receiver of the garage
door system. 212
FeaturesSto
wage an d features
Page 215 of 284

Synchronizing the rolling code
Observe the "Important safety notes"
(Y
page 211).
Your vehicle must be within reach of the
garage door or exterior gate drive. Make sure
that neither your vehicle nor any persons/
objects are present within the sweep of the
door or gate.
X Turn the SmartKey to position 2in the
ignition lock.
X Press the program button of the door or
gate drive (see the door or gate drive
operating instructions, e.g. under
"programming of additional remote
controls").
i Usually, you now have 30seconds to
initiate the next step.
X Press previously programmed button ;,
= or? of the integrated garage door
opener until the door closes.
The rolling code synchronization is then
complete.
Notes on programming the remote
control
Canadian radio frequency laws require a
"break" (or interruption) of the transmission
signals after broadcasting for a few seconds.
Therefore, these signals may not last long
enough for the integrated garage door
opener. The signal is not recognized during
programming. Comparable with Canadian
law, some U.S. garage door openers also
feature a "break".
Proceed as follows:
R if you live in Canada
R if you have difficulties programming the
garage door opener (regardless of where
you live) when using the programming
steps X
Press and hold one of buttons ;to? on
the integrated garage door opener.
After a short time, indicator lamp :lights
up yellow.
X Release the button.
Indicator lamp :flashes yellow.
X Press button Bof garage door remote
control Afor two seconds, then release it
for two seconds.
X Press button Bagain for two seconds.
X Repeat this sequence on button Bof
remote control Auntil indicator lamp :
lights up green.
If indicator lamp :turns red, repeat the
process.
X Continue with the other programming
steps (see above).
Problems when programming
If you are experiencing problems
programming the integrated garage door
opener on the rear-view mirror, take note of
the following instructions:
R Check the transmitter frequency of garage
door drive remote control A. This can
usually be found on the back of the remote
control.
The integrated garage door opener is
compatible with devices that have units
which operate in the frequency range of
280to 433MHz.
R Replace the batteries in garage door
remote control A. This increases the
likelihood that garage door remote control
A will transmit a strong and precise signal
to the integrated garage door opener in the
rear-view mirror.
R When programming, hold remote control
A at varying distances and angles from the
button that you are programming. Try
various angles at a distance between 2and
12 inches (5to 30 cm) or at the same angle
but at varying distances.
R If another remote control for the same
garage door drive is available, repeat the Features
213Stowage and features Z
Page 224 of 284

should drive for a few minutes after
cleaning. Braking heats the brake discs and
the brake pads/linings, thus drying them.
The vehicle can then be parked.
Regular care of your vehicle is a condition for
retaining the quality in the long term.
Use care products and cleaning agents
recommended and approved by Mercedes-
Benz. Exterior care
Automatic car wash G
WARNING
Braking efficiency is reduced after washing
the vehicle. There is a risk of an accident.
After the vehicle has been washed, brake
carefully while paying attention to the traffic
conditions until full braking power is restored.
! If DISTRONIC PLUS or the HOLD function
is activated, the vehicle brakes
automatically in certain situations. To
prevent damage to the vehicle, deactivate
DISTRONIC PLUS and the HOLD function in
the following or other similar situations:
R when towing the vehicle
R in the car wash
! It is preferable to use car washes with
adjustable high-pressure pre-cleaning that
corresponds to the specification for the
Cabriolet program. In car washes that use
high water pressures, there is a risk that a
small amount of water may leak into the
vehicle.
! Vehicles with HANDS-FREE ACCESS: if a
SmartKey with KEYLESS-GO is within the
detection range of the KEYLESS-GO
antenna, the following situations could lead
to the unintentional opening of the trunk
lid:
R using a car wash
R using a power washer Make sure that the SmartKey is at least
6.5 ft (2 m) away from the vehicle.
! Never clean your vehicle in a Touchless
Automatic Car Wash as these use special
cleaning agents. These cleaning agents can
damage the paintwork or plastic parts.
! Make sure that the automatic
transmission is in position Nwhen washing
your vehicle in a tow-through car wash. The
vehicle could be damaged if the
transmission is in another position.
! Make sure that:
R the side windows and the roof are
completely closed
R the climate control blower is switched off
R the windshield wiper switch is at position
0
The vehicle could otherwise be damaged.
You can wash the vehicle in an automatic car
wash from the very start.
If the vehicle is very dirty, pre-wash it before
cleaning it in an automatic car wash.
After using an automatic car wash, wipe off
wax from the windshield and the wiper
blades. This will prevent smears and reduce
wiping noises caused by residue on the
windshield.
Information in the Digital Operator's
Manual In the Digital Operator's Manual you will find
information on the following topics:
R
Washing by hand
R Power washers
R Cleaning the wheels
R Cleaning the paintwork
R Matte finish care
R Cleaning the windows
R Cleaning wiper blades
R Cleaning the exterior lighting
R Cleaning the mirror turn signals
R Cleaning the sensors 222
CareMaintenance and care
Page 281 of 284

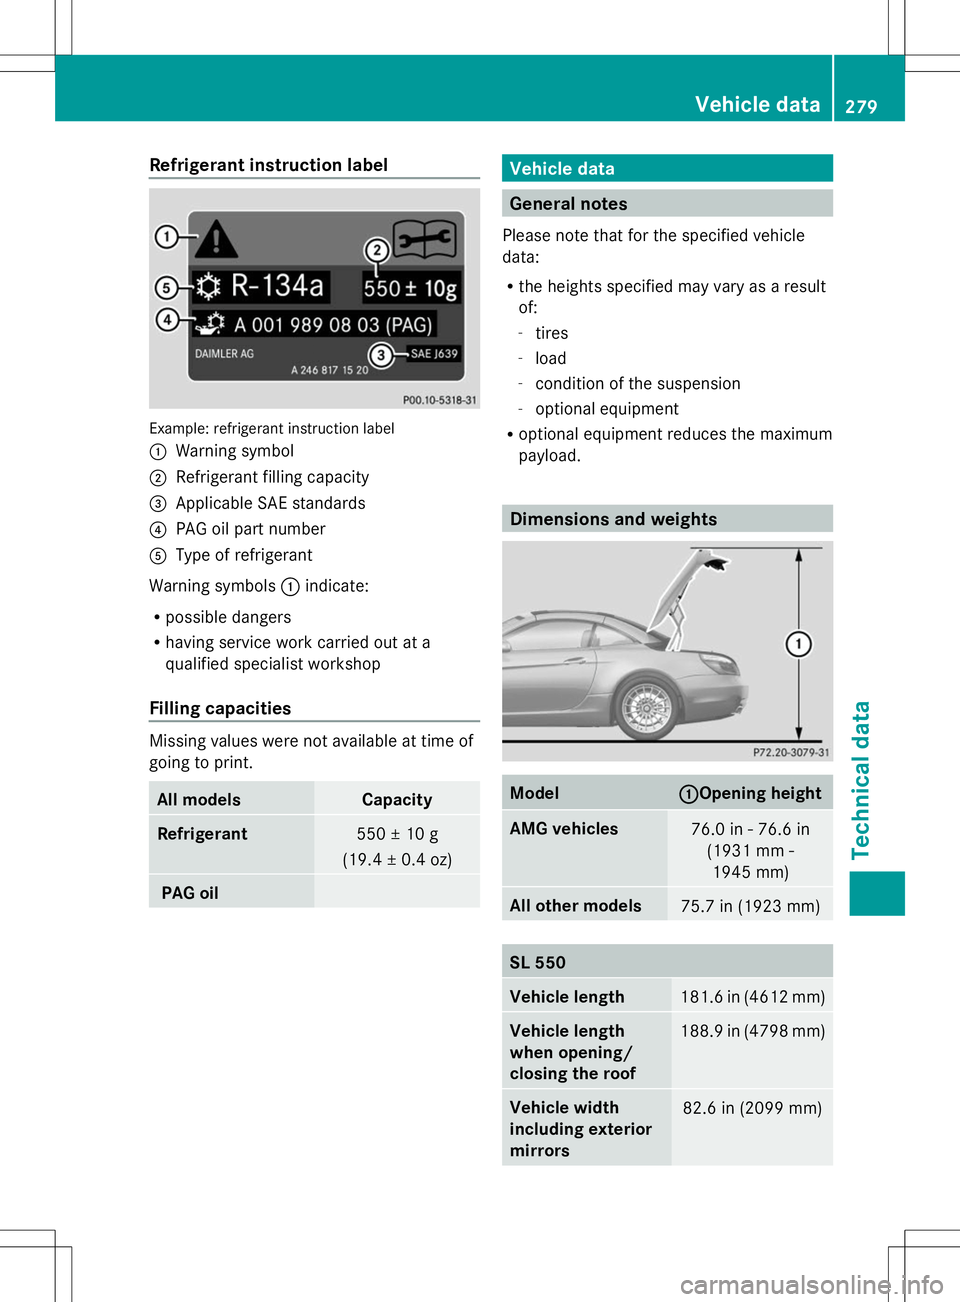
Refrigerant instruction label
Example: refrigerant instruction label
:
Warning symbol
; Refrigerant filling capacity
= Applicable SAE standards
? PAG oil part number
A Type of refrigerant
Warning symbols :indicate:
R possible dangers
R having service work carried out at a
qualified specialist workshop
Filling capacities Missing values were not available at time of
going to print. All models Capacity
Refrigerant
550 ± 10 g
(19.4 ± 0.4 oz) PAG oil Vehicle data
General notes
Please note that for the specified vehicle
data:
R the heights specified may vary as a result
of:
-tires
- load
- condition of the suspension
- optional equipment
R optional equipment reduces the maximum
payload. Dimensions and weights
Model : :Opening height
AMG vehicles
76.0 in - 76.6 in
(1931 mm -1945 mm) All other models
75.7 in (1923 mm)
SL 550
Vehicle length
181.6 in (4612 mm)
Vehicle length
when opening/
closing the roof
188.9 in (4798 mm)
Vehicle width
including exterior
mirrors
82.6 in (2099 mm) Vehicle data
279Technical data Z
Page 282 of 284

SL 550
Vehicle height
51.8 in (1315 mm)
Vehicle height,
when opening/
closing the roof
66.8 in (1696 mm)
Wheelbase
101.8 in (2585 mm)
Turning radius
36.2 ft (11.04 m)
Maximum trunk
load
220 lb (100 kg)
SL 63 AMG and
SL 65 AMG V12
Vehicle length
182.4 in (4633 mm)
Vehicle length
when opening/
closing the roof
191.3 in (4858 mm)
Vehicle width
including exterior
mirrors
82.6 in (2099 mm)
Vehicle height
51.2 in - 51.5 in
(1300 mm -1308 mm) Vehicle height,
when opening/
closing the roof
66.5 in - 67.4 in
(1688 mm -1713 mm) Wheelbase
101.8 in (2585 mm)
Turning radius
36.3 ft (11.05 m)
Maximum trunk
load
220 lb (100 kg)280
Vehicle dataTechnical data