2014 MERCEDES-BENZ SL-CLASS ROADSTER radio
[x] Cancel search: radioPage 193 of 284
COMAND display
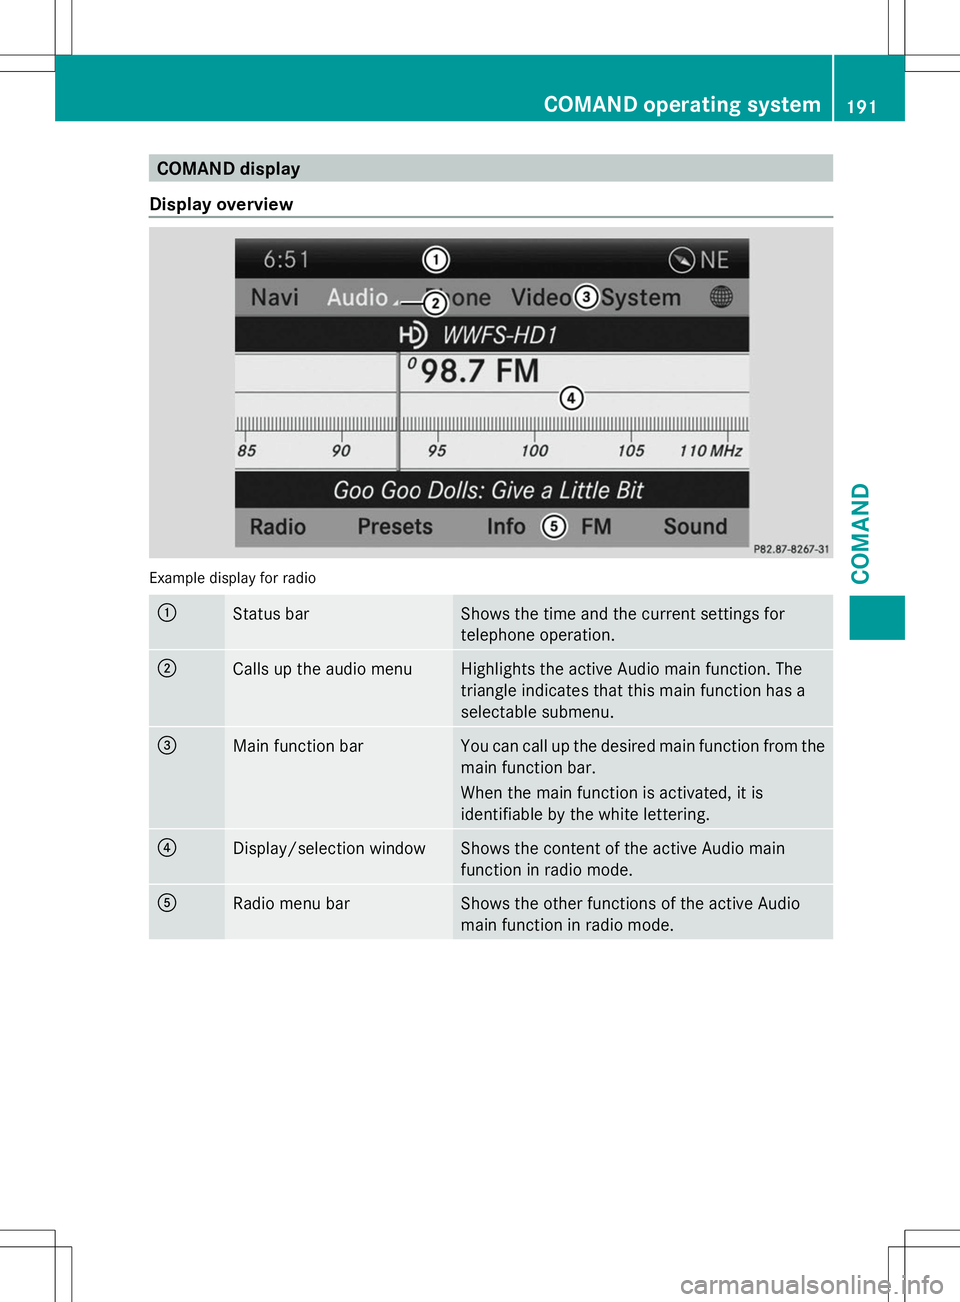
Display overview Example display for radio
:
Status bar Shows the time and the current settings for
telephone operation.
;
Calls up the audio menu Highlights the active Audio main function. The
triangle indicates that this main function has a
selectable submenu.
=
Main function bar You can call up the desired main function from the
main function bar.
When the main function is activated, it is
identifiable by the white lettering.
?
Display/selection window Shows the content of the active Audio main
function in radio mode.
A
Radio menu bar Shows the other functions of the active Audio
main function in radio mode. COMAND operating system
191COMAND Z
Page 194 of 284
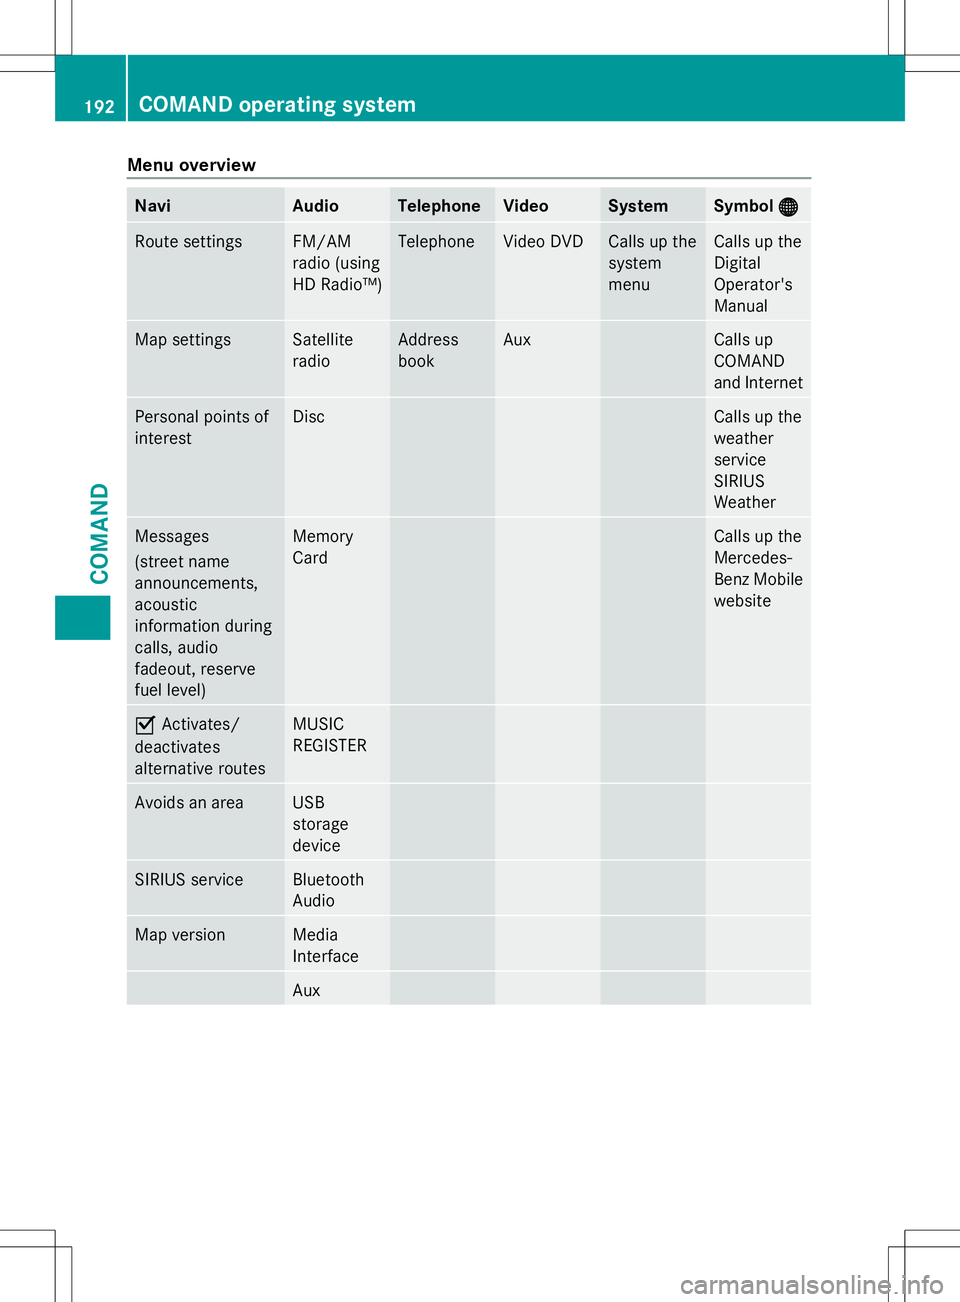
Menu overview
Navi Audio Telephone Video System Symbol
®
® Route settings FM/AM
radio (using
HD Radio™) Telephone Video DVD Calls up the
system
menu Calls up the
Digital
Operator's
Manual
Map settings Satellite
radio Address
book Aux Calls up
COMAND
and Internet
Personal points of
interest Disc Calls up the
weather
service
SIRIUS
Weather
Messages
(street name
announcements,
acoustic
information during
calls, audio
fadeout, reserve
fuel level) Memory
Card Calls up the
Mercedes-
Benz Mobile
website
O
Activates/
deactivates
alternative routes MUSIC
REGISTER
Avoids an area USB
storage
device
SIRIUS service Bluetooth
Audio
Map version Media
Interface
Aux192
COMAND operating systemCOMAND
Page 197 of 284
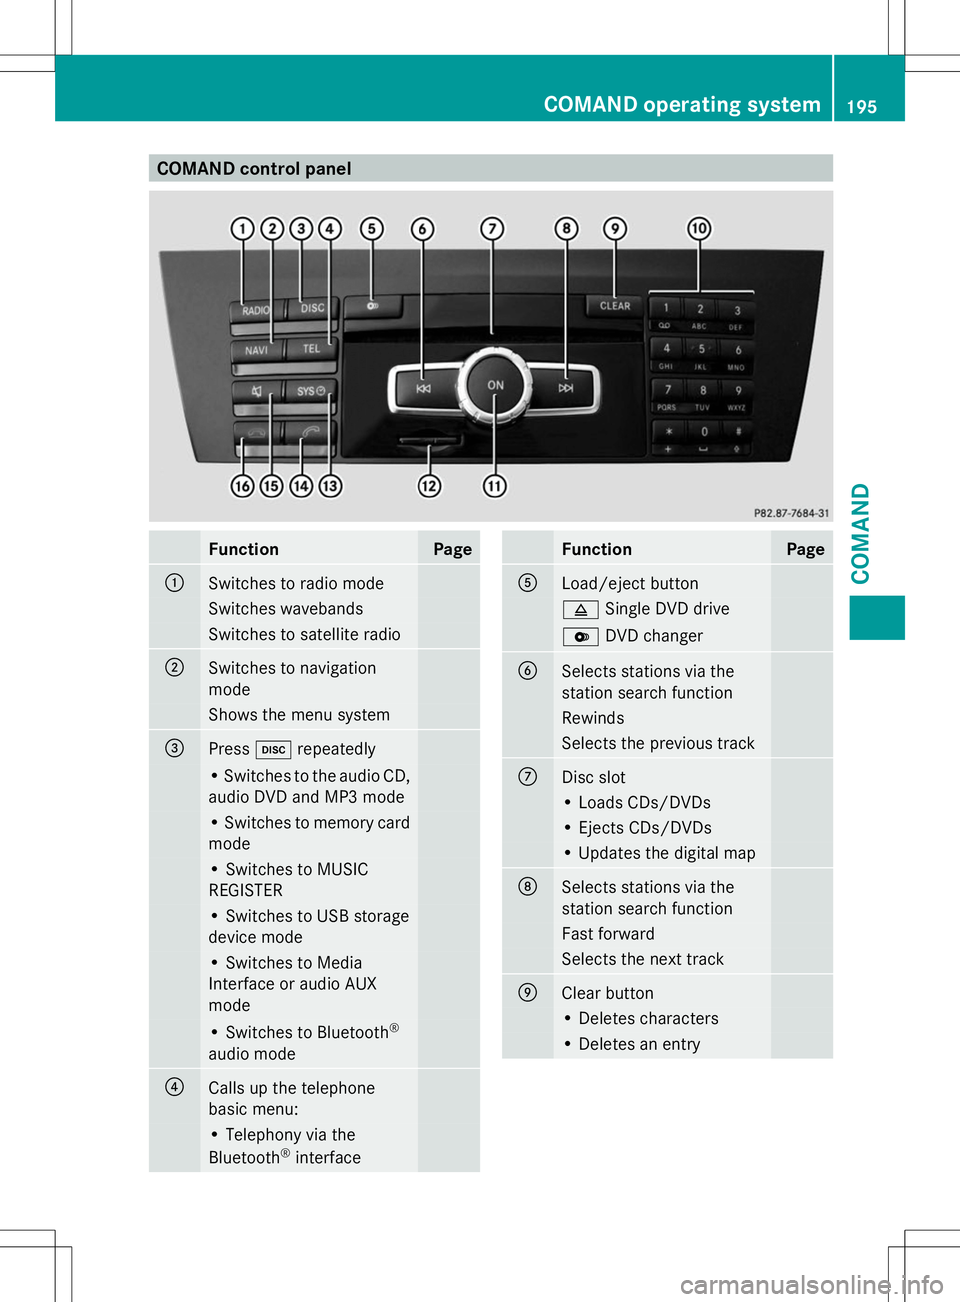
COMAND control panel
Function Page
:
Switches to radio mode
Switches wavebands
Switches to satellite radio
;
Switches to navigation
mode Shows the menu system
=
Press
hrepeatedly • Switches to the audio CD,
audio DVD and MP3 mode
• Switches to memory card
mode
• Switches to MUSIC
REGISTER
• Switches to USB storage
device mode
• Switches to Media
Interface or audio AUX
mode
• Switches to Bluetooth
®
audio mode ?
Calls up the telephone
basic menu: • Telephony via the
Bluetooth ®
interface Function Page
A
Load/eject button
8
Single DVD drive V
DVD changer B
Selects stations via the
station search function
Rewinds
Selects the previous track
C
Disc slot
• Loads CDs/DVDs
• Ejects CDs/DVDs
• Updates the digital map
D
Selects stations via the
station search function
Fast forward
Selects the next track
E
Clear button
• Deletes characters
• Deletes an entryCOMAND operating system
195COMAND Z
Page 199 of 284

The COMAND controller can be:
R
pressed briefly or pressed and held W
R turned clockwise or counter-clockwise
cVd
R slid left or right XVY
R slid forwards or backwards ZVÆ
R slid diagonally aVb
Example of operation In the instructions, operating sequences are
described as follows:
X Press the $button.
Radio mode is activated.
X Select Radio
Radio by sliding VÆand turning
cVd the COMAND controller and press
W to confirm.
X Confirm Station List
Station List by pressingW.
The station list appears. Buttons on the COMAND controller
Overview :
Back button (Y page 197)
; Clear button (Y page 197)
= Seat function button
? Favorites button
i If your vehicle is not equipped with the
seat function button, it features two
favorites buttons. i
For AMG vehicles: the COMAND
Controller is configured with buttons :
and ;.
Back button You can use the
kbutton to exit a menu
or to call up the basic display of the current
operating mode.
X To exit the menu: briefly press thek
back button.
COMAND changes to the next higher menu
level in the current operating mode.
X To call up the basic display: press and
hold the kback button.
COMAND changes to the basic display of
the current operating mode.
Clear button X
To delete individual characters: briefly
press the 2clear button.
X To delete an entire entry: press and hold
the 2 clear button.
Seat function button You can use the
Tbutton to call up the
following seat functions:
R Multicontour seat (with 4-way lumbar
support)
R Active multicontour seat (dynamic seat and
massage function)
R Balance (seat heating distribution)
Favorites button You can assign predefined functions to
the
; favorites button and call them up by
pressing the button. COMAND operating system
197COMAND Z
Page 201 of 284
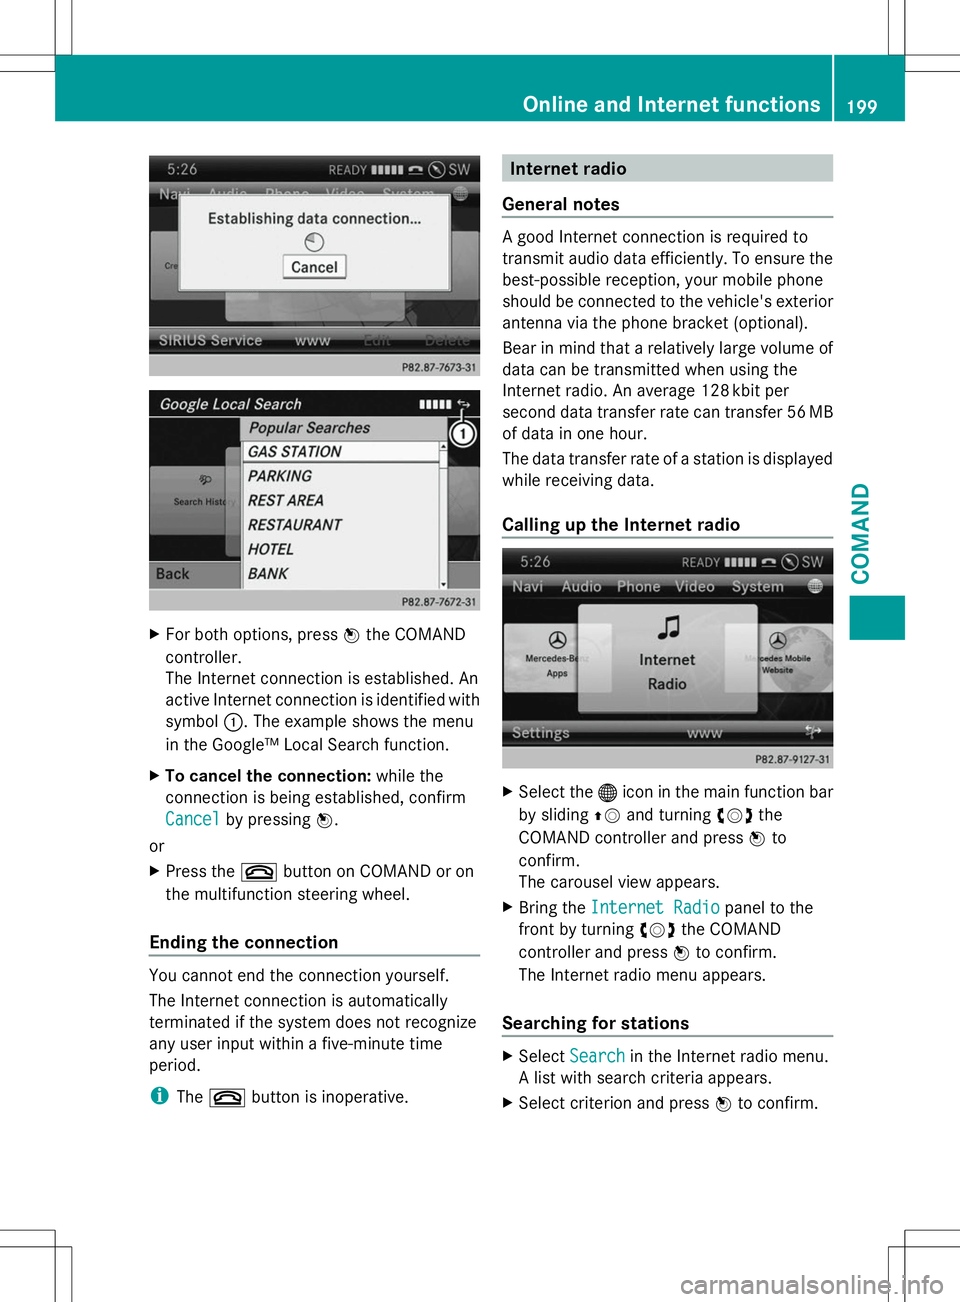
X
For both options, press Wthe COMAND
controller.
The Internet connection is established. An
active Internet connection is identified with
symbol :. The example shows the menu
in the Google™ Local Search function.
X To cancel the connection: while the
connection is being established, confirm
Cancel Cancel by pressing W.
or
X Press the ~button on COMAND or on
the multifunction steering wheel.
Ending the connection You cannot end the connection yourself.
The Internet connection is automatically
terminated if the system does not recognize
any user input within a five-minute time
period.
i The ~ button is inoperative. Internet radio
General notes A good Internet connection is required to
transmit audio data efficiently. To ensure the
best-possible reception, your mobile phone
should be connected to the vehicle's exterior
antenna via the phone bracket (optional).
Bear in mind that a relatively large volume of
data can be transmitted when using the
Internet radio. An average 128 kbit per
second data transfer rate can transfer 56 MB
of data in one hour.
The data transfer rate of a station is displayed
while receiving data.
Calling up the Internet radio
X
Select the ®icon in the main function bar
by sliding ZVand turning cVdthe
COMAND controller and press Wto
confirm.
The carousel view appears.
X Bring the Internet Radio Internet Radio panel to the
front by turning cVdthe COMAND
controller and press Wto confirm.
The Internet radio menu appears.
Searching for stations X
Select Search
Search in the Internet radio menu.
A list with search criteria appears.
X Select criterion and press Wto confirm. Online and Internet functions
199COMAND Z
Page 202 of 284
i
For example as a search criterion, you can
set an Internet radio station that is located
close to your navigation destination.
Connecting to a station X
Search for a station (Y page 199).
X Select ;(play) in the Internet radio
menu and press Wto confirm.
The call is placed.
If the data stream is interrupted, an automatic
attempt is made to re-establish the
connection.
Manually re-establishing a connection
X Select ;(play) again in the Internet
radio menu and press Wto confirm.
Ending data transfer:
X Select É(stop) in the Internet radio
menu and press Wto confirm.
or
X Change to another audio source, for
example Disc
Disc .
If you change to a main function that is not an
audio source, e.g. navigation, the data
connection remains on. You can continue
listening to the set station. Internet
Display restriction Internet pages cannot be shown while the
vehicle is in motion. Calling up a website Calling up the carousel view
X
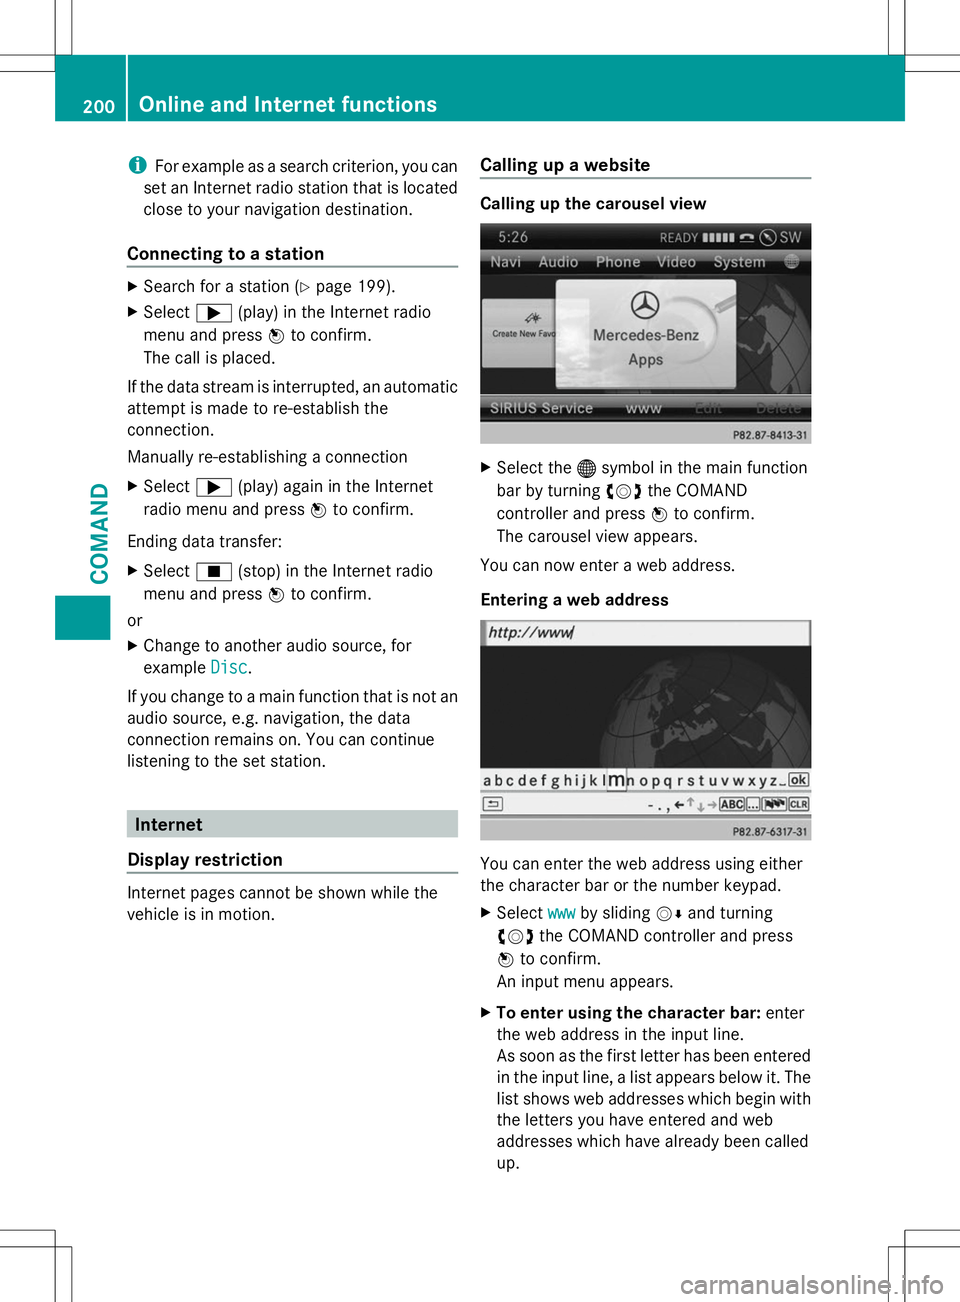
Select the ®symbol in the main function
bar by turning cVdthe COMAND
controller and press Wto confirm.
The carousel view appears.
You can now enter a web address.
Entering a web address You can enter the web address using either
the character bar or the number keypad.
X
Select www wwwby sliding VÆand turning
cVd the COMAND controller and press
W to confirm.
An input menu appears.
X To enter using the character bar: enter
the web address in the input line.
As soon as the first letter has been entered
in the input line, a list appears below it. The
list shows web addresses which begin with
the letters you have entered and web
addresses which have already been called
up. 200
Online and Internet functionsCOMAND
Page 215 of 284

Synchronizing the rolling code
Observe the "Important safety notes"
(Y
page 211).
Your vehicle must be within reach of the
garage door or exterior gate drive. Make sure
that neither your vehicle nor any persons/
objects are present within the sweep of the
door or gate.
X Turn the SmartKey to position 2in the
ignition lock.
X Press the program button of the door or
gate drive (see the door or gate drive
operating instructions, e.g. under
"programming of additional remote
controls").
i Usually, you now have 30seconds to
initiate the next step.
X Press previously programmed button ;,
= or? of the integrated garage door
opener until the door closes.
The rolling code synchronization is then
complete.
Notes on programming the remote
control
Canadian radio frequency laws require a
"break" (or interruption) of the transmission
signals after broadcasting for a few seconds.
Therefore, these signals may not last long
enough for the integrated garage door
opener. The signal is not recognized during
programming. Comparable with Canadian
law, some U.S. garage door openers also
feature a "break".
Proceed as follows:
R if you live in Canada
R if you have difficulties programming the
garage door opener (regardless of where
you live) when using the programming
steps X
Press and hold one of buttons ;to? on
the integrated garage door opener.
After a short time, indicator lamp :lights
up yellow.
X Release the button.
Indicator lamp :flashes yellow.
X Press button Bof garage door remote
control Afor two seconds, then release it
for two seconds.
X Press button Bagain for two seconds.
X Repeat this sequence on button Bof
remote control Auntil indicator lamp :
lights up green.
If indicator lamp :turns red, repeat the
process.
X Continue with the other programming
steps (see above).
Problems when programming
If you are experiencing problems
programming the integrated garage door
opener on the rear-view mirror, take note of
the following instructions:
R Check the transmitter frequency of garage
door drive remote control A. This can
usually be found on the back of the remote
control.
The integrated garage door opener is
compatible with devices that have units
which operate in the frequency range of
280to 433MHz.
R Replace the batteries in garage door
remote control A. This increases the
likelihood that garage door remote control
A will transmit a strong and precise signal
to the integrated garage door opener in the
rear-view mirror.
R When programming, hold remote control
A at varying distances and angles from the
button that you are programming. Try
various angles at a distance between 2and
12 inches (5to 30 cm) or at the same angle
but at varying distances.
R If another remote control for the same
garage door drive is available, repeat the Features
213Stowage and features Z
Page 253 of 284
must first be taught-in to the tire pressure
monitor. If there is a substantial loss of
pressure, the warning threshold for the
warning message is aligned to the reference
values taught-in. Restart the tire pressure
monitor after adjusting the pressure of the
cold tires (Y page 252). The current
pressures are saved as new reference values.
As a result, a warning message will appear if
the tire pressure drops significantly.
The tire pressure monitor does not warn you
of an incorrectly set tire pressure. Observe
the notes on the recommended tire pressure
(Y page 246).
The tire pressure monitor is not able to warn
you of a sudden loss of pressure, e.g. if the
tire is penetrated by a foreign object. In the
event of a sudden loss of pressure, bring the
vehicle to a halt by braking carefully. Avoid
abrupt steering maneuvers.
The tire pressure monitor has a yellow
warning lamp in the instrument cluster for
indicating a pressure loss or malfunction.
Whether the warning lamp flashes or lights up
indicates whether a tire pressure is too low or
the tire pressure monitor is malfunctioning:
R if the warning lamp is lit continuously, the
tire pressure on one or more tires is
significantly too low. The tire pressure
monitor is not malfunctioning.
R if the warning lamp flashes for around a
minute and then remains lit constantly, the
tire pressure monitor is malfunctioning.
i In addition to the warning lamp, a
message appears in the multifunction
display.
Further information can be found on
(Y page 174).
If the tire pressure monitor is malfunctioning,
it may take more than ten minutes for the tire
pressure warning lamp to inform you of the
malfunction by flashing for approximately one
minute and then remaining lit. When the
malfunction has been rectified, the tire
pressure warning lamp goes out after a few
minutes of driving. The tire pressure values indicated by the on-
board computer may differ from those
measured at a gas station with a pressure
gauge. The tire pressures shown by the on-
board computer refer to those measured at
sea level. At high altitudes, the tire pressure
values indicated by a pressure gauge are
higher than those shown by the on-board
computer. In this case, do not reduce the tire
pressures.
The operation of the tire pressure monitor can
be affected by interference from radio
transmitting equipment (e.g. radio
headphones, two-way radios) that may be
being operated in or near the vehicle.
Checking the tire pressure
electronically X
Make sure that the SmartKey is in position
2in the ignition lock (Y page 121).
X Press the =or; button on the
steering wheel to select the Service
Service
menu.
X Press the 9or: button to select
Tire Pressure Tire Pressure .
X Press the abutton.
The current tire pressure of each tire is
shown in the multifunction display.
If the vehicle has been parked for over
20 minutes, the Tire pressure will be Tire pressure will be
displayed after driving a few
displayed after driving a few
minutes minutes message appears.
After a teach-in process, the tire pressure
monitor automatically detects new wheels or
new sensors. As long as a clear allocation of
the tire pressure value to the individual
wheels is not possible, the Tire Pressure Tire Pressure
Monitor Active
Monitor Active display message is shown
instead of the tire pressure display. The tire
pressures are already being monitored. Tire pressure
251Wheels and tires Z