2014 MERCEDES-BENZ SL-CLASS ROADSTER battery
[x] Cancel search: batteryPage 85 of 284

Problem Possible causes/consequences and
M
MSolutions The engine can no
longer be started using
the SmartKey. The on-board voltage is too low.
X
Switch off non-essential consumers, e.g. seat heating or interior
lighting, and try to start the engine again.
If this does not work:
X Check the starter battery and charge it if necessary
(Y page 233).
or
X Jump-start the vehicle (Y page 235).
or
X Consult a qualified specialist workshop. The engine can no
longer be started using
KEYLESS-GO. The
SmartKey is in the
vehicle. The vehicle is locked.
X
Unlock the vehicle and try to start the vehicle again. There is interference from a powerful source of radio waves.
X
Start your vehicle with the SmartKey in the ignition lock. Doors
Important safety notes
G
WARNING
If children are left unsupervised in the vehicle,
they could:
R open the doors, thus endangering other
people or road users.
R get out and disrupt traffic.
R operate the vehicle's equipment.
Additionally, children could set the vehicle in
motion if, for example, they:
R release the parking brake.
R shift the automatic transmission out of
parking position P.
R shift the manual transmission into neutral.
R starting the engine.
There is a risk of an accident and injury.
When leaving the vehicle, always take the
SmartKey with you and lock the vehicle. Never
leave children or animals unattended in the
vehicle. Always keep the SmartKey out of
reach of children. G
WARNING
If children are left unsupervised in the vehicle,
they could:
R open the doors, thus endangering other
people or road users.
R get out and disrupt traffic.
R operate the vehicle's equipment.
Additionally, children could set the vehicle in
motion if, for example, they:
R release the parking brake.
R shifting the automatic transmission out of
park position P
R Start the engine.
There is a risk of an accident and injury.
When leaving the vehicle, always take the
SmartKey with you and lock the vehicle. Never
leave children or animals unattended in the
vehicle. Always keep the SmartKey out of
reach of children. Doors
83Opening and closing Z
Page 91 of 284
X
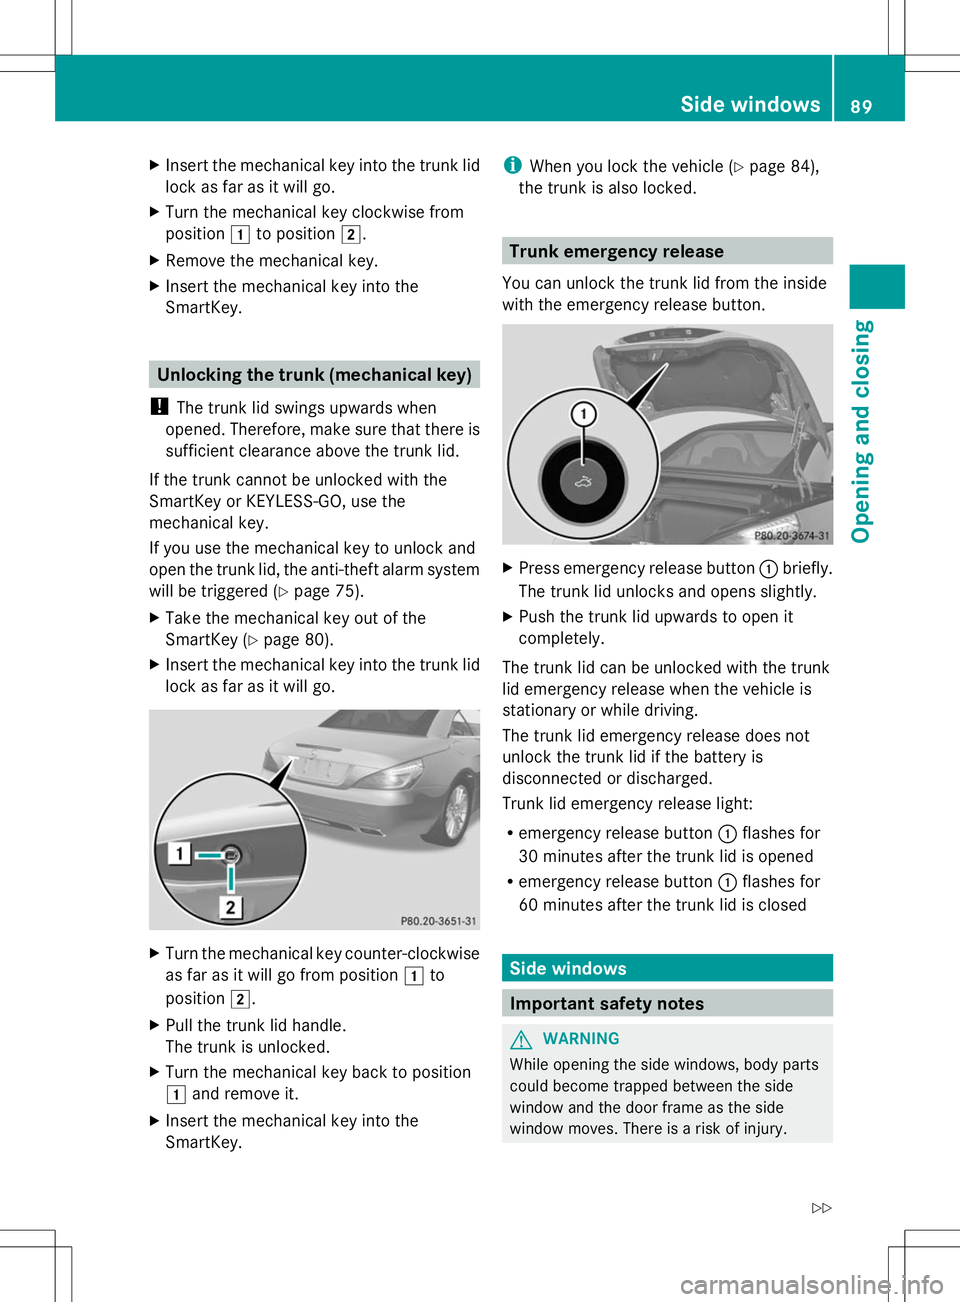
Insert the mechanical key into the trunk lid
lock as far as it will go.
X Turn the mechanical key clockwise from
position 1to position 2.
X Remove the mechanical key.
X Insert the mechanical key into the
SmartKey. Unlocking the trunk (mechanical key)
! The trunk lid swings upwards when
opened. Therefore, make sure that there is
sufficient clearance above the trunk lid.
If the trunk cannot be unlocked with the
SmartKey or KEYLESS-GO, use the
mechanical key.
If you use the mechanical key to unlock and
open the trunk lid, the anti-theft alarm system
will be triggered (Y page 75).
X Take the mechanical key out of the
SmartKey (Y page 80).
X Insert the mechanical key into the trunk lid
lock as far as it will go. X
Turn the mechanical key counter-clockwise
as far as it will go from position 1to
position 2.
X Pull the trunk lid handle.
The trunk is unlocked.
X Turn the mechanical key back to position
1 and remove it.
X Insert the mechanical key into the
SmartKey. i
When you lock the vehicle (Y page 84),
the trunk is also locked. Trunk emergency release
You can unlock the trunk lid from the inside
with the emergency release button. X
Press emergency release button :briefly.
The trunk lid unlocks and opens slightly.
X Push the trunk lid upwards to open it
completely.
The trunk lid can be unlocked with the trunk
lid emergency release when the vehicle is
stationary or while driving.
The trunk lid emergency release does not
unlock the trunk lid if the battery is
disconnected or discharged.
Trunk lid emergency release light:
R emergency release button :flashes for
30 minutes after the trunk lid is opened
R emergency release button :flashes for
60 minutes after the trunk lid is closed Side windows
Important safety notes
G
WARNING
While opening the side windows, body parts
could become trapped between the side
window and the door frame as the side
window moves. There is a risk of injury. Side windows
89Opening and closing
Z
Page 104 of 284

Therefore, do not switch the seat heating on
repeatedly. Driver's and front-passenger seat
The three red indicator lamps in the button
indicate the heating level you have selected.
The system automatically switches down
from level 3to level 2after approximately
eight minutes.
The system automatically switches down
from level 2to level 1after approximately ten
minutes.
The system automatically switches off
approximately 20 minutes after it is set to
level 1.
You can set the distribution of the heated
sections of the seat cushion and backrest
using COMAND. See Digital Operator's
Manual; keyword "Seat balance (seat
heating)".
X Make sure that the SmartKey is in position
1or 2in the ignition lock.
X To switch on: press button:repeatedly
until the desired heating level is set.
X To switch off: press button:repeatedly
until all the indicator lamps go out.
i If the battery voltage is too low, the seat
heating may switch off.
Problems with the seat heating You can find information about this in the
Digital Operator's Manual. Steering wheel
Important safety notes
G
WARNING
You could lose control of your vehicle if you
do the following while driving:
R adjust the driver's seat, head restraint,
steering wheel or mirrors
R fasten the seat belt
There is a risk of an accident.
Adjust the driver's seat, head restraint,
steering wheel and mirror and fasten your
seat belt before starting the engine. G
WARNING
You can no longer steer the vehicle if the
steering wheel lock has been engaged. There
is a risk of an accident.
Always switch off the ignition when towing the
vehicle with a tow cable or a tow bar. Information in the Digital Operator's
Manual
In the Digital Operator's Manual you will find
information on the following topics:
R Adjusting the steering wheel
R EASY-ENTRY/EXIT system Mirrors
In the Digital Operator's Manual you will find
information on the following topics:
R Exterior mirrors
R Automatic anti-glare mirrors
R Parking position for the exterior mirror on
the front-passenger side 102
MirrorsSeats, steering wheel and mirrors
Page 110 of 284
Parking lamps
!
If the battery has been excessively
discharged, the parking lamps or standing
lamps are automatically switched off to
enable the next engine start. Always park
your vehicle safely and sufficiently lit
according to legal standards. Avoid the
continuous use of the Tparking lamps
for several hours. If possible, switch on the
X right or the Wleft standing lamp.
X To switch on: turn the light switch to
T.
The green Tindicator lamp in the
instrument cluster lights up.
Standing lamps
Switching on the standing lamps ensures the
corresponding side of the vehicle is
illuminated.
X To switch on the standing lamps: the
SmartKey is not in the ignition lock or it is
in position 0.
X Turn the light switch to W(left-hand side
of the vehicle) or X(right-hand side of
the vehicle).
Information in the Digital Operator's
Manual In the Digital Operator's Manual you will find
information on the following topics:
R Automatic headlamp mode
R Low-beam headlamps
R Parking lamps
R Standing lamps Combination switch
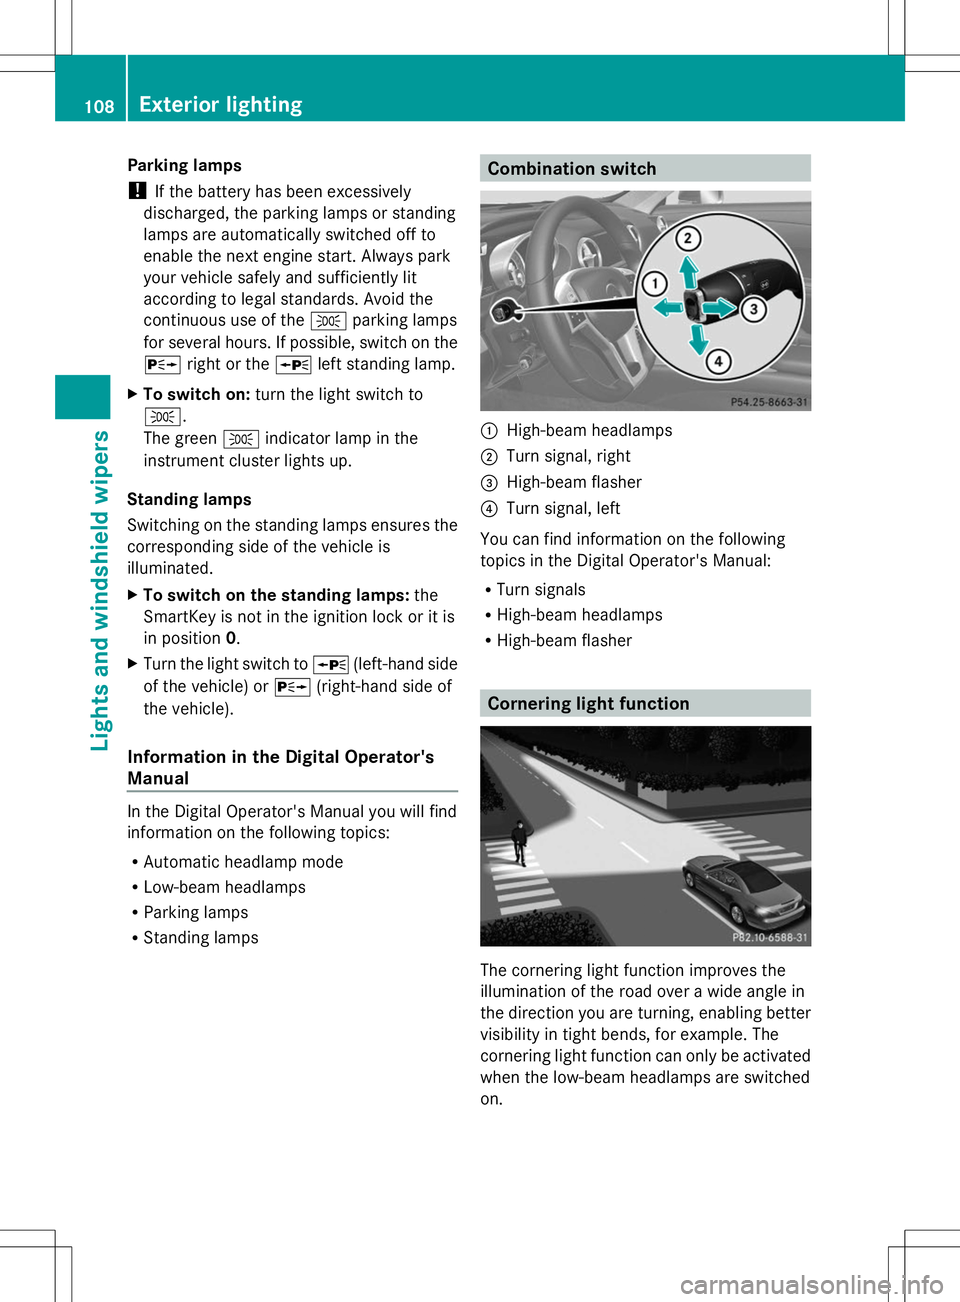
:
High-beam headlamps
; Turn signal, right
= High-beam flasher
? Turn signal, left
You can find information on the following
topics in the Digital Operator's Manual:
R Turn signals
R High-beam headlamps
R High-beam flasher Cornering light function
The cornering light function improves the
illumination of the road over a wide angle in
the direction you are turning, enabling better
visibility in tight bends, for example. The
cornering light function can only be activated
when the low-beam headlamps are switched
on. 108
Exterior lightingLights and windshield wipers
Page 139 of 284
vehicle. It maintains the preset distance to
the vehicle in front.
If DISTRONIC PLUS detects that there is a risk
of a collision, you will be warned visually and
acoustically. DISTRONIC PLUS cannot
prevent a collision without your intervention.
An intermittent warning tone will then sound
and the distance warning lamp will light up in
the instrument cluster. Brake immediately in
order to increase the distance from the
vehicle in front, or take evasive action,
provided it is safe to do so.
If DISTRONIC PLUS detects a faster-moving
vehicle in front, it increases the driving speed.
However, the vehicle is only accelerated up
to the speed you have stored.
Changing lanes
If you wish to change to the passing lane (in
countries where traffic drives on the right, the
passing lane is the left-hand lane),
DISTRONIC PLUS supports you if:
R you are driving faster than 40 mph
(60 km/h)
R DISTRONIC PLUS is maintaining the
distance to a vehicle in front
R you have switched on the corresponding
turn signal
R DISTRONIC PLUS does not detect a danger
of collision
If these conditions are fulfilled, your vehicle
is accelerated. Acceleration will be
interrupted if changing lanes takes too long
or if the distance between your vehicle and
the vehicle in front becomes too small.
Stopping G
WARNING
When leaving the vehicle, even if it is braked
only by DISTRONIC PLUS, it could roll away if:
R there is a malfunction in the system or in
the voltage supply.
R DISTRONIC PLUS has been deactivated
with the cruise control lever, e.g. by a vehicle occupant or from outside the
vehicle.
R the electrical system in the engine
compartment, the battery or the fuses have
been tampered with.
R the battery is disconnected.
R the accelerator pedal has been depressed,
e.g. by a vehicle occupant.
There is a risk of an accident.
If you wish to exit the vehicle, always turn off
DISTRONIC PLUS and secure the vehicle
against rolling away.
Deactivating DISTRONIC PLUS
(Y page 138).
If DISTRONIC PLUS detects that the vehicle
in front is stopping, it brakes your vehicle until
it is stationary.
Once your vehicle is stationary, it remains
stationary and you do not need to depress the
brake. After a time, the electric parking brake
secures the vehicle and relieves the service
brake.
Depending on the specified minimum
distance, your vehicle will come to a standstill
at a sufficient distance behind the vehicle in
front. The specified minimum distance is set
using the control on the cruise control lever.
The electric parking brake automatically
secures the vehicle if DISTRONIC PLUS is
activated and:
R the driver's door is open and the driver's
seat belt is unfastened.
R the engine is switched off, unless it is
automatically switched off by the ECO
start/stop function.
R a system malfunction occurs.
R the power supply is not sufficient.
If a malfunction occurs, then the transmission
may also be shifted into position P
automatically. Driving systems
137Driving and parking Z
Page 142 of 284
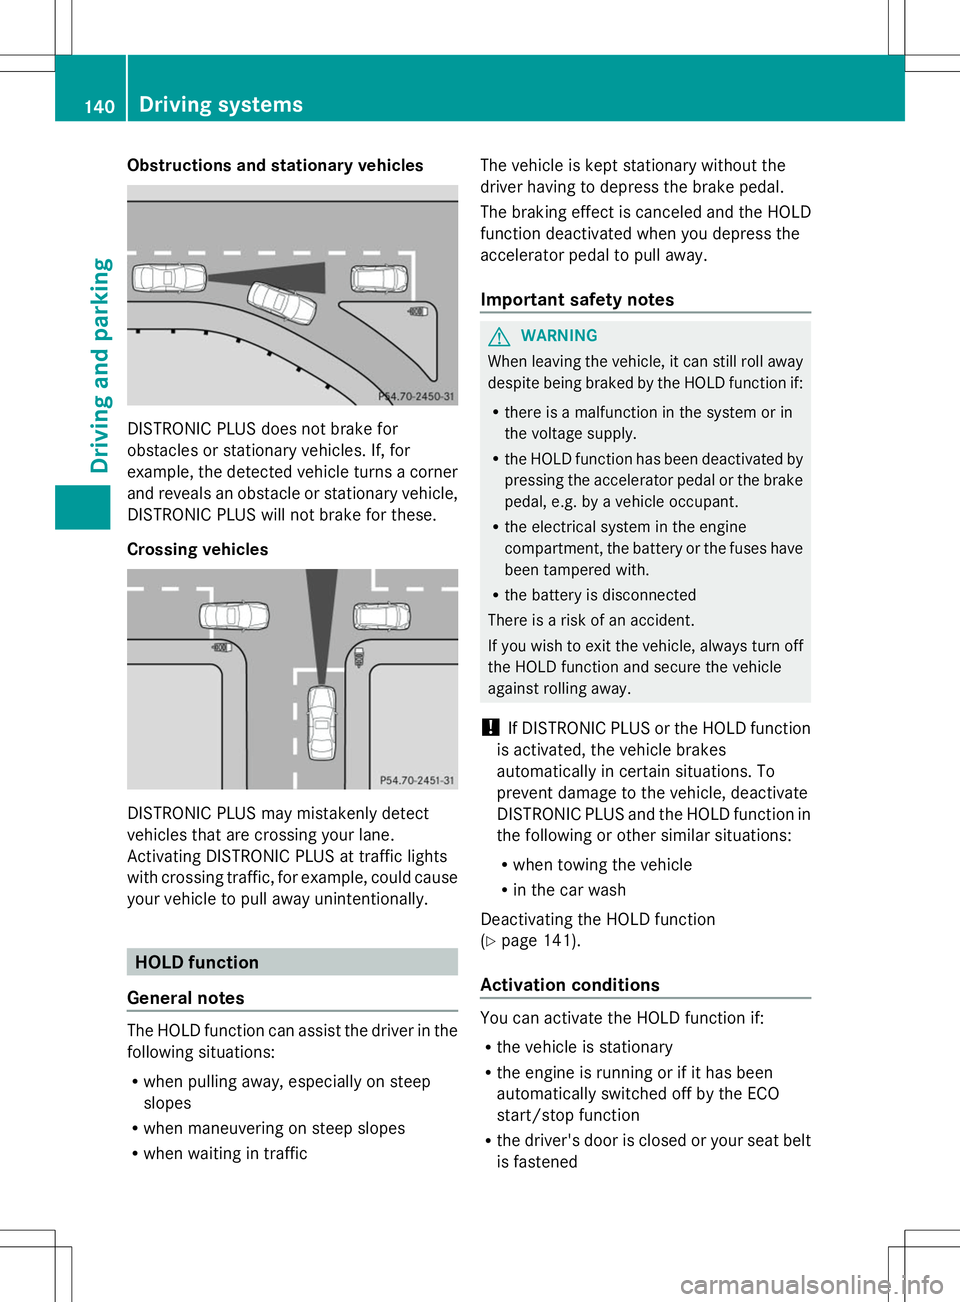
Obstructions and stationary vehicles
DISTRONIC PLUS does not brake for
obstacles or stationary vehicles. If, for
example, the detected vehicle turns a corner
and reveals an obstacle or stationary vehicle,
DISTRONIC PLUS will not brake for these.
Crossing vehicles DISTRONIC PLUS may mistakenly detect
vehicles that are crossing your lane.
Activating DISTRONIC PLUS at traffic lights
with crossing traffic, for example, could cause
your vehicle to pull away unintentionally. HOLD function
General notes The HOLD function can assist the driver in the
following situations:
R when pulling away, especially on steep
slopes
R when maneuvering on steep slopes
R when waiting in traffic The vehicle is kept stationary without the
driver having to depress the brake pedal.
The braking effect is canceled and the HOLD
function deactivated when you depress the
accelerator pedal to pull away.
Important safety notes
G
WARNING
When leaving the vehicle, it can still roll away
despite being braked by the HOLD function if:
R there is a malfunction in the system or in
the voltage supply.
R the HOLD function has been deactivated by
pressing the accelerator pedal or the brake
pedal, e.g. by a vehicle occupant.
R the electrical system in the engine
compartment, the battery or the fuses have
been tampered with.
R the battery is disconnected
There is a risk of an accident.
If you wish to exit the vehicle, always turn off
the HOLD function and secure the vehicle
against rolling away.
! If DISTRONIC PLUS or the HOLD function
is activated, the vehicle brakes
automatically in certain situations. To
prevent damage to the vehicle, deactivate
DISTRONIC PLUS and the HOLD function in
the following or other similar situations:
R when towing the vehicle
R in the car wash
Deactivating the HOLD function
(Y page 141).
Activation conditions You can activate the HOLD function if:
R
the vehicle is stationary
R the engine is running or if it has been
automatically switched off by the ECO
start/stop function
R the driver's door is closed or your seat belt
is fastened 140
Driving systemsDriving and parking
Page 209 of 284

mbrace
Information in the Digital Operator's
Manual In the Digital Operator's Manual you will find
information on the following topics:
R Downloading destinations in COMAND
R Search and Send
R Vehicle remote opening
R Vehicle remote closing
R Stolen vehicle recovery service
R Vehicle remote malfunction diagnosis
R Downloading routes
R Speed alert
R Geo fencing
R Triggering the vehicle alarm
General notes You must have a license agreement to
activate the mbrace service. Make sure that
your system is activated and operational. To
log in, press the ïMB Info call button. If
any of the steps mentioned are not carried
out, the system may not be activated.
If you have questions about the activation,
contact one of the following telephone
hotlines:
R USA: Mercedes-Benz Customer Assistance
Center at
1-800-FOR-MERCedes (1-800-367-6372)
or 1-866-990-9007
R Canada: Customer Service at
1-888-923-8367
Shortly after successfully registering with the
service, a user ID and password will be sent
to you by post.
USA only: you can use this password to log
onto the mbrace area under "Owners Online"
at http://www.mbusa.com .The system is available if:
R
it has been activated and is operational
R the corresponding mobile phone network
is available for transmitting data to the
Customer Center
R a service subscription is available
R the starter battery is sufficiently charged
i Determining the location of the vehicle on
a map is only possible if:
R GPS reception is available.
R the vehicle position can be forwarded to
the Customer Assistance Center.
The mbrace system To adjust the volume during a call, proceed
as follows:
X
Press the WorX button on the
multifunction steering wheel.
or
X Use the volume controller of COMAND.
The system offers various services, e.g:
R Automatic and manual emergency call
R Roadside Assistance call
R MB Info call
USA only: you can find information and a
description of all available features under
"Owners Online" at http://www.mbusa.com.
System self-test After you have switched on the ignition, the
system carries out a self-diagnosis.
A malfunction in the system has been
detected if one of the following occurs:
R
The indicator lamp in the SOS button does
not come on during the system self-test.
R The indicator lamp in the FRoadside
Assistance button does not light up during
self-diagnosis of the system.
R The indicator lamp in the ïMB Info call
button does not light up during self-
diagnosis of the system. Features
207Stowage an d features Z
Page 222 of 284
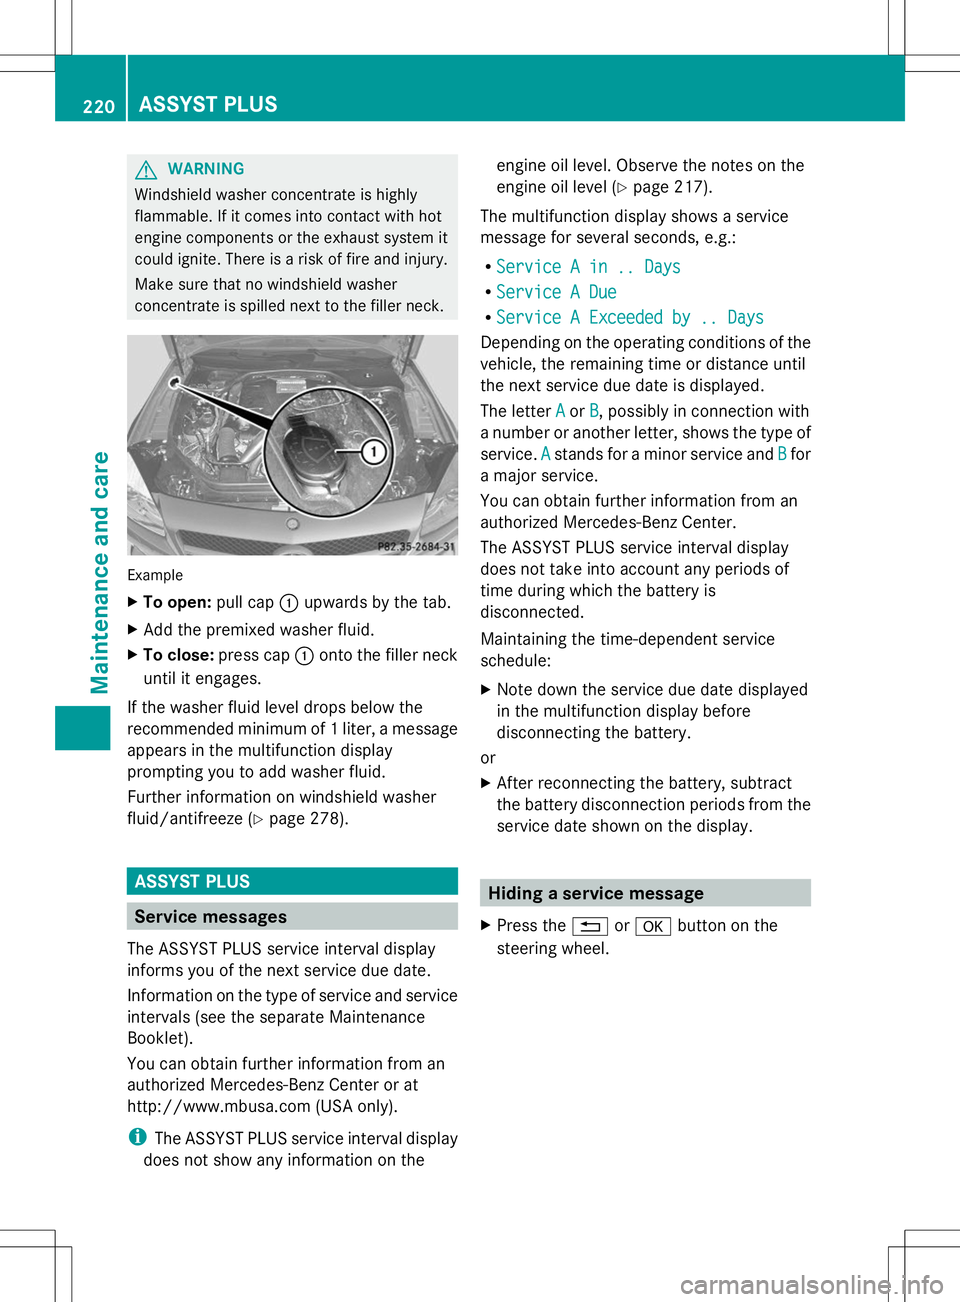
G
WARNING
Windshield washer concentrate is highly
flammable. If it comes into contact with hot
engine components or the exhaust system it
could ignite. There is a risk of fire and injury.
Make sure that no windshield washer
concentrate is spilled next to the filler neck. Example
X
To open: pull cap:upwards by the tab.
X Add the premixed washer fluid.
X To close: press cap :onto the filler neck
until it engages.
If the washer fluid level drops below the
recommended minimum of 1 liter, a message
appears in the multifunction display
prompting you to add washer fluid.
Further information on windshield washer
fluid/antifreeze (Y page 278).ASSYST PLUS
Service messages
The ASSYST PLUS service interval display
informs you of the next service due date.
Information on the type of service and service
intervals (see the separate Maintenance
Booklet).
You can obtain further information from an
authorized Mercedes-Benz Center or at
http://www.mbusa.com (USA only).
i The ASSYST PLUS service interval display
does not show any information on the engine oil level. Observe the notes on the
engine oil level (Y
page 217).
The multifunction display shows a service
message for several seconds, e.g.:
R Service A in .. Days Service A in .. Days
R Service A Due
Service A Due
R Service A Exceeded by .. Days
Service A Exceeded by .. Days
Depending on the operating conditions of the
vehicle, the remaining time or distance until
the next service due date is displayed.
The letter A Aor B
B, possibly in connection with
a number or another letter, shows the type of
service. A Astands for a minor service and B
Bfor
a major service.
You can obtain further information from an
authorized Mercedes-Benz Center.
The ASSYST PLUS service interval display
does not take into account any periods of
time during which the battery is
disconnected.
Maintaining the time-dependent service
schedule:
X Note down the service due date displayed
in the multifunction display before
disconnecting the battery.
or
X After reconnecting the battery, subtract
the battery disconnection periods from the
service date shown on the display. Hiding a service message
X Press the %ora button on the
steering wheel. 220
ASSYST PLUSMaintenance and care