2014 MERCEDES-BENZ SL-Class turn signal
[x] Cancel search: turn signalPage 34 of 274

harman/kardon
®
Logic 7 ®
Surround
Soun dsystem The example describes how to set the
surround sound for radio mode.
X
To switch surround sound on/off: press
the 0006 button.
The radio display appears. You will hear the
last station played on the last waveband.
X Select Sound by sliding
00120008and turning
003C0012003D the COMAND controller and press
0037 to confirm.
X Select surround and press
0037to confirm.
X Select Logic7 ®
On or
Logic7 ®
Off by
turning 003C0012003Dthe COMAND controller and
press 0037to confirm.
Depending on yours election, surround
sound is switched on or off and the menu
is exited.
X To exit the menu without saving: press
the 000A back button or slide 003400120035the
COMAND controller.
i Please note the following: for the
optimum audio experience for all passengers when Logic7
®
is switched on,
the balance should be set to the center of
the vehicle interior.
You will achieve the best sound results by
playing high-quality audio and video DVDs.
MP3 tracks should have abit rate of at least
128 kbit/s.
Surround sound playback does not
function for mono signal sources, such as
for AM radio mode.
If radio receptio nis poor, e.g. in a tunnel,
you should switch off Logic7 ®
, since it may
otherwise switch dynamically between
stereo and mono and cause temporary
sound distortions.
On some stereo recordings, the sound
characteristics may differ from
conventional stereo playback.
i The Logic7 ®
On function creates a
surround sound experience for every
passenger when playing stereo recordings,
for example. It enables optimum playback
of music and films on CD, audio DVD or
video DVD with multichannel audio
formats, such as MLP, dts or Dolby Digital.
This results in sound characteristics like
those intended by the sound engineer
when the original was recorded.
i If you select Logic7 ®
Off , the sound
system plays the tracks as stored on the
medium. Due to the design of the
passenger compartment, an optimum
audio experience cannot be guaranteed for
all passengers. 32
Basic COMAND functionsAt a glance
Page 36 of 274

When playing using an iPod
®
, the bit rate
should also be at least 224 kbit/s.
For optimum playback quality:
XDeactivate the “EQ” setting on the
iPod ®
.
Surround-sound playback does not
function for mono signal sources, such as
the medium wave range (MW) in radio
mode.
On some stereo recordings, the sound
characteristics may differ from
conventional stereo playback. Character entry (telephony)
Example: entering characters
00010021
To switch the character bar to
uppercase/lowercase letters
00020001 To switch the character bar from
uppercase/lowercase letters to
digits
00140013 To change the language of the
character bar
00130015 To delete a character/an entry
The example describes how to enter the
surname “Schulz”.
X Call up the input menu with data fields
(Y page 141).
X Select S and confirm
0037with the COMAND
controller.
S appears in the data field. X
Select c and confirm
0037with the COMAND
controller.
The letter c is added to
S in the data field.
X Repeat the process until the name has
been entered in full.
Other input menu functions:
R Deleting a character/an entry
(Y page 35)
R Switching between upper/lower-case
letters (Y page 35)
R Changing the character set (Y page 35)
R Moving the cursor to the next data field
(Y page 35)
X To enter a phone number: select the
digits one by one in the corresponding data
field by turning 003C0012003Dand sliding 003600120008the
COMAND controller and press 0037to
confirm. Switching dataf
ields 0001
Cursor in the nex tdata field
0002 To store an entry
0014 0039 and 0020symbols to selec tadata field
In the input menu, if you want to enter a first
name after you have entered a surname, for
example, proceed as follows to switch
between the data fields:
Option 1
X Select 0039or0020 in the character bar and
press 0037to confirm.
The input menu shows the data field
selected. 34
Character entry (telephony)At a glance
Page 73 of 274

X
Select My Address by turning
003C0012003Dthe
COMAND controller.
X Irrespective of the option, press 0037to
confirm your selection.
The address entry menu appears again.
"My Address" has been entered.
X To start route calculation: selectStart and press
0037to confirm. Entering
adestination from the list of
last destinations
X To switch to navigation mode: press the
0012 button.
X To show the menu: press0037the COMAND
controller.
X Select Destination in the navigation
system menu bar by turning 003C0012003Dthe
COMAND controller and pressing 0037to
confirm. X
Select From Last Destinations and
press 0037to confirm.
X Select the desired destination by turning
003C0012003D the COMAND controller and press
0037 to confirm.
The address entry menu appears again .The
destination address selected has been
entered.
X To start route calculation: selectStart and press
0037to confirm.
Once the route has been calculated, route
guidance begins (Y page 69). i
“Last destinations” memory
(Y page 107). Entering
adestination usin gthe map
Calling up the map X
To switch to navigation mode: press the
0012 button.
X To show the menu: press0037the COMAND
controller.
X Select Destination in the navigation
system menu bar by turning 003C0012003Dthe
COMAND controlle rand pressing 0037to
confirm. 0001
Current vehicle position
0002 Crosshair
0014 Details of the crosshair position
0013 Map scale selected
X Select Using Map and press
0037to confirm.
You will see the map with acrosshair.
Display 0014depends on the settings selected
in "Map information in the display"
(Y page1 11). You can see the current street
name if the digital map contains the
necessary data, You can see the coordinates
of the crosshair if the geo-coordinate display
is switched on and the GPS signal is strong
enough. Destination input
71Navigation Z
Page 114 of 274

0014
Curren tvehicle position :longitude
coordinates
0013 Number of GPS satellites currently being
used
There must be sufficient GPS reception for all
displays to be shown. If this is not the case,
the display will be grayed out. Height
display 0001may vary from the actual value,
because the navigation system uses the GPS
signals for the calculation.
During the "Move map" function, you will see
the geo-coordinates of the crosshair position.
Height display 0001and number of satellites
used 0013are not displayed. Display switched off
0001
Current map orientation
While moving the map, you will see additional
data, depending on the crosshair position, if
the digital map supports this data. Astreet
name, for example, can be shown here
(Y page 108).
Coordinates on the map X
To show the menu: press0037the COMAND
controller.
X Select Navi in the main function bar by
sliding 00360012and turning 003C0012003Dthe COMAND
controlle rand press 0037to confirm.
X Select Map Settings and press
0037to
confirm.
The map settings menu appears.
X Select Compass On Map and press
0037to
confirm.
Am enu appears. X
Select Never ,
When Off-Road or
When Route Guidance Inactive and press
0037
to confirm.
The selected setting is accepted.
Switching additional information on/
off Switching the topographic map on/off
X
To show the menu: press0037the COMAND
controller.
X Select Navi in the main function bar by
sliding 00360012and turning 003C0012003Dthe COMAND
controller and press 0037to confirm.
X Select Map Settings and press
0037to
confirm.
The map settings menu appears.
X Select Topographic Map and press
0037to
confirm.
Depending on the previous status, switch
the option on 0010or off 0003.
The topographical map uses differen tcolors
to depict elevation. The color key generally
reflects the topography's dominant
vegetation or the ground's perceived color
when seen from the air, for example:
R green (grass) for lowland
R yellow, brown (woodland) for hills
R gray (stone) and white (snow) for
mountains. Example: highway information
Switching highway information on/off112
Map operation and map settingsNavigation
Page 135 of 274

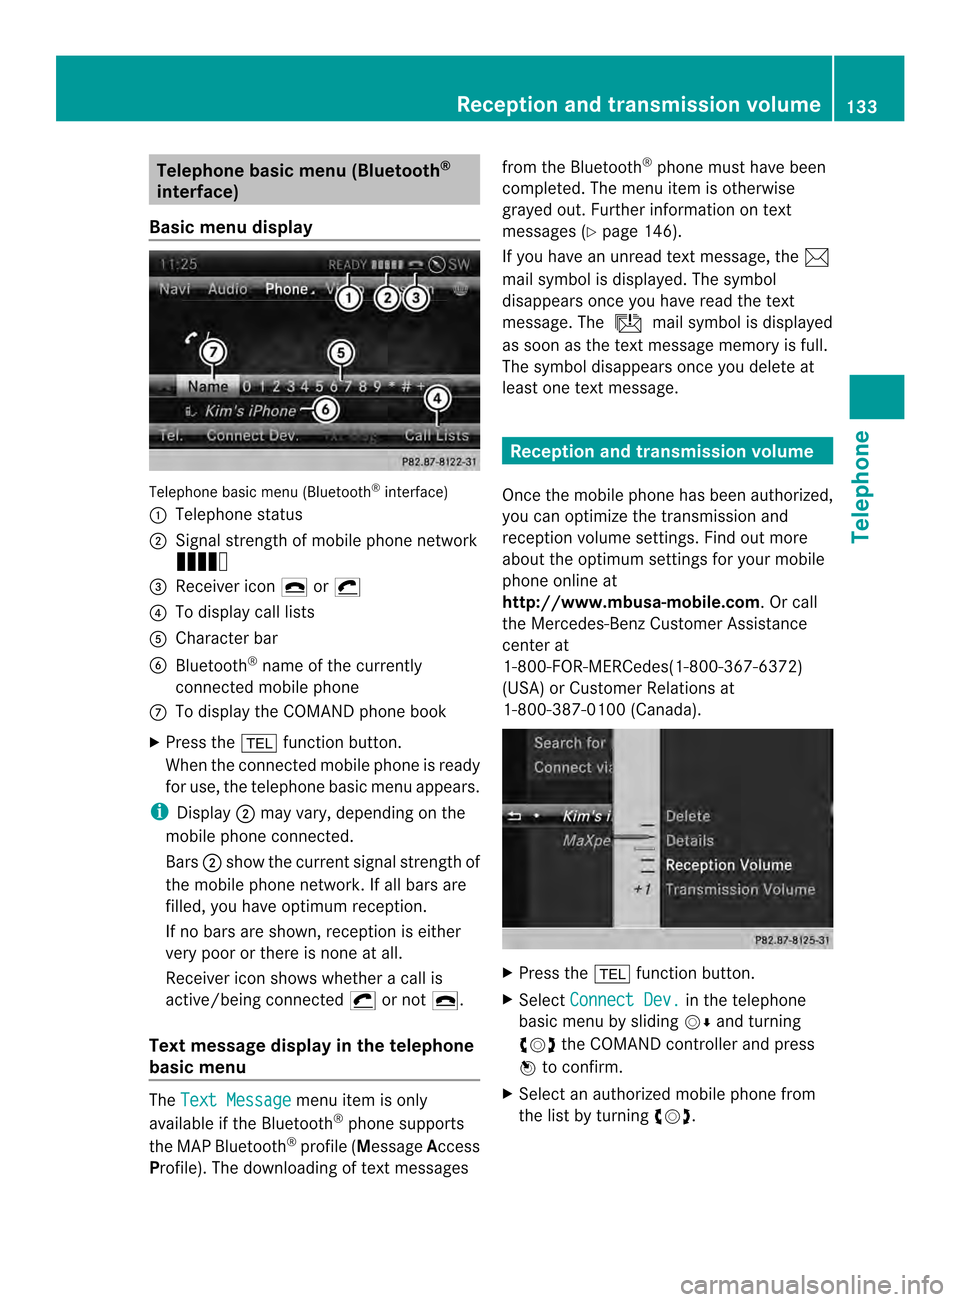
Telephone basic men
u(Bluetooth ®
interface)
Basic menu display Telephone basi
cmenu (Bluetooth ®
interface)
0001 Telephone status
0002 Signal strength of mobile phone network
Ä
0014 Receiver icon 0025or0028
0013 To display call lists
0011 Character bar
0012 Bluetooth ®
name of the currently
connected mobile phone
0005 To display the COMAND phone book
X Press the 000Ffunction button.
When the connected mobile phone is ready
for use, the telephone basic menu appears.
i Display 0002may vary, depending on the
mobile phone connected.
Bars 0002show the curren tsignal strength of
the mobile phone network .Ifall bars are
filled, you have optimum reception.
If no bars are shown, receptio nis either
very poor or there is none at all.
Receiver icon shows whether acall is
active/being connected 0028or not 0025.
Tex tmessage displa yin the telephone
basic menu The
Text Message menu item is only
available if the Bluetooth ®
phone supports
the MAP Bluetooth ®
profile ( Message Access
Profile). The downloading of textm essagesfrom the Bluetooth
®
phone must have been
completed. The menu item is otherwise
grayed out. Further information on text
messages (Y page 146).
If you have an unread textm essage, the0014
mail symbol is displayed. The symbol
disappears once you have read the text
message. The úmail symbol is displayed
as soon as the textm essage memory is full.
The symbol disappears once you delete at
least one textm essage. Reception and transmission volume
Once the mobile phone has been authorized,
you can optimize the transmission and
reception volume settings. Find out more
about the optimum settings for your mobile
phone online at
http://www.mbusa-mobile.com. Or call
the Mercedes-BenzC ustomerAssistance
center at
1-800-FOR-MERCedes(1-800-367-6372)
(USA) or Customer Relations at
1-800-387-0100 (Canada). X
Press the 000Ffunction button.
X Select Connect Dev. in the telephone
basic menu by sliding 00120008and turning
003C0012003D the COMAND controller and press
0037 to confirm.
X Select an authorized mobile phone from
the list by turning 003C0012003D. Reception and transmission volume
133Telephone Z
Page 192 of 274

button again takes you back to FM radio
mode.
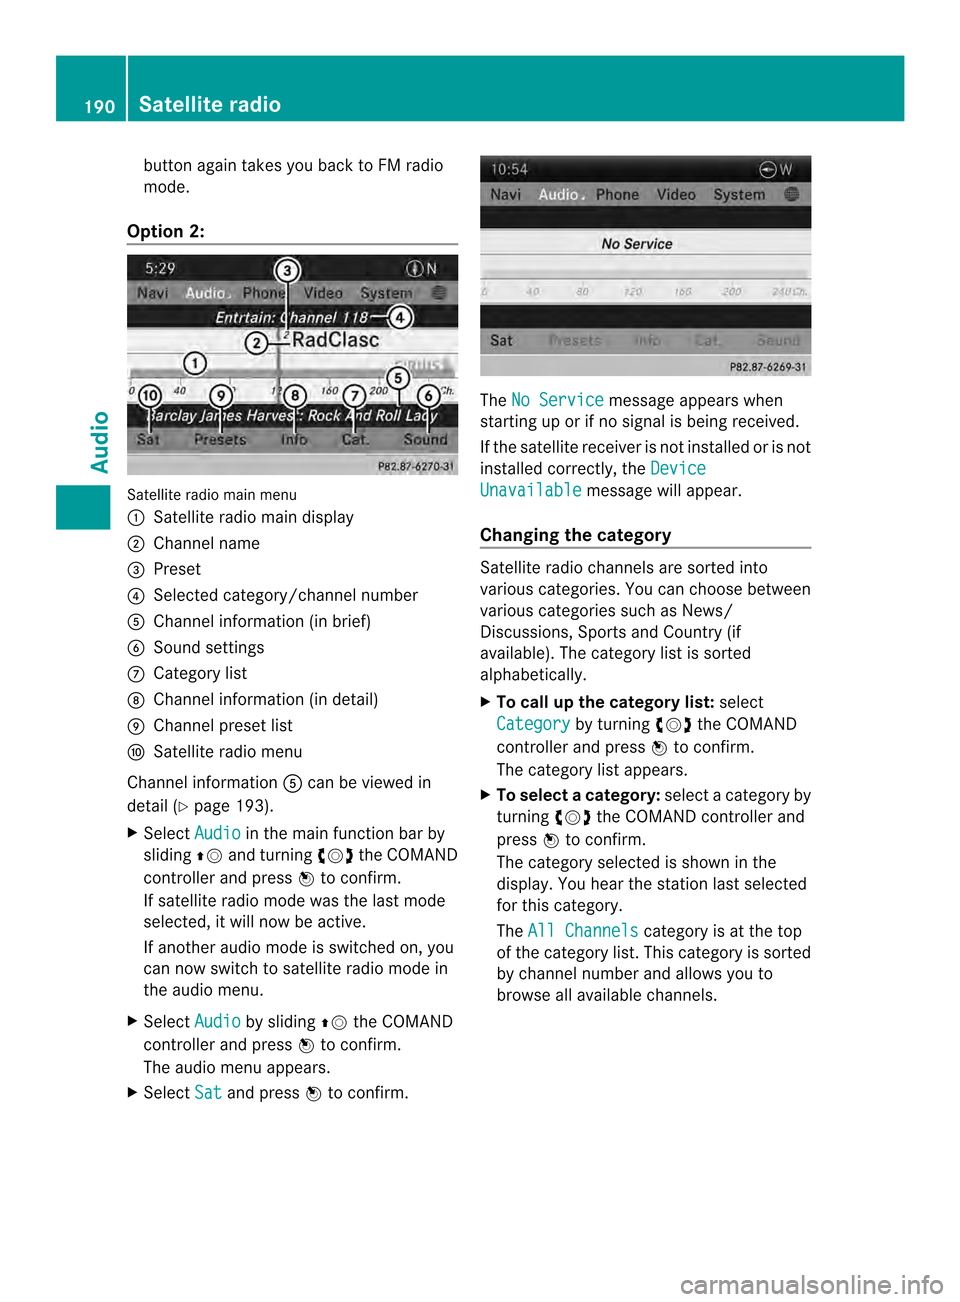
Option 2: Satellite radio main menu
0001
Satellite radio main display
0002 Channel name
0014 Preset
0013 Selected category/channel number
0011 Channel information (in brief)
0012 Sound settings
0005 Category list
0006 Channel information (in detail)
0007 Channel preset list
0008 Satellite radio menu
Channel information 0011can be viewed in
detail ( Ypage 193).
X Select Audio in the main function bar by
sliding 00360012and turning 003C0012003Dthe COMAND
controller and press 0037to confirm.
If satellite radio mode was the last mode
selected, it will now be active.
If another audio mode is switched on, you
can now switch to satellite radio mode in
the audio menu.
X Select Audio by sliding
00360012the COMAND
controller and press 0037to confirm.
The audio menu appears.
X Select Sat and press
0037to confirm. The
No Service message appears when
starting up or if no signal is being received.
If the satellite receiver is not installed or is not
installed correctly, the Device Unavailable message will appear.
Changing the category Satellite radio channels are sorted into
various categories. You can choose between
various categories such as News/
Discussions, Sports and Country (if
available). The category list is sorted
alphabetically.
X To call up the category list: select
Category by turning
003C0012003Dthe COMAND
controller and press 0037to confirm.
The category list appears.
X To select acategory: select a category by
turning 003C0012003Dthe COMAND controller and
press 0037to confirm.
The category selected is show ninthe
display. You hear the station last selected
for this category.
The All Channels category is at the top
of the category list. This category is sorted
by channel number and allows you to
browse all available channels. 190
Satellite radioAudio