2014 MERCEDES-BENZ M-Class door lock
[x] Cancel search: door lockPage 315 of 462
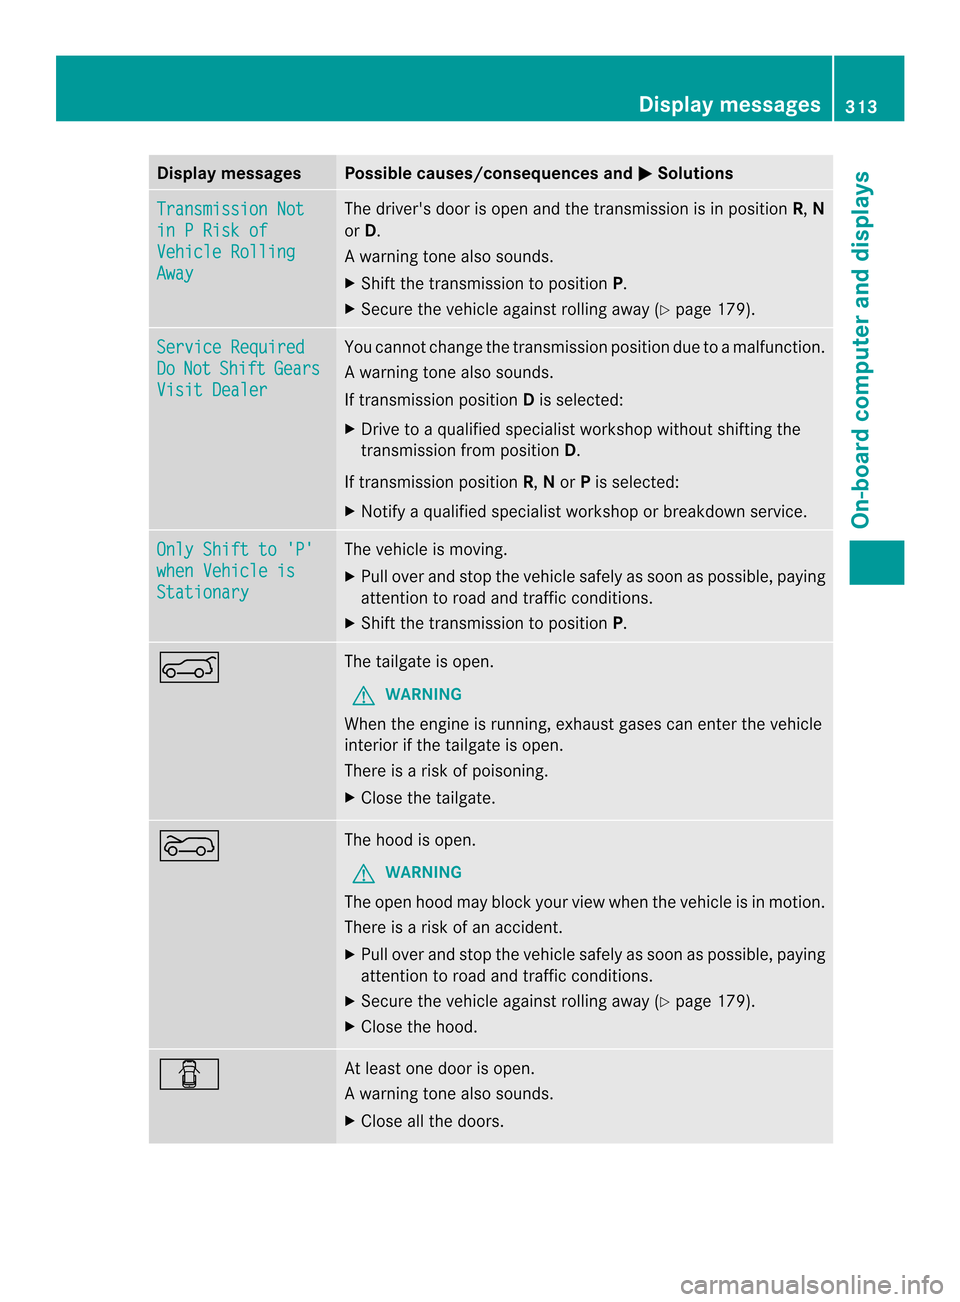
Display messages Possible causes/consequences and
0001 Solutions
Transmission Not
in P Risk of
Vehicle Rolling
Away The driver's doo
ris open and the transmission is in position R,N
or D.
Aw arning tone also sounds.
X Shift the transmission to position P.
X Secure the vehicle against rolling away ( Ypage 179). Service Required
Do Not Shift Gears
Visit Dealer You canno
tchange the transmission position due to a malfunction.
Aw arning tone also sounds.
If transmission position Dis selected:
X Drive to a qualified specialist workshop without shifting the
transmission from position D.
If transmission position R,Nor Pis selected:
X Notify a qualified specialist workshop or breakdown service. Only Shift to 'P'
when Vehicle is
Stationary The vehicle is moving.
X
Pull ove rand stop the vehicle safely as soo nas possible, paying
attention to road and traffic conditions.
X Shift the transmission to position P.0006 The tailgate is open.
G WARNING
When the engine is running, exhaust gases can enter the vehicle
interior if the tailgate is open.
There is a risk of poisoning.
X Close the tailgate. 0007 The hood is open.
G WARNING
The open hood may block your view when the vehicle is in motion.
There is a risk of an accident.
X Pull over and stop the vehicle safely as soon as possible, paying
attention to road and traffic conditions.
X Secure the vehicle against rolling away (Y page 179).
X Close the hood. 0003 At least one door is open.
Aw
arning tone also sounds.
X Close all the doors. Display messages
313On-board computer and displays Z
Page 317 of 462

Display messages Possible causes/consequences and
0001 Solutions
0001
Replace
Key Battery The batteries of the KEYLESS-GO key are discharged.
X Change the batteries ( Ypage 83). 0001
Don't Forget Your
Key This display message is displayed fo
ramaximum of 60 seconds
and is simply a reminder.
You have opened the driver's door with the engine switched off.
The KEYLESS-GO key is not in the ignition lock.
X Remember to take the KEYLESS-GO key with you when you
leave the vehicle. 0001
Key Not Detected
(red display message) The KEYLESS-GO key is not in the vehicle.
Aw
arning tone also sounds.
If the engine is switched off, you can no longer loc kthe vehicle
centrally or start the engine.
X Pull over and stop the vehicle safely as soon as possible, paying
attention to road and traffic conditions.
X Secure the vehicle against rolling away (Y page 179).
X Locate the KEYLESS-GO key. The KEYLESS-GO key is not detected while the engine is running
because there is interference from a strong source of radio waves.
Aw
arning tone also sounds.
X Pull ove rand stop the vehicle safely as soo nas possible, paying
attention to road and traffic conditions.
X Secure the vehicle against rolling away (Y page 179).
X Operate the vehicle with the SmartKey in the ignition lock. 0001
Key Not Detected
(white display
message) The KEYLESS-GO key cannot be detected at present.
X
Change the location of the SmartKey with the KEYLESS-GO
functions in the vehicle.
If the KEYLESS-GO key is still not detected:
X Operate the vehicle with the SmartKey in the ignition lock. 0001
Key Detected in
Vehicle The KEYLESS-GO key has been detected inside the vehicle during
locking.
X
Remove the KEYLESS-GO key from the vehicle. Display messages
315On-board computer and displays Z
Page 318 of 462
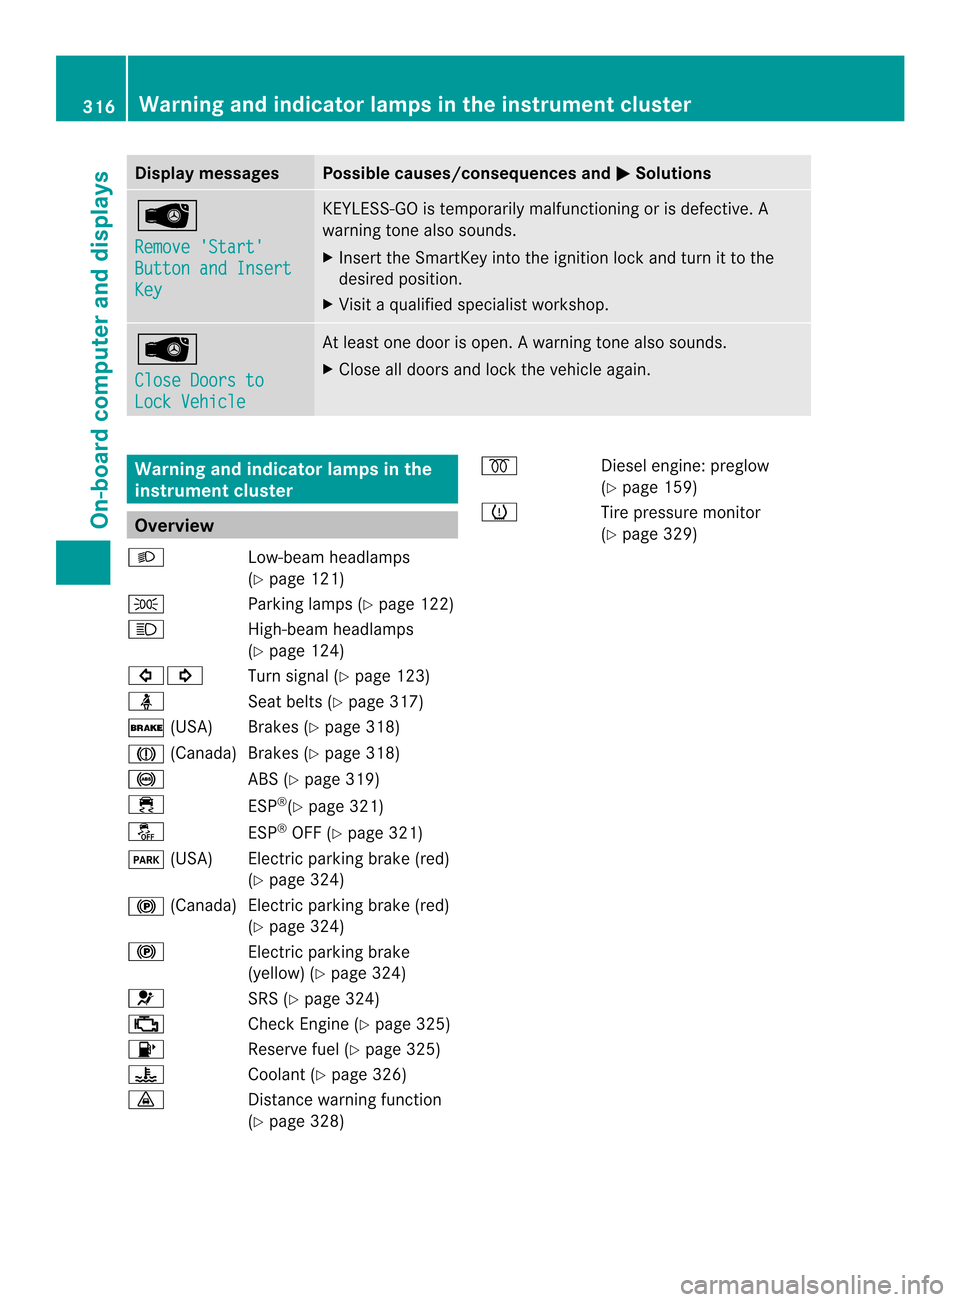
Display messages Possible causes/consequences and
0001 Solutions
0001
Remove 'Start'
Button and Insert
Key KEYLESS-GO is temporarily malfunctioning or is defective. A
warning tone also sounds.
X
Insert the SmartKey into the ignition lock and turn it to the
desired position.
X Visit a qualified specialist workshop. 0001
Close Doors to
Lock Vehicle At leas
tone door is open. Awarning tone also sounds.
X Close all doors and loc kthe vehicle again. Warning and indicator lamps in the
instrument cluster
Overview
000D Low-beam headlamps
(Ypage 121)
0016 Parking lamps (Y page 122)
000C High-beam headlamps
(Ypage 124)
00070006 Turn signal (Ypage 123)
0014 Seat belts (Ypage 317)
0011 (USA) Brakes (Y page 318)
0008 (Canada)B rakes (Ypage 318)
0019 ABS (Ypage 319)
000F ESP®
(Y page 321)
0017 ESP®
OFF (Y page 321)
0007 (USA) Electric parking brake (red)
(Ypage 324)
000C (Canada )Electric parking brake (red)
(Y page 324)
000C Electric parking brake
(yellow) (Y page 324)
001F SRS (Ypage 324)
0010 Check Engine (Y page 325)
0012 Reserve fuel (Ypage 325)
000E Coolant (Ypage 326)
000E Distance warning function
(Ypage 328) 000F
Diesel engine: preglow
(Y page 159)
0012 Tire pressure monitor
(Ypage 329) 316
Warning and indicator lamps in the instrument clusterOn-board computer and displays
Page 334 of 462
Useful information
i This Operator's Manual describes all
models and all standard and optional
equipment of your vehicle available at the
time of publication of the Operator's
Manual. Country-specific differences are
possible. Please note that your vehicle may
not be equipped with all features
described. This also applies to safety-
related systems and functions.
i Read the information on qualified
specialist workshops: (Y page 28).Stowage areas
Loading guidelines
G
WARNING
If objects, luggage or loads are not secured or
not secured sufficiently, they could slip, tip
over or be flung around and thereby hit vehicle
occupants. There is a risk of injury,
particularly in the even tofsudden braking or
a sudde nchange in direction.
Always store objects so that they cannot be
flung around. Secure objects, luggage or
loads against slipping or tipping before the
journey. G
WARNING
Combustion engines emit poisonous exhaust
gases such as carbon monoxide. If the tailgate
is open when the engine is running,
particularly if the vehicle is moving, exhaust
fumes could enter the passenger
compartment. There is a risk of poisoning.
Turn off the engine before opening the
tailgate. Never drive with the tailgate open.
The gross vehicle weight (GVW) is the vehicle
weight including fuel, vehicle tool kit, spare
wheel, installed accessories, vehicle
occupants and luggage/cargo.
The gross load limit and the gross vehicle
weight rating (GVWR) for your vehicle must never be exceeded. The gross load limit and
the GVWR are specified on the vehicle
identification plate on the B-pillar of the
driver's door (Y
page 409).
The load must also be distributed so that the
weight on each axle never exceeds the gross
axle weight rating (GAWR) for the front and
rear axles. The specifications for GVWR and
GAWR are on the vehicle identification plate
on the B-pillar of the driver's door
(Y page 409).
Observe the notes on the loading the vehicle
(Y page 409).
The handling characteristics of a laden
vehicle are dependent on the distribution of
the load within the vehicle. For this reason,
you should observe the following notes when
transporting a load:
R Never exceed the maximum permissible
gross vehicle weight or the gross axle
weight rating of the vehicle (including
occupants).
R The cargo compartment is the preferred
place to carry objects.
R Position heavy loads as far forwards as
possible and as low down in the cargo
compartmenta s possible.
R The load must not protrude above the
upper edge of the seat backrests.
R Always place the load against the rear or
front seat backrests. Make sure that the
seat backrests are securely locked into
place.
R Always place the load behind unoccupied
seats if possible.
R Use the cargo tie down rings and the parcel
nets to transport loads and luggage.
R Use cargo tie-down rings and fastening
materials appropriate for the weight and
size of the load.
R Hook in the cargo net when loading.
R Secure the load with sufficiently strong and
wear-resistant tie-downs. pad sharp edges
for protection. 332
Stowage areasStowage and features
Page 345 of 462
cargo compartment floor, fasten it with the
press studs. Roof carrier
Important safety notes G
WARNING
Whe nyou load the roof, the center of gravity
of the vehicle rises and the driving
characteristics change. If you exceed the
maximum roof load, the driving
characteristics, as well as steering and
braking, will be greatly impaired. There is a
risk of an accident.
Never exceed the maximum roof load and
adjust your driving style.
! Mercedes-Benz recommends that you
only use roof carriers that have been tested
and approved for Mercedes-Benz vehicles.
This helps to prevent damage to the
vehicle.
Position the load on the roof carrier in such
a way that the vehicle will not sustain
damage even when it is in motion.
Depending on the vehicle equipment,
ensure that when the roof carrier is
installed you can:
R raise the sliding sunroof fully
R open the panorama roof with power tilt/
sliding panel fully
R open the tailgate fully
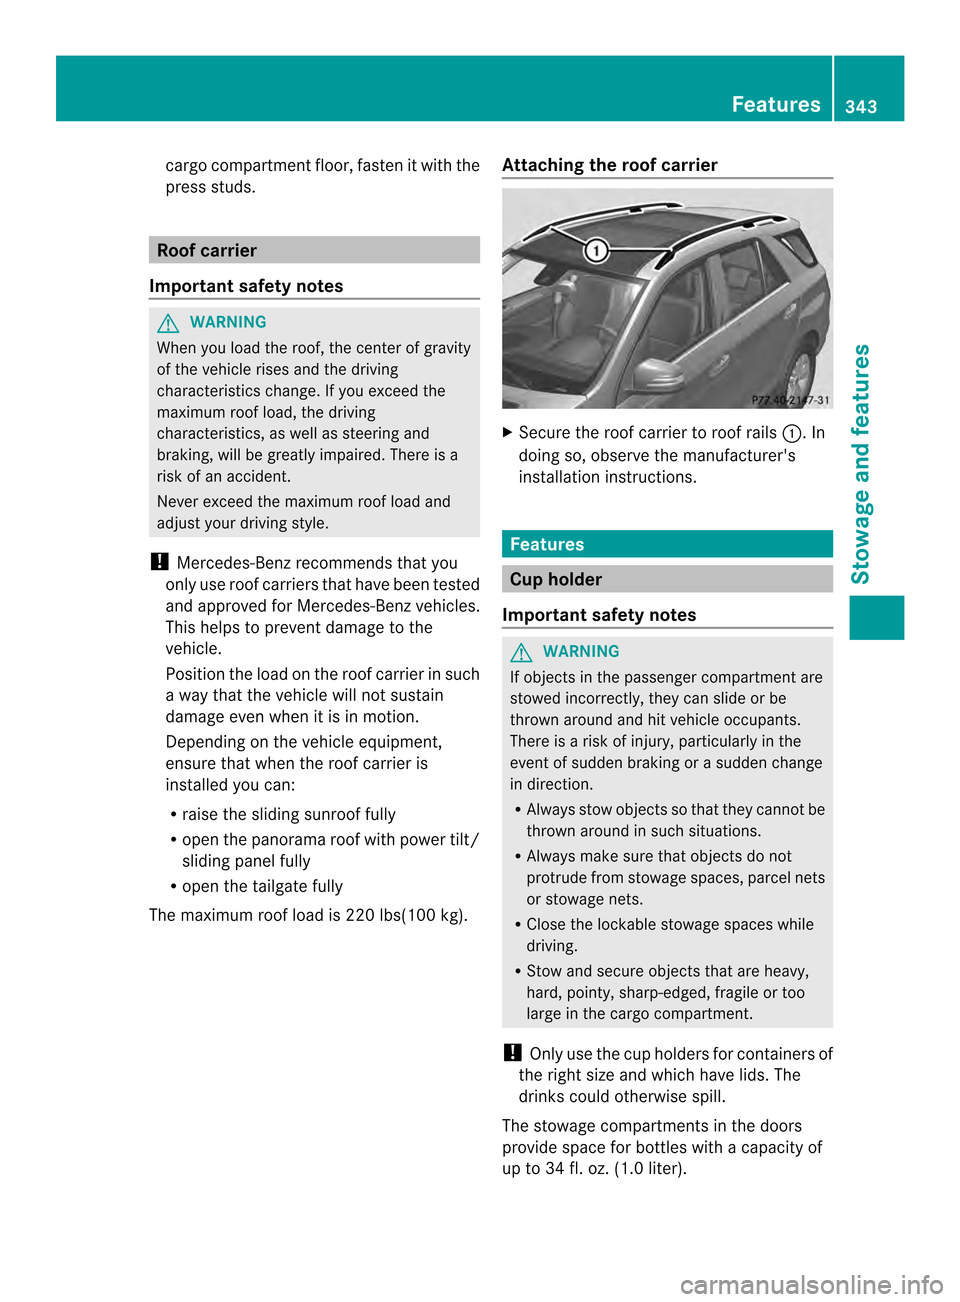
The maximum roof load is 220 lbs(100 kg). Attaching the roof carrier X
Secure the roof carrier to roof rails 0002. In
doing so, observe the manufacturer's
installation instructions. Features
Cup holder
Important safety notes G
WARNING
If objects in the passenger compartment are
stowed incorrectly, they can slide or be
thrown around and hit vehicle occupants.
There is a risk of injury, particularly in the
event of sudden braking or a sudden change
in direction.
R Always stow objects so that they cannot be
thrown around in such situations.
R Always make sure that objects do not
protrude from stowage spaces, parcel nets
or stowage nets.
R Close the lockable stowage spaces while
driving.
R Stow and secure objects that are heavy,
hard, pointy, sharp-edged, fragile or too
large in the cargo compartment.
! Only use the cup holders for containers of
the right size and which have lids. The
drinks could otherwise spill.
The stowage compartments in the doors
provide space for bottles with a capacity of
up to 34 fl. oz. (1.0 liter). Features
343Stowage and features Z
Page 358 of 462

If you own multiple Mercedes-Benz
vehicles with mbrace and activated mbrace
accounts:
If multiple vehicles are registered under the
same e-mail address, the destination will
be sent to all the vehicles.
Vehicle remote opening You can use the vehicle remote opening if you
have unintentionally locked yourv ehicle and
a replacemen tSmartKey is not available.
The vehicle can be opened by the Mercedes-
Benz Customer Assistance Center.
The vehicle can be immediately opened
remotely withi nfour days of the ignition being
turned off. After this time, the remote
unlocking may be delayed by 15 to
60 minutes. After 30 days, the vehicle can no
longer be opened remotely.
X Contact the following service hotlines:
R
USA: Mercedes-Benz Customer
Assistance Center at
1-800-FOR-MERCedes
(1-800-367-6372) or 1-866-990-9007
R Canada: Customer Service at
1-888-923-8367
You will be asked for your password.
X Return to your vehicle at the time agreed
upon with the Mercedes-Benz Customer
Assistance Center.
USA only: alternatively, the vehicle can be
opened via:
R the Internet, under the "Owners Online"
section
R the telephone application (e.g. iPhone ®
,
Blackberry)
To do this, you will need your identification
number and password.
i Vehicle remote opening is only possible if
the corresponding mobile phone network
is accessible. Vehicle remote closing The remote closing feature can be used when
you have forgotten to lock the vehicle and you
are no longer nearby.
The vehicle can then be locked by the
Mercedes-Benz Customer Assistance Center.
The vehicle can be immediately remotely
locked within four days of the ignition being
turned off. After this time, the remote closing
may be delayed by 15 to 60 minutes. After
30 days the vehicle can no longer be closed
remotely.
X
Contact the following service hotlines:
R
USA: Mercedes-Benz Customer
Assistance Center at
1-800-FOR-MERCedes
(1-800-367-6372) or 1-866-990-9007
R Canada: Customer Service at
1-888-923-8367
You will be asked for your password.
The next time you are inside the vehicle and
you switch on the ignition, the Doors Locked Remotely message appears in the
multifunction display.
USA only: alternatively, the vehicle can be
locked via:
R the Internet, under the "Owners Online"
section
R the telephone application (e.g. iPhone ®
,
Blackberry)
To do this, you will need your identification
number and password.
i The vehicle remote closing feature is
available when the relevant mobile phone
network is available and data connection is
possible. 356
FeaturesStowage and features
Page 361 of 462
Triggering the vehicle alarm
With this function, you can trigge
rthe
vehicle's panic alarm via text message. An
alarm sounds and the exterior lighting
flashes. Depending on the setting, the panic
alarm lasts five or ten seconds. Afterwards,
the alarm switches off. Garage door opener
Important safety notes G
WARNING
When you operate or program the garage door
with the integrated garage door opener,
persons in the range of movement of the
garage door can become trapped or struck by
the garage door. There is arisk of injury.
When using the integrated garage door
opener, always make sure that nobody is
within the range of movement of the garage
door. G
WARNING
Combustion engines emit poisonous exhaust
gases such as carbo nmonoxide. Inhaling
these exhaust gases leads to poisoning. There
is a risk of fatal injury. Therefore never leave
the engine running in enclosed spaces
without sufficient ventilation.
The HomeLink ®
garage door opener
integrated in the rear-view mirror allows you
to operate up to three different door and gate
systems.
Use the integrated garage door opener only
on garage doors that:
R have safety stop and reverse features and
R meet current U.S. federal safety standards
When programming a garage door opener,
park the vehicle outside the garage.
i Certain garage door drives are
incompatible with the integrated garage
door opener. If you have difficulty
programming the integrated garage door opener, contact an authorized Mercedes-
Benz Center.
Alternatively, you can call the following
telephone assistance services:
R
USA: Mercedes-Benz Customer
Assistance Center at
1-800-FOR-MERCedes
R Canada: Customer Service at
1-800-387-0100
R HomeLink ®
hotline 1-800-355-3515
(free of charge)
More information on HomeLink ®
and/or
compatible products is also available
online at http://www.homelink.com.
i Notes on the declaration of conformity
(Y page 27).
USA: FCC ID: CB2HMIHL4
Canada: IC: 279B-HMIHL4
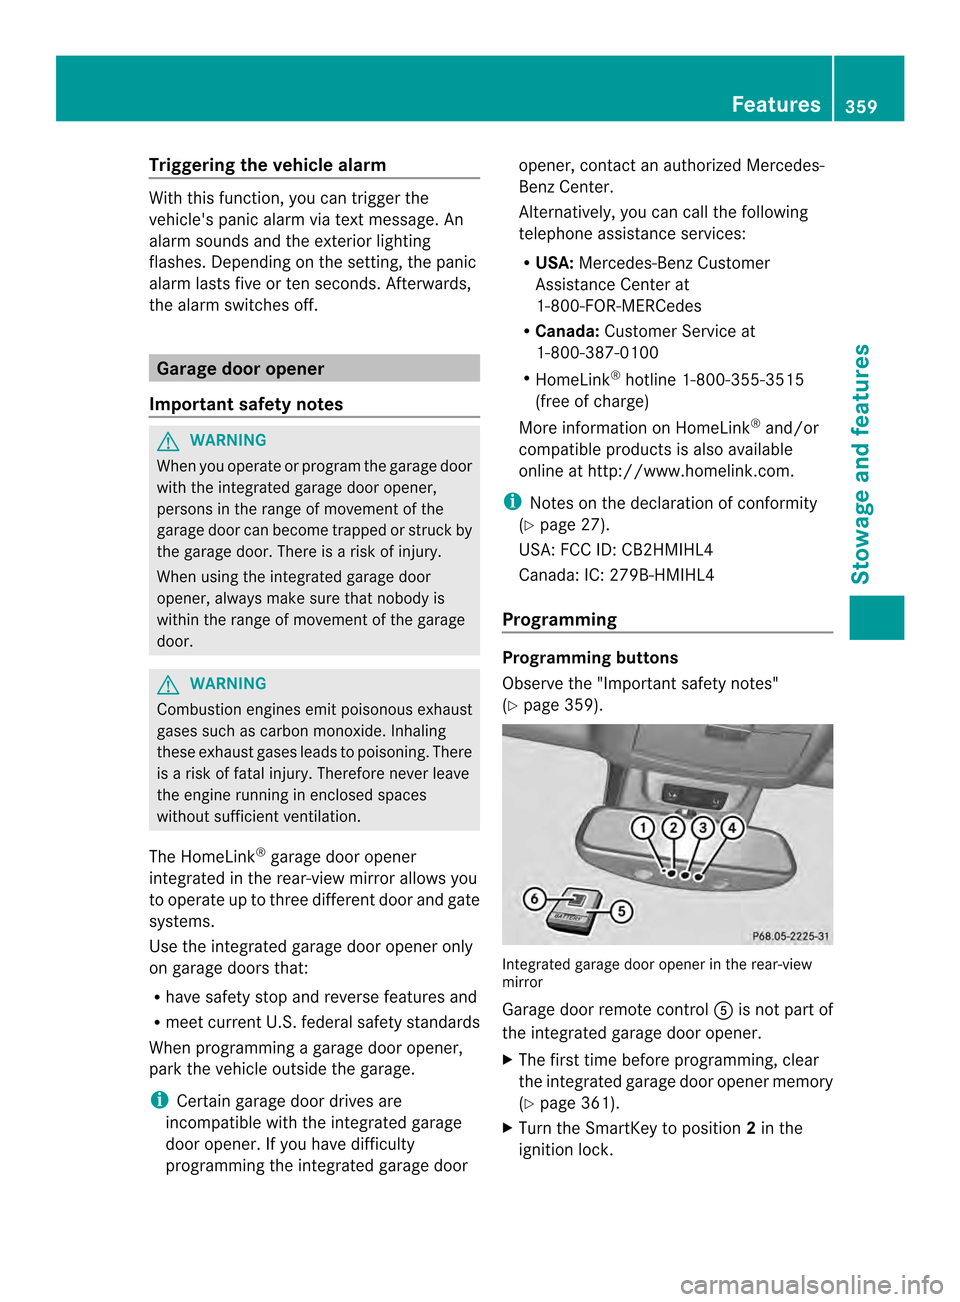
Programming Programming buttons
Observe the "Important safety notes"
(Y
page 359). Integrated garage door opener in the rear-view
mirror
Garage door remote control
0020is not part of
the integrated garage door opener.
X The first time before programming, clear
the integrated garage door opener memory
(Y page 361).
X Turn the SmartKey to position 2in the
ignition lock. Features
359Stowage and features Z
Page 362 of 462

X
Press and hold one of buttons 0003to0022 on
the integrated garage door opener.
After a short time, indicator lamp 0002lights
up yellow.
i Indicator lamp 0002lights up yellow as soon
as button 0003,0023or0022 is programmed for
the first time. If the selected button has
already been programmed, indicator
lamp 0002will only light up yellow after ten
seconds have elapsed.
X Release button 0003,0023or0022. Indicator
lamp 0002flashes yellow.
X Point garage door remote control 0020
towards buttons 0003to0022 on the rear-view
mirror at a distance of 2 to 8 inches (5 to
20 cm).
i The required distance between remote
control 0020and the integrated garage door
opener depends on the garage door drive
system. Several attempts might be
necessary. You should test every position
for at least 25 seconds before trying
another position.
X Press and hold button 0021on remot econtrol
0020 until indicator lamp 0002lights up green.
If indicator lamp 0002lights up green or
flashes, then programming has been
successful.
X Release button 0021on remote control 0020for
the garage door drive system.
X If indicator lamp 0002lights up red: repeat
the programming procedure for the
corresponding button on the rear-view
mirror. When doing so, vary the distance
between remote control 0020and the rear-
view mirror.
i If the indicator lamp flashes green after
successful programming, the garage door
system is using a rolling code. After
programming, you must synchronize the
garage door opener integrated in the rear-
view mirror with the receiver of the garage
door system. Synchronizing the rolling code
Observe the "Important safety notes"
(Y
page 359).
Your vehicle must be within reach of the
garage door or exterior gate drive. Make sure
that neither your vehicle nor any persons/
objects are present within the sweep of the
door or gate.
X Turn the SmartKey to position 2in the
ignition lock.
X Press the program button of the door or
gate drive (see the door or gate drive
operating instructions, e.g. under
"programming of additional remote
controls").
i Usually, you now have 30seconds to
initiate the next step.
X Press previously programmed button 0003,
0023 or0022 of the integrated garage door
opener until the door closes.
The rolling code synchronization is then
complete.
Notes on programming the remote
control
Canadia nradio frequency laws require a
"break" (or interruption) of the transmission
signals after broadcasting for a few seconds.
Therefore, these signals may no tlast long
enough for the integrated garage door
opener. The signal is no trecognized during
programming. Comparable with Canadian
law, some U.S.g arage door openers also
feature a "break".
Proceed as follows:
R if you live in Canada
R if you have difficulties programming the
garage door opener (regardless of where
you live) when using the programming
steps 360
FeaturesStowage and features