2014 MERCEDES-BENZ M-Class rear lights
[x] Cancel search: rear lightsPage 151 of 462

Switching the ZONE function on/off
X
To activate: press the0004button.
The indicator lamp above the 0004button
lights up.
Dual-zone automatic climate control: the
temperature setting for the driver's side is
not adopted for the front-passenger side.
3-zone automatic climate control: the
temperature setting for the driver's side is
not adopted for the front-passenger side
and the rear compartment.
X To deactivate: press the0004button.
The indicator lamp above the 0004button
goes out.
Dual-zone automatic climate control: the
temperature setting for the driver's side is
adopted for the front-passenger side.
3-zone automatic climate control: the
temperature setting for the driver's side is
adopted for the front-passenger side and
the rear compartment. Defrosting the windshield
You can use this function to defrost the
windshield or to defrost the inside of the
windshield and the side windows.
Switch off the "Windshield defrosting"
function as soon as the windshield is clear
again. X
Turn the SmartKey to position 2in the
ignition lock (Y page 157).
X To activate: press the0009button.
The indicator lamp in the 0009button lights
up.
The climate control system switches to the
following functions:
R high airflow
R high temperature
R air distribution to the windshield and
front side windows
R air-recirculation mode off
X To deactivate: press the0009button.
The indicator lamp in the 0009button goes
out. The previously selected settings are
restored. Air-recirculation mode remains
deactivated.
or
X Press the 0006button.
The indicator lamp in the 0009button goes
out. Airflow and air distribution are set to
automatic mode.
or
X Turn controls 0002or0021 clockwise or
counter-clockwise:
Dual-zone automatic climate control
(Y page 139)
3-zone automatic climate control
(Y page 142)
or
X Press the 0019or0018 button. MAX COOL maximum cooling
The MAX COOL function is only available in
vehicles for the USA. Operating the climate control systems
149Climate control
Page 152 of 462

MAX COOL is only operational when the
engine is running.
X
To activate: press the0001button.
The indicator lamp in the button lights up.
X To activate: press off-road button 0001
again.
The indicator lamp goes out. The previously
selected settings are restored.
When you activate MAX COOL, climate
control switches to the following functions:
R maximum cooling
R maximum airflow
R air-recirculation mode on Defrosting the windows
Windows fogged up on the inside X
Activate the 0007/0005cooling with air
dehumidification function.
X Activate automatic mode 0006.
X If the windows continue to fog up, activate
the "windshield defrosting" function
(Y page 149).
i You should only select this setting until
the windshield is clear again.
Windows fogged up on the outside X
Press the 0017button repeatedly until the
001C or001B symbol appears in the
display.
i You should only select this setting until
the windshield is clear again. Rear window defroster
Activating/deactivating The rear window defroster has a high current
draw. You should therefore switch it off as
soon as the rear window is clear. Otherwise,
the rear window defroster switches off
automatically after several minutes.
If the battery voltage is too low, the rear
window defroster may switch off.
X
Turn the SmartKey to position 2in the
ignition lock (Y page 157).
X Press the 000Dbutton.
The indicator lamp in the 000Dbutton lights
up or goes out. 150
Operating the climate control systemsClimate control
Page 153 of 462
Problems with the rear window defroster
Problem Possible causes/consequences and
0001 Solutions
The rear window
defroster has
deactivated
prematurely or cannot
be activated. The battery has not been sufficiently charged.
X
Switch off any consumers that are not required, e.g. reading
lamps, interior lighting or the seat heating.
When the battery is sufficiently charged, the rear window
defroster can be activated again. Activating/deactivating air-
recirculation mode
General notes You can deactivate the flow of fresh air if
unpleasant odors are enteringt he vehicle
from outside. The air already inside the
vehicle will then be recirculated.
If you switch on air-recirculation mode, the
windows can fog up more quickly, in
particular at low temperatures. Only use air-
recirculation mode briefly to prevent the
windows from fogging up.
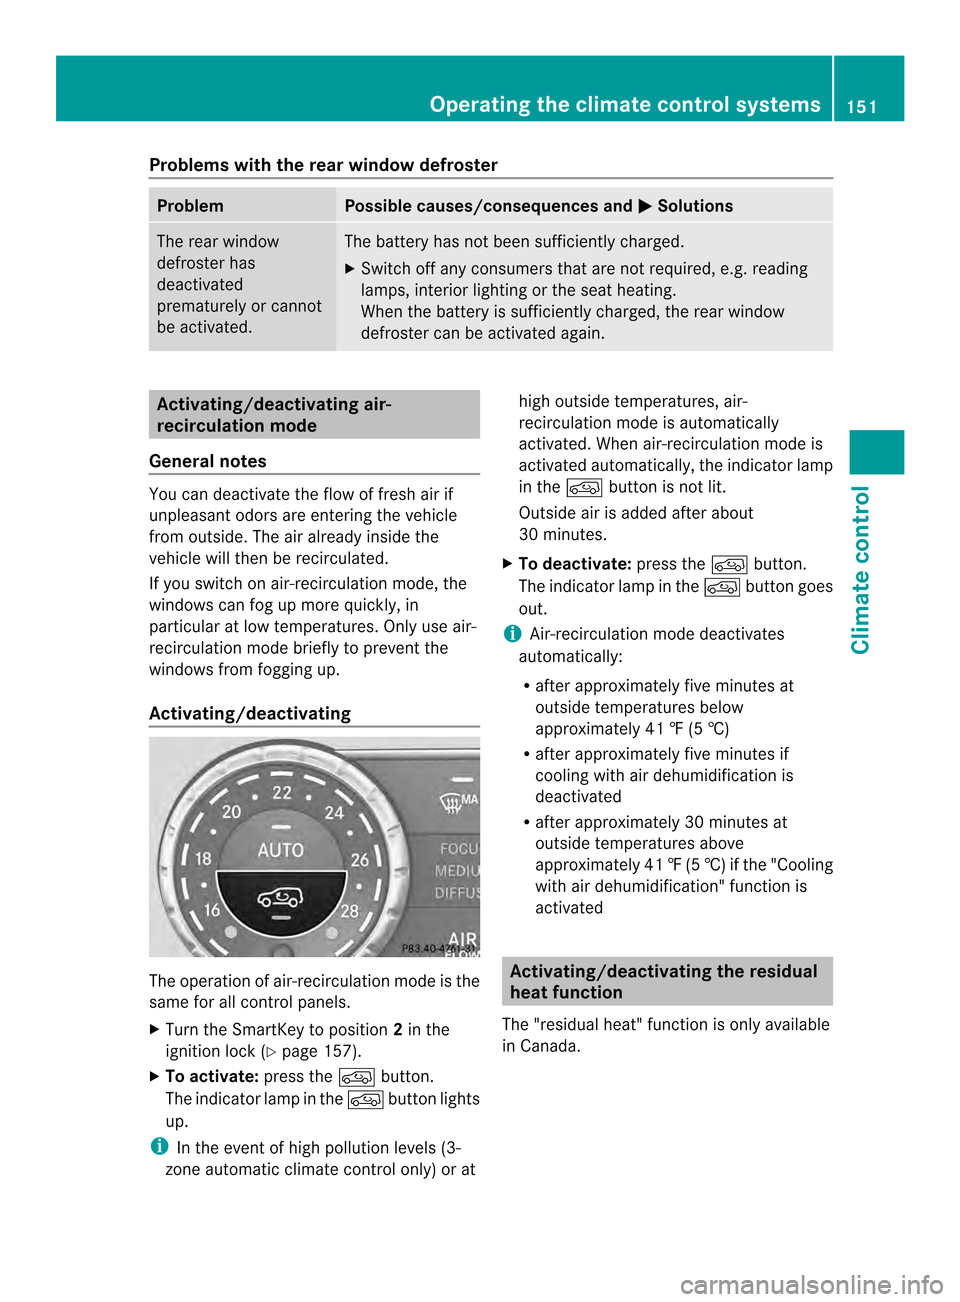
Activating/deactivating The operation of air-recirculation mode is the
same for all control panels.
X Turn the SmartKey to position 2in the
ignition lock (Y page 157).
X To activate: press the0016button.
The indicator lamp in the 0016button lights
up.
i In the event of high pollution levels (3-
zone automatic climate control only) or at high outside temperatures, air-
recirculation mode is automatically
activated. When air-recirculation mode is
activated automatically, the indicator lamp
in the
0016button is not lit.
Outside air is added after about
30 minutes.
X To deactivate: press the0016button.
The indicator lamp in the 0016button goes
out.
i Air-recirculation mode deactivates
automatically:
R after approximately five minutes at
outside temperatures below
approximately 41 ‡ (5 †)
R after approximately five minutes if
cooling with air dehumidification is
deactivated
R after approximately 30 minutes at
outside temperatures above
approximately 41 ‡(5†) if the "Cooling
with air dehumidification" function is
activated Activating/deactivating the residual
heat function
The "residual heat" function is only available
in Canada. Operating the climate control systems
151Climate control
Page 191 of 462
R
Do not jump with the vehicle as this will
interrupt the vehicle's propulsion.
R Always keep the engine running and in gear
when driving on a slope.
R Do not shift the automatic transmission to
transmission position N.
i Do not use the HOLD function when
driving off-road, on steep uphill or downhill
gradients or on slippery or loose surfaces.
The HOLD functio ncannot hold the vehicle
on such surfaces.
Checklist before driving off-road !
If the engine oil warning lamp lights up
while the vehicle is in motion, stop the
vehicle in a safe place as soon as possible.
Chec kthe engine oil level. The engine oil
warning lamp warning must not be ignored.
Continuing the journey while the symbol is
displayed could lead to engine damage.
X Engine oil level: check the engine oil level
and add oil if necessary.
When driving on steep gradients, the
engine oil level must be sufficiently high to
ensure a correct oil supply in the vehicle.
X DEF tank (BlueTEC vehicles): check the
level and top up if necessary (Y page 177).
X Tire-changing tool kit: check that the jack
is working and make sure you have the lug
wrench, a robust tow cable and a folding
spade in the vehicle.
X Wheels and tires: check the tire tread
depth and tire pressure.
X Check for damage and remove any foreign
objects, e.g. small stones, from the
wheels/tires.
X Replace any missing valve caps.
X Replace dented or damaged wheels.
X Rims: dented or bent rims can result in a
loss of tire pressure and damage the tire
bead. Therefore, check your rims before
driving off-road and replace them as
required. Checklist after driving off-road !
If you detect damage to the vehicle after
driving off-road, have the vehicle checked
immediately at a qualified specialist
workshop.
X Deactivate DSR (Y page 246).
X Vehicles with the AIRMATIC package:
lower the vehicle to a ride height suitable
for the road conditions, e.g. to the
highway/high-speed level.
X Cleant he headlamps and rear lights and
check for damage.
X Cleant he front and rear license plates.
X Cleant he wheels/tires with a water jet and
remove any foreign objects.
X Cleant he wheels, wheel housings and the
vehicle underside with a water jet; check
for any foreign objects and damage.
X Check whether twigs or other parts of
plants have become trapped. These
increase the risk of fire and can damage
fuel pipes, brake hoses or the rubber
bellows of the axle joints and propeller
shafts.
X After the trip, examine without fail the
entire undercarriage, wheels, tires, brakes,
bodywork structure, steering, chassis and
exhaust system for damage.
X After driving for extended periods across
sand, mud, gravel, water or in similarly dirty
conditions, have the brake discs, wheels,
brake pads/linings and axle joints checked
and cleaned.
X If you detect strong vibrations after off-road
travel, check for foreign objects in the
wheels and drive train and remove them if
necessary. Foreign objects can disturb the
balance and cause vibrations.
Driving over rough terrain places greater
demands on your vehicle than driving on
normal roads. After driving off-road, check
the vehicle. This allows you to detect damage
promptly and reduce the risk of an accident
to yourself and other road users. Driving tips
189Driving and parking Z
Page 215 of 462
If indicator lamp
0003lights up:
X Press button 0002once.
Second indicator lamp 0023lights up. You
have selected Sport +mode. The vehicle is
lowered by 10 mm.
The AMG Ride Control SPORT + message
appears in the multifunction display.
Comfort mode
In comfort mode, the driving characteristics
of your vehicle are more comfortable. Select
this mode if you prefer a comfortable driving
style. Select comfor tmode also when driving
fast on straight roads, e.g. on straight
stretches of freeway.
X Press button 0002repeatedly until indicator
lamps 0023and 0003go out.
You have selected Comfort mode. The
vehicle is raised by 10 mm compared with
Sport +suspension tuning.
The AMG Ride Control COMFORT message appears in the multifunction
display. PARKTRONIC
Important safety notes PARKTRONIC is an electronic parking aid with
ultrasonic sensors. It indicates visually and
audibly the distance between your vehicle
and an object.
PARKTRONIC is only an aid. It is not a
replacement for your attention to your
immediate surroundings. You are always
responsible for safe maneuvering, parking
and exiting a parking space. When
maneuvering, parking or pulling out of a
parking space, make sure that there are no
persons, animals or objects in the area in
which you are maneuvering.
! When parking, pay particular attention to
objects above or below the sensors, such
as flower pots or trailer drawbars.
PARKTRONIC does no tdetec tsuch objects when they are in the immediate vicinity of
the vehicle. You could damag
ethe vehicle
or the objects.
The sensors may not detect snow and other
objects that absorb ultrasonic waves.
Ultrasonic sources such as an automatic
car wash, the compressed-air brakes on a
truck or a pneumatic drill could cause
PARKTRONIC to malfunction.
PARKTRONIC may not function correctly on
uneven terrain.
PARKTRONIC is activated automatically when
you:
R switch on the ignition
R shift the transmission to position D,Ror N
R release the electric parking brake
PARKTRONIC is deactivated at speeds above
11 mph (18km/h). It is reactivated at lower
speeds.
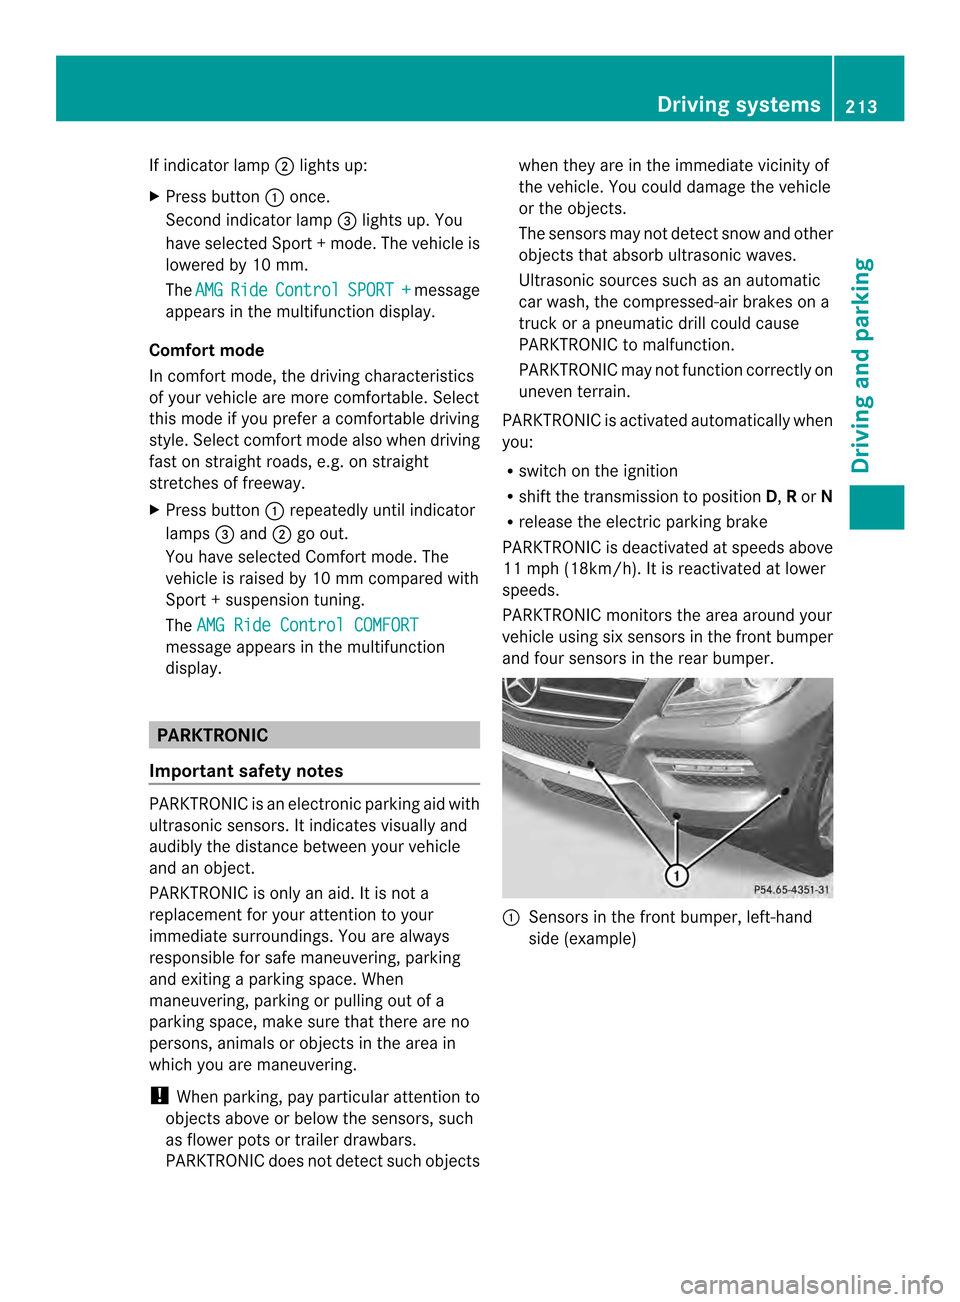
PARKTRONIC monitors the area around your
vehicle using six sensors in the front bumper
and four sensors in the rear bumper. 0002
Sensors in the front bumper, left-hand
side (example) Driving systems
213Driving and parking Z
Page 217 of 462
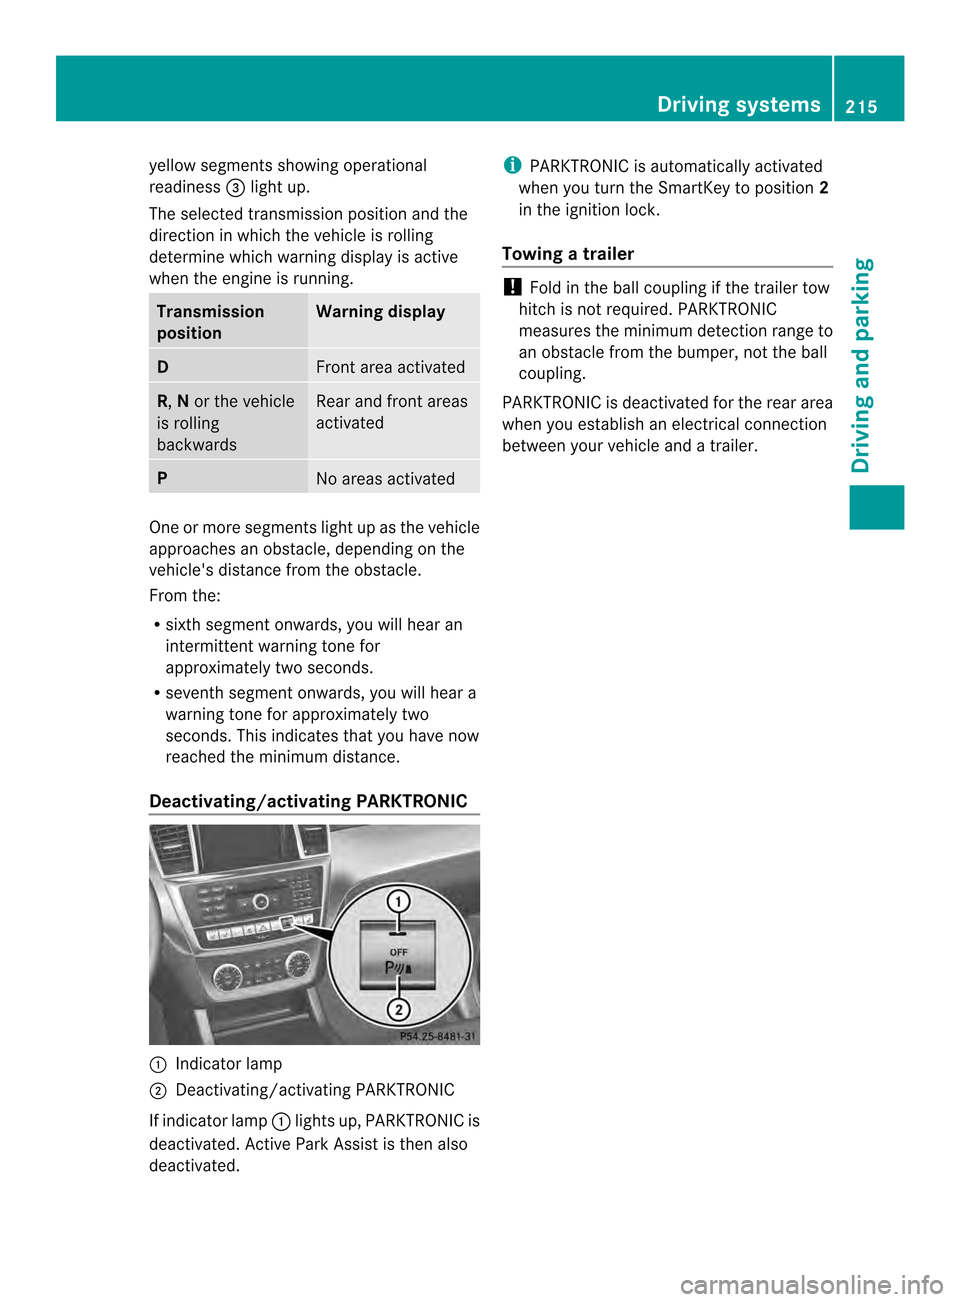
yellow segments showing operational
readiness 0023ligh tup.
The selected transmission position and the
direction in which the vehicle is rolling
determine which warning display is active
when the engine is running. Transmission
position Warning display
D
Front area activated
R,
Nor the vehicle
is rolling
backwards Rear and front areas
activated
P
No areas activated
One or more segments light up as the vehicle
approaches an obstacle, dependin gonthe
vehicle's distance from the obstacle.
From the:
R sixth segment onwards, you will hear an
intermittent warning tone for
approximately two seconds.
R seventh segment onwards, you will hear a
warning tone for approximately two
seconds. This indicates that you have now
reached the minimum distance.
Deactivating/activating PARKTRONIC 0002
Indicator lamp
0003 Deactivating/activating PARKTRONIC
If indicator lamp 0002lights up, PARKTRONIC is
deactivated. Active Park Assist is then also
deactivated. i
PARKTRONIC is automatically activated
when you turn the SmartKey to position 2
in the ignition lock.
Towing atrailer !
Fold in the ball coupling if the trailer tow
hitch is not required .PARKTRONIC
measures the minimu mdetection range to
an obstacle from the bumper, not the ball
coupling.
PARKTRONIC is deactivated for the rear area
when you establish an electrical connection
between your vehicle and a trailer. Driving systems
215Driving and parking Z
Page 222 of 462
Once you have exited the parking space
completely, the steering wheel is moved to
the straight-ahead position. You hear a tone
and the
Park Assist Switched Off message appears in the multifunction
display. You will then have to steer and merge
into traffic on your own. PARKTRONIC is still
available. You can take over the steering,
before the vehicle has exited the parking
space completely. This is useful, for example
when you recognize that it is already possible
to pull out of the parking space.
Canceling Active Parking Assist
X
Stop the movement of the multifunction
steering wheel or steer yourself.
Active Parking Assist will be canceled at
once. The Park Assist Canceled message appears in the multifunction
display.
or
X Press the PARKTRONIC button on the
center console (Y page 215).
PARKTRONIC is switched off and Active
Parking Assist is immediately canceled.
The Park Assist Canceled message
appears in the multifunction display.
Active Parking Assist is canceled
automatically if:
R the electric parking brake is engaged
R transmission position Pis selected
R parking using Active Parking Assist is no
longer possible
R you are driving faster than 6 mph
(10 km/h)
R a wheel spins, ESP ®
intervenes or fails. The
000F warning lamp lights up in the
instrument cluster.
Aw arning tone sounds. The parking symbol
disappears and the multifunction display
shows the Park Assist Canceled message.
If Active Parking Assist is canceled, you must
steer again yourself. Towing
atrailer For vehicles with a trailer tow hitch, the
minimum length for parking spaces is slightly
increased.
If you have attached a trailer to your vehicle,
you should not use Active Parking Assist.
Once the electrical connectio
nis established
between your vehicle and the trailer, Active
Parking Assist is no longer available.
PARKTRONIC is deactivated for the rear area. Rear view camera
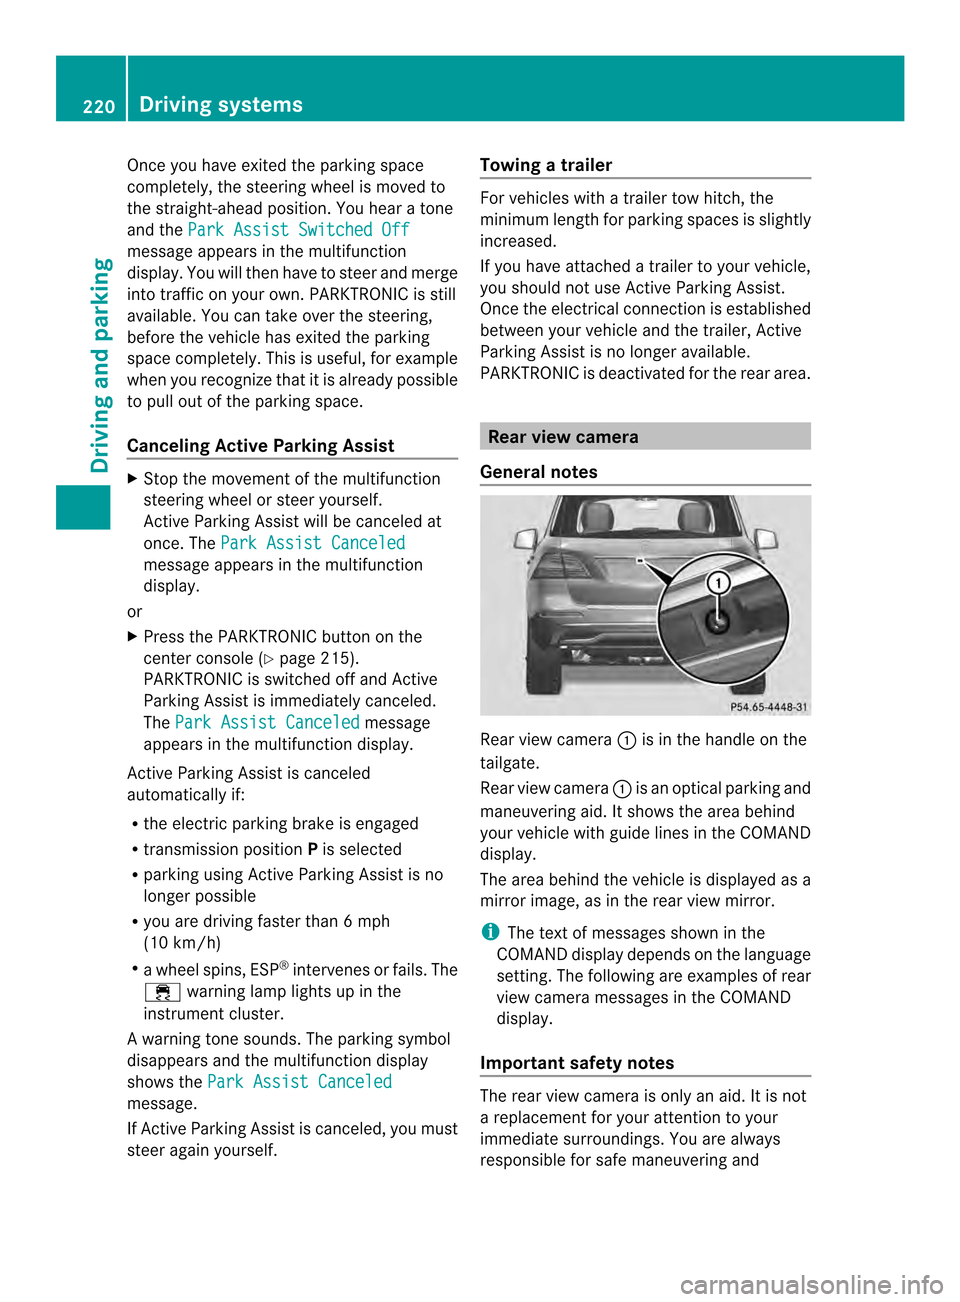
General notes Rear view camera
0002is in the handle on the
tailgate.
Rear view camera 0002is an optical parking and
maneuvering aid. It shows the area behind
your vehicle with guide lines in the COMAND
display.
The area behind the vehicle is displayed as a
mirror image, as in the rear view mirror.
i The text of messages shown in the
COMAND display depends on the language
setting. The following are examples of rear
view camera messages in the COMAND
display.
Important safety notes The rear view camera is only an aid. It is not
a replacement for your attention to your
immediate surroundings. You are always
responsible for safe maneuvering and220
Driving systemsDriving and parking
Page 236 of 462

This device has been approved by the FCC
as a "Vehicular RadarS
ystem". The radar
sensor is intended fo ruse in an automotive
radar system only. Removing, tampering
with, or altering the device will void any
warranties, and is not permitted by the
FCC. Do not tamper with, alter, or use in
any non-approved way.
Any unauthorized modification to this
device could void the user’s authority to
operate the equipment.
Monitoring range of the sensors
In particular, the detection of obstacles can
be impaired if:
R dirt on the sensors or anything else
covering the sensors
R poor visibility, e.g. due to fog, heavy rain,
snow or spray
R narrow vehicles, e.g. motorcycles or
bicycles
R the road has very wide lanes
R the road has narrow lanes
R you are not driving in the middle of the lane
R there are barriers or similarl ane borders
Vehicles in the monitorin grange are then not
indicated. Blind Spo
tAssist monitors the area up to
10 ft (3 m) behind your vehicle and directly
next to your vehicle, as shown in the diagram. If the lanes are narrow, vehicles driving in the
lane beyond the lane next to your vehicle may
be indicated, especially if the vehicles are not
driving in the middle of their lane. This may
be the case if there are vehicles driving at the
inner edge of their lanes.
Due to the nature of the system:
R
warnings may be issued in error when
driving close to crash barriers or similar
solid lane borders.
R the warning is canceled when driving for an
extended period next to long vehicles, such
as trucks.
The two radar sensors for Blind Spot Assist
are integrated into the sides of the rear
bumper. Make sure that the bumper is free of
dirt, ice or slush in the vicinity of the sensors.
The sensors must not be covered, for
example by cycle racks or overhanging loads.
Following a severe impact or in the event of
damage to the bumpers, have the condition
of the radar sensors checked at a qualified
specialist workshop. Blind Spot Assist may
otherwise not work properly.
Indicator and warning display
Blind Spot Assist is not active at speeds below
approximately 20 mph (30 km/h). Vehicles in
the monitoring range are then not indicated. 0002
Yellow indicator lamp/red warning lamp
When Blind Spot Assist is activated, indicator
lamp 0002in the exterior mirrors lights up
yellow at speeds of up to 20 mph (30k m/h).
At speeds above 20 mph (30 km/h), the 234
Driving systemsDriving and parking