2014 MERCEDES-BENZ M-Class headlamp
[x] Cancel search: headlampPage 133 of 462

X
Align housing cover 0002and turn it
clockwise until it engages.
X Replace the cove rinthe front wheel
housing (Y page 130).
High-beam headlamps (halogen
headlamps) X
Switch off the lights.
X Open the hood.
X Turn housing cover 0002counter-clockwise
and pull it out.
X Pull lever 0023upwards and remove bulb
holder 0003.
X Take the bulb out of bulb holder 0003.
X Insert the new bulb into bulb holder 0003.
X Simultaneously press bulb holder 0003and
pull lever 0023downwards.
X Align housing cover 0002and turn it
clockwise until it engages.
Parking lamps/standing lamps
(halogen headlamps) X
Switch off the lights.
X Open the hood.
X Turn housing cover 0002counter-clockwise
and pull it out.
X Pull out bulb holder 0003.
X Take the bulb out of bulb holder 0003.
X Insert the new bulb into bulb holder 0003.
X Insert bulb holder 0003.
X Align housing cover 0002and turn it
clockwise until it engages.
Side marker lamps X
Remove the cover in the front wheel
housing (Y page 130).
X Turn cap 0003counter-clockwise and remove
it.
X Pull out bulb holder 0002.
X Take the bulb out of bulb holder 0002.
X Insert the new bulb into bulb holder 0002.
X Insert bulb holder 0002.
X Align cap 0003and turn it clockwise until it
engages.
X Replace the cover in the front wheel
housing (Y page 130). Replacing bulbs
131Lights and windshield wipers Z
Page 191 of 462
R
Do not jump with the vehicle as this will
interrupt the vehicle's propulsion.
R Always keep the engine running and in gear
when driving on a slope.
R Do not shift the automatic transmission to
transmission position N.
i Do not use the HOLD function when
driving off-road, on steep uphill or downhill
gradients or on slippery or loose surfaces.
The HOLD functio ncannot hold the vehicle
on such surfaces.
Checklist before driving off-road !
If the engine oil warning lamp lights up
while the vehicle is in motion, stop the
vehicle in a safe place as soon as possible.
Chec kthe engine oil level. The engine oil
warning lamp warning must not be ignored.
Continuing the journey while the symbol is
displayed could lead to engine damage.
X Engine oil level: check the engine oil level
and add oil if necessary.
When driving on steep gradients, the
engine oil level must be sufficiently high to
ensure a correct oil supply in the vehicle.
X DEF tank (BlueTEC vehicles): check the
level and top up if necessary (Y page 177).
X Tire-changing tool kit: check that the jack
is working and make sure you have the lug
wrench, a robust tow cable and a folding
spade in the vehicle.
X Wheels and tires: check the tire tread
depth and tire pressure.
X Check for damage and remove any foreign
objects, e.g. small stones, from the
wheels/tires.
X Replace any missing valve caps.
X Replace dented or damaged wheels.
X Rims: dented or bent rims can result in a
loss of tire pressure and damage the tire
bead. Therefore, check your rims before
driving off-road and replace them as
required. Checklist after driving off-road !
If you detect damage to the vehicle after
driving off-road, have the vehicle checked
immediately at a qualified specialist
workshop.
X Deactivate DSR (Y page 246).
X Vehicles with the AIRMATIC package:
lower the vehicle to a ride height suitable
for the road conditions, e.g. to the
highway/high-speed level.
X Cleant he headlamps and rear lights and
check for damage.
X Cleant he front and rear license plates.
X Cleant he wheels/tires with a water jet and
remove any foreign objects.
X Cleant he wheels, wheel housings and the
vehicle underside with a water jet; check
for any foreign objects and damage.
X Check whether twigs or other parts of
plants have become trapped. These
increase the risk of fire and can damage
fuel pipes, brake hoses or the rubber
bellows of the axle joints and propeller
shafts.
X After the trip, examine without fail the
entire undercarriage, wheels, tires, brakes,
bodywork structure, steering, chassis and
exhaust system for damage.
X After driving for extended periods across
sand, mud, gravel, water or in similarly dirty
conditions, have the brake discs, wheels,
brake pads/linings and axle joints checked
and cleaned.
X If you detect strong vibrations after off-road
travel, check for foreign objects in the
wheels and drive train and remove them if
necessary. Foreign objects can disturb the
balance and cause vibrations.
Driving over rough terrain places greater
demands on your vehicle than driving on
normal roads. After driving off-road, check
the vehicle. This allows you to detect damage
promptly and reduce the risk of an accident
to yourself and other road users. Driving tips
189Driving and parking Z
Page 232 of 462
Warning and display messages in the
multifunction display
X
Activate ATTENTION ASSIST using the on-
board computer (Y page 273).
X If ATTENTION ASSIST is active, it will not
warn you until at least 20 minutes after
you rjourney has begun. You then hear an
intermittent warning tonet wice and the
Attention Assist: Take a Break! message appears in the multifunction
display.
If necessary, take a break.
X Press the 000Bor0007 button to confirm
the message.
On long journeys, take regular breaks in good
time to allow yourself to rest properly. If you
do not take a break and ATTENTION ASSIST
still detects increasing lapses in
concentration, you will be warned again after
15 minutes at the earliest.
ATTENTION ASSIST is reset when you
continue your journey and starts assessing
your tiredness again if:
R you switch off the engine.
R you take off your seat belt and open the
driver's door, e.g .for a change of drivers or
to take a break. Night View Assist Plus
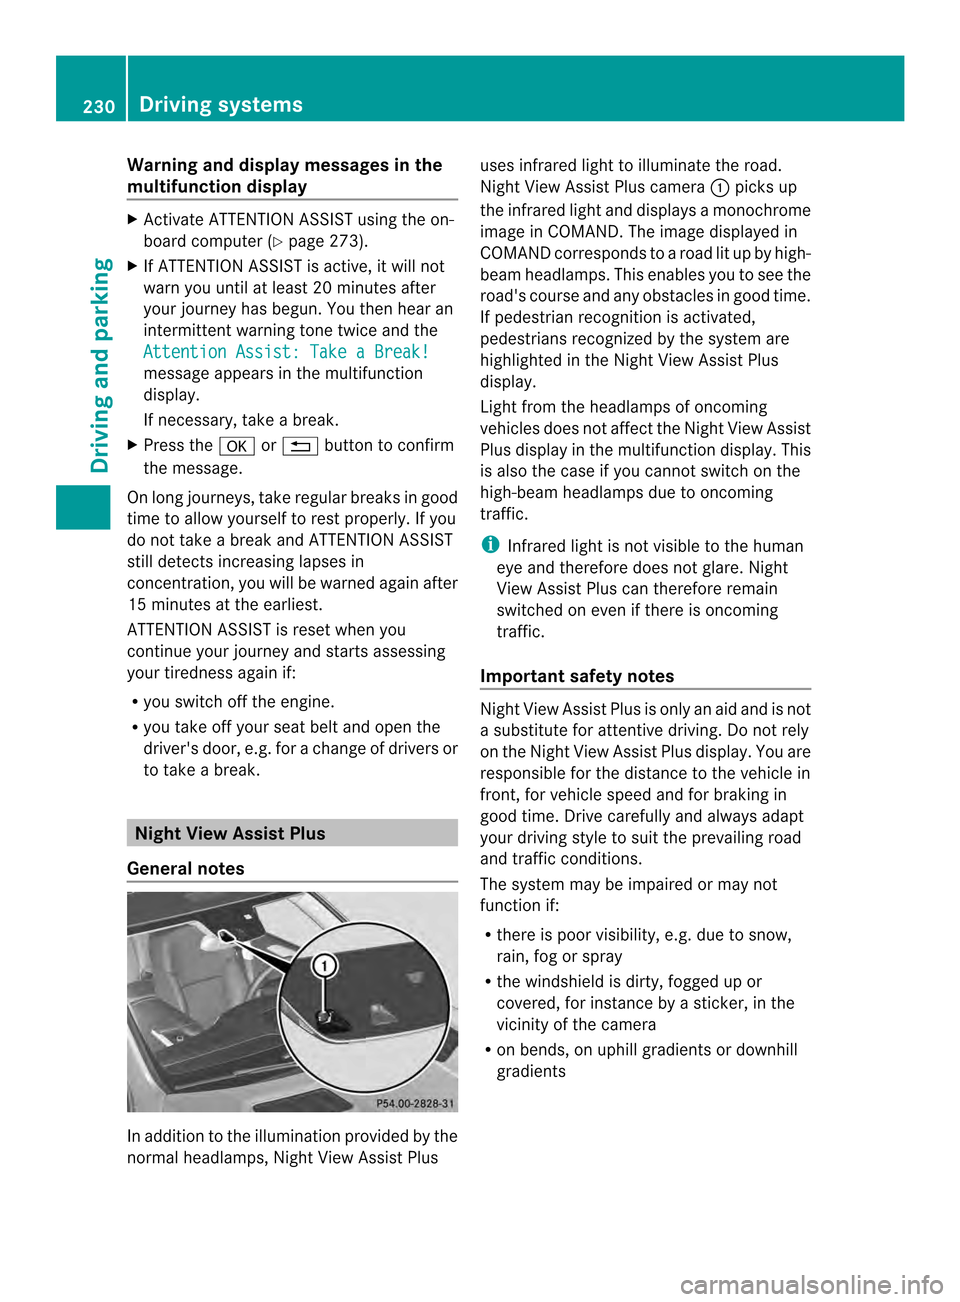
General notes In addition to the illumination provided by the
normal headlamps, Night View Assist Plus uses infrared light to illuminate the road.
Night View Assist Plus camera
0002picks up
the infrared light and displays a monochrome
image in COMAND. The image displayed in
COMAND corresponds to a road lit up by high-
beam headlamps. This enables you to see the
road's course and any obstacles in good time.
If pedestrian recognition is activated,
pedestrians recognized by the system are
highlighted in the Night View Assist Plus
display.
Light from the headlamps of oncoming
vehicles does not affect the Night View Assist
Plus display in the multifunction display .This
is also the case if you cannot switch on the
high-beam headlamps due to oncoming
traffic.
i Infrared light is not visible to the human
eye and therefore does not glare. Night
View Assist Plus can therefore remain
switched on even if there is oncoming
traffic.
Important safety notes Night View Assist Plus is only an aid and is not
a substitute for attentive driving. Do not rely
on the Night View Assist Plus display. You are
responsible for the distance to the vehicle in
front, for vehicle speed and for braking in
good time. Drive carefully and always adapt
your driving style to suit the prevailing road
and traffic conditions.
The system may be impaired or may not
function if:
R
there is poor visibility, e.g. due to snow,
rain, fog or spray
R the windshield is dirty, fogged up or
covered, for instance by a sticker, in the
vicinity of the camera
R on bends, on uphill gradients or downhill
gradients 230
Driving systemsDriving and parking
Page 233 of 462
Pedestrian recognition may be impaired or
inoperative if:
R pedestrians are partially or entirely
obscured by objects, e.g. parked vehicles
R the silhouette of the pedestrian in the Night
View Assist Plus display is incomplete or
interrupted, e.g. by powerful light
reflections
R pedestrians do not contrast adequately
from the background
R pedestrians are not in an upright position,
e.g. sitting, squatting or lying
Activating Night View Assist Plus Activation conditions
You can only activate Night View Assist Plus
if:
R the SmartKey is in position 2in the ignition
lock.
R it is dark.
R the light switch is in the 0006or000D
position.
R reverse gear has not been engaged.
Switching on Night View Assist Plus X
Make sure that COMAND is switched on.
X Press button 0002.
The Night View Assist Plus display appears
in the COMAND display.
You can read about how to adjust the
brightness of the COMAND display in the
COMAND operating instructions. i
The infrared headlamps only switch on
when the vehicle is being driven at speeds
of approximately 6 mph (10 km/h). This
means that you do not have the full visual
range while the vehicle is stationary and
cannot check whether Night View Assist
Plus is working.
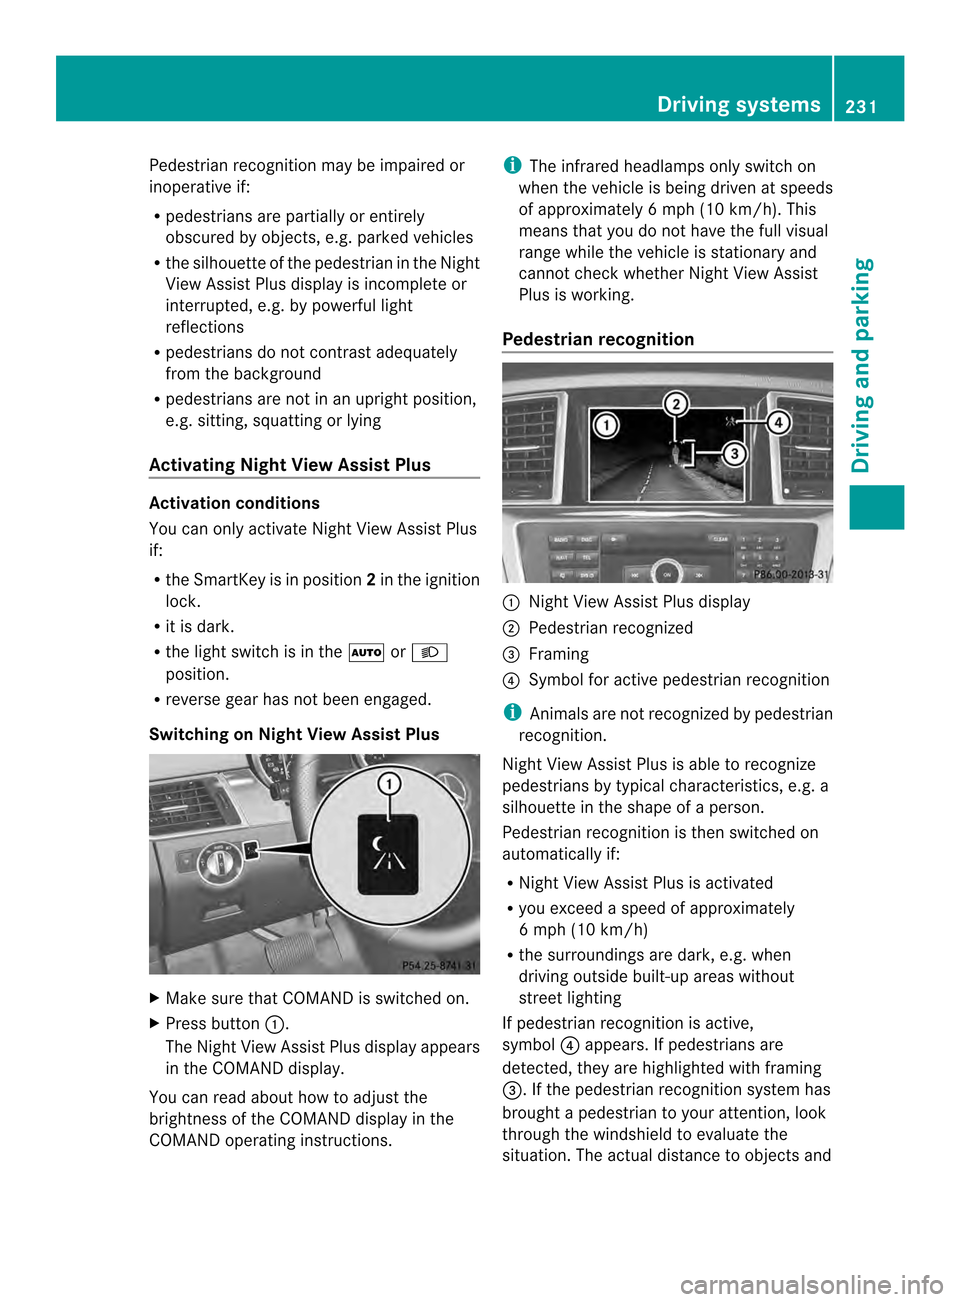
Pedestrian recognition 0002
Night View Assist Plus display
0003 Pedestrian recognized
0023 Framing
0022 Symbol for active pedestrian recognition
i Animals are not recognized by pedestrian
recognition.
Night View Assist Plus is able to recognize
pedestrians by typical characteristics, e.g. a
silhouette in the shape of aperson.
Pedestrian recognition is then switched on
automatically if:
R Night View Assist Plus is activated
R you exceed a speed of approximately
6 mph (10 km/h)
R the surroundings are dark, e.g. when
driving outside built-up areas without
street lighting
If pedestrian recognition is active,
symbol 0022appears. If pedestrians are
detected, they are highlighted with framing
0023.Ift he pedestrian recognition system has
brought a pedestrian to your attention, look
through the windshield to evaluate the
situation. The actual distance to objects and Driving systems
231Driving and parking Z
Page 278 of 462
R
Surround lighting: the exterior lighting
remains lit for 40 seconds after unlocking
with the SmartKey. If you start the engine,
the surround lighting is switched off and
the automatic headlamp mode is activated
(Y page 120).
R Exterior lighting delayed switch-off: the
exterior lighting remains lit for
60 seconds after the engine is switched off.
If you close all the doors and the tailgate,
the exterior lighting goes off after
5s econds.
i Depending on your vehicle's equipment,
when the surround lighting and delayed
switch-off exterior lighting are on, the
following light up:
R Parking lamps
R Daytime running lamps
R Side marker lamps
R Surround lighting in the exterior mirrors
Activating/deactivating the interior
lighting delayed switch-off
If you activate the Interior LightingDelay function, the interior lighting remains
on for 20seconds after you remove the
SmartKey from the ignition lock.
X Press the 0002or0005 button on the
steering wheel to select the Sett. menu.
X Press the 0004or0003 button to select the
Lights submenu.
X Press 000Bto confirm.
X Press 0004or0003 to select the
Interior Lighting Delay function.
When the Interior Lighting Delay function is activated, the vehicle interior is
displayed in red in the multifunction
display.
X Press the 000Bbutton to save the setting. Vehicle submenu Activating/deactivating the automatic
door locking mechanism
If you activate the
Automatic Door Lock function, the vehicle is centrally locked above
a speed of around 9 mph (15 km/h).
X Press the 0002or0005 button on the
steering wheel to select the Sett. menu.
X Press 0004or0003 to select the Vehicle submenu.
X Press 000Bto confirm.
X Press 0004or0003 to select the
Automatic Door Lock function.
When the Automatic Door Lock function
is activated, the vehicle doors are displayed
in red in the multifunction display.
X Press the 000Bbutton to save the setting.
For further information on the automatic
locking feature, see (Y page 88).
Activating/deactivating the acoustic
locking verification signal
If you switch on the Acoustic Lock function,
an acoustic signal sounds when you lock the
vehicle.
X Press the 0002or0005 button on the
steering wheel to select the Sett. menu.
X Press 0004or0003 to select the Vehicle submenu.
X Press 000Bto confirm.
X Press the 0004or0003 button to select the
Acoustic Lock function.
If the Acoustic Lock function is activated,
the 000B symbol in the multifunction
display lights up red.
X Press the 000Bbutton to save the setting.
Activating/deactivating the radar sensor
system
X Press the 0002or0005 button on the
steering wheel to select the Sett. menu.
X Press 0004or0003 to select the Vehicle submenu.276
Menus and submenusOn-board computer and displays
Page 297 of 462
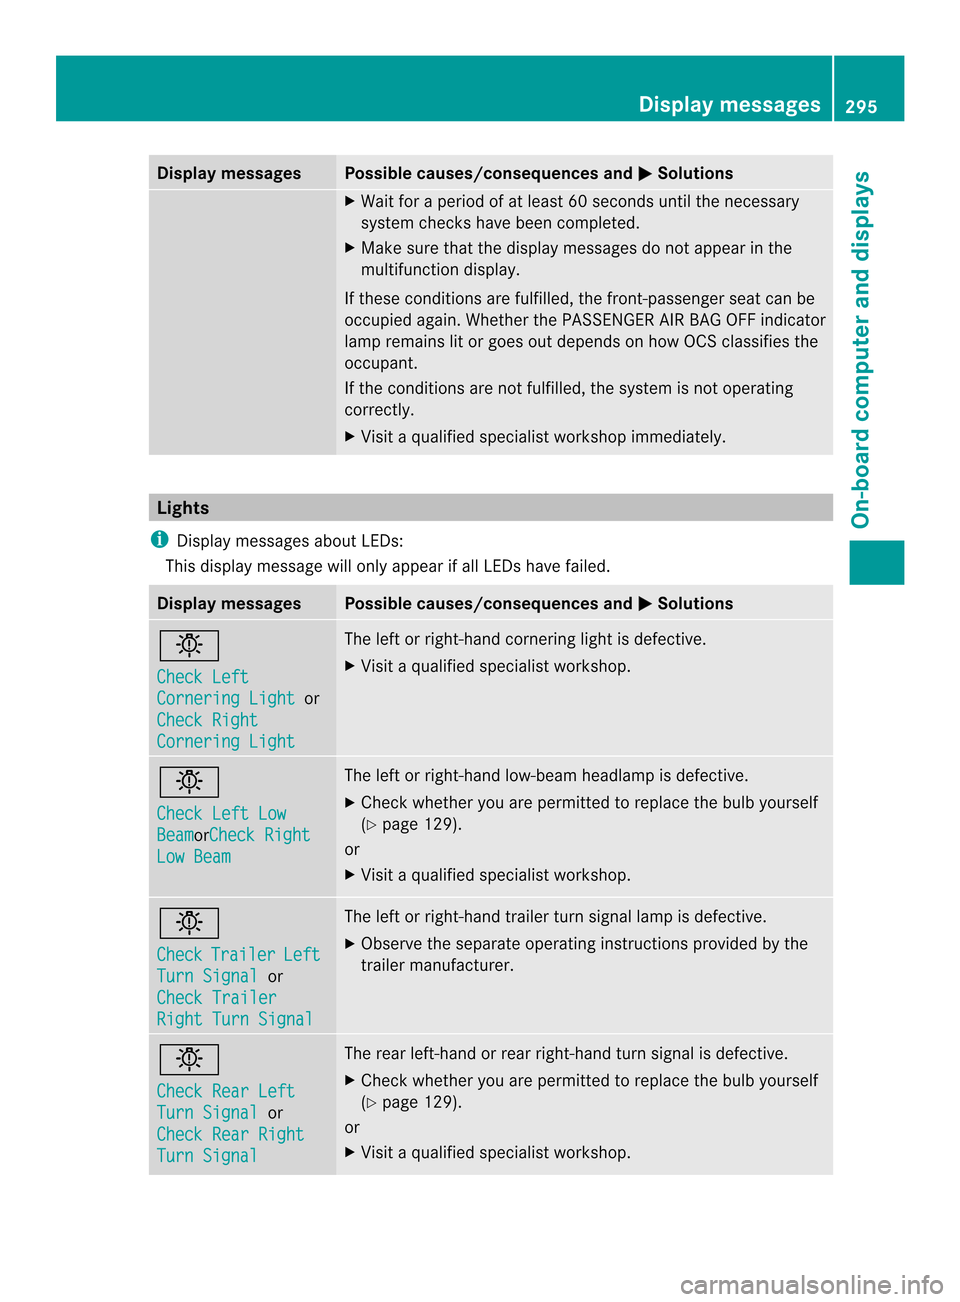
Display messages Possible causes/consequences and
0001 Solutions
X
Wait fo raperiod of at least 60 seconds until the necessary
system checks have been completed.
X Make sure that the display messages do not appear in the
multifunction display.
If these conditions are fulfilled, the front-passenger seat can be
occupied again. Whether the PASSENGER AIR BAG OFF indicator
lamp remains lit or goes out depends on how OCS classifies the
occupant.
If the conditions are not fulfilled, the system is not operating
correctly.
X Visit a qualified specialist workshop immediately. Lights
i Display messages about LEDs:
This display message will only appear if all LEDs have failed. Display messages Possible causes/consequences and
0001 Solutions
0004
Check Left
Cornering Light or
Check Right Cornering Light The left or right-hand cornering light is defective.
X
Visit a qualified specialist workshop. 0004
Check Left Low
Beam orCheck Right
Low Beam The left or right-hand low-beam headlamp is defective.
X
Check whether you are permitted to replace the bulb yourself
(Y page 129).
or
X Visit a qualified specialist workshop. 0004
Check
Trailer Left
Turn Signal or
Check Trailer Right Turn Signal The left or right-hand trailer turn signal lamp is defective.
X
Observe the separate operatin ginstructions provided by the
trailer manufacturer. 0004
Check Rear Left
Turn Signal or
Check Rear Right Turn Signal The rea
rleft-hand or rear right-hand turn signal is defective.
X Check whether you are permitted to replace the bulb yourself
(Y page 129).
or
X Visit a qualified specialist workshop. Display messages
295On-board computer and displays Z
Page 299 of 462

Display messages Possible causes/consequences and
0001 Solutions
0004
Check Front Left
Parking Lamp or
Check Front Right Parking Lamp The front left or front right parking or standing lamp is defective.
X Chec kwhether you are permitted to replace the bulb yourself
(Y page 129).
or
X Visit a qualified specialist workshop. 0004
Backup Light The backup lamp is defective.
X
Visit a qualified specialist workshop. 0004
Check Front Left
Sidemarker Lamp or
Check Front Right Sidemarker Lamp The left or right front side marker lamp is defective.
X
Visit a qualified specialist workshop. 0004
Check Left Tail
Lamp or
Check Right Tail Lamp The left or right-hand tail lamp is defective.
or
The rear left or right side marker lamp is defective.
X
Visit a qualified specialist workshop. 0004
Check
Left Daytime
Running
Light orCheck Right
Daytime Running
Light The left-hand or right-hand daytime running lamp is faulty.
X
Visit a qualified specialist workshop. 0004
Active Headlamps
Inoperative The active light function is defective.
X
Visit a qualified specialist workshop. 0004
Malfunction See
Operator's Manual The exterior lighting is defective.
X
Visit a qualified specialist workshop. Vehicles with trailer tow hitch: a fuse may have blown.
X
Check the fuses (Y page 394).
X If necessary, replace the blown fuse. Observe the warning notes.
If the display message continues to be displayed:
X Visit a qualified specialist workshop. Display messages
297On-board computer and displays Z
Page 318 of 462
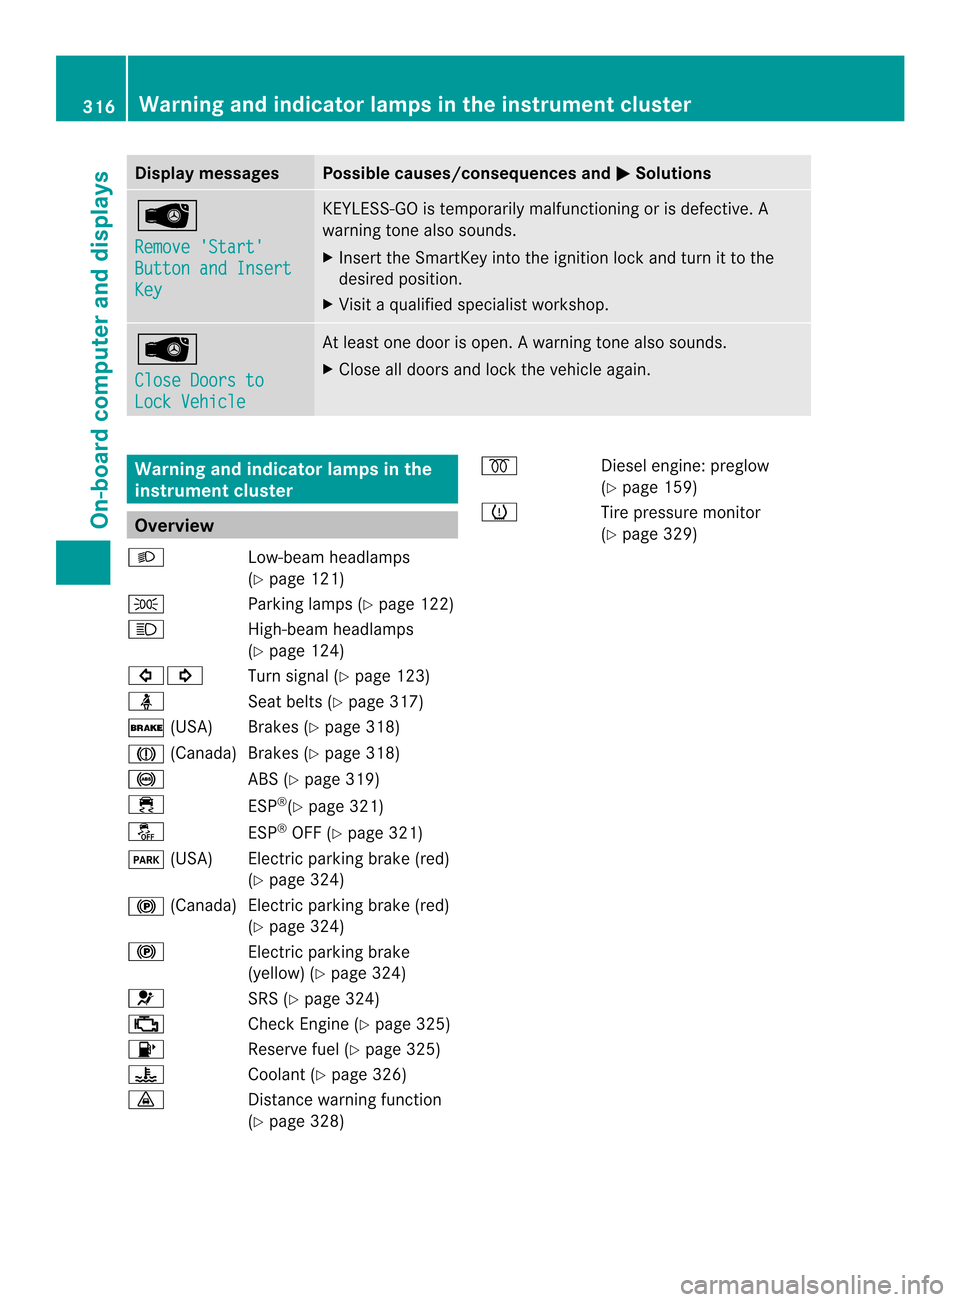
Display messages Possible causes/consequences and
0001 Solutions
0001
Remove 'Start'
Button and Insert
Key KEYLESS-GO is temporarily malfunctioning or is defective. A
warning tone also sounds.
X
Insert the SmartKey into the ignition lock and turn it to the
desired position.
X Visit a qualified specialist workshop. 0001
Close Doors to
Lock Vehicle At leas
tone door is open. Awarning tone also sounds.
X Close all doors and loc kthe vehicle again. Warning and indicator lamps in the
instrument cluster
Overview
000D Low-beam headlamps
(Ypage 121)
0016 Parking lamps (Y page 122)
000C High-beam headlamps
(Ypage 124)
00070006 Turn signal (Ypage 123)
0014 Seat belts (Ypage 317)
0011 (USA) Brakes (Y page 318)
0008 (Canada)B rakes (Ypage 318)
0019 ABS (Ypage 319)
000F ESP®
(Y page 321)
0017 ESP®
OFF (Y page 321)
0007 (USA) Electric parking brake (red)
(Ypage 324)
000C (Canada )Electric parking brake (red)
(Y page 324)
000C Electric parking brake
(yellow) (Y page 324)
001F SRS (Ypage 324)
0010 Check Engine (Y page 325)
0012 Reserve fuel (Ypage 325)
000E Coolant (Ypage 326)
000E Distance warning function
(Ypage 328) 000F
Diesel engine: preglow
(Y page 159)
0012 Tire pressure monitor
(Ypage 329) 316
Warning and indicator lamps in the instrument clusterOn-board computer and displays