2014 MERCEDES-BENZ M-Class light
[x] Cancel search: lightPage 340 of 462

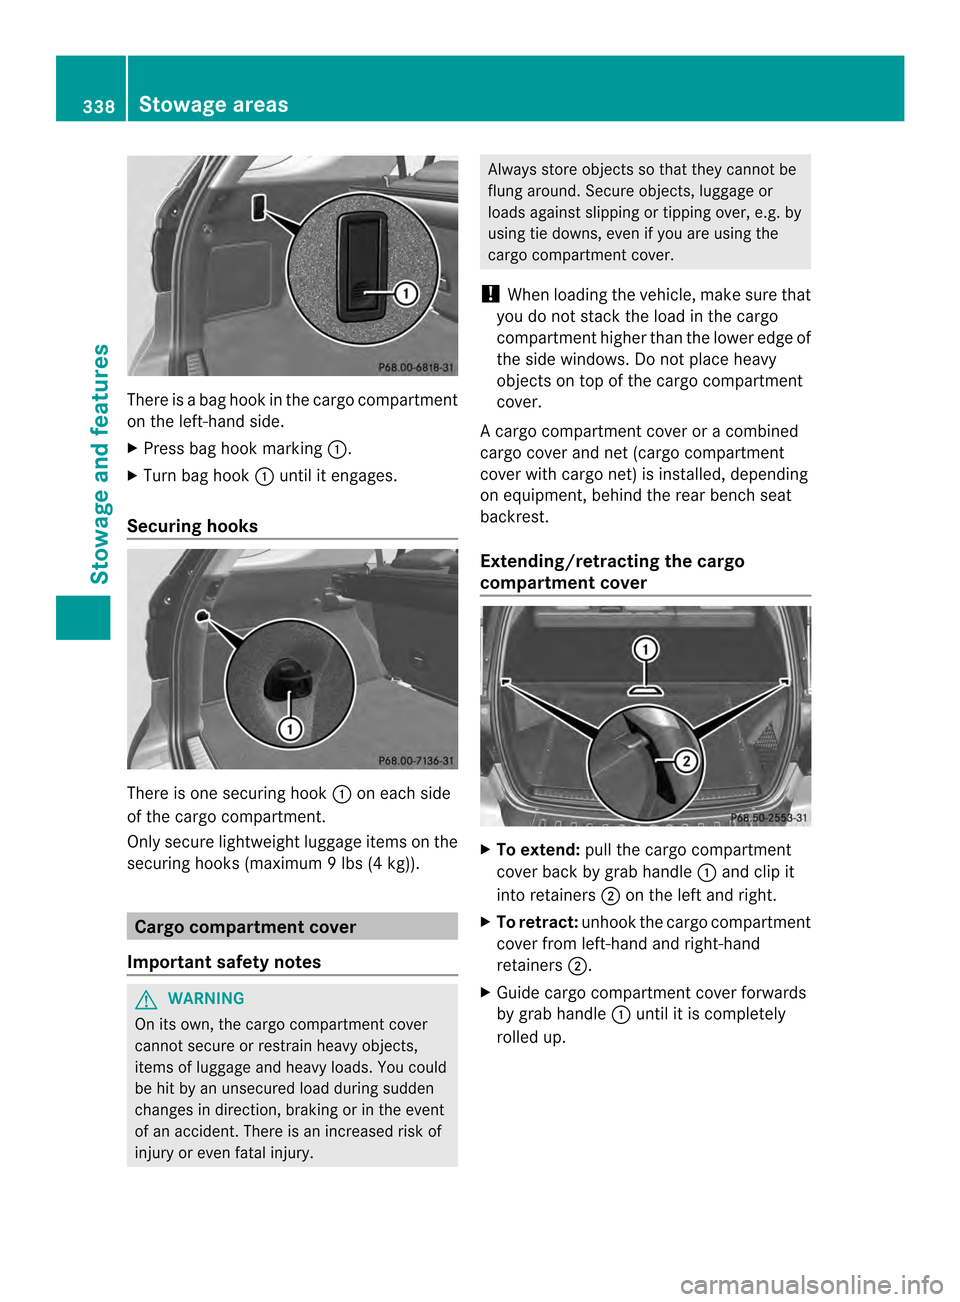
There is a bag hook in the cargo compartment
on the left-hand side.
X
Press bag hook marking 0002.
X Turn bag hook 0002until it engages.
Securing hooks There is one securing hook
0002on each side
of the cargo compartment.
Only secure lightweight luggage items on the
securing hooks (maximum 9lbs (4 kg)). Cargo compartment cover
Important safety notes G
WARNING
On its own, the cargo compartment cover
cannot secure or restrain heavy objects,
items of luggage and heavy loads. You could
be hit by an unsecured load during sudden
changes in direction, braking or in the event
of an accident. There is an increased risk of
injury or even fatal injury. Always store objects so that they cannot be
flung around. Secure objects, luggage or
loads against slipping or tipping over, e.g. by
using tie downs, even if you are using the
cargo compartment cover.
! When loading the vehicle, make sure that
you do not stac kthe load in the cargo
compartmenth igher than the lower edge of
the side windows .Do not place heavy
objects on top of the cargo compartment
cover.
A cargo compartment cover or a combined
cargo cover and net (cargo compartment
cover with cargo net) is installed, depending
on equipment, behind the rear bench seat
backrest.
Extending/retracting the cargo
compartment cover X
To extend: pull the cargo compartment
cover back by grab handle 0002and clip it
into retainers 0003on the left and right.
X To retract: unhook the cargo compartment
cover from left-hand and right-hand
retainers 0003.
X Guide cargo compartment cover forwards
by grab handle 0002until it is completely
rolled up. 338
Stowage areasStowage and features
Page 343 of 462

Inserting the brackets int
othe loading
rail X
Insert bracket 0002into the center of loading
rail 0022.
X Press release button 0003and push
bracket 0002into the desired position in
loading rail 0022.
X Let go of release button 0003.
X Press locking button 0023.
Bracket 0002is locked in loading rail 0022.
X If necessary, fold cargo tie-dow nring 0020
upwards.
Luggage holder !
Only use the luggage holder to secure
cargo with a maximum weight of 15.4 lbs
(7 kg) and with dimensions that the luggage
holder can safely and securely contain. The luggage holder can be used to secure
light loads against the side wall of the cargo
compartment to prevent them from moving
around. X
To install: insert two brackets 0020into the
left or right loading rail (Y page 340).
X Press release button 0002of the luggage
holder and pull the strap out slightly.
X Insert luggage holder 0003into brackets 0020
and, while doing so, press release button
0023 and push the luggage holder downwards
until it engages.
X Press release button 0002of the luggage
holder and pull the strap out in the direction
of the arrow.
X Place the load between the strap and the
cargo compartmen tside wall.
X Using one hand, press locking button 0002of
the luggage holder.
X With your other hand, let the strap go slowly
until the load is secured.
X Make sure that locking button 0022on
brackets 0020is pressed.
This keeps brackets 0020in place on the
loading rail.
X To remove: press release button 0023on
respective bracket 0020and remove luggage
holder 0003by pulling upwards and out.
Telescopic rod The telescopic rod can be used to secure the
load against the rear seats to prevent it from
moving around. Stowage areas
341Stowage and features Z
Page 346 of 462

The bottles are not secured or prevented from
tipping over. Therefore, do not place any open
drink containers in the stowage
compartments.
Cup holder in the front-compartment
center console
0002
Cup holder
0003 Cover
X To open: slide cover 0003to its foremost
position.
X To close: pull cover 0003back as far as it will
go.
You can remove the cup holder's rubber mat
for cleaning. Clean with clear, lukewarm
water only.
Temperature-controlled cup holder in
the front-compartment center console 0002
Cup holder
0003 Residual heat indicator lamp
0023 Switch The temperature-controlled cup holder can
be used to keep cold drink
scool and warm
drinks warm.
X Turn the SmartKey to position 2in the
ignition lock.
X To switch on the cooling function: press
and hold button 0023until the blue indicator
lamp on the button lights up.
X To switch on the heating function: press
and hold button 0023until the red indicator
lamp on the button lights up.
X To switch off the function: press and hold
button 0023until the indicator lamp on the
button goes out.
When the heating function is used, the metal
insert of the cup holder is heated. Once a
certain temperature is reached, residual heat
indicator lamp 0003lights up. This means that
the metal insert of the cup holder is hot. For
this reason, you must not reach into the cup
holder metal insert.
Do not use hard or sharp objects to clean the
cup holder. Use only a soft cloth to clean it.
Cup holder in the rear seat armrest !
Do not sit on or support your body weight
on the rear seat armrest when it is folded
down, as you could otherwise damage it. X
Fold down the rear seat armrest.
Cup holder 0002is located in the rear seat
armrest. 344
FeaturesStowage and features
Page 347 of 462

Sun visors
Overview G
WARNING
If the mirror cover of the vanity mirror is folded
up when the vehicle is in motion, you could be
blinded by incident light. There is a risk of an
accident.
Always keep the mirror cover folded down
while driving. 0002
Mirror light
0003 Bracket
0023 Retaining clip, e.g. for a car park ticket
0022 Vanity mirror
0020 Mirror cover
Vanity mirror in the sun visor Mirror light
0002only functions if the sun visor
is clipped into bracket 0003and mirror cover
0020 has been folded up.
Glare from the side X
Fold down sun visor 0002.
X Pull sun visor 0002out of retainer 0023.
X Swing sun visor 0002to the side.
X Slide sun visor 0002horizontally as required.
X Fold down additional sun visor 0003to the
windshield. Roller sunblinds on the rear side
windows
! Always guide the roller sunblind by hand.
Do not let it snap back suddenly as this
would damage the automatic roller
mechanism.
! Do not drive the vehicle with the roller
sunblind hooked in and the side windows
opened simultaneously .The roller sunblind
can jump out of the retainers and spring
back suddenly when driving at high speeds,
e.g. when driving on the freeway. This could
damage the inertia reel. Therefore, either
close the side window or retract the roller
sunblind before driving at high speeds. X
To extend: pull the roller sunblind out by
tab 0002and hook it onto retainers 0003at the
back of the window. Features
345Stowage and features Z
Page 348 of 462

The roller sunblind can be hooked back into
place should it pop out from the top of the
guide rail.
X Tilt pull-out profile 0002as illustrated.
X Slip guide bush 0003into open area of guide
rail 0023.
X Straighten up pull-out profile 0002again. Ashtray
Front ashtray !
The holder under the ashtray is not heat
resistant .Before placing lit cigarettes in the
ashtray, make sure that the ashtray is
properly engaged. Otherwise, the holder
could be damaged. X
To open: slide cover 0002to its foremost
position.
X Fold cover 0023of the insert upwards.
X To remove the insert: push insert0023to
the left 0022.
Insert 0023slides out slightly to the right. X
Lift insert 0023up0003 and out.
X To re-install the insert: place insert0023
into the holder and press it down on the
right until it engages.
X To close: pull cover 0002back as far as it will
go.
Rear-compartment ashtray !
Close the ashtray when it is not in use and
before you fold the rear seats forward. You
can otherwise damage the ashtray. X
To open: briefly press cover 0003at the top.
The ashtray opens.
X To remove the insert: push into recess
0023 from the right.
Ashtray insert 0002slides out slightly to the
right.
X Lift insert 0002up and out.
X To re-install the insert: place insert0002
into the holder and press down on the right
until it engages.
Vehicles without a Rear Seat Entertainment
System have an ashtray in the center console
in the rear compartment. Cigarette lighter
G
WARNING
You can burn yourself if you touch the hot
heating element or the socket of the cigarette
lighter. 346
FeaturesStowage and features
Page 349 of 462

In addition, flammable materials can ignite if:
R
the hot cigarette lighter falls
R a child holds the hot cigarette lighter to
objects, for example
There is a risk of fire and injury.
Always hold the cigarette lighter by the knob.
Always make sure that the cigarette lighter is
out of reach of children. Never leave children
unsupervised in the vehicle.
! The cigarette lighter in the center console
in the front compartment is not intended
for operating the tire inflation compressor. Youra
ttention must always be focused on the
traffic conditions. Only use the cigarette
lighter when road and traffi cconditions
permit.
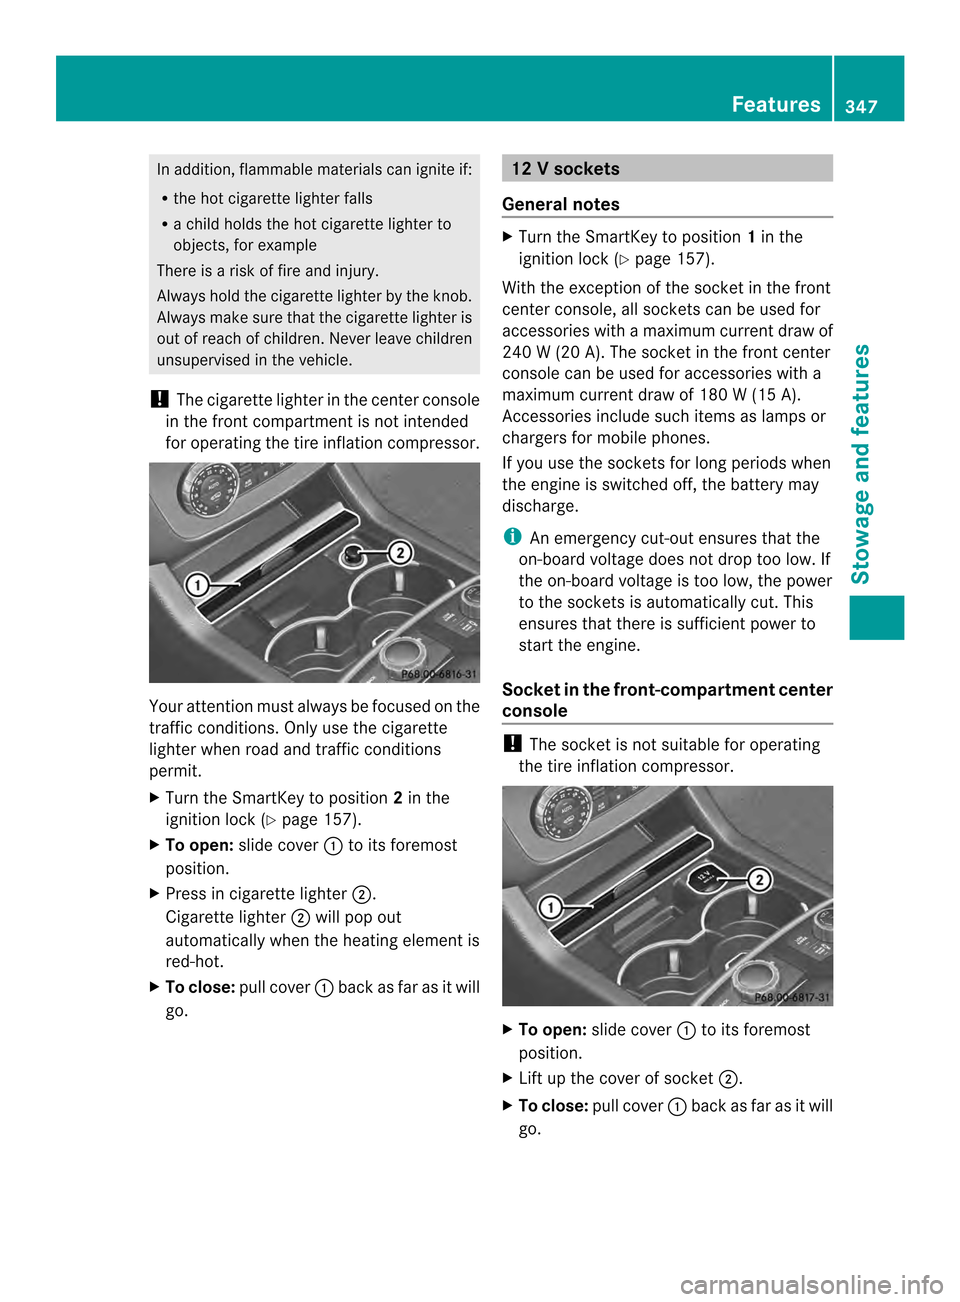
X Turn the SmartKey to position 2in the
ignition lock (Y page 157).
X To open: slide cover 0002to its foremost
position.
X Press in cigarette lighter 0003.
Cigarette lighter 0003will pop out
automatically when the heating element is
red-hot.
X To close: pull cover 0002back as far as it will
go. 12
Vsockets
General notes X
Turn the SmartKey to position 1in the
ignitio nlock (Y page 157).
With the exception of the socket in the front
center console, all socket scan be used for
accessories with a maximum curren tdraw of
240 W (20 A). The socket in the front center
console can be used for accessories with a
maximum current draw of 180 W (15 A).
Accessories include such items as lamps or
chargers for mobile phones.
If you use the sockets for long periods when
the engine is switched off, the battery may
discharge.
i An emergency cut-out ensures that the
on-board voltage does not drop too low.If
the on-board voltage is too low, the power
to the sockets is automatically cut. This
ensures tha tthere is sufficient power to
start the engine.
Socket in the front-compartment center
console !
The socket is not suitable for operating
the tire inflation compressor. X
To open: slide cover 0002to its foremost
position.
X Lift up the cover of socket 0003.
X To close: pull cover 0002back as far as it will
go. Features
347Stowage and features Z
Page 351 of 462

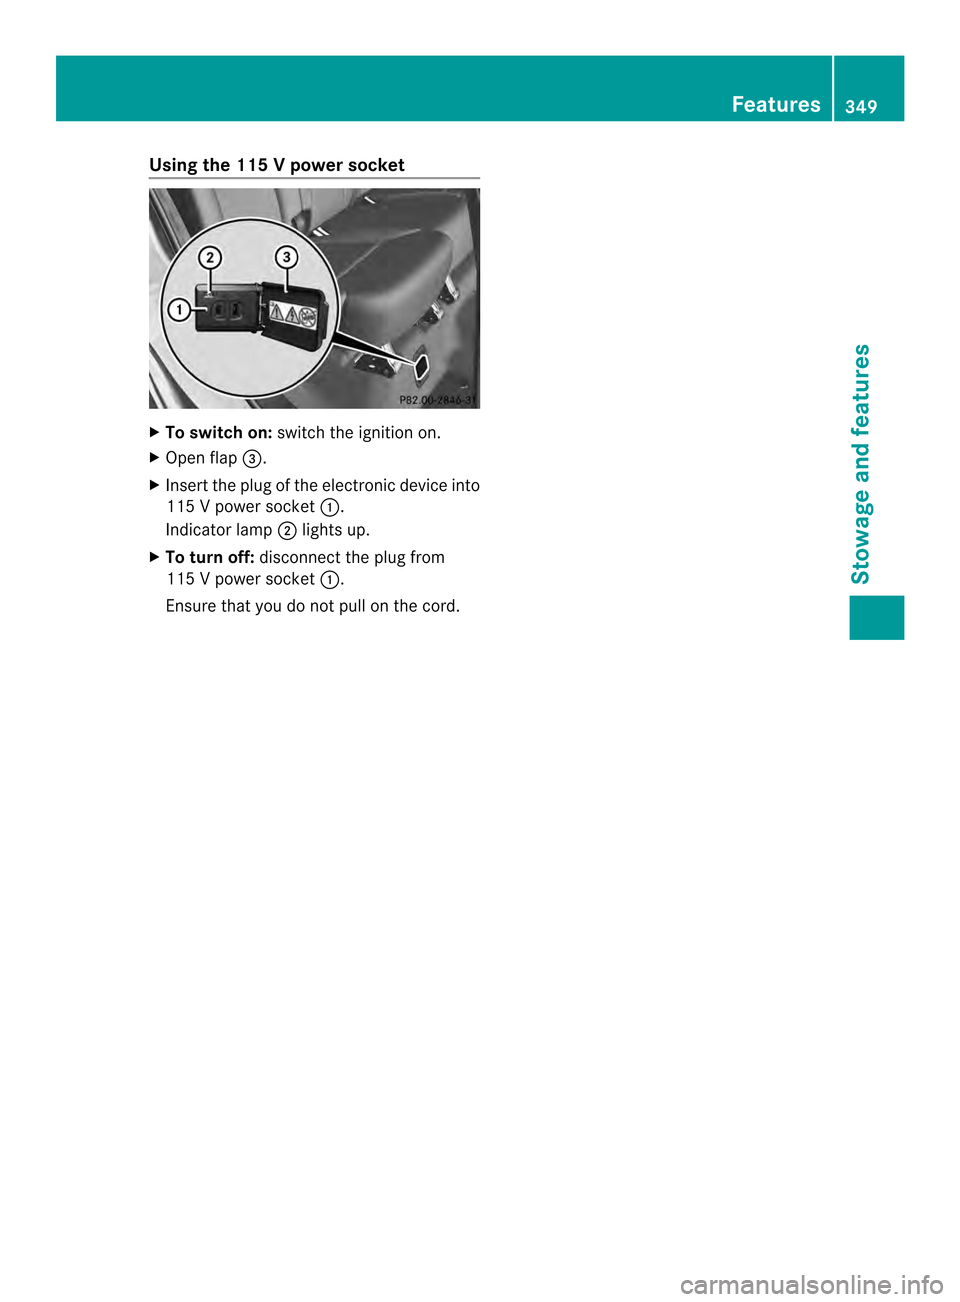
Using the 115
Vpower socket X
To switch on: switch the ignitio non.
X Ope nflap 0023.
X Insert the plug of the electronic device into
115 V power socket 0002.
Indicator lamp 0003lights up.
X To turn off: disconnect the plug from
115 V power socket 0002.
Ensure that you do not pull on the cord. Features
349Stowage and features Z
Page 352 of 462

Problems with the 115
Vpower socket Problem Possible causes/consequences and
0001 Solutions
The warning lamp on
the 11 5Vpower socket
is not lit. The on-board voltage is too low because the battery is too weak.
X
Start the engine.
or
X Charge the battery (Y page 388).
If the indicator lamp still does not light up:
X Visit a qualified specialist workshop. The temperature of the DC/AC converter is temporarily too high.
X
Remove the electronic device connector from the 115 V socket.
X Let the DC/AC converter cool down.
If the indicator lamp still does not light up after cooling down the
converter:
X Visit a qualified specialist workshop. You have connected an electronic device that has a constant
nominal power of less than 150 watts, but a very high switch-on
current. This device will not work. If you connect such a device,
the 115
Vpower socket will not supply it with power.
X Connect a suitable device. mbrace
General notes You must have a license agreement to
activate the mbrace service. Make sure that
your system is activated and operational. To
log in, press the
000BMB Info call button. If
any of the steps mentioned are not carried
out, the system may not be activated.
If you have questions about the activation,
contact one of the following telephone
hotlines:
R USA: Mercedes-Benz Customer Assistance
Center at
1-800-FOR-MERCedes (1-800-367-6372)
or 1-866-990-9007
R Canada: Customer Service at
1-888-923-8367 Shortly after successfully registering with the
service, a user ID and password will be sent
to you by post.
USA only: you can use this password to log
onto the mbrace area under "Owners Online"
at
http://www.mbusa.com.
The system is available if:
R it has been activated and is operational
R the corresponding mobile phone network
is available for transmitting data to the
Customer Center
R a service subscription is available
R the starter battery is sufficiently charged
i Determining the location of the vehicle on
a map is only possible if:
R GPS reception is available.
R the vehicle position can be forwarded to
the Customer Assistance Center. 350
FeaturesStowage and features