2014 MERCEDES-BENZ M-Class steering wheel adjustment
[x] Cancel search: steering wheel adjustmentPage 118 of 462

Parking position for the exterior
mirror on the front-passenger side
Setting and storing the parking position Using reverse gear
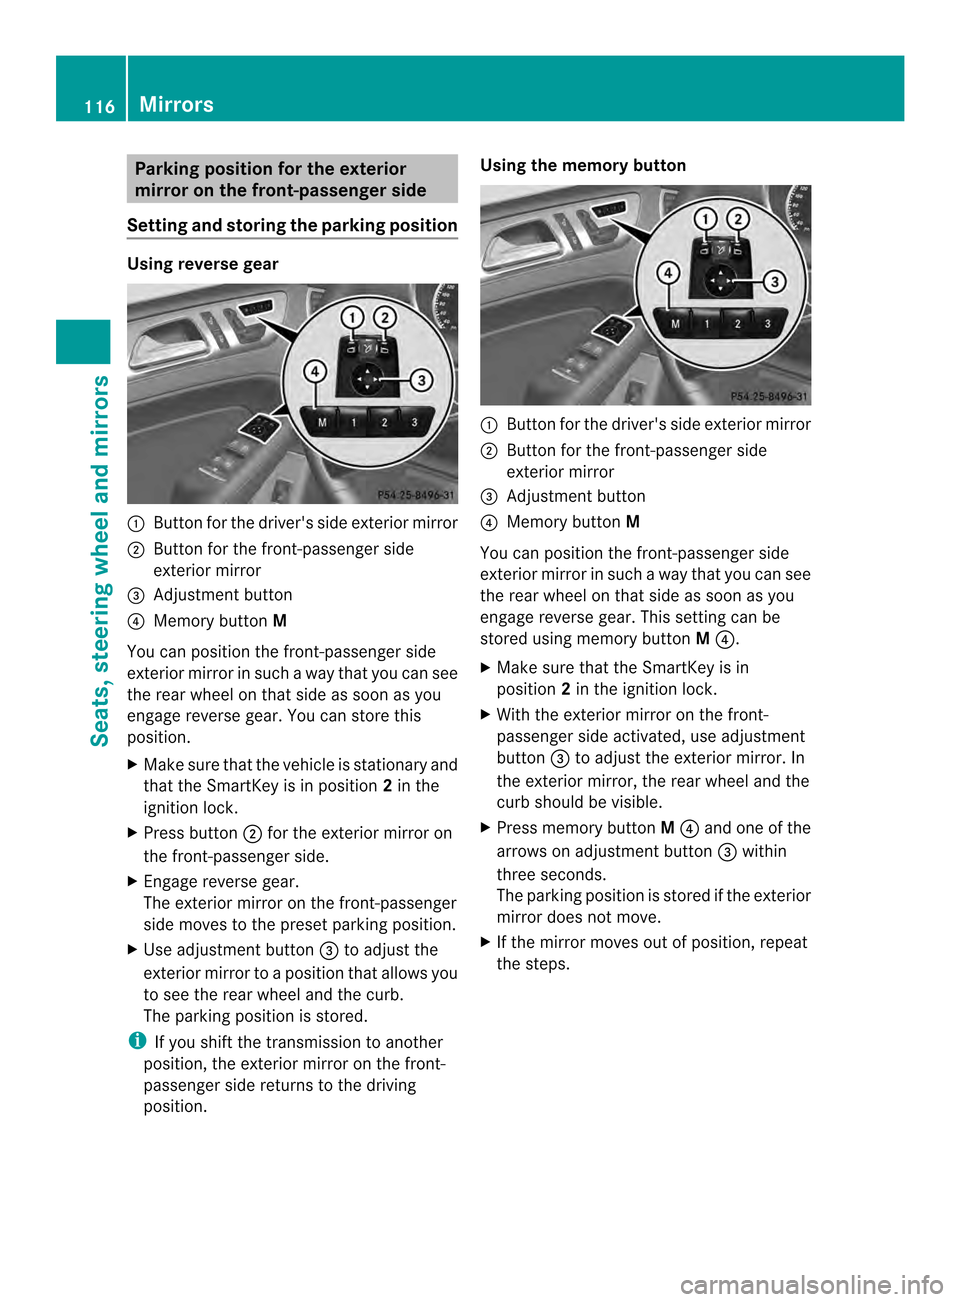
0002
Button for the driver's side exterior mirror
0003 Button for the front-passenger side
exterior mirror
0023 Adjustment button
0022 Memory button M
You can position the front-passenger side
exterior mirror in such a way that you can see
the rear wheel on that side as soon as you
engage reverse gear. You can store this
position.
X Make sure that the vehicle is stationary and
that the SmartKey is in position 2in the
ignition lock.
X Press button 0003for the exterior mirror on
the front-passenger side.
X Engage reverse gear.
The exterior mirror on the front-passenger
side moves to the preset parking position.
X Use adjustment button 0023to adjust the
exterior mirror to a position that allows you
to see the rear wheel and the curb.
The parking position is stored.
i If you shift the transmission to another
position, the exterior mirror on the front-
passenger side returns to the driving
position. Using the memory button
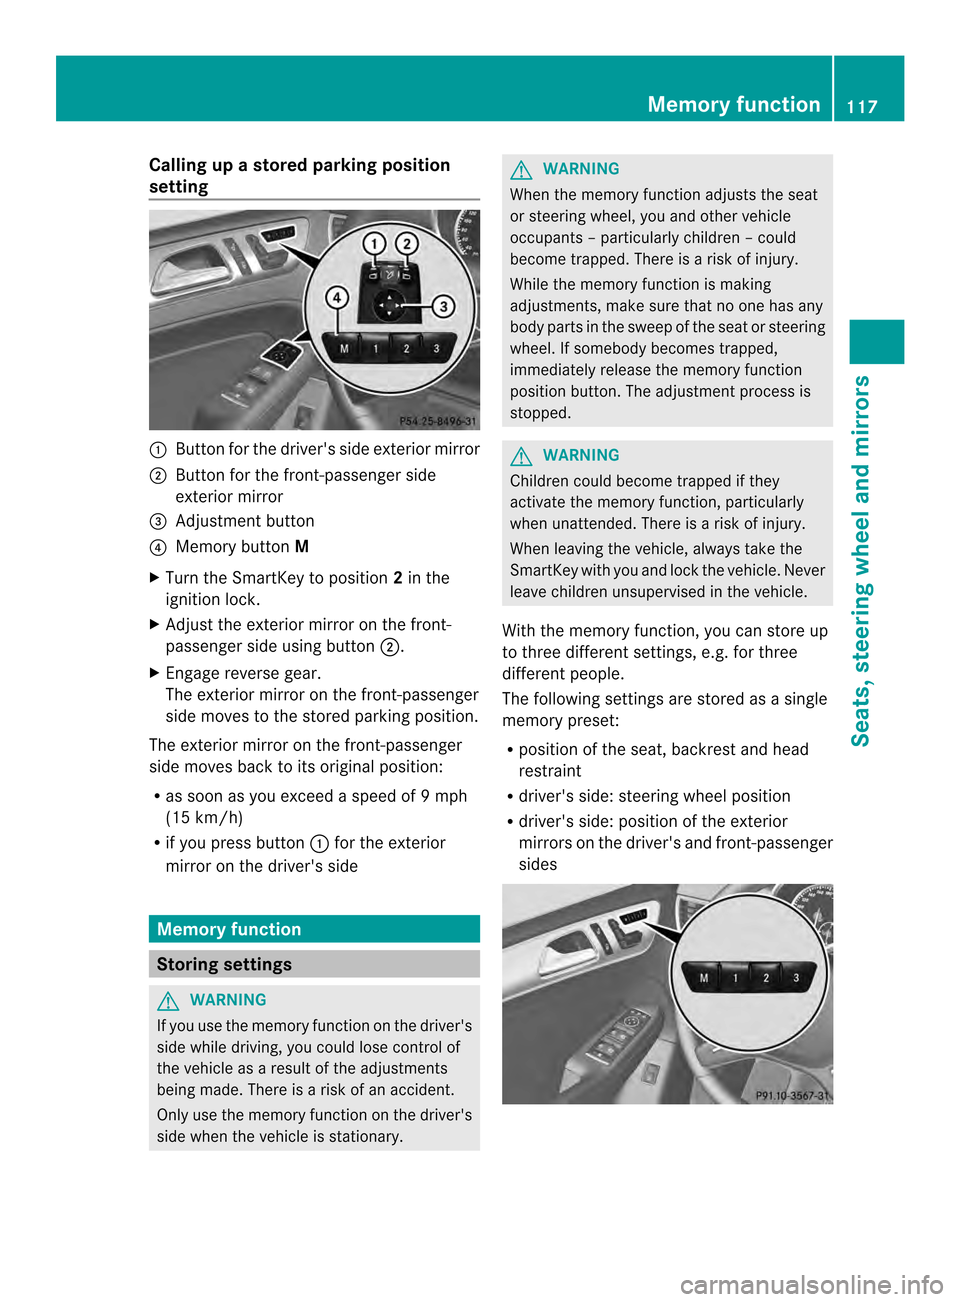
0002
Button for the driver's side exterior mirror
0003 Button for the front-passenger side
exterior mirror
0023 Adjustment button
0022 Memory button M
You can position the front-passenger side
exterior mirror in such a way that you can see
the rear wheel on that side as soon as you
engage reverse gear. This setting can be
stored using memory button M0022.
X Make sure that the SmartKey is in
position 2in the ignition lock.
X With the exterior mirror on the front-
passenger side activated, use adjustment
button 0023to adjust the exterior mirror. In
the exterior mirror, the rear wheel and the
curb should be visible.
X Press memory button M0022 and one of the
arrows on adjustment button 0023within
three seconds.
The parking position is stored if the exterior
mirror does not move.
X If the mirror moves out of position, repeat
the steps. 116
MirrorsSeats, steering wheel and mirrors
Page 119 of 462

Calling up a stored parking position
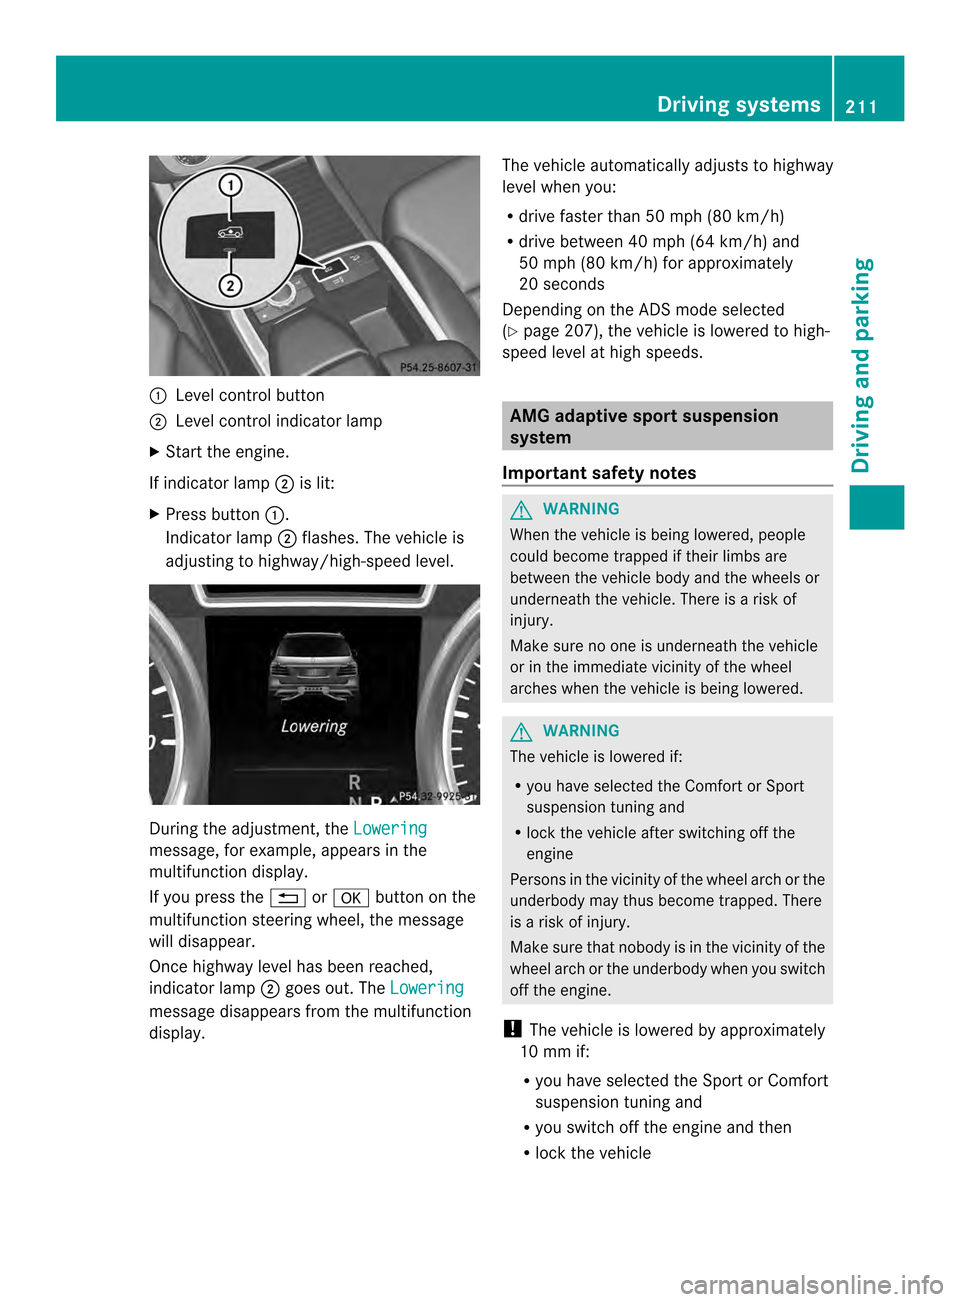
setting 0002
Butto nfor the driver's side exterior mirror
0003 Button for the front-passenger side
exterior mirror
0023 Adjustment button
0022 Memory button M
X Turn the SmartKey to position 2in the
ignition lock.
X Adjust the exterior mirror on the front-
passenger side using button 0003.
X Engage reverse gear.
The exterior mirror on the front-passenger
side moves to the stored parking position.
The exterior mirror on the front-passenger
side moves back to its original position:
R as soon as you exceed a speed of 9mph
(15 km/h)
R if you press button 0002for the exterior
mirror on the driver's side Memory function
Storing settings
G
WARNING
If you use the memor yfunctio nonthe driver's
side while driving, you could lose control of
the vehicle as a result of the adjustments
being made. There is a risk of an accident.
Only use the memory function on the driver's
side when the vehicle is stationary. G
WARNING
When the memory function adjusts the seat
or steering wheel, you and other vehicle
occupants –particularly childre n–could
become trapped. There is a risk of injury.
While the memory function is making
adjustments, make sure that no one has any
body parts in the sweep of the seat or steering
wheel. If somebody becomes trapped,
immediately release the memory function
position button .The adjustment process is
stopped. G
WARNING
Children could become trapped if they
activate the memory function, particularly
when unattended. There is arisk of injury.
When leaving the vehicle, always take the
SmartKey with you and lock the vehicle. Never
leave children unsupervised in the vehicle.
With the memory function, you can store up
to three different settings, e.g. for three
differen tpeople.
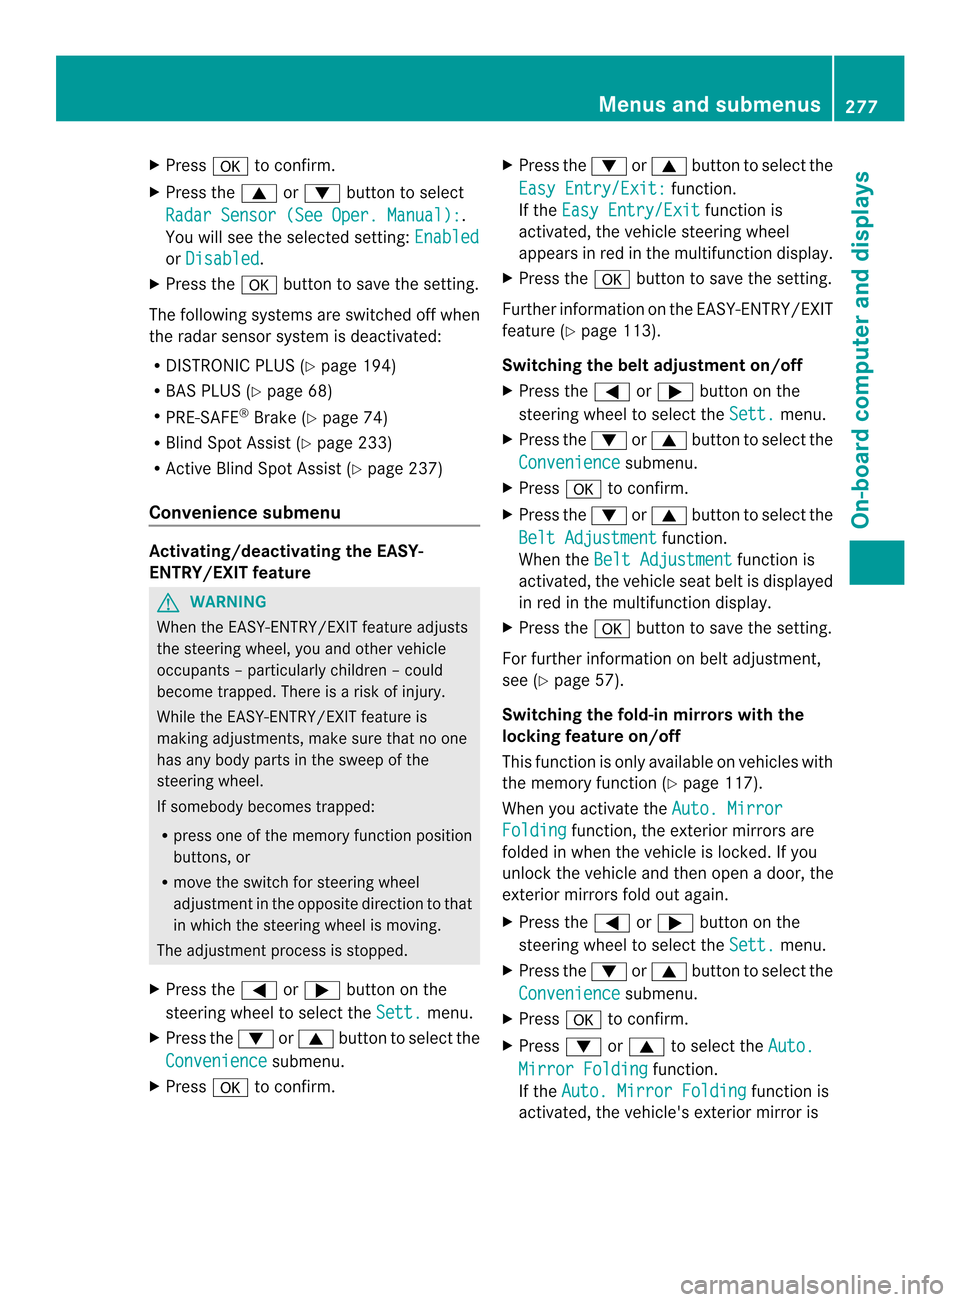
The following settings are stored as a single
memory preset:
R position of the seat, backrest and head
restraint
R driver's side: steering wheel position
R driver's side: position of the exterior
mirrors on the driver's and front-passenger
sides Memory function
117Seats, steering wheel and mirrors Z
Page 206 of 462

The individual vehicle levels differ from
highway level as follows:
R
highway level: +/–0 in (+/–0 mm)
R high-speed level: –0.6 in (–15 mm)
R off-road level 1: + 1.2 in (+ 30 mm)
R off-road level 2: + 2.3 in (+ 60 mm)
R off-road level 3: + 3.6 in (+ 90 mm)
Highway/high-speed level !
Make sure that there is enough ground
clearance when the vehicle is being
lowered. It could otherwise hit the ground,
damaging the underbody. 0002
Selector wheel
0003 To raise the level
0023 Indicator lamps
0022 To lower the level
X Start the engine.
X Selector wheel 0002 engaged:
briefly press
selector wheel 0002.
Selector wheel 0002extends.
If one or more indicator lamps 0023are on:
X Turn selector wheel 0002counter-
clockwise 0022until all indicator lamps 0023
that are lit start to flash.
The vehicle is lowered to highway level. As
soon as the next lowest level is reached,
the indicator lamp stops flashing and goes
out. During the adjustment, the
Lowering message, for example, appears in the
multifunction display.
If you press the
0007or000B button on the
multifunction steering wheel, the message
will disappear. Once highway level has been
reached, all indicator lamps 0023go out.
The vehicle automatically selects highway
level if you are driving at a speed above
70 mph (115 km/h) or if you drive at a speed
between 62 mph (100 km/h) and 70 mph
(115 km/h) for approximately 20 seconds.
The vehicle is lowered to high-speed level if
you are traveling at higher speeds.
Off-road levels General notes
R
Only select off-road level 3 for driving off-
road in particularly rough terrain.
R Adjust your driving style to the altered
handling characteristics.
R Do not drive at speeds above 12 mph
(20 km/h). 204
Driving systemsDriving and parking
Page 207 of 462

Only select an off-road level when this is
appropriate for road conditions. Otherwise,
fuel consumption increases and handling may
be affected.
X Start the engine.
X Selector wheel 0002 engaged:
briefly press
selector wheel 0002.
Selector wheel 0002extends.
X To raise: turn selector wheel 0002
clockwise 0003.
The vehicle is raised.
or
X To lower: turn selector wheel 0002counter-
clockwise 0022.
The vehicle is lowered.
Indicator lamps 0023for the desired off-road
level flash:
R Off-road level 1: the lower indicator lamp
flashes
R Off-road level 2: the lower and center
indicator lamps flash
R Off-road level 3: all three indicator lamps
flash
The vehicle adjusts to the off-road level
selected. As soon as an off-road level is
reached, the corresponding indicator lamp
stops flashing and lights up constantly.
Raising the vehicle
During the adjustment, the Raisingmessage, for example, appears in the
multifunction display.
The vehicle rises from highwayl
evel to off-
road level 1.
If you press the 0007or000B button on the
multifunction steering wheel, the message
will disappear.
i Up to off-road level 2, you can hide the
messages using the 0007or000B button
on the multifunction steering wheel.
Once off-road level 2has been reached, the
lower and cente rindicato rlamps of the
selecto rwheel are on. While the adjustment from off-road level
2to
off-road level 3is taking place, you will see a
message such as the following in the
multifunction display: Raising Max. Speed
12 mph (20 km/h ).
The Max. Speed 12 mph (20 km/h) message draws your attention to the
maximum speed permitted for off-road
level 3.
Once off-road level
3has been reached, you
will see a message shown in white in the
multifunction display, for example: Max. Speed 12 mph (20 km/h) .
If you drive abov e12 mph (20 km/h) at off-
road level 3, you will see the following
message in red in the multifunctio ndisplay:
Lowering Max. Speed 12 mph (20 km/h ).
i
You cannot clear these messages.
You also hear a warning. The vehicle is
lowered and off-road level 3is canceled.
If you continue to increase your speed, the
red message continues to be shown in the
multifunction display. The newly set level is
not displayed until the vehicle has been set
to a level suitable for the current speed. Driving systems
205Driving and parking Z
Page 212 of 462

significant level changes, such as after the
vehicle has been stationary for a long period,
the engine must be on. For safety reasons,
the vehicle is only lowered when the doors are
closed. Lowering is interrupted if a door is
opened, and it continues once the door has
been closed.
Basic settings (excluding AMG vehicles)
The extent to which the vehicle is raised or
lowered depends on the basic setting
selected. Select raised level for off-road
driving or highway/high-speed level for
normal roads.
The individual vehicle levels differ from
highway level as follows:
R
highway level: +/–0 in (+/–0 mm)
R high-speed level: –0.6 in (–15 mm)
R raised level: +2.3 in (+60 mm)
Basic settings for AMG vehicles
The extent to which the vehicle is raised or
lowered depends on the AMG adaptive sport
suspension setting selected. Select the
raised level for off-road driving or highway/
high-speed level for normal roads.
The raised level corresponds to a vehicle
position raised by 50 mm compared with
highway level in comfort mode.
Raised level Only select raised level if this is appropriate
for the road conditions. Otherwise, fuel
consumption may increase and handling may
be affected.
X Start the engine. If indicator lamp
0003is not lit:
X Press button 0002.
Indicator lamp 0003flashes. The vehicle rises
to raised level. During the adjustment, the
Raising message, for example, appears in the
multifunction display.
If you press the
0007or000B button on the
multifunction steering wheel, the message
will disappear.
Once the vehicle has reached raised level,
indicator lamp 0003remains lit. The Raising message disappears from the multifunction
display.
If you try to select raised level at a speed
above 40 mph (64 km/h), the
Drive More Slowly message appears in the multifunction
display.
Highway/high-speed level
! Make sure that there is enough ground
clearance when the vehicle is being
lowered. It could otherwise hit the ground,
damaging the underbody. 210
Driving systemsDriving and parking
Page 213 of 462

0002
Level control button
0003 Level control indicator lamp
X Start the engine.
If indicator lamp 0003is lit:
X Press button 0002.
Indicator lamp 0003flashes. The vehicle is
adjusting to highway/high-speed level. During the adjustment, the
Loweringmessage, for example, appears in the
multifunction display.
If you press the 0007or000B button on the
multifunction steering wheel, the message
will disappear.
Once highway level has been reached,
indicator lamp 0003goes out. The Lowering message disappears from the multifunction
display. The vehicle automatically adjusts to highway
level when you:
R
drive faster than 50 mph (80 km/h)
R drive between 40 mph (64 km/h) and
50 mph (80 km/h) for approximately
20 seconds
Depending on the ADS mode selected
(Y page 207), the vehicle is lowered to high-
speed level at high speeds. AMG adaptive sport suspension
system
Important safety notes G
WARNING
When the vehicle is being lowered, people
could become trapped if their limbs are
betwee nthe vehicle body and the wheels or
underneath the vehicle. There is a risk of
injury.
Make sure no one is underneath the vehicle
or in the immediate vicinity of the wheel
arches when the vehicle is being lowered. G
WARNING
The vehicle is lowered if:
R you have selected the Comfort or Sport
suspension tuning and
R lock the vehicle after switching off the
engine
Persons in the vicinity of the wheel arch or the
underbody may thus become trapped. There
is a risk of injury.
Make sure that nobody is in the vicinity of the
wheel arch or the underbody when you switch
off the engine.
! The vehicle is lowered by approximately
10 mm if:
R you have selected the Sport or Comfort
suspension tuning and
R you switch off the engine and then
R lock the vehicle Driving systems
211Driving and parking Z
Page 279 of 462

X
Press 000Bto confirm.
X Press the 0003or0004 button to select
Radar Sensor (See Oper. Manual): .
You will see the selected setting: Enabledor
Disabled .
X Press the 000Bbutton to save the setting.
The following systems are switched off when
the radar sensor system is deactivated:
R DISTRONIC PLUS (Y page 194)
R BAS PLUS (Y page 68)
R PRE-SAFE ®
Brake (Y page 74)
R Blind Spot Assist (Y page 233)
R Active Blind Spot Assist (Y page 237)
Convenience submenu Activating/deactivating the EASY-
ENTRY/EXIT feature
G
WARNING
When the EASY-ENTRY/EXIT feature adjusts
the steering wheel, you and other vehicle
occupants –particularly childre n–could
become trapped. There is a risk of injury.
While the EASY-ENTRY/EXIT feature is
making adjustments, make sure that no one
has any body parts in the sweep of the
steering wheel.
If somebody becomes trapped:
R press one of the memory function position
buttons, or
R move the switch for steering wheel
adjustmen tinthe opposite direction to that
in which the steering wheel is moving.
The adjustment process is stopped.
X Press the 0002or0005 button on the
steering wheel to select the Sett. menu.
X Press the 0004or0003 button to select the
Convenience submenu.
X Press 000Bto confirm. X
Press the 0004or0003 button to select the
Easy Entry/Exit: function.
If the Easy Entry/Exit function is
activated, the vehicle steering wheel
appears in red in the multifunction display.
X Press the 000Bbutton to save the setting.
Further information on the EASY-ENTRY/EXIT
feature (Y page 113).
Switching the belt adjustment on/off
X Press the 0002or0005 button on the
steering wheel to select the Sett. menu.
X Press the 0004or0003 button to select the
Convenience submenu.
X Press 000Bto confirm.
X Press the 0004or0003 button to select the
Belt Adjustment function.
When the Belt Adjustment function is
activated, the vehicle seat belt is displayed
in red in the multifunction display.
X Press the 000Bbutton to save the setting.
For further information on belt adjustment,
see (Y page 57).
Switching the fold-in mirrors with the
locking feature on/off
This function is only available on vehicles with
the memory function (Y page 117).
When you activate the Auto. Mirror Folding function, the exterior mirrors are
folded in when the vehicle is locked. If you
unlock the vehicle and then open a door, the
exterior mirrors fold out again.
X Press the 0002or0005 button on the
steering wheel to select the Sett. menu.
X Press the 0004or0003 button to select the
Convenience submenu.
X Press 000Bto confirm.
X Press 0004or0003 to select the Auto. Mirror Folding function.
If the Auto. Mirror Folding function is
activated, the vehicle's exterior mirror is Menus and submenus
277On-board computer and displays Z