2014 MERCEDES-BENZ M-Class fuel pressure
[x] Cancel search: fuel pressurePage 185 of 462

these exhaust gases leads to poisoning. There
is a risk of fatal injury. Therefore never leave
the engine running in enclosed spaces
withou tsufficient ventilation.
Certain engine systems are designed to keep
the level of poisonous components in exhaust
fumes within legal limits.
These systems only work at peak efficiency if
they are serviced exactly in accordance with
the manufacturer's specifications. For this
reason, all work on th eengine must be carried
ou tb y qualified and authorized Mercedes-
Benz technicians.
The engine settings mus tnot be changed
under any circumstances. Furthermore, all
specific service work must be carried out at
regular intervals and in accordance with the
Mercedes-Benz service requirements. Details
can be found in the Maintenance Booklet. ECO display
Example: ECO display
The ECO display gives you information on how
economical your driving style is. The ECO
display assists you in achieving the optimum
driving style in terms of consumption, taking
the actual and selected conditions into
consideration. Your driving style can
significantly influence the vehicle's
consumption.
The ECO display consists of three bars:
R Acceleration R
Constant R
Coasting The percent value is the average value of the
three bars. The three bars and the mean value
begin at the value of 50%. Ahigher percentage indicates a mor
eeconomical
driving style.
The ECO display does not indicate the actual
fuel consumption and a fixed percentage
count in the ECO display does not indicate a
fixed consumption figure.
Apart from driving style, consumption is
dependent on many factors such as, e.g.:
R load
R tire pressure
R cold start
R choice of route
R electrical consumers switched on
These factors are not taken into
consideration by the ECO display.
The evaluation of your driving style is carried
ou tu sing the following three categories:
R Acceleration (evaluation of all
acceleration processes):
- The bar fills up: moderate acceleration,
especially at higher speeds
- The bar empties: sporty acceleration
R Constant (assessment of driving behavior
at all times):
- The bar fills up: constant speed and
avoidance of unnecessary acceleration
and deceleration
- The bar empties: fluctuations in speed
R Coasting (assessment of all deceleration
processes):
- The bar fills up: anticipatory driving,
keeping your distance and early release
of the accelerator. The vehicle can coast
without use of the brakes.
- The bar empties: frequent braking
i An economical driving style specially
requires driving at moderate engine
speeds.
To achieve a higher value in the categories
Acceleration and
Constant , observe the
gearshift recommendations. Driving tips
183Driving and parking Z
Page 191 of 462
R
Do not jump with the vehicle as this will
interrupt the vehicle's propulsion.
R Always keep the engine running and in gear
when driving on a slope.
R Do not shift the automatic transmission to
transmission position N.
i Do not use the HOLD function when
driving off-road, on steep uphill or downhill
gradients or on slippery or loose surfaces.
The HOLD functio ncannot hold the vehicle
on such surfaces.
Checklist before driving off-road !
If the engine oil warning lamp lights up
while the vehicle is in motion, stop the
vehicle in a safe place as soon as possible.
Chec kthe engine oil level. The engine oil
warning lamp warning must not be ignored.
Continuing the journey while the symbol is
displayed could lead to engine damage.
X Engine oil level: check the engine oil level
and add oil if necessary.
When driving on steep gradients, the
engine oil level must be sufficiently high to
ensure a correct oil supply in the vehicle.
X DEF tank (BlueTEC vehicles): check the
level and top up if necessary (Y page 177).
X Tire-changing tool kit: check that the jack
is working and make sure you have the lug
wrench, a robust tow cable and a folding
spade in the vehicle.
X Wheels and tires: check the tire tread
depth and tire pressure.
X Check for damage and remove any foreign
objects, e.g. small stones, from the
wheels/tires.
X Replace any missing valve caps.
X Replace dented or damaged wheels.
X Rims: dented or bent rims can result in a
loss of tire pressure and damage the tire
bead. Therefore, check your rims before
driving off-road and replace them as
required. Checklist after driving off-road !
If you detect damage to the vehicle after
driving off-road, have the vehicle checked
immediately at a qualified specialist
workshop.
X Deactivate DSR (Y page 246).
X Vehicles with the AIRMATIC package:
lower the vehicle to a ride height suitable
for the road conditions, e.g. to the
highway/high-speed level.
X Cleant he headlamps and rear lights and
check for damage.
X Cleant he front and rear license plates.
X Cleant he wheels/tires with a water jet and
remove any foreign objects.
X Cleant he wheels, wheel housings and the
vehicle underside with a water jet; check
for any foreign objects and damage.
X Check whether twigs or other parts of
plants have become trapped. These
increase the risk of fire and can damage
fuel pipes, brake hoses or the rubber
bellows of the axle joints and propeller
shafts.
X After the trip, examine without fail the
entire undercarriage, wheels, tires, brakes,
bodywork structure, steering, chassis and
exhaust system for damage.
X After driving for extended periods across
sand, mud, gravel, water or in similarly dirty
conditions, have the brake discs, wheels,
brake pads/linings and axle joints checked
and cleaned.
X If you detect strong vibrations after off-road
travel, check for foreign objects in the
wheels and drive train and remove them if
necessary. Foreign objects can disturb the
balance and cause vibrations.
Driving over rough terrain places greater
demands on your vehicle than driving on
normal roads. After driving off-road, check
the vehicle. This allows you to detect damage
promptly and reduce the risk of an accident
to yourself and other road users. Driving tips
189Driving and parking Z
Page 256 of 462

plates and those for the towing vehicle under
"Technical data" (Y
page 456).
When towing a trailer, your vehicle's handling
characteristics will be differen tincomparison
with when driving without atrailer.
The vehicle/trailer combination:
R is heavier
R is restricted in its acceleration and
gradient-climbing capability
R has an increased braking distance
R is affected more by strong crosswinds
R demands more sensitive steering
R has a larger turning radius
This could impair the handling
characteristics.
When towing a trailer, always adjust your
speed to the current road and weather
conditions. Do not exceed the maximum
permissible speed for yourv ehicle/trailer
combination.
General notes R
Do not exceed the legally prescribed
maximum speed for vehicle/trailer
combinations in the relevant country.
This lowers the risk of an accident.
R Only install an approved trailer coupling on
your vehicle.
Further information on availability and on
installation is available from any authorized
Mercedes-Benz Center.
R The bumpers of your vehicle are not
suitable for installing detachable trailer
couplings.
R Do not install hired trailer couplings or
other detachable trailer couplings on the
bumpers of your vehicle.
R If you no longer need the ball coupling,
remove it from the ball coupling recess.
This will reduce the risk of damage to the
ball coupling.
i When towing a trailer, set the tire
pressure on the rear axle of the towing vehicle for a maximum load; see the tire
pressure table in the fuel filler flap
(Y
page 419).
Please note that when towing a trailer,
PARKTRONIC ( Ypage 213) and Blind Spot
Assist (Y page 233) are only available with
limitations, or not at all.
i On vehicles without level control, the
height of the ball coupling will alter
according to the load placed on the vehicle.
If necessary, use a trailer with a height-
adjustable drawbar.
You will find installing dimensions and loads
under "Technical data" (Y page 455).
Driving tips i
Observe the information on ESP ®
trailer
stabilization (Y page 73) and on pulling
away with a trailer (Y page 160).
The maximum permissible speed for vehicle/
trailer combinations depends on the type of
trailer. Before beginning the journey, check
the trailer's documents to see what the
maximum permissible speed is. Observe the
legally prescribed maximum speed in the
relevant country.
For certain Mercedes-Benzv ehicles, the
maximum permissible rear axle load is
increased when towing a trailer. See
"Technical data" to find out whether this
applies to your vehicle (Y page 456). If you
utilize any of the added maximum rear axle
load when towing a trailer, the vehicle/trailer
combination may not exceed a maximum
speed of 60 mph (100 km/h) for reasons
concerning the operating permit .This also
applies in countries in which the permissible
maximum speed for vehicle/trailer
combinations is above 60 mph (100 km/h).
When towing a trailer, your vehicle's handling
characteristics will be different in comparison
with when driving without atrailer.
Use the left-hand paddle shifter to shift into
a lower gearing ood time on long and steep
downhill gradients. 254
Towing
atrailerDriving an d parking
Page 302 of 462
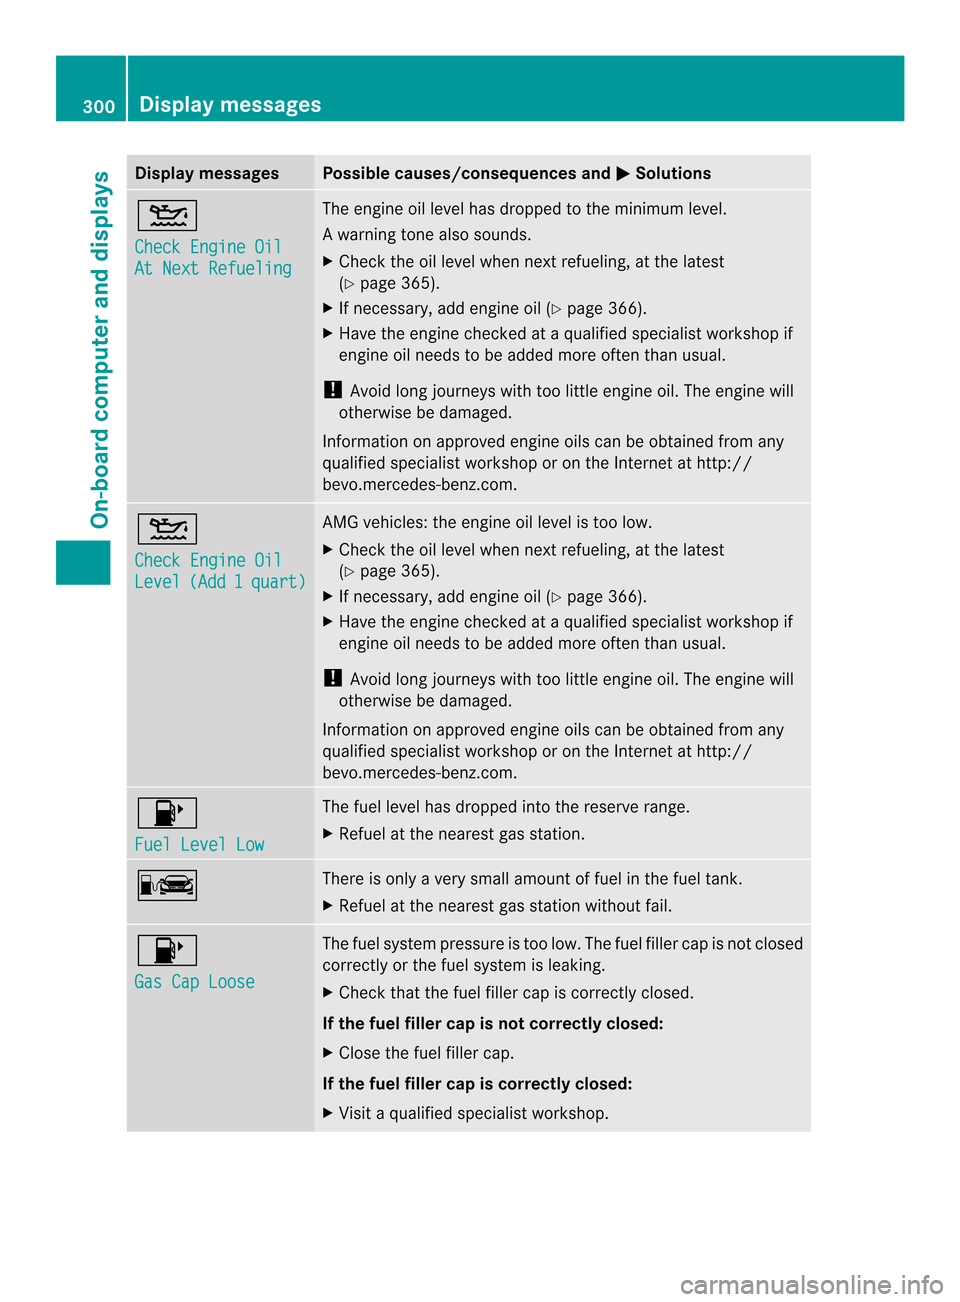
Display messages Possible causes/consequences and
0001 Solutions
0013
Check Engine Oil
At Next Refueling The engine oil level has dropped to the minimum level.
Aw
arning tone also sounds.
X Chec kthe oil level when next refueling, at the latest
(Y page 365).
X If necessary, add engine oil (Y page 366).
X Have the engine checked at a qualified specialist workshop if
engine oil needs to be added more often than usual.
! Avoid long journeys with too little engine oil. The engine will
otherwise be damaged.
Information on approved engine oils can be obtained from any
qualified specialist workshop or on the Internet at http://
bevo.mercedes-benz.com. 0013
Check Engine Oil
Level (Add 1 quart) AMG vehicles: the engine oil level is too low.
X
Check the oil level when next refueling, at the latest
(Y page 365).
X If necessary, add engine oil (Y page 366).
X Have the engine checked at a qualified specialist workshop if
engine oil needs to be added more often than usual.
! Avoid long journeys with too little engine oil. The engine will
otherwise be damaged.
Information on approved engine oils can be obtained from any
qualified specialist workshop or on the Internet at http://
bevo.mercedes-benz.com. 0012
Fuel Level Low The fuel level has dropped into the reserve range.
X
Refuel at the nearest gas station. 000A There is only a very small amount of fuel in the fuel tank.
X
Refuel at the nearest gas station without fail. 0012
Gas Cap Loose The fuel system pressure is too low. The fuel filler cap is not closed
correctly or the fuel system is leaking.
X
Check that the fuel filler cap is correctly closed.
If the fuel filler cap is not correctly closed:
X Close the fuel filler cap.
If the fuel filler cap is correctly closed:
X Visit a qualified specialist workshop. 300
Display messagesOn-board computer and displays
Page 318 of 462
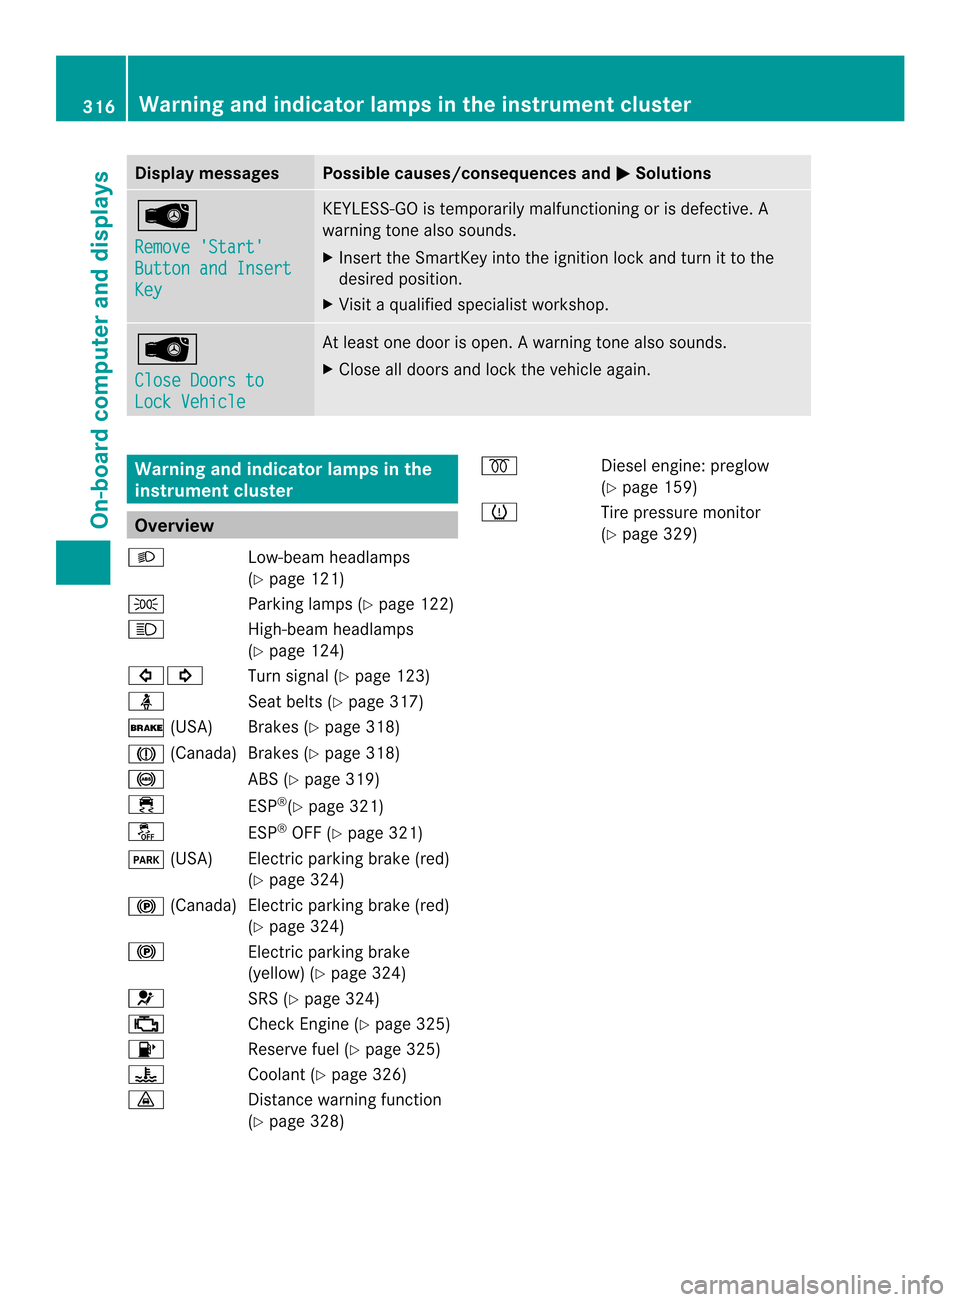
Display messages Possible causes/consequences and
0001 Solutions
0001
Remove 'Start'
Button and Insert
Key KEYLESS-GO is temporarily malfunctioning or is defective. A
warning tone also sounds.
X
Insert the SmartKey into the ignition lock and turn it to the
desired position.
X Visit a qualified specialist workshop. 0001
Close Doors to
Lock Vehicle At leas
tone door is open. Awarning tone also sounds.
X Close all doors and loc kthe vehicle again. Warning and indicator lamps in the
instrument cluster
Overview
000D Low-beam headlamps
(Ypage 121)
0016 Parking lamps (Y page 122)
000C High-beam headlamps
(Ypage 124)
00070006 Turn signal (Ypage 123)
0014 Seat belts (Ypage 317)
0011 (USA) Brakes (Y page 318)
0008 (Canada)B rakes (Ypage 318)
0019 ABS (Ypage 319)
000F ESP®
(Y page 321)
0017 ESP®
OFF (Y page 321)
0007 (USA) Electric parking brake (red)
(Ypage 324)
000C (Canada )Electric parking brake (red)
(Y page 324)
000C Electric parking brake
(yellow) (Y page 324)
001F SRS (Ypage 324)
0010 Check Engine (Y page 325)
0012 Reserve fuel (Ypage 325)
000E Coolant (Ypage 326)
000E Distance warning function
(Ypage 328) 000F
Diesel engine: preglow
(Y page 159)
0012 Tire pressure monitor
(Ypage 329) 316
Warning and indicator lamps in the instrument clusterOn-board computer and displays
Page 327 of 462
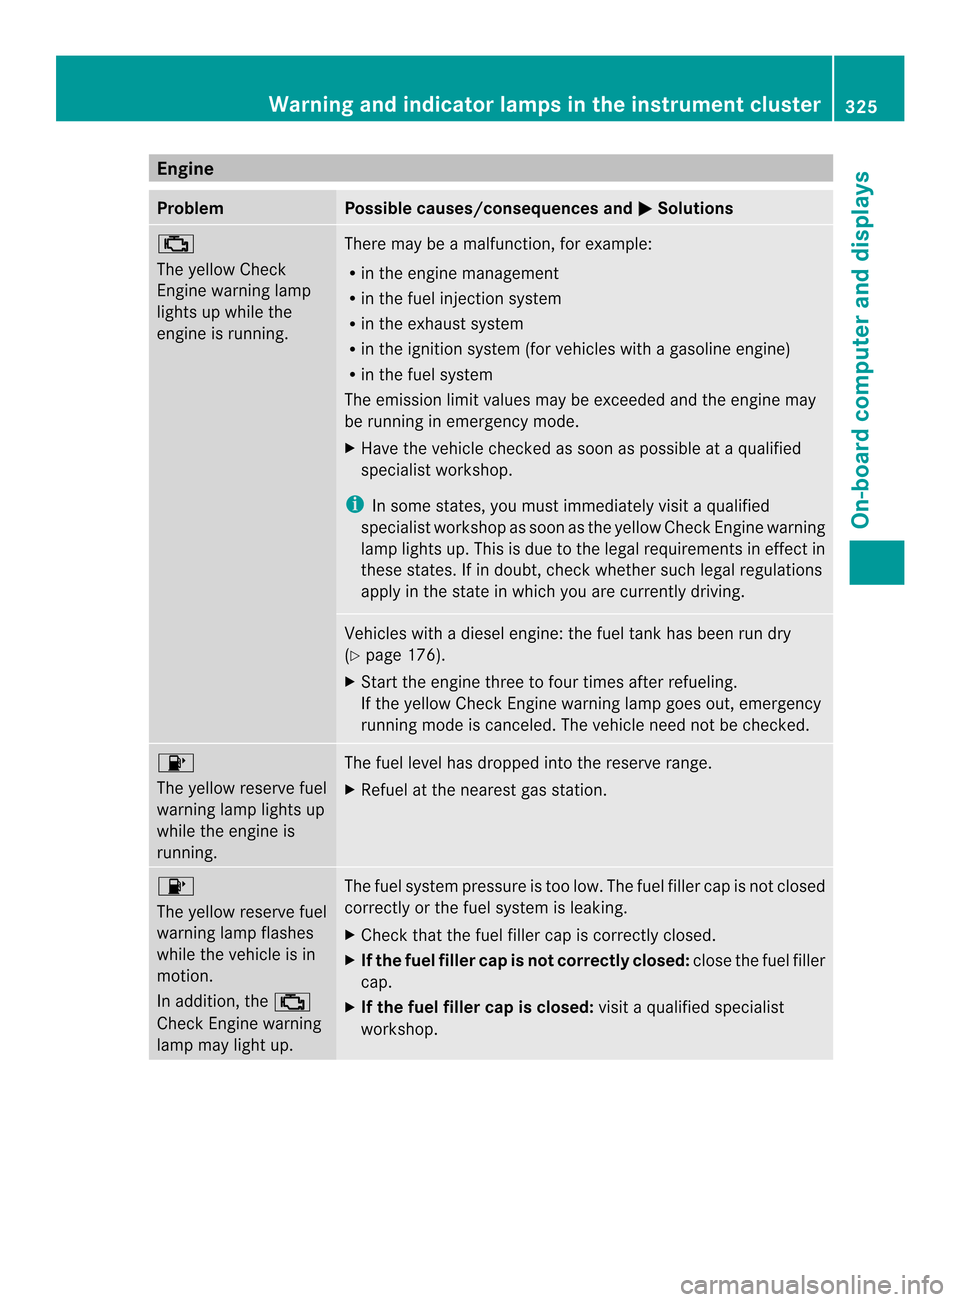
Engine
Problem Possible causes/consequences and
0001 Solutions
0010
The yellow Check
Engine warning lamp
lights up while the
engine is running.
There may be a malfunction, for example:
R
in the engine management
R in the fuel injection system
R in the exhaust system
R in the ignition system (for vehicles with a gasoline engine)
R in the fuel system
The emission limit values may be exceeded and the engin emay
be running in emergency mode.
X Have the vehicle checked as soon as possible at a qualified
specialist workshop.
i In some states, you must immediately visit a qualified
specialist workshop as soon as the yellow Chec kEngine warning
lamp lights up .This is due to the legal requirements in effect in
these states. If in doubt, check whether such legal regulations
apply in the state in which you are currently driving. Vehicles with a diesel engine: the fuel tank has been run dry
(Y
page 176).
X Start the engine three to four times after refueling.
If the yellow Check Engine warning lamp goes out, emergency
running mode is canceled. The vehicle need not be checked. 0012
The yellow reserve fuel
warning lamp lights up
while the engine is
running.
The fuel level has dropped into the reserve range.
X
Refuel at the nearest gas station. 0012
The yellow reserve fuel
warning lamp flashes
while the vehicle is in
motion.
In addition, the
0010
Check Engine warning
lamp may light up. The fuel system pressure is too low. The fuel filler cap is not closed
correctly or the fuel system is leaking.
X
Check that the fuel filler cap is correctly closed.
X If the fuel filler cap is not correctly closed: close the fuel filler
cap.
X If the fuel filler cap is closed: visit a qualified specialist
workshop. Warning and indicator lamps in the instrument cluster
325On-board computer and displays Z
Page 387 of 462
!
Residue from the tire sealant may come
out of the filler hose after use. This could
cause stains.
Therefore, place the filler hose in the plastic
bag which contained the TIREFIT kit. H
Environmental note
Have the used tire sealant bottle disposed of
professionally, e.g. at aqualified specialist
workshop.
If a tire pressure of 18 0kPa (1.8 bar/26 psi)
has been attained after five minutes:
X Switch off the tire inflation compressor.
X Unscrew the filler hose from the valve of
the faulty tire.
X Stow the tire sealant bottle and the tire
inflation compressor.
X Pull away immediately.
The maximum speed for a tire sealed with
tire sealant is 50 mph (80 km/h). The upper
part of the TIREFIT sticker must be affixed
to the instrument cluster in the driver's
field of vision.
X Stop after driving for approximately ten
minutes and check the tire pressure with
the tire inflation compressor.
The tire pressure must now be at least
130 kPa (1.3 bar/19 psi). G
WARNING
If the required tire pressure is not reached
after driving for a short period, the tire is too
badly damaged. The tire sealant cannot repair
the tire in this instance. Damaged tires and a
tire pressure that is too low can significantly
impair the vehicle's braking and driving
characteristics. There is a risk of accident.
Do not continue driving. Contact a qualified
specialist workshop.
X Correct the tire pressure if it is still at least
130 kPa (1.3 bar/19 psi) (for the values,
see the Tire and Loading Information placard on the B-pillar on the driver's side
or tire pressure table on the fuel filler flap).
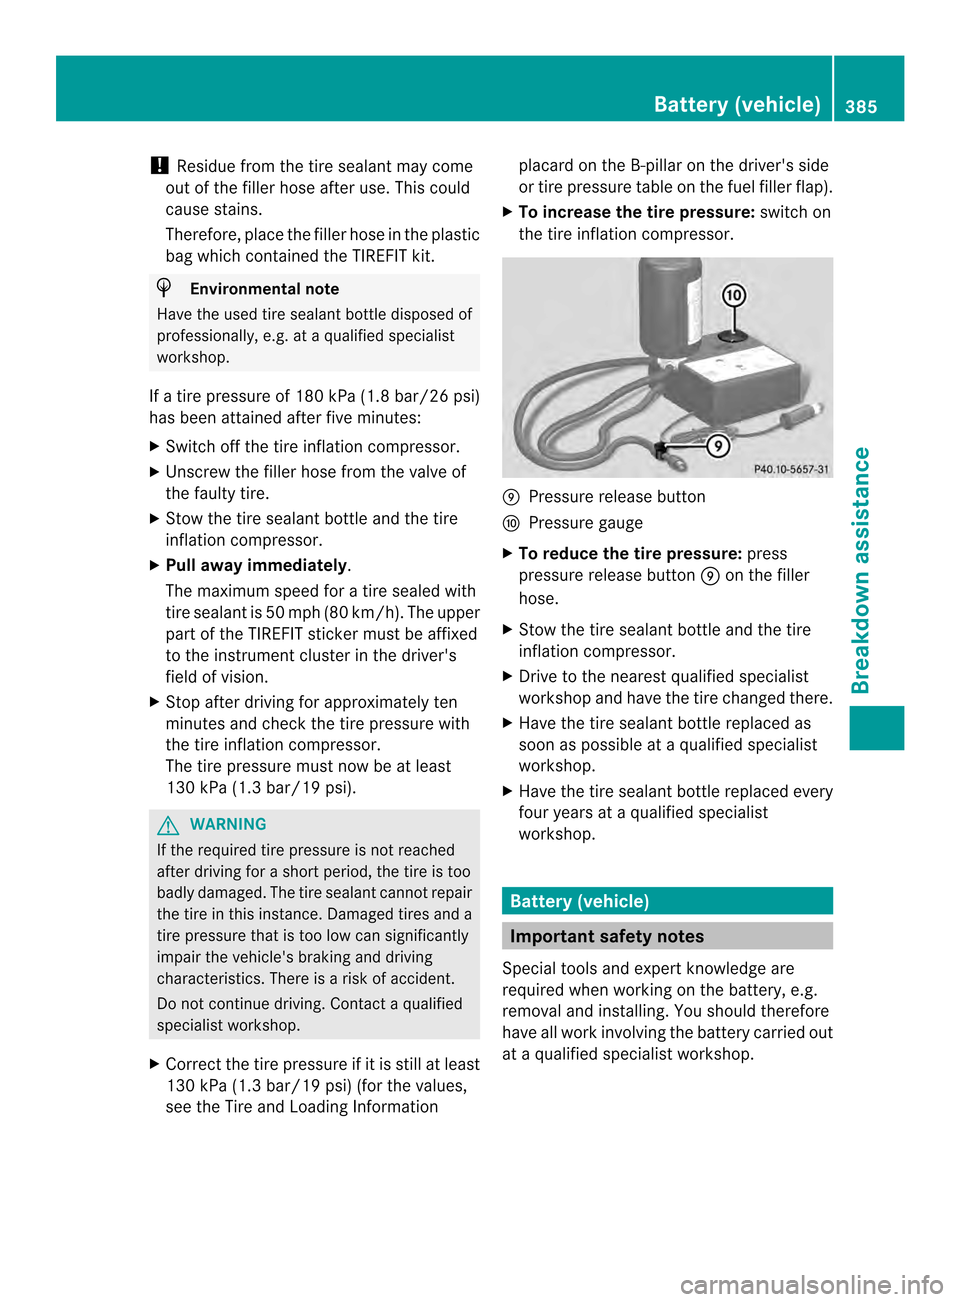
X To increase the tire pressure: switch on
the tire inflation compressor. 0016
Pressure release button
0017 Pressure gauge
X To reduce the tire pressure: press
pressure release button 0016on the filler
hose.
X Stow the tire sealant bottle and the tire
inflation compressor.
X Drive to the nearest qualified specialist
workshop and have the tire changed there.
X Have the tire sealant bottle replaced as
soon as possible at a qualified specialist
workshop.
X Have the tire sealant bottle replaced every
four years at a qualified specialist
workshop. Battery (vehicle)
Important safety notes
Special tools and expert knowledge are
required when working on the battery, e.g.
removal and installing. You should therefore
have all work involving the battery carried out
at a qualified specialist workshop. Battery (vehicle)
385Breakdown assistance Z
Page 400 of 462

Useful information
i This Operator's Manual describes all
models and all standard and optional
equipment of your vehicle available at the
time of publication of the Operator's
Manual. Country-specific differences are
possible. Please note that your vehicle may
not be equipped with all features
described. This also applies to safety-
related systems and functions.
i Read the information on qualified
specialist workshops: (Y page 28).Important safety notes
G
WARNING
If wheels and tires of the wrong size are used,
the wheel brakes or suspension components
may be damaged. There is arisk of an
accident.
Always replace wheels and tires with those
that fulfill the specifications of the original
part.
When replacing wheels, make sure to use the
correct:
R designation
R model
When replacing tires, make sure to use the
correct:
R designation
R manufacturer
R model G
WARNING
Af lat tire severely impairs the driving,
steering and braking characteristics of the
vehicle. There is a risk of accident.
Tires without run-flat characteristics:
R do not drive with aflat tire.
R immediately replace the flat tire with your
emergency spare wheel or spare wheel, or
consult a qualified specialist workshop. Tires with run-flat characteristics:
R
pay attention to the information and
warning notices on MOExtended tires (tires
with run-flat characteristics).
Accessories that are not approved for your
vehicle by Mercedes-Ben zorthat are not
being used correctly can impair operating
safety.
Before purchasing and using non-approved
accessories, visit a qualified specialist
workshop and inquire about:
R suitability
R legal stipulations
R factory recommendations
Information on the dimensions and types of
wheels and tires for your vehicle can be found
in the "Wheel/tire combinations" section
(Y page 426).
Information on air pressure for the tires on
your vehicle can be found:
R on the vehicle's Tire and Loading
Information placard on the B-pillar
(Y page 409)
R on the tire pressure label on the fuel filler
flap (Y page 174)
R in the "Tire pressure" section Operation
Information on driving
If the vehicle is heavily loaded, check the tire
pressures and correct them if necessary.
While driving, pay attention to vibrations,
noises and unusual handling characteristics,
e.g. pulling to one side. This may indicate that
the wheels or tires are damaged. If you
suspect that a tire is defective, reduce your
speed immediately. Stop the vehicle as soon
as possible to check the wheels and tires for
damage. Hidden tire damage could also be
causing the unusual handling characteristics.
If you find no signs of damage, have the tires 398
OperationWheels and tires