2014 MERCEDES-BENZ GLK-CLASS SUV power steering
[x] Cancel search: power steeringPage 8 of 384

Parking brake
........................ 165, 169
Warning lamp ................................. 263
Breakdown
see Flat tire
see Towing away/tow-starting
Bulbs
see Replacing bulbs C
California Important notice for retail
customers and lessees ....................24
Calling up a malfunction
see Display messages
Car
see Vehicle
Care
Carpets .......................................... 312
Car wash ........................................ 306
Display ........................................... 310
Exterior lights ................................ 309
Gear or selector lever ....................311
Interior ........................................... 310
Matte finish ................................... 308
Notes ............................................. 305
Paint .............................................. 307
Plastic trim .................................... 310
Power washer ................................ 307
Rear view camera .......................... 309
Roof lining ...................................... 312
Seat belt ........................................ 312
Seat cover ..................................... 311
Sensors ......................................... 309
Steering wheel ............................... 311
Tail pipes ....................................... 310
Trim pieces .................................... 311
Washing by hand ........................... 306
Wheels ........................................... 307
Windows ........................................ 308
Wiper blades .................................. 308
Wooden trim .................................. 311
Cargo compartment cover ...............278
Cargo compartment
enlargement ...................................... 276
Cargo compartment floor Opening/closing ............................ 281
Stowage well (under) .....................281Cargo net
Attaching ....................................... 280
Important safety information .........279
Cargo tie down rings .........................277
Car wash (care) ................................. 306
CD player/CD changer (on-board
computer) .......................................... 226
Center console Lower section .................................. 37
Upper section .................................. 36
Central locking
Automatic locking (on-board
computer) ...................................... 232
Locking/unlocking (SmartKey) ........76
Changing bulbs
Cornering light function .................121
High-beam headlamps ...................120
Low-beam headlamps ....................120
Parking lamps ................................ 120
Reversing lamps ............................ 122
Standing lamps (front) ...................120
Turn signals (front) ......................... 121
Child-proof locks
Important safety notes ....................66
Rear doors ....................................... 66
Children
In the vehicle ................................... 61
Restraint systems ............................ 61
Special seat belt retractor ...............64
Child seat
LATCH-type (ISOFIX) child seat
anchors ............................................ 64
Top Tether ....................................... 65
Cigarette lighter ................................ 284
Cleaning Mirror turn signal ........................... 309
Trailer tow hitch ............................. 310
Climate control
Adjusting the airflow (AIR FLOW) ...135
Automatic climate control (3-zone) 132
Controlling automatically ...............135
Cooling with air dehumidification ..133
Defrosting the windows .................138
Defrosting the windshield ..............137
Dual-zone automatic climate
control ........................................... 129
Important safety notes ..................128
Indicator lamp ................................ 135 6
Index
Page 27 of 384
If you have purchased a used car, please send
us the "Notification of Used Car Purchase" in
the Service and Guarantee booklet or simply
call the Mercedes-Benz Customer Assistance
Center (USA) at the hotline number
1-800-FOR-MERCedes(1-800-367-6372) or
Customer Service (Canada) at
1-800-387-0100. Vehicle operation outside the USA
and Canada
If you plan to operate your vehicle in foreign
countries, please be aware that:
R service facilities or replacement parts may
not be readily available.
R unleaded fuel for vehicles with a catalytic
converter may not be available. Leaded fuel
may cause damage to the catalytic
converter.
R the fuel may have a considerably lower
octane rating. Unsuitable fuel can cause
engine damage.
Some Mercedes-Benz models are available
for delivery in Europe through our European
Delivery Program. For details, consult an
authorized Mercedes-Benz Center or write to
one of the following addresses.
In the USA
Mercedes-Benz USA, LLC
European Delivery Department
One Mercedes Drive
Montvale, NJ 07645-0350
In Canada
Mercedes-Benz Canada, Inc.
European Delivery Department
98 Vanderhoof Avenue
Toronto, Ontario M4G 4C9 Sports Utility Vehicle
G
WARNING
Due to the high center of gravity, the vehicle
may start to skid and roll over in the event of an abrupt steering maneuver and/or when
the vehicle's speed is not adapted to the road
conditions. There is a risk of an accident.
Always adapt your speed and driving style to
the vehicle's driving characteristics and to the
prevailing road and weather conditions.
Utility vehicles have a significantly higher
rollover rate than other types of vehicles.
Failure to operate this vehicle safely may
result in an accident, rollover of the vehicle,
and severe or fatal injury.
In a rollover crash, an unbelted person is
significantly more likely to die than a person
wearing a seat belt.
You and all vehicle occupants should always
wear your seat belts. Operating safety
Important safety notes
G
WARNING
If you do not have the prescribed service/
maintenance work or any required repairs
carried out, this can result in malfunctions or
system failures. There is a risk of an accident.
Always have the prescribed service/
maintenance work as well as any required
repairs carried out at a qualified specialist
workshop. G
WARNING
If you switch off the ignition while driving,
safety-relevant functions are only available
with limitations, or not at all. This could affect,
for example, the power steering and the brake
boosting effect. You will require considerably
more effort to steer and brake. There is a risk
of an accident.
Do not switch off the ignition while driving. G
WARNING
Modifications to electronic components, their
software as well as wiring can impair their
function and/or the function of other Introduction
25 Z
Page 146 of 384
Useful information
i This Operator's Manual describes all
models and all standard and optional
equipment of your vehicle available at the
time of publication of the Operator's
Manual. Country-specific differences are
possible. Please note that your vehicle may
not be equipped with all features
described. This also applies to safety-
related systems and functions.
i Read the information on qualified
specialist workshops: (Y page 27).Notes on breaking-in a new vehicle
Important safety notes
New and replaced brake pads and discs only
reach their optimum braking effect after
several hundred kilometers of driving.
Compensate for this by applying greater force
to the brake pedal. The first 1000 miles(1500 km)
The more you look after the engine when it is
new, the more satisfied you will be with its
performance in the future.
R You should therefore drive at varying
vehicle and engine speeds for the first
1000 miles (1500 km).
R Ideally, for the first 1000 miles (1500 km),
drive in program E.
R Avoid heavy loads, e.g. driving at full
throttle, during this period.
R Change gear in good time, before the
tachometer needle is Ôof the way to the
red area of the tachometer.
R Do not manually shift to a lower gear to
brake the vehicle.
R If possible, do not depress the accelerator
pedal past the point of resistance
(kickdown). After 1000 miles (1500 km), you can increase
the engine speed gradually and accelerate
the vehicle to full speed.
i You should also observe these notes on
breaking in if the engine or parts of the drive
train on your vehicle have been replaced.
i Always observe the respective speed
limits. Driving
Important safety notes
G
WARNING
Objects in the driver's footwell can restrict the
pedal travel or obstruct a depressed pedal.
The operating and road safety of the vehicle
is jeopardized. There is a risk of an accident.
Make sure that all objects in the vehicle are
stowed correctly, and that they cannot enter
the driver's footwell. Install the floormats
securely and as specified in order to ensure
sufficient clearance for the pedals. Do not use
loose floormats and do not place floormats on
top of one another. G
WARNING
Unsuitable footwear can hinder correct usage
of the pedals, e.g.:
R shoes with thick soles
R shoes with high heels
R slippers
There is a risk of an accident.
Wear suitable footwear to ensure correct
usage of the pedals. G
WARNING
If you switch off the ignition while driving,
safety-relevant functions are only available
with limitations, or not at all. This could affect,
for example, the power steering and the brake
boosting effect. You will require considerably
more effort to steer and brake. There is a risk
of an accident. 144
DrivingDriving and parking
Page 147 of 384
Do not switch off the ignition while driving.
G
WARNING
If the parking brake has not been fully
released when driving, the parking brake can:
R overheat and cause a fire
R lose its hold function.
There is a risk of fire and an accident. Release
the parking brake fully before driving off.
! Warm up the engine quickly. Do not use
the engine's full performance until it has
reached operating temperature.
Only shift the automatic transmission to
the desired drive position when the vehicle
is stationary.
Where possible, avoid spinning the drive
wheels when pulling away on slippery
roads. You could otherwise damage the
drive train. Key positions
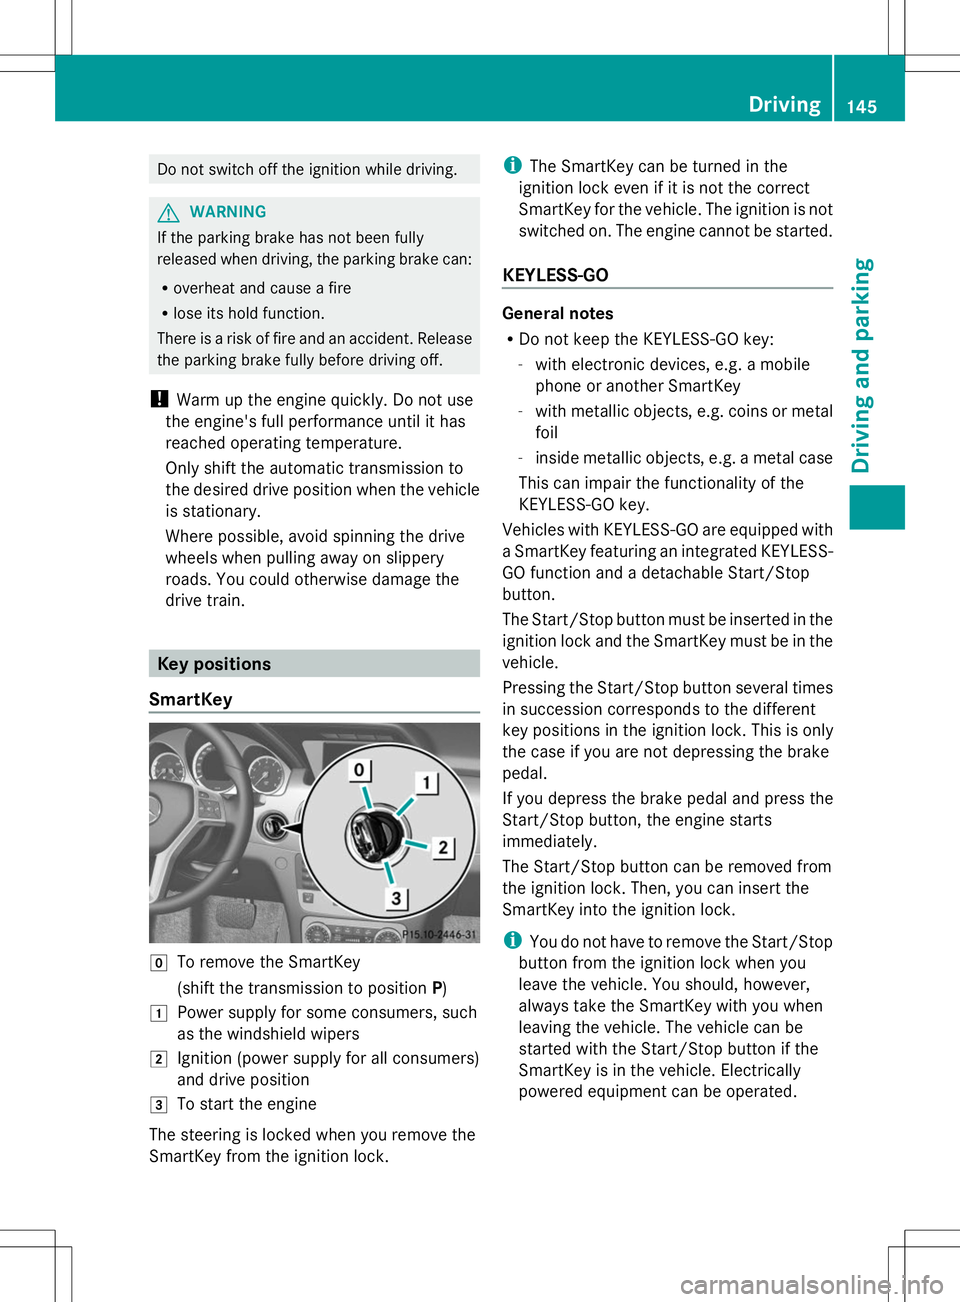
SmartKey g
To remove the SmartKey
(shift the transmission to position P)
1 Power supply for some consumers, such
as the windshield wipers
2 Ignition (power supply for all consumers)
and drive position
3 To start the engine
The steering is locked when you remove the
SmartKey from the ignition lock. i
The SmartKey can be turned in the
ignition lock even if it is not the correct
SmartKey for the vehicle. The ignition is not
switched on. The engine cannot be started.
KEYLESS-GO General notes
R
Do not keep the KEYLESS-GO key:
-with electronic devices, e.g. a mobile
phone or another SmartKey
- with metallic objects, e.g. coins or metal
foil
- inside metallic objects, e.g. a metal case
This can impair the functionality of the
KEYLESS-GO key.
Vehicles with KEYLESS-GO are equipped with
a SmartKey featuring an integrated KEYLESS-
GO function and a detachable Start/Stop
button.
The Start/Stop button must be inserted in the
ignition lock and the SmartKey must be in the
vehicle.
Pressing the Start/Stop button several times
in succession corresponds to the different
key positions in the ignition lock. This is only
the case if you are not depressing the brake
pedal.
If you depress the brake pedal and press the
Start/Stop button, the engine starts
immediately.
The Start/Stop button can be removed from
the ignition lock. Then, you can insert the
SmartKey into the ignition lock.
i You do not have to remove the Start/Stop
button from the ignition lock when you
leave the vehicle. You should, however,
always take the SmartKey with you when
leaving the vehicle. The vehicle can be
started with the Start/Stop button if the
SmartKey is in the vehicle. Electrically
powered equipment can be operated. Driving
145Driving an d parking Z
Page 166 of 384

X
Replace DEF cover :as shown and turn it
clockwise as far as it will go.
X Fold the cargo compartment floor down.
X Close the tailgate.
X Drive faster than 10 mph (16 km/h).
The Check Additive See Operator's
Check Additive See Operator's
Manual
Manual message goes out after
approximately one minute.
i If the Check Additive See
Check Additive See
Operator's Manual
Operator's Manual message remains
shown in the multifunction display, add an
additional bottle of DEF.
For further information on DEF, see
(Y page 370). Parking
Important safety notes
G
WARNING
Flammable material such as leaves, grass or
twigs may ignite if they come into contact with
hot parts of the exhaust system or exhaust
gas flow. There is a risk of fire.
Park the vehicle so that no flammable
materials come into contact with parts of the
vehicle which are hot. Take particular care not
to park on dry grassland or harvested grain
fields. G
WARNING
If you switch off the ignition while driving,
safety-relevant functions are only available
with limitations, or not at all. This could affect,
for example, the power steering and the brake
boosting effect. You will require considerably
more effort to steer and brake. There is a risk
of an accident.
Do not switch off the ignition while driving. G
WARNING
If you leave children unsupervised in the
vehicle, they could set it in motion by, for
example:
R release the parking brake.
R shift the automatic transmission out of the
parking position P.
R start the engine.
In addition, they may operate vehicle
equipment and become trapped. There is a
risk of an accident and injury.
When leaving the vehicle, always take the
SmartKey with you and lock the vehicle. Never
leave children unsupervised in the vehicle.
! Always secure the vehicle correctly
against rolling away. Otherwise, the vehicle
or its drivetrain could be damaged.
To ensure that the vehicle is secured against
rolling away unintentionally:
R the parking brake must be applied.
R the transmission must be in position Pand
the SmartKey must be removed from the
ignition lock.
R on uphill or downhill gradients, the front
wheels must be turned towards the curb. Switching off the engine
Important safety notes G
WARNING
The automatic transmission switches to
neutral position Nwhen you switch off the
engine. The vehicle may roll away. There is a
risk of an accident.
After switching off the engine, always switch
to parking position P. Prevent the parked
vehicle from rolling away by applying the
parking brake. 164
Pa
rkingDriving an d parking
Page 168 of 384

X
Connecting a trickle charger.
i You can obtain information about trickle
chargers from a qualified specialist
workshop.
If you leave the vehicle parked for longer than
six weeks, the vehicle may suffer damage as
a result of lack of use.
X Visit a qualified specialist workshop and
seek advice. Driving tips
General driving tips
Important safety notes G
WARNING
If you switch off the ignition while driving,
safety-relevant functions are only available
with limitations, or not at all. This could affect,
for example, the power steering and the brake
boosting effect. You will require considerably
more effort to steer and brake. There is a risk
of an accident.
Do not switch off the ignition while driving. G
WARNING
If you operate mobile communication
equipment while driving, you will be
distracted from traffic conditions. You could
also lose control of the vehicle. There is a risk
of an accident.
Only operate this equipment when the vehicle
is stationary.
Observe the legal requirements for the
country in which you are driving. Some
jurisdictions prohibit the driver from using a
mobile phone while driving a vehicle.
If you make a call while driving, always use
hands-free mode. Only operate the telephone
when the traffic situation permits. If you are
unsure, pull over to a safe location and stop
before operating the telephone.
Bear in mind that at a speed of only 30 mph
(approximately 50 km/h), the vehicle covers a distance of 44 ft (approximately 14 m) per
second.
Drive sensibly – save fuel Observe the following tips to save fuel:
X
The tires should always be inflated to the
recommended tire pressure.
X Remove unnecessary loads.
X Remove roof racks when they are not
needed.
X Warm up the engine at low engine speeds.
X Avoid frequent acceleration or braking.
X Have all maintenance work carried out as
indicated by the service intervals in the
Maintenance Booklet or by the service
interval display.
Fuel consumption also increases when
driving in cold weather, in stop-start traffic
and in hilly terrain.
Drinking and driving G
WARNING
Drinking and driving and/or taking drugs and
driving are very dangerous combinations.
Even a small amount of alcohol or drugs can
affect your reflexes, perceptions and
judgment.
The possibility of a serious or even fatal
accident is greatly increased when you drink
or take drugs and drive.
Do not drink or take drugs and drive or allow
anyone to drive who has been drinking or
taking drugs.
Emission control G
WARNING
Combustion engines emit poisonous exhaust
gases such as carbon monoxide. Inhaling
these exhaust gases leads to poisoning. There
is a risk of fatal injury. Therefore never leave
the engine running in enclosed spaces
without sufficient ventilation. 166
Driving tipsDriving and pa
rking
Page 261 of 384

Display messages Possible causes/consequences and
M
MSolutions ? The hood is open.
G WARNING
The open hood may block your view when the vehicle is in motion.
There is a risk of an accident.
X Pull over and stop the vehicle safely as soon as possible, paying
attention to road and traffic conditions.
X Secure the vehicle against rolling away ( Ypage 164).
X Close the hood. C At least one door is open.
X
Close all the doors. Ð
Power Steering Power Steering
Malfunction See Malfunction See
Operator's Manual Operator's Manual The power steering is malfunctioning.
A warning tone also sounds.
G WARNING
You will need to use more force to steer.
There is a risk of an accident.
X Check whether you are able to apply the extra force required.
X If you are able to steer safely: carefully drive on to a qualified
specialist workshop.
X If you are unable to steer safely: do not drive on. Contact the
nearest qualified specialist workshop. Phone No Service Phone No Service Your vehicle is outside the network provider's transmitter/
receiver range.
X
Wait until the mobile phone operational readiness symbol
appears in the multifunction display. ¥
Check Washer Fluid Check Washer Fluid The washer fluid level in the washer fluid reservoir has dropped
below the minimum.
X
Add washer fluid ( Ypage 305). Display
messages
259On-board computer and displays Z
Page 324 of 384

X
First, remove the jumper cables from ground point Aand negative terminal ?, then from
positive clamp ;and positive terminal =. Begin each time at the contacts on your own
vehicle first.
X Close cover :of positive terminal ;after removing the jumper cables.
X Have the battery checked at a qualified specialist workshop.
i Jump-starting is not considered to be a normal operating condition.
i Jumper cables and further information regarding jump-starting can be obtained at any
qualified specialist workshop. Towing and tow-starting
Important safety notes
G
WARNING
You can no longer steer the vehicle if the
steering wheel lock has been engaged. There
is a risk of an accident.
Always switch off the ignition when towing the
vehicle with a tow cable or a tow bar. G
WARNING
If the weight of the vehicle to be towed or tow-
started is greater than the permissible gross
weight of your vehicle:
R the towing eye could detach itself
R the vehicle/trailer combination could
rollover.
There is a risk of an accident.
When towing or tow-starting another vehicle,
its weight should not be greater than the
permissible gross weight of your vehicle.
Information on your vehicle's gross vehicle
weight rating can be found on the vehicle
identification plate (Y page 366).
! If DISTRONIC PLUS or the HOLD function
is activated, the vehicle brakes
automatically in certain situations. To
prevent damage to the vehicle, deactivate
DISTRONIC PLUS and the HOLD function in
the following or other similar situations:
R when towing the vehicle
R in the car wash !
The vehicle can be towed a maximum of
30 miles (50km). The towing speed of
30 mph (50 km/h) must not be exceeded.
If the vehicle has to be towed more than
30 miles (50km), the entire vehicle must be
raised and transported.
! Only secure the tow rope or tow bar at the
towing eyes. Otherwise, the vehicle could
be damaged.
! Do not use the towing eyes for recovery
purposes as this could damage the vehicle.
If in doubt, recover the vehicle with a crane.
! When towing, pull away slowly and
smoothly. If the tractive power is too high,
the vehicles could be damaged.
! Do not tow with sling-type equipment.
This could damage the vehicle.
! On vehicles with KEYLESS-GO, use the
SmartKey instead of the Start/Stop
button. Turn the SmartKey to position 2in
the ignition lock and shift the automatic
transmission to N. Then, turn the SmartKey
back to 0and leave it in the ignition lock.
It is better to have the vehicle transported
than to have it towed.
The automatic transmission must be in
position Nwhen the vehicle is being towed. 322
Towing and tow-startingBreakdown assistance