2014 MERCEDES-BENZ GLK-CLASS SUV center console
[x] Cancel search: center consolePage 194 of 384
Once you have exited the parking space
completely, the steering wheel is moved to
the straight-ahead position. You hear a tone
and the Park Assist Finished Park Assist Finished message
appears in the multifunction display. You will
then have to steer and merge into traffic on
your own. PARKTRONIC is still available.
Canceling Active Parking Assist You can cancel Active Parking Assist at any
time.
X Stop the movement of the multifunction
steering wheel or steer yourself.
Active Parking Assist will be canceled at
once. The Park Assist Canceled Park Assist Canceled
message appears in the multifunction
display.
or
X Press the PARKTRONIC button on the
center console (Y page 187).
PARKTRONIC is switched off and Active
Parking Assist is immediately canceled.
The Park Assist Canceled
Park Assist Canceled message
appears in the multifunction display.
Active Parking Assist is canceled
automatically if:
R the electric parking brake is engaged
R transmission position Pis selected
R parking using Active Parking Assist is no
longer possible
R you are driving faster than 6 mph
(10 km/h)
R a wheel spins, ESP ®
intervenes or fails. The
÷ warning lamp lights up in the
instrument cluster.
A warning tone sounds. The parking symbol
disappears and the multifunction display
shows the Park Assist Canceled
Park Assist Canceled
message.
If Active Parking Assist is canceled, you must
steer again yourself.
If a system malfunction occurs, the vehicle is
braked to a standstill. To drive on, depress the
accelerator again. Towing a trailer For vehicles with a trailer tow hitch, the
minimum length for parking spaces is slightly
increased.
If you have attached a trailer to your vehicle,
you should not use Active Parking Assist.
Once the electrical connection is established
between your vehicle and the trailer, Active
Parking Assist is no longer available.
PARKTRONIC is deactivated for the rear area.
Rear view camera
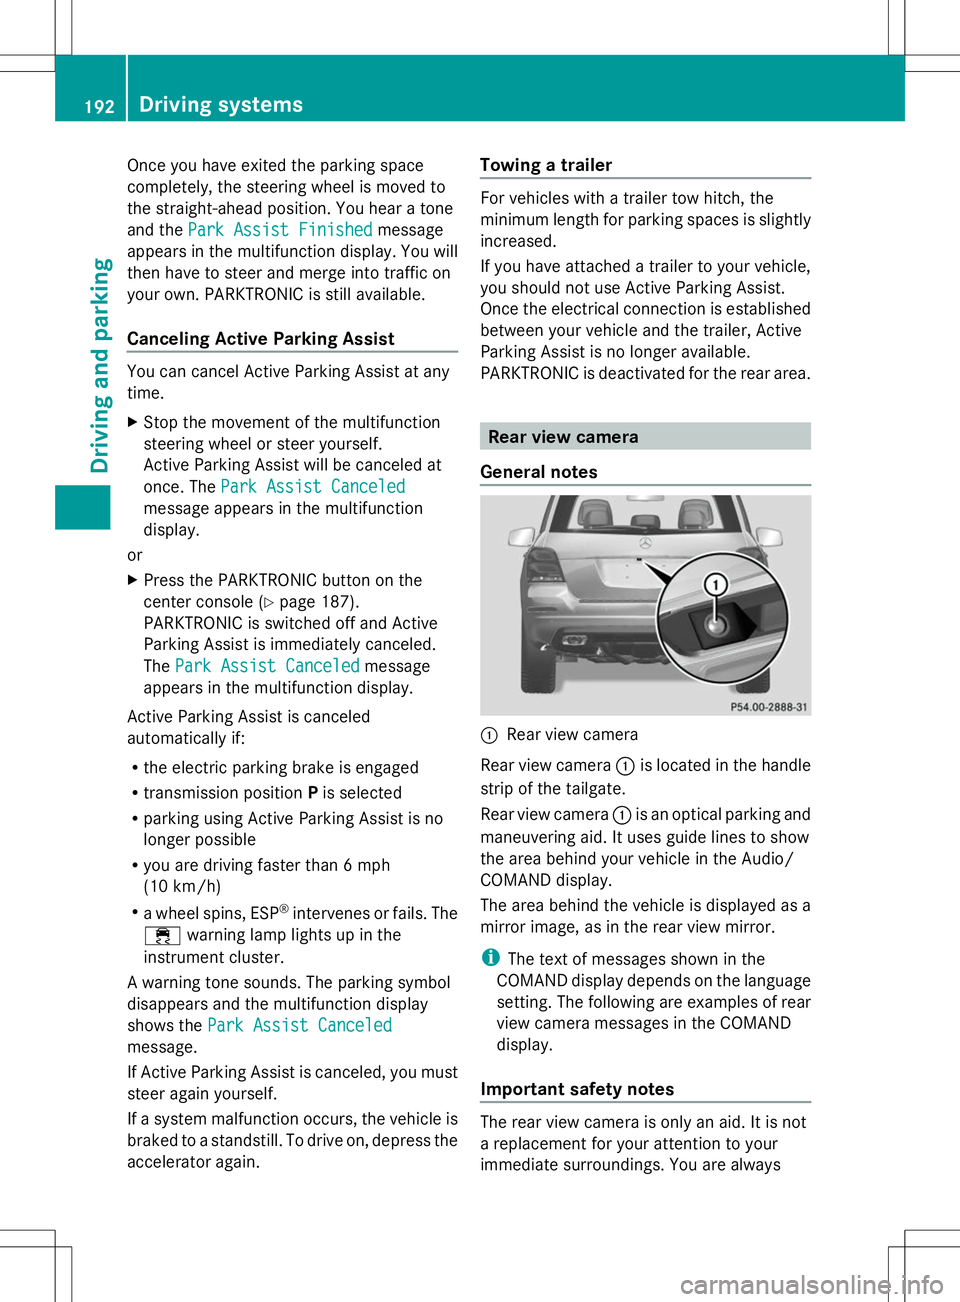
General notes :
Rear view camera
Rear view camera :is located in the handle
strip of the tailgate.
Rear view camera :is an optical parking and
maneuvering aid. It uses guide lines to show
the area behind your vehicle in the Audio/
COMAND display.
The area behind the vehicle is displayed as a
mirror image, as in the rear view mirror.
i The text of messages shown in the
COMAND display depends on the language
setting. The following are examples of rear
view camera messages in the COMAND
display.
Important safety notes The rear view camera is only an aid. It is not
a replacement for your attention to your
immediate surroundings. You are always192
Driving systemsDriving and parking
Page 243 of 384
Display messages Possible causes/consequences and
M
MSolutions Front Passenger
Front Passenger
Airbag Disabled Airbag Disabled
See Operator's See Operator's
Manual Manual The front-passenger air bag is disabled during the journey, even
though:
R
an adult
or
R a person larger than a certain size is occupying the front-
passenger seat
If additional forces are applied to the seat, the system may
interpret the occupant's weight as lower than it actually is.
G WARNING
The front-passenger air bag does not deploy during an accident.
There is an increased risk of injury.
X Pull over and stop the vehicle safely as soon as possible, paying
attention to road and traffic conditions.
X Secure the vehicle against rolling away ( Ypage 164).
X Switch the ignition off.
X Have the occupant get out of the vehicle.
X Keep the seat unoccupied, close the front-passenger door and
switch on the ignition.
X Observe the PASSENGER AIR BAG OFF indicator lamp in the
center console and the multifunction display and check the
following:
Seat unoccupied and ignition switched on:
R the PASSENGER AIR BAG OFF indicator lamp must light up and
remain lit. If the indicator lamp is on, OCS has disabled the front-
passenger air bag ( Ypage 49).
R the Front Passenger Airbag Enabled See Operator's
Front Passenger Airbag Enabled See Operator's
Manual Manual orFront Passenger Airbag Disabled See
Front Passenger Airbag Disabled See
Operator's Manual
Operator's Manual display messages must not be shown in
the multifunction display.
X Wait for a period of at least 60 seconds until the necessary
system checks have been completed.
X Make sure that the display messages do not appear in the
multifunction display.
If these conditions are fulfilled, the front-passenger seat can be
occupied again. Whether the PASSENGER AIR BAG OFF indicator
lamp remains lit or goes out depends on how OCS classifies the
occupant.
If the conditions are not fulfilled, the system is not operating
correctly.
X Visit a qualified specialist workshop immediately. Display
messages
241On-board computer and displays Z
Page 244 of 384
Display messages Possible causes/consequences and
M
MSolutions For further information about the Occupant Classification System,
see (Y
page 49). Front Passenger Front Passenger
Airbag Enabled Airbag Enabled
See Operator's See Operator's
Manual Manual The front-passenger air bag is enabled during the journey, even
though:
R
a child, a small adult or an object weighing less than the
system's weight threshold is located on the front-passenger
seat
or
R the front-passenger seat is unoccupied
The system may detect objects or forces applying additional
weight on the seat.
G WARNING
The air bag may deploy unintentionally.
There is an increased risk of injury.
X Pull over and stop the vehicle safely as soon as possible, paying
attention to road and traffic conditions.
X Secure the vehicle against rolling away ( Ypage 164).
X Switch the ignition off.
X Open the front-passenger door.
X Remove the child and the child restraint system from the front-
passenger seat.
X Make sure that there are no objects on the seat adding to the
weight.
The system may otherwise detect the additional weight and
interpret the seat occupant's weight as greater than it actually
is.
X Keep the seat unoccupied, close the front-passenger door and
switch on the ignition.
X Observe the PASSENGER AIR BAG OFF indicator lamp in the
center console and the multifunction display and check the
following:
Seat unoccupied and ignition switched on:
R the PASSENGER AIR BAG OFF indicator lamp must light up and
remain lit. If the indicator lamp is on, OCS (Occupant
Classification System) has disabled the front-passenger air bag
(Y page 49).
R the Front Passenger Airbag Enabled See Operator's Front Passenger Airbag Enabled See Operator's
Manual Manual orFront Passenger Airbag Disabled See
Front Passenger Airbag Disabled See
Operator's Manual
Operator's Manual display messages must not be shown in
the multifunction display. 242
Display
messagesOn-board computer and displays
Page 284 of 384
This helps to prevent damage to the
vehicle.
Position the load on the roof rack in such a
way that the vehicle will not sustain
damage even when it is in motion.
Ensure that, depending on the vehicle's
equipment, you can raise the panorama
roof with power tilt/sliding panel fully and
open the tailgate fully when the roof carrier
is installed.
The maximum roof load is 165 lbs(75 kg).
An incorrectly secured roof carrier or roof
load could become detached from the
vehicle. Therefore, always comply with the
installation instructions supplied by the
manufacturer of the roof carrier.
Attaching the roof carrier X
Secure the roof carrier to the roof rails.
X Observe the manufacturer's installation
instructions. Features
Cup holder
Important safety notes !
Only use the cup holders for containers of
the right size and which have lids. The
drinks could otherwise spill.
Cup holder in the front-compartment
center console :
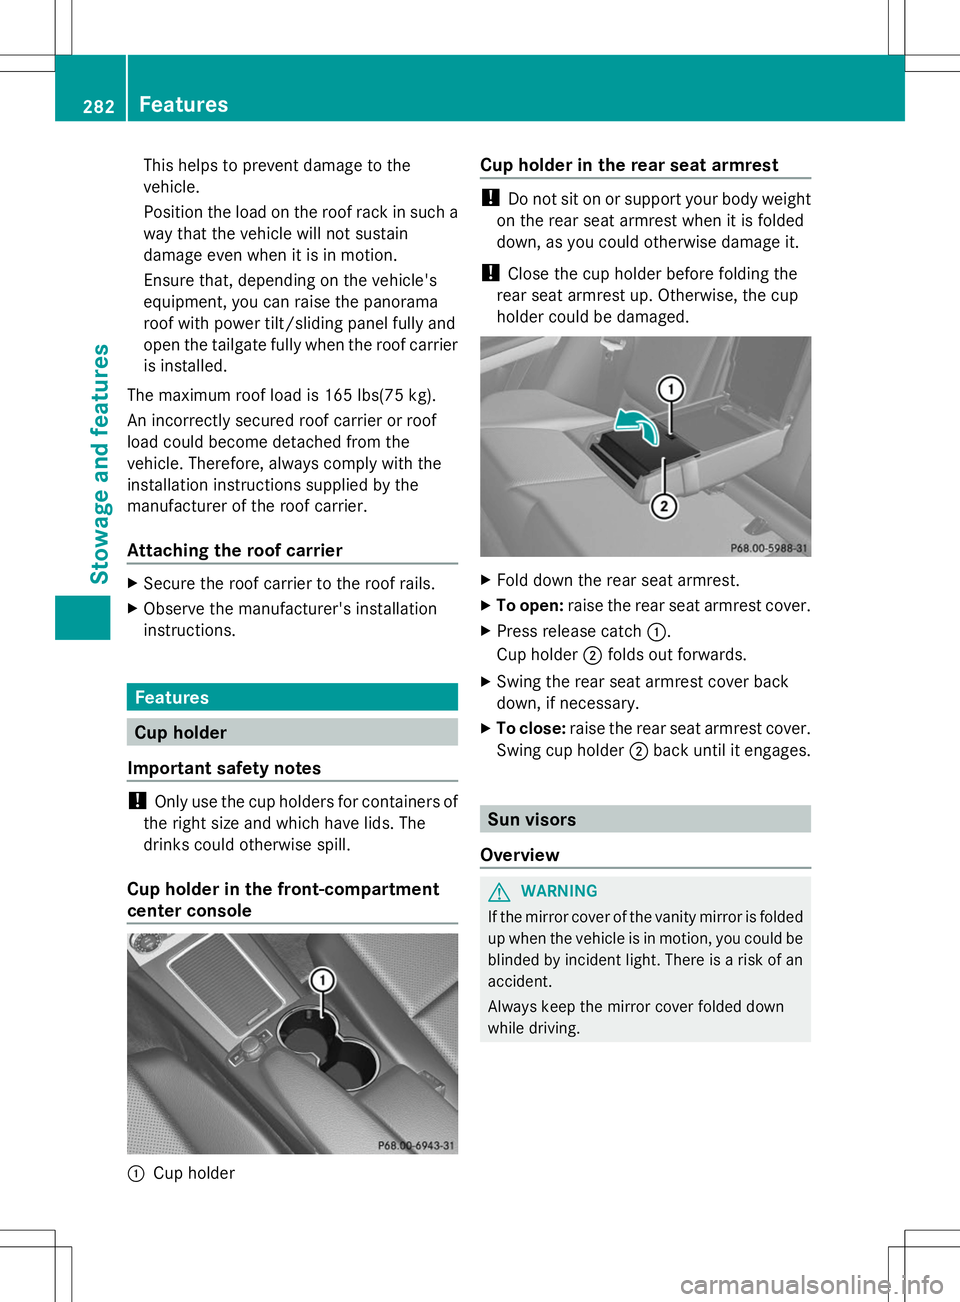
Cup holder Cup holder in the rear seat armrest !
Do not sit on or support your body weight
on the rear seat armrest when it is folded
down, as you could otherwise damage it.
! Close the cup holder before folding the
rear seat armrest up. Otherwise, the cup
holder could be damaged. X
Fold down the rear seat armrest.
X To open: raise the rear seat armrest cover.
X Press release catch :.
Cup holder ;folds out forwards.
X Swing the rear seat armrest cover back
down, if necessary.
X To close: raise the rear seat armrest cover.
Swing cup holder ;back until it engages. Sun visors
Overview G
WARNING
If the mirror cover of the vanity mirror is folded
up when the vehicle is in motion, you could be
blinded by incident light. There is a risk of an
accident.
Always keep the mirror cover folded down
while driving. 282
FeaturesStowage and features
Page 286 of 384
X
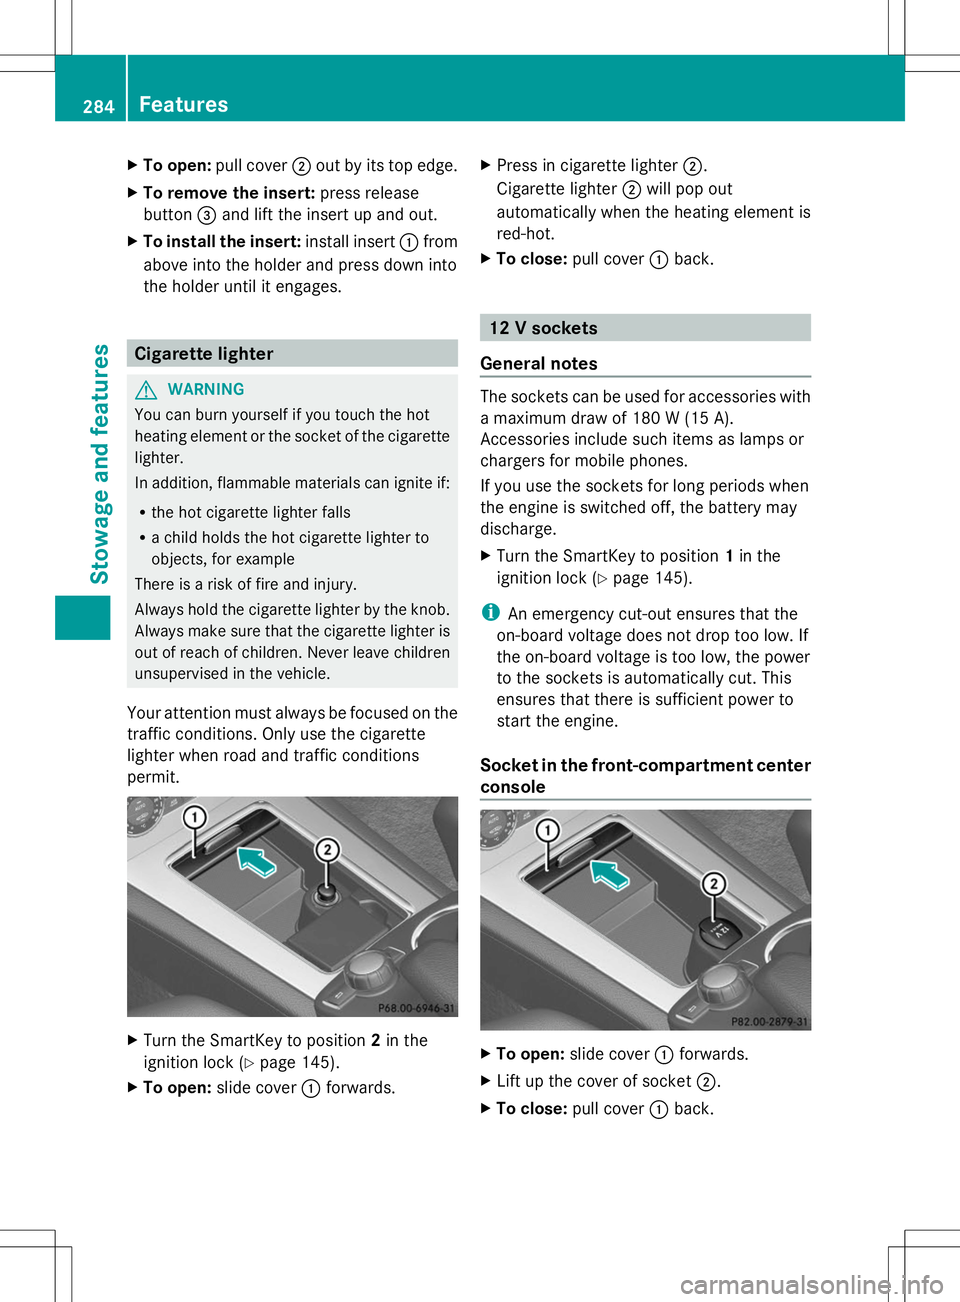
To open: pull cover ;out by its top edge.
X To remove the insert: press release
button =and lift the insert up and out.
X To install the insert: install insert:from
above into the holder and press down into
the holder until it engages. Cigarette lighter
G
WARNING
You can burn yourself if you touch the hot
heating element or the socket of the cigarette
lighter.
In addition, flammable materials can ignite if:
R the hot cigarette lighter falls
R a child holds the hot cigarette lighter to
objects, for example
There is a risk of fire and injury.
Always hold the cigarette lighter by the knob.
Always make sure that the cigarette lighter is
out of reach of children. Never leave children
unsupervised in the vehicle.
Your attention must always be focused on the
traffic conditions. Only use the cigarette
lighter when road and traffic conditions
permit. X
Turn the SmartKey to position 2in the
ignition lock (Y page 145).
X To open: slide cover :forwards. X
Press in cigarette lighter ;.
Cigarette lighter ;will pop out
automatically when the heating element is
red-hot.
X To close: pull cover :back. 12 V sockets
General notes The sockets can be used for accessories with
a maximum draw of 180 W (15 A).
Accessories include such items as lamps or
chargers for mobile phones.
If you use the sockets for long periods when
the engine is switched off, the battery may
discharge.
X Turn the SmartKey to position 1in the
ignition lock (Y page 145).
i An emergency cut-out ensures that the
on-board voltage does not drop too low. If
the on-board voltage is too low, the power
to the sockets is automatically cut. This
ensures that there is sufficient power to
start the engine.
Socket in the front-compartment center
console X
To open: slide cover :forwards.
X Lift up the cover of socket ;.
X To close: pull cover :back. 284
FeaturesSto
wage an d features
Page 287 of 384
Socket in the rear-compartment center
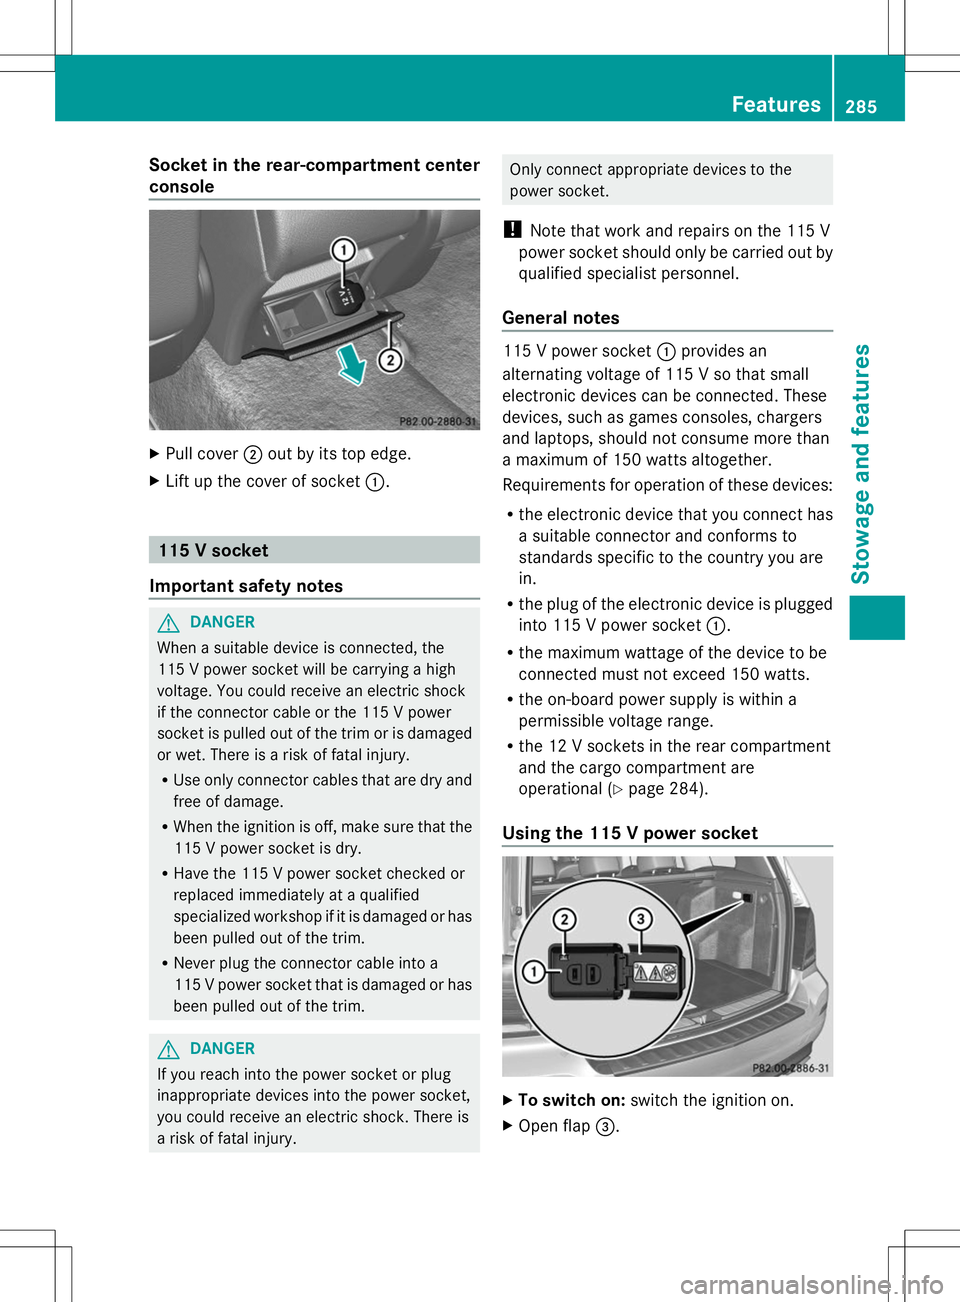
console X
Pull cover ;out by its top edge.
X Lift up the cover of socket :.115 V socket
Important safety notes G
DANGER
When a suitable device is connected, the
115 V power socket will be carrying a high
voltage. You could receive an electric shock
if the connector cable or the 115 V power
socket is pulled out of the trim or is damaged
or wet. There is a risk of fatal injury.
R Use only connector cables that are dry and
free of damage.
R When the ignition is off, make sure that the
115 V power socket is dry.
R Have the 115 V power socket checked or
replaced immediately at a qualified
specialized workshop if it is damaged or has
been pulled out of the trim.
R Never plug the connector cable into a
115 V power socket that is damaged or has
been pulled out of the trim. G
DANGER
If you reach into the power socket or plug
inappropriate devices into the power socket,
you could receive an electric shock. There is
a risk of fatal injury. Only connect appropriate devices to the
power socket.
! Note that work and repairs on the 115 V
power socket should only be carried out by
qualified specialist personnel.
General notes 115 V power socket
:provides an
alternating voltage of 115 V so that small
electronic devices can be connected. These
devices, such as games consoles, chargers
and laptops, should not consume more than
a maximum of 150 watts altogether.
Requirements for operation of these devices:
R the electronic device that you connect has
a suitable connector and conforms to
standards specific to the country you are
in.
R the plug of the electronic device is plugged
into 115 V power socket :.
R the maximum wattage of the device to be
connected must not exceed 150 watts.
R the on-board power supply is within a
permissible voltage range.
R the 12 V sockets in the rear compartment
and the cargo compartment are
operational (Y page 284).
Using the 115 V power socket X
To switch on: switch the ignition on.
X Open flap =. Features
285Stowage and features Z