Page 401 of 462
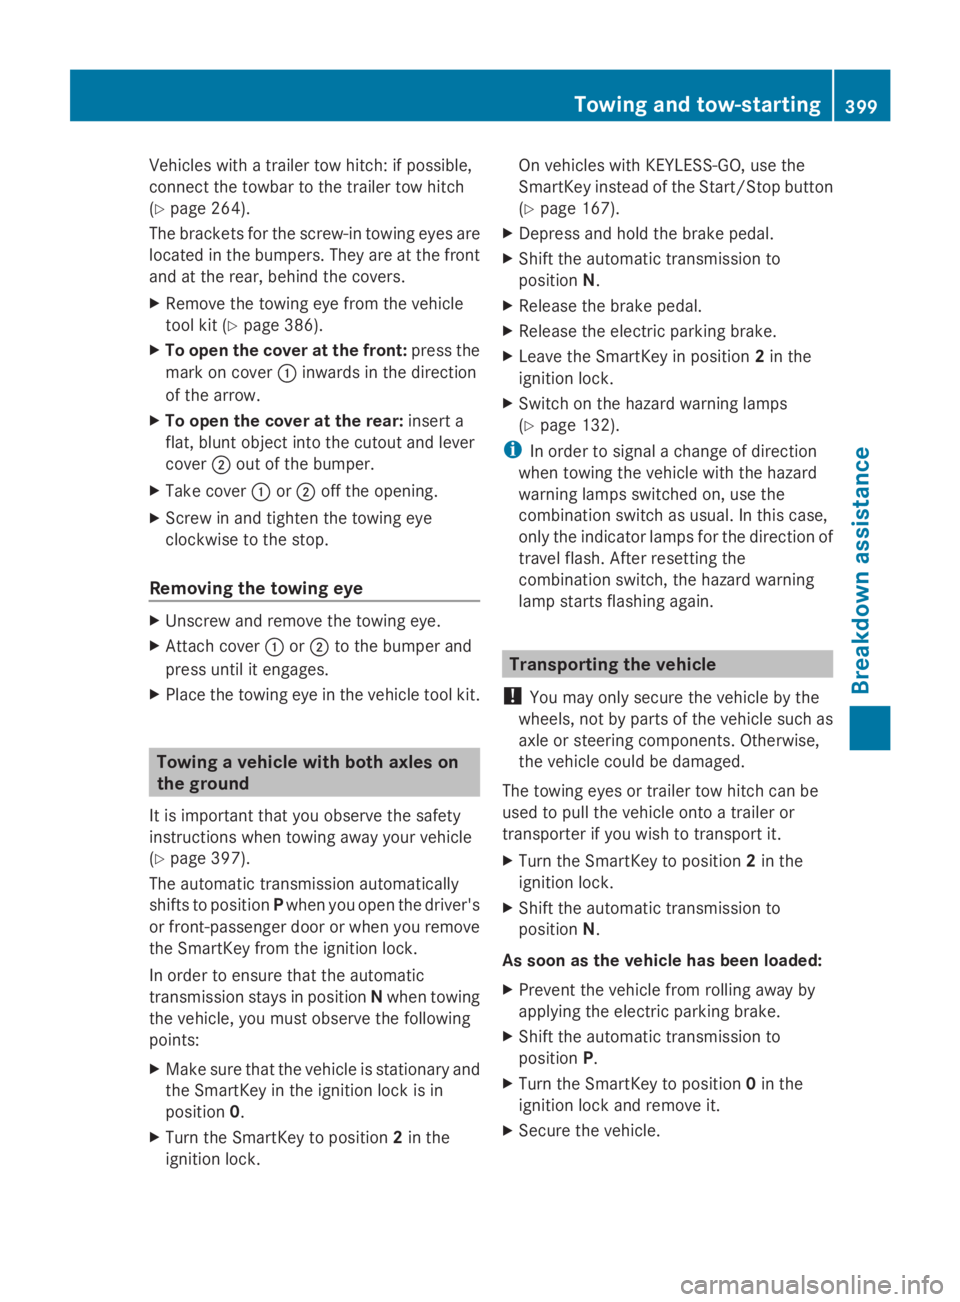
Vehicles with a trailer tow hitch: if possible,
connect the towbar to the trailer tow hitch
(Ypage 264).
The brackets for the screw-in towing eyes are
located in the bumpers. They are at the front
and at the rear, behind the covers.
XRemove the towing eye from the vehicle
tool kit (Ypage 386).
XTo open the cover at the front:press the
mark on coverCinwards in the direction
of the arrow.
XTo open the cover at the rear:insert a
flat, blunt object into the cutout and lever
coverDout of the bumper.
XTake coverCorDoff the opening.
XScrew in and tighten the towing eye
clockwise to the stop.
Removing the towing eye
XUnscrew and remove the towing eye.
XAttach coverCorDto the bumper and
press until it engages.
XPlace the towing eye in the vehicle tool kit.
Towing a vehicle with both axles on
the ground
It is important that you observe the safety
instructions when towing away your vehicle
(Ypage 397).
The automatic transmission automatically
shifts to positionPwhen you open the driver's
or front-passenger door or when you remove
the SmartKey from the ignition lock.
In order to ensure that the automatic
transmission stays in positionNwhen towing
the vehicle, you must observe the following
points:
XMake sure that the vehicle is stationary and
the SmartKey in the ignition lock is in
position0.
XTurn the SmartKey to position2in the
ignition lock.
On vehicles with KEYLESS-GO, use the
SmartKey instead of the Start/Stop button
(Ypage 167).
XDepress and hold the brake pedal.
XShift the automatic transmission to
positionN.
XRelease the brake pedal.
XRelease the electric parking brake.
XLeave the SmartKey in position2in the
ignition lock.
XSwitch on the hazard warning lamps
(Ypage 132).
iIn order to signal a change of direction
when towing the vehicle with the hazard
warning lamps switched on, use the
combination switch as usual. In this case,
only the indicator lamps for the direction of
travel flash. After resetting the
combination switch, the hazard warning
lamp starts flashing again.
Transporting the vehicle
!You may only secure the vehicle by the
wheels, not by parts of the vehicle such as
axle or steering components. Otherwise,
the vehicle could be damaged.
The towing eyes or trailer tow hitch can be
used to pull the vehicle onto a trailer or
transporter if you wish to transport it.
XTurn the SmartKey to position2in the
ignition lock.
XShift the automatic transmission to
positionN.
As soon as the vehicle has been loaded:
XPrevent the vehicle from rolling away by
applying the electric parking brake.
XShift the automatic transmission to
positionP.
XTurn the SmartKey to position0in the
ignition lock and remove it.
XSecure the vehicle.
Towing and tow-starting399
Breakdown assistance
Z
Page 414 of 462
Ryou adopt a very sporty driving style
(cornering at high speeds or driving with
high rates of acceleration).
Ryou are towing a very heavy or large trailer.
Ryou are driving with a heavy load (in the
vehicle or on the roof).
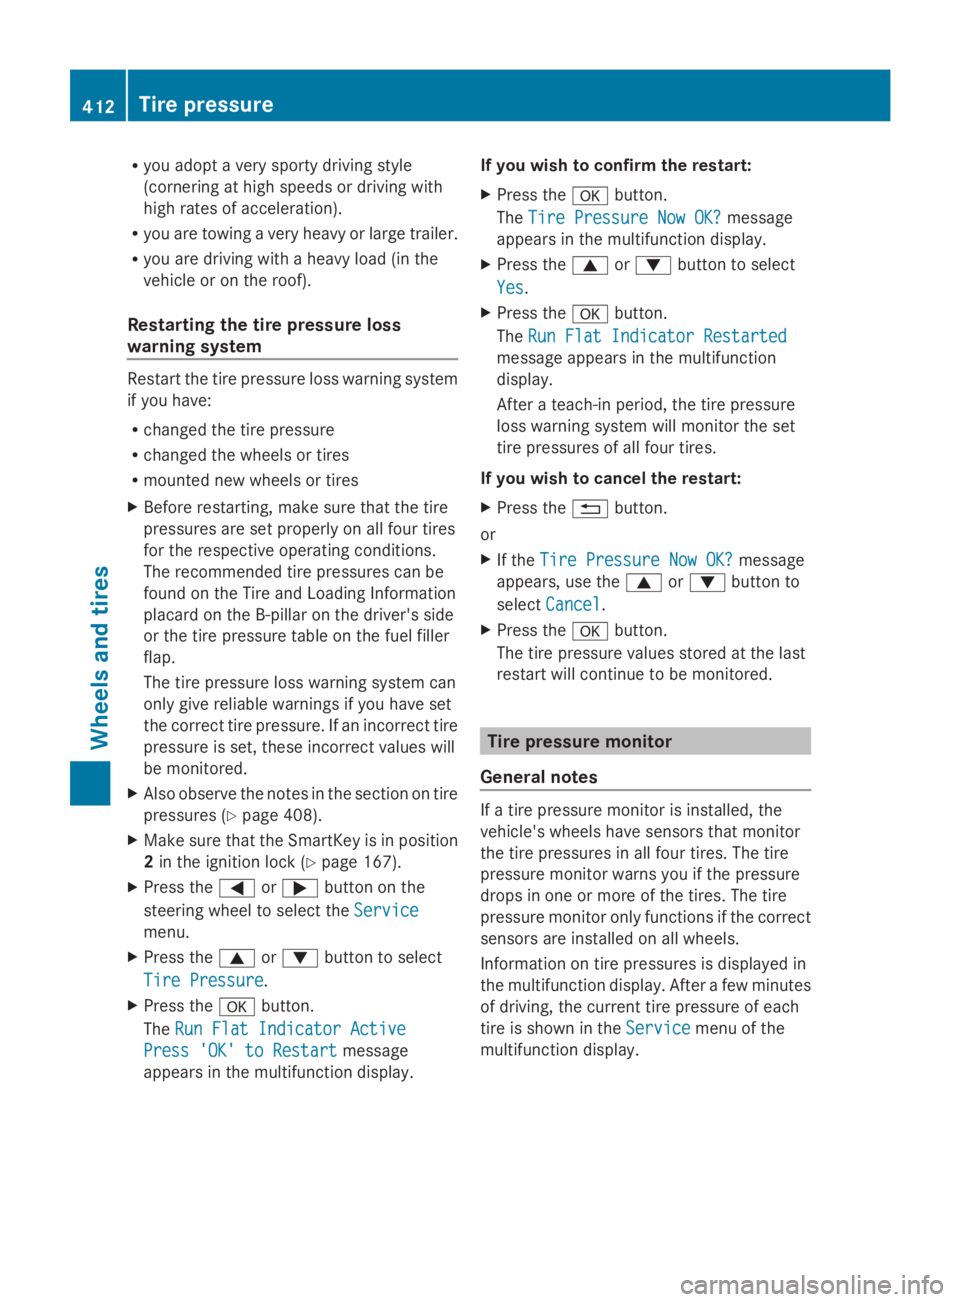
Restarting the tire pressure loss
warning system
Restart the tire pressure loss warning system
if you have:
Rchanged the tire pressure
Rchanged the wheels or tires
Rmounted new wheels or tires
XBefore restarting, make sure that the tire
pressures are set properly on all four tires
for the respective operating conditions.
The recommended tire pressures can be
found on the Tire and Loading Information
placard on the B-pillar on the driver's side
or the tire pressure table on the fuel filler
flap.
The tire pressure loss warning system can
only give reliable warnings if you have set
the correct tire pressure. If an incorrect tire
pressure is set, these incorrect values will
be monitored.
XAlso observe the notes in the section on tire
pressures (Ypage 408).
XMake sure that the SmartKey is in position
2in the ignition lock (Ypage 167).
XPress theYorebutton on the
steering wheel to select theServiceService
menu.
XPress thecordbutton to select
Tire PressureTire Pressure.
XPress thevbutton.
TheRun Flat Indicator ActiveRun Flat Indicator Active
Press 'OK' to RestartPress 'OK' to Restartmessage
appears in the multifunction display.
If you wish to confirm the restart:
XPress thevbutton.
TheTire Pressure Now OK?Tire Pressure Now OK?message
appears in the multifunction display.
XPress thecordbutton to select
YesYes.
XPress thevbutton.
TheRun Flat Indicator RestartedRun Flat Indicator Restarted
message appears in the multifunction
display.
After a teach-in period, the tire pressure
loss warning system will monitor the set
tire pressures of all four tires.
If you wish to cancel the restart:
XPress the8button.
or
XIf theTire Pressure Now OK?Tire Pressure Now OK?message
appears, use thecordbutton to
selectCancelCancel.
XPress thevbutton.
The tire pressure values stored at the last
restart will continue to be monitored.
Tire pressure monitor
General notes
If a tire pressure monitor is installed, the
vehicle's wheels have sensors that monitor
the tire pressures in all four tires. The tire
pressure monitor warns you if the pressure
drops in one or more of the tires. The tire
pressure monitor only functions if the correct
sensors are installed on all wheels.
Information on tire pressures is displayed in
the multifunction display. After a few minutes
of driving, the current tire pressure of each
tire is shown in theServiceServicemenu of the
multifunction display.
412Tire pressure
Whe els and tires
Page 420 of 462
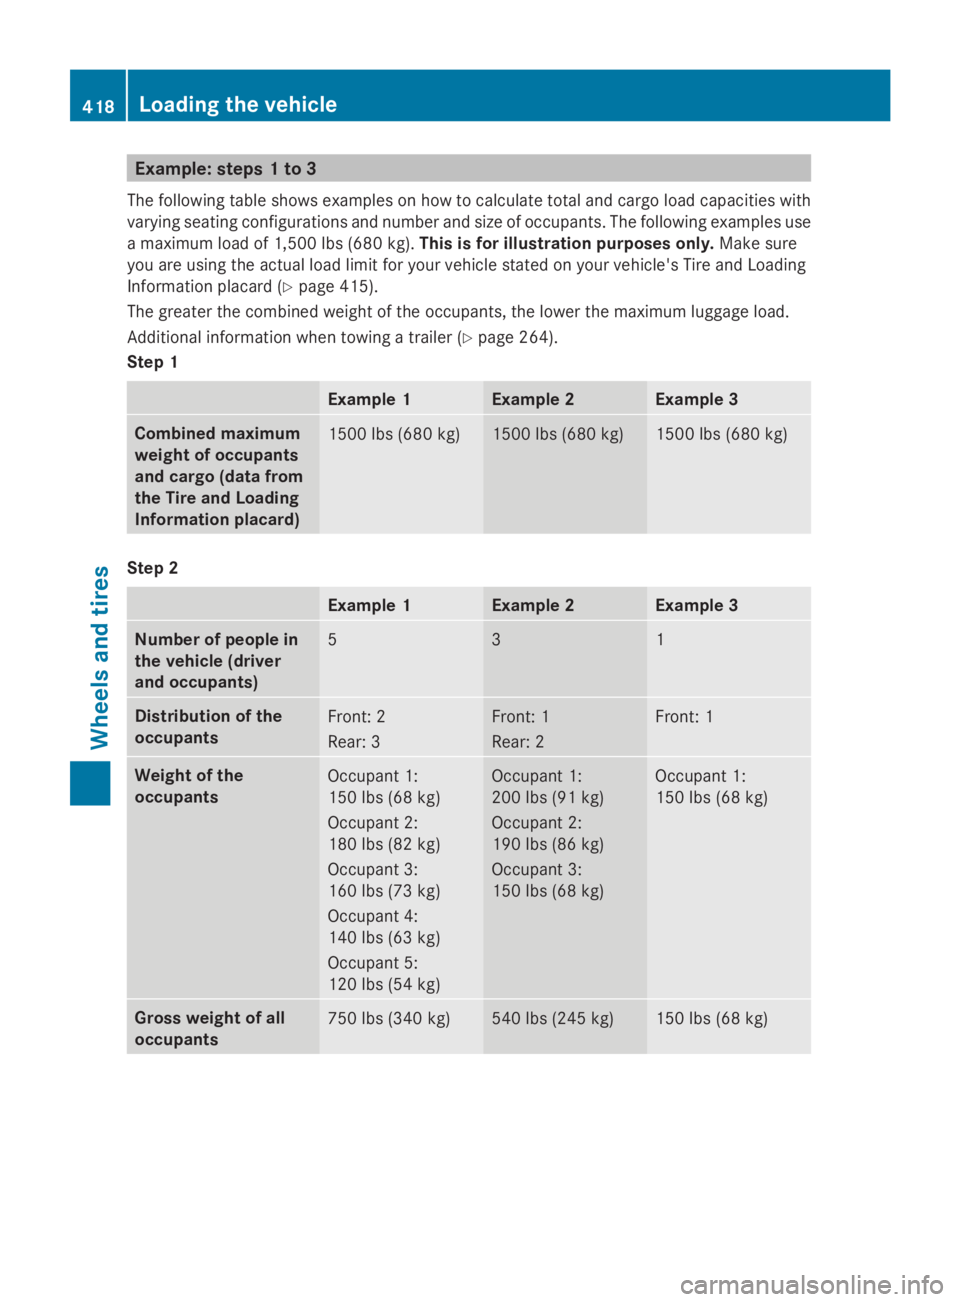
Example: steps 1 to 3
The following table shows examples on how to calculate total and cargo load capacities with
varying seating configurations and number and size of occupants. The following examples use
a maximum load of 1,500 lbs (680 kg).This is for illustration purposes only.Make sure
you are using the actual load limit for your vehicle stated on your vehicle's Tire and Loading
Information placard (Ypage 415).
The greater the combined weight of the occupants, the lower the maximum luggage load.
Additional information when towing a trailer (Ypage 264).
Step 1
Example 1Example 2Example 3
Combined maximum
weight of occupants
and cargo (data from
the Tire and Loading
Information placard)
1500 lbs (680 kg)1500 lbs (680 kg)1500 lbs (680 kg)
Step 2
Example 1Example 2Example 3
Number of people in
the vehicle (driver
and occupants)
531
Distribution of the
occupants
Front: 2
Rear: 3
Front: 1
Rear: 2
Front: 1
Weight of the
occupants
Occupant 1:
150 lbs (68 kg)
Occupant 2:
180 lbs (82 kg)
Occupant 3:
160 lbs (73 kg)
Occupant 4:
140 lbs (63 kg)
Occupant 5:
120 lbs (54 kg)
Occupant 1:
200 lbs (91 kg)
Occupant 2:
190 lbs (86 kg)
Occupant 3:
150 lbs (68 kg)
Occupant 1:
150 lbs (68 kg)
Gross weight of all
occupants
750 lbs (340 kg)540 lbs (245 kg)150 lbs (68 kg)
418Loading the vehicle
Wheels and tires
Page 459 of 462
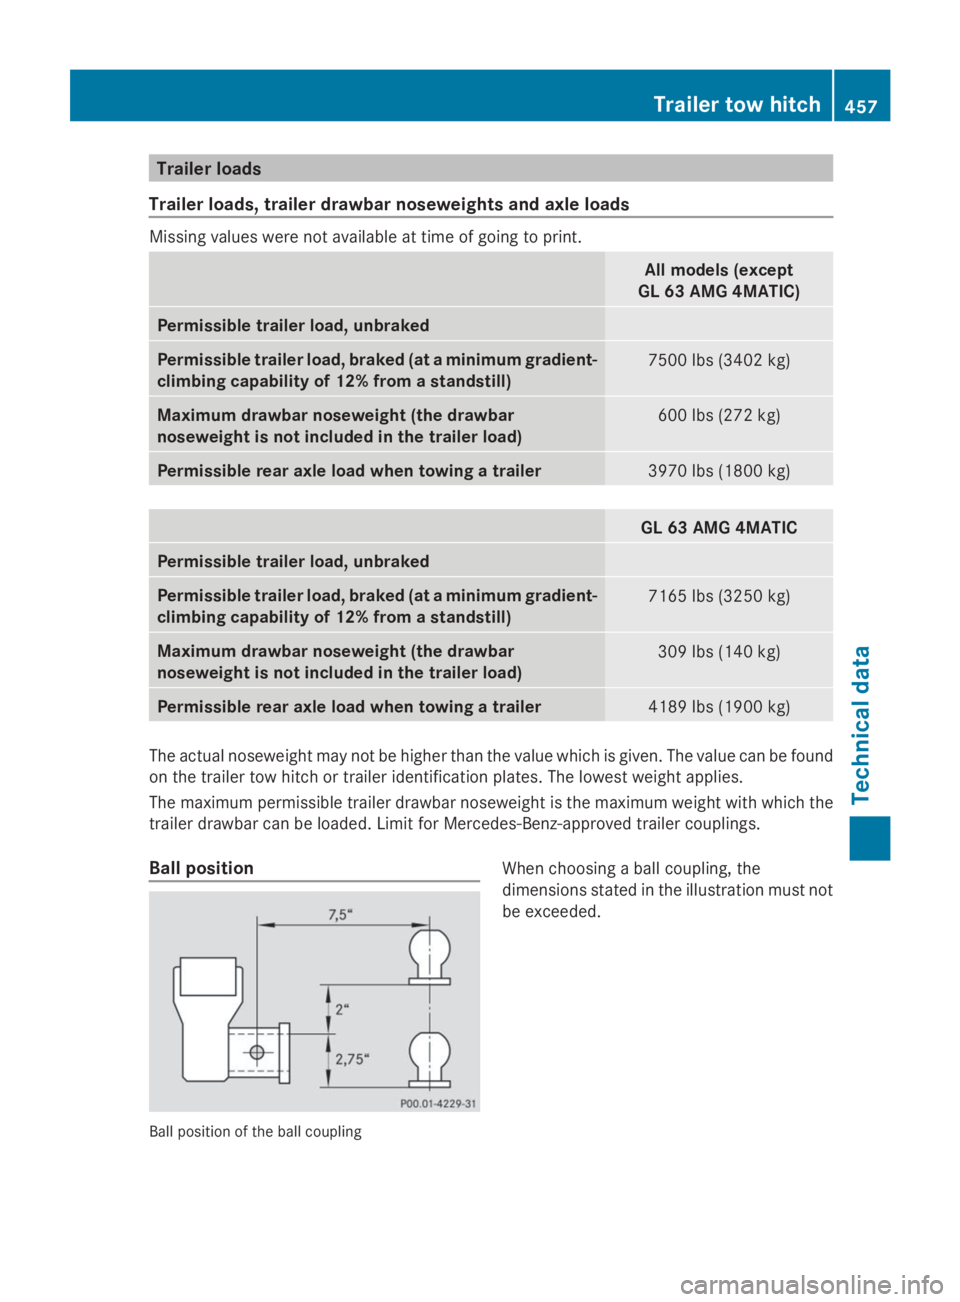
Trailer loads
Trailer loads, trailer drawbar noseweights and axle loads
Missing values were not available at time of going to print.
All models (except
GL 63 AMG 4MATIC)
Permissible trailer load, unbraked
Permissible trailer load, braked (at a minimum gradient-
climbing capability of 12% from a standstill)
7500 lbs (3402 kg)
Maximum drawbar noseweight (the drawbar
noseweight is not included in the trailer load)
600 lbs (272 kg)
Permissible rear axle load when towing a trailer3970 lbs (1800 kg)
GL 63 AMG 4MATIC
Permissible trailer load, unbraked
Permissible trailer load, braked (at a minimum gradient-
climbing capability of 12% from a standstill)
7165 lbs (3250 kg)
Maximum drawbar noseweight (the drawbar
noseweight is not included in the trailer load)
309 lbs (140 kg)
Permissible rear axle load when towing a trailer4189 lbs (1900 kg)
The actual noseweight may not be higher than the value which is given. The value can be found
on the trailer tow hitch or trailer identification plates. The lowest weight applies.
The maximum permissible trailer drawbar noseweight is the maximum weight with which the
trailer drawbar can be loaded. Limit for Mercedes-Benz-approved trailer couplings.
Ball position
Ball position of the ball coupling
When choosing a ball coupling, the
dimensions stated in the illustration must not
be exceeded.
Trailer tow hitch457
Technical data
Z