2014 MERCEDES-BENZ GL air condition
[x] Cancel search: air conditionPage 200 of 462
RAlways keep the engine running and in gear
when driving on a downhill gradient.
Activate DSR (Ypage 256).
RAlways keep the doors, tailgate, windows
and sliding sunroof closed while driving.
RAdapt your speed to the terrain. The
rougher, steeper or more ruts on the
terrain, the slower your speed should be.
RDrive slowly and at an even speed through
the water. Ensure that a bow wave does not
form as you drive.
RDrive with extreme care on unfamiliar off-
road routes where visibility is poor. For
safety reasons, get out of the vehicle first
and survey the off-road route.
RLook out for obstacles, such as rocks,
holes, tree stumps and furrows.
RCheck the depth of water before fording
rivers and streams.
RWhen fording, do not stop and do not
switch off the engine.
ROn sand, drive quickly to overcome the
rolling resistance. Otherwise the vehicle's
wheels could become stuck in loose
ground.
RDo not jump with the vehicle as this will
interrupt the vehicle's propulsion.
RAlways keep the engine running and in gear
when driving on a slope.
RDo not shift the automatic transmission to
transmission positionN.
iDo not use the HOLD function when
driving off-road, on steep uphill or downhill
gradients or on slippery or loose surfaces.
The HOLD function cannot hold the vehicle
on such surfaces.
Checklist before driving off-road
!If the engine oil warning lamp lights up
while the vehicle is in motion, stop the
vehicle in a safe place as soon as possible.
Check the engine oil level. The engine oil
warning lamp warning must not be ignored.
Continuing the journey while the symbol is
displayed could lead to engine damage.
XEngine oil level:check the engine oil level
and add oil if necessary.
When driving on steep gradients, the
engine oil level must be sufficiently high to
ensure a correct oil supply in the vehicle.
XDEF tank (BlueTEC vehicles):check the
level and top up if necessary (Ypage 186).
XTire-changing tool kit:check that the jack
is working and make sure you have the lug
wrench, a robust tow cable and a folding
spade in the vehicle.
XWheels and tires:check the tire tread
depth and tire pressure.
XCheck for damage and remove any foreign
objects, e.g. small stones, from the
wheels/tires.
XReplace any missing valve caps.
XReplace dented or damaged wheels.
XRims:dented or bent rims can result in a
loss of tire pressure and damage the tire
bead. Therefore, check your rims before
driving off-road and replace them as
required.
Checklist after driving off-road
!If you detect damage to the vehicle after
driving off-road, have the vehicle checked
immediately at a qualified specialist
workshop.
XVehicles with the ON&OFFROAD
package:activate the on-road program
(Ypage 258).
XDeactivate the LOW RANGE off-road gear
(Ypage 259).
XDeactivate DSR (Ypage 256).
XVehicles with the AIRMATIC package:
lower the vehicle to a ride height suitable
for the road conditions, e.g. to the
highway/high-speed level.
XClean the headlamps and rear lights and
check for damage.
XClean the front and rear license plates.
XClean the wheels/tires with a water jet and
remove any foreign objects.
198Driving tips
Driving an d parking
Page 201 of 462
XClean the wheels, wheel housings and the
vehicle underside with a water jet; check
for any foreign objects and damage.
XCheck whether twigs or other parts of
plants have become trapped. These
increase the risk of fire and can damage
fuel pipes, brake hoses or the rubber
bellows of the axle joints and propeller
shafts.
XAfter the trip, examine without fail the
entire undercarriage, wheels, tires, brakes,
bodywork structure, steering, chassis and
exhaust system for damage.
XAfter driving for extended periods across
sand, mud, gravel, water or in similarly dirty
conditions, have the brake discs, wheels,
brake pads/linings and axle joints checked
and cleaned.
XIf you detect strong vibrations after off-road
travel, check for foreign objects in the
wheels and drive train and remove them if
necessary. Foreign objects can disturb the
balance and cause vibrations.
Driving over rough terrain places greater
demands on your vehicle than driving on
normal roads. After driving off-road, check
the vehicle. This allows you to detect damage
promptly and reduce the risk of an accident
to yourself and other road users.
Driving on sand
Observe the following rules when driving on
sand:
RVehicles with the ON&OFFROAD
package:select off-road program 1
(Ypage 258).
RVehicles with the AIRMATIC package:
select a raised vehicle level.
RAvoid high engine speeds.
RUse the left-hand steering wheel paddle
shifter to shift to a lower gear appropriate
to the terrain.
RDrive quickly to overcome the rolling
resistance. Otherwise the vehicle's wheels
could become stuck in loose ground.
RDrive in the tracks of other vehicles if
possible. Make sure that:
-the tire ruts are not too deep.
-the sand is sufficiently firm.
-the ground clearance of the vehicle is
sufficient.
Tire ruts and gravel roads
!Check that the ruts are not too deep and
that your vehicle has sufficient clearance.
Otherwise, your vehicle could be damaged
or bottom out and get stuck.
Observe the following rules when driving
along ruts in off-road terrain or on roads with
loose gravel:
RVehicles with the AIRMATIC package:
select a raised vehicle level.
RAvoid high engine speeds.
RShift to a lower gear using the left-hand
steering wheel paddle shifter.
RDrive slowly.
RWhere ruts are too deep, drive with the
wheels of one side on the center grassy
area, if possible.
Driving over obstacles
!Obstacles could damage the floor of the
vehicle or components of the chassis. Ask
passengers for guidance when driving over
large obstacles. The passenger should
always keep a safe distance from the
vehicle when doing so in order to avoid
injury as a result of unexpected vehicle
movements. After driving off-road or over
obstacles, check the vehicle for possible
damage, especially to the underbody and
the components of the chassis.
Driving tips199
Driving and pa rking
Z
Page 207 of 462
There is a risk of an accident.
Continue to drive carefully and be ready to
brake, in particular when warned to do so by
DISTRONIC PLUS.
GWARNING
DISTRONIC PLUS brakes your vehicle with up
to 40% of the maximum braking force. If this
braking force is insufficient, DISTRONIC PLUS
warns you visually and audibly. There is a risk
of an accident.
In such cases, apply the brakes yourself and
try to take evasive action.
!If DISTRONIC PLUS or the HOLD function
is activated, the vehicle brakes
automatically in certain situations. To
prevent damage to the vehicle, deactivate
DISTRONIC PLUS and the HOLD function in
the following or other similar situations:
Rwhen towing the vehicle
Rin the car wash
If you fail to adapt your driving style,
DISTRONIC PLUS can neither reduce the risk
of accident nor override the laws of physics.
DISTRONIC PLUS cannot take into account
the road, traffic and weather conditions.
DISTRONIC PLUS is only an aid. You are
responsible for the distance to the vehicle in
front, for vehicle speed, for braking in good
time and for staying in your lane.
Do not use DISTRONIC PLUS:
Rin road and traffic conditions which do not
allow you to maintain a constant speed e.g.
in heavy traffic or on winding roads
Ron slippery road surfaces. Braking or
accelerating could cause the drive wheels
to lose traction and the vehicle could then
skid
Rwhen there is poor visibility, e.g. due to fog,
heavy rain or snow
DISTRONIC PLUS may not detect narrow
vehicles driving in front, e.g. motorcycles, or
vehicles driving on a different line.
In particular, the detection of obstacles can
be impaired if:
Rdirt on the sensors or anything else
covering the sensors
Rsnow or heavy rain
Rinterference by other radar sources
Rstrong radar reflections, for example, in
parking garages
If DISTRONIC PLUS no longer detects a
vehicle in front, DISTRONIC PLUS may
unexpectedly accelerate the vehicle to the
stored speed.
This speed may:
Rbe too high if you are driving in a filter lane
or an exit lane
Rbe so high when driving in the right-hand
lane that you overtake vehicles in the left-
hand lane
Rbe so high when driving in the left-hand lane
that you overtake vehicles in the right-hand
lane
If there is a change of drivers, advise the new
driver of the speed stored.
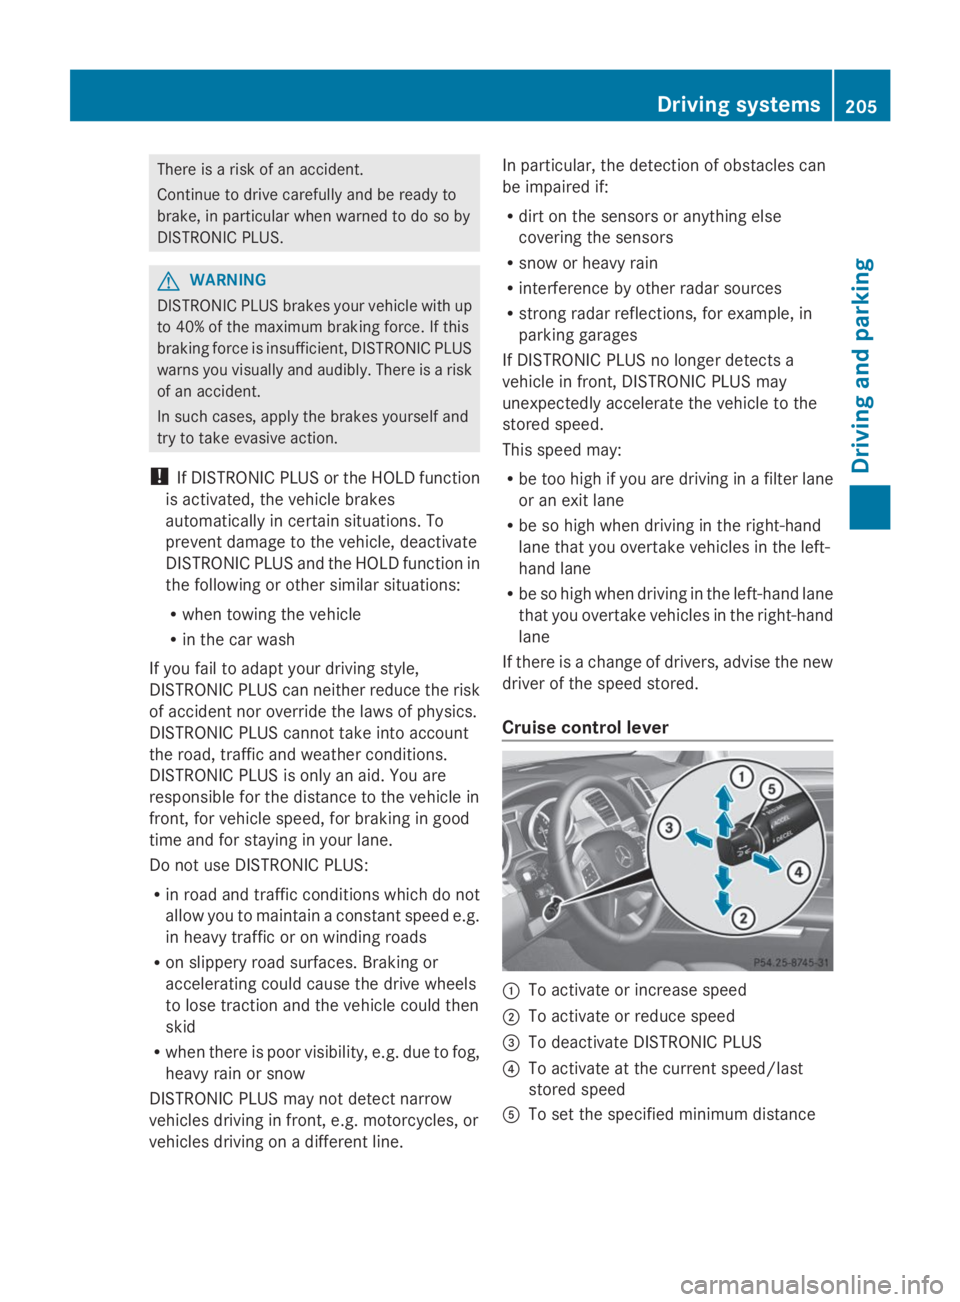
Cruise control lever
CTo activate or increase speed
DTo activate or reduce speed
Page 219 of 462
Deactivating the HOLD function
The HOLD function is deactivated
automatically if:
Ryou accelerate and the transmission is in
positionDorR.
Ryou shift the transmission to positionP.
Ryou depress the brake pedal again with a
certain amount of pressure untilC
disappears from the multifunction display.
Ryou secure the vehicle using the electric
parking brake.
Ryou activate DISTRONIC PLUS.
iAfter a time, the electric parking brake
secures the vehicle and relieves the service
brake.
The electric parking brake automatically
secures the vehicle if the HOLD function is
activated and:
Rthe driver's door is open and the driver's
seat belt is unfastened.
Rthe engine is switched off.
Ra system malfunction occurs.
Rthe power supply is not sufficient.
On steep uphill or downhill inclines or if there
is a malfunction, the transmission may also
be automatically shifted into positionP.
AIRMATIC package
General notes
AIRMATIC regulates the level of your vehicle.
As well as level control (Ypage 218), your
vehicle can be equipped with ADS (Adaptive
Damping System) (Ypage 217) and ACTIVE
CURVE SYSTEM (Ypage 218).
Observe the notes on driving with a trailer
(Ypage 264).
ADS (Adaptive Damping System)
General notes
ADS adapts the damping characteristics to
the current operating and driving situation.
This depends on:
Ryour driving style
Rthe road surface conditions
Rthe ADS setting
Rthe vehicle level setting
Your selection remains stored even if you
remove the SmartKey from the ignition lock.
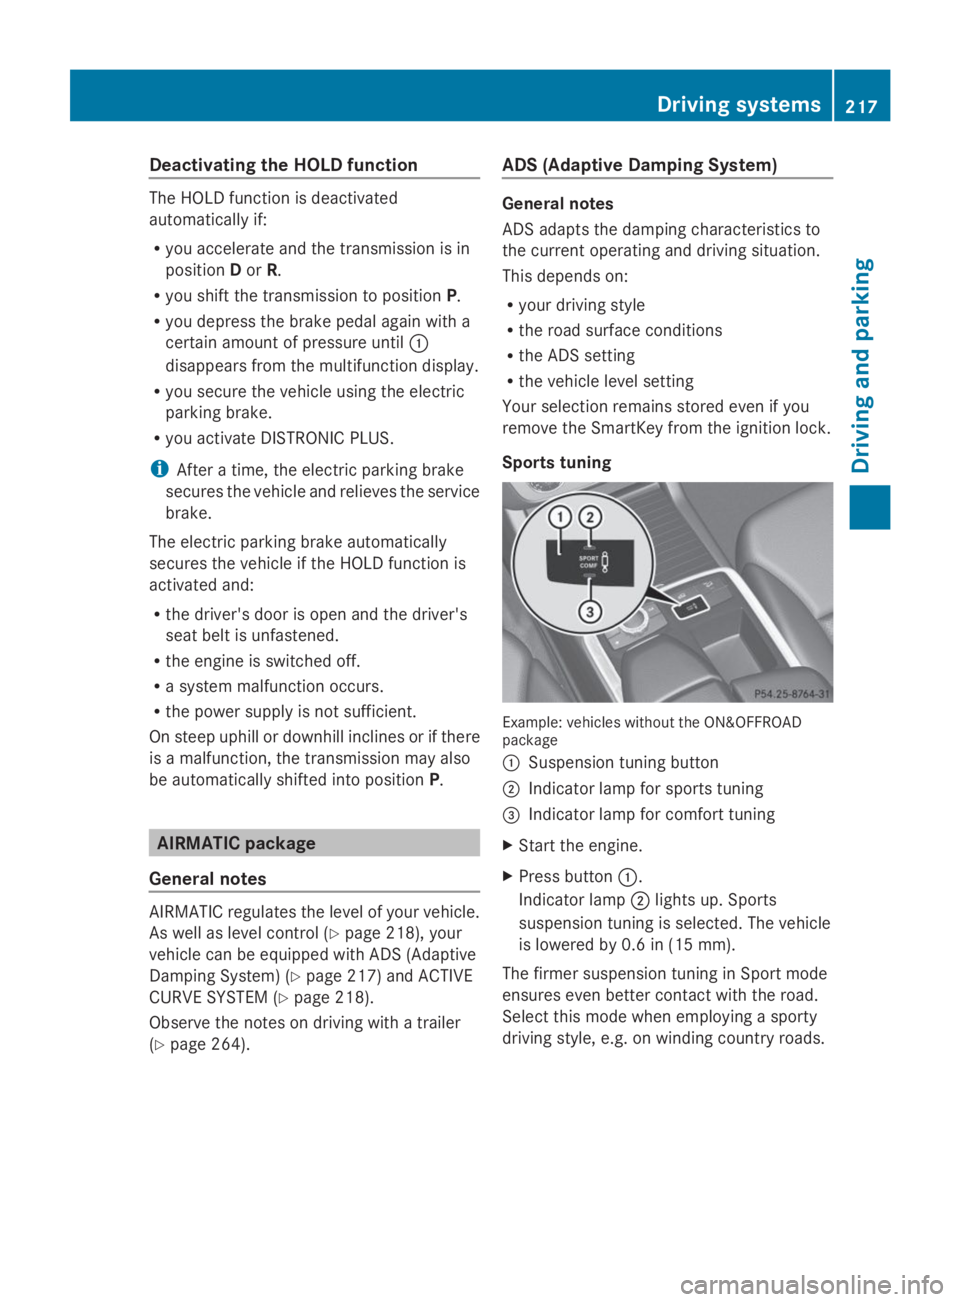
Sports tuning
Example: vehicles without the ON&OFFROADpackage
CSuspension tuning button
DIndicator lamp for sports tuning
Page 242 of 462
Warning and display messages in the
multifunction display
XActivate ATTENTION ASSIST using the on-
board computer (Ypage 281).
XIf ATTENTION ASSIST is active, it will not
warn you until at least 20 minutes after
your journey has begun. You then hear an
intermittent warning tone twice and the
Attention Assist: Take a Break!Attention Assist: Take a Break!
message appears in the multifunction
display.
If necessary, take a break.
XPress thevor8button to confirm
the message.
On long journeys, take regular breaks in good
time to allow yourself to rest properly. If you
do not take a break and ATTENTION ASSIST
still detects increasing lapses in
concentration, you will be warned again after
15 minutes at the earliest.
ATTENTION ASSIST is reset when you
continue your journey and starts assessing
your tiredness again if:
Ryou switch off the engine.
Ryou take off your seat belt and open the
driver's door, e.g. for a change of drivers or
to take a break.
Night View Assist Plus
General notes
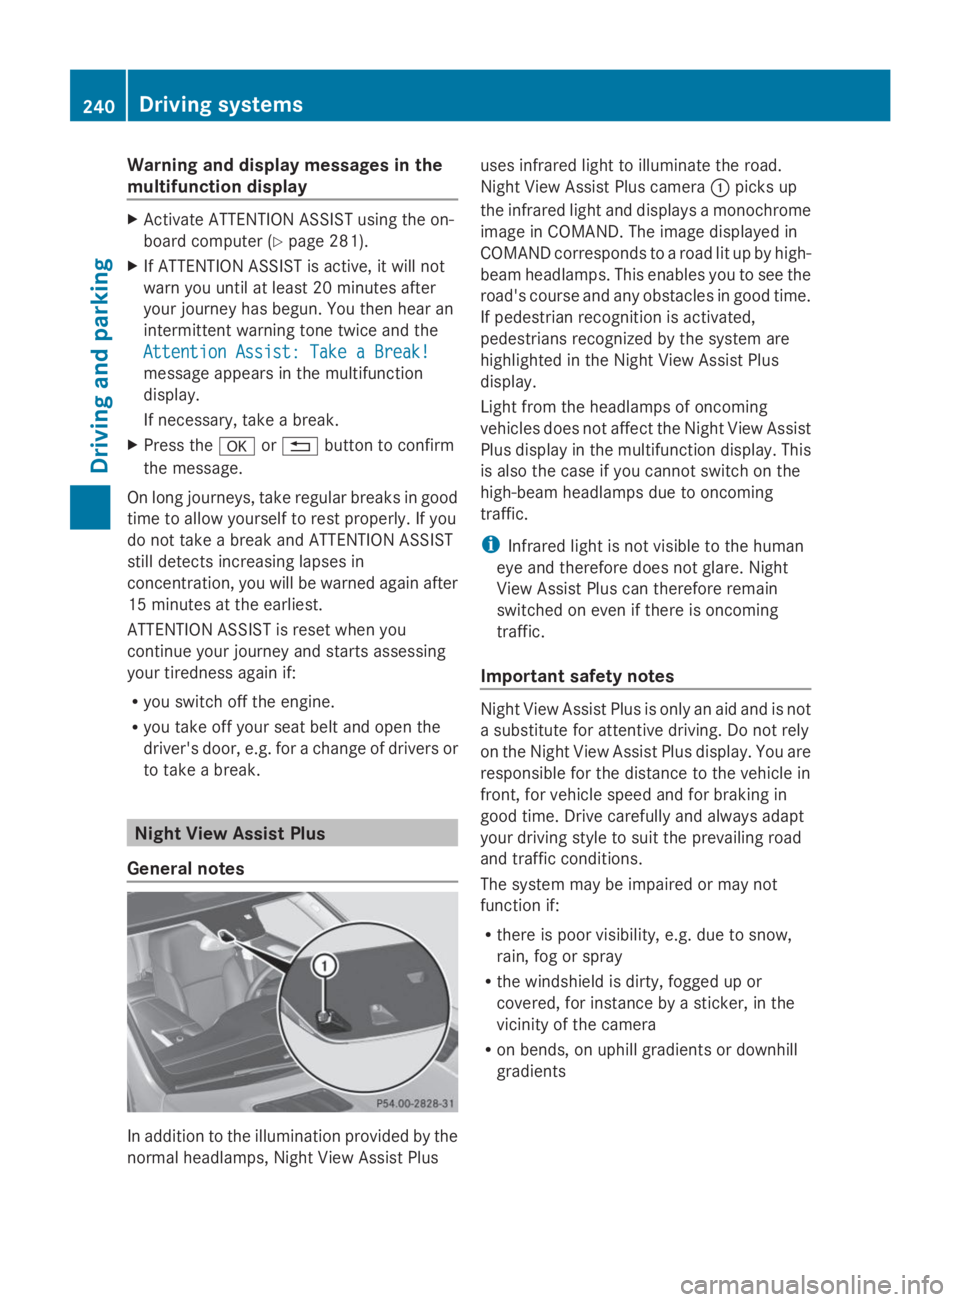
In addition to the illumination provided by the
normal headlamps, Night View Assist Plus
uses infrared light to illuminate the road.
Night View Assist Plus cameraCpicks up
the infrared light and displays a monochrome
image in COMAND. The image displayed in
COMAND corresponds to a road lit up by high-
beam headlamps. This enables you to see the
road's course and any obstacles in good time.
If pedestrian recognition is activated,
pedestrians recognized by the system are
highlighted in the Night View Assist Plus
display.
Light from the headlamps of oncoming
vehicles does not affect the Night View Assist
Plus display in the multifunction display. This
is also the case if you cannot switch on the
high-beam headlamps due to oncoming
traffic.
iInfrared light is not visible to the human
eye and therefore does not glare. Night
View Assist Plus can therefore remain
switched on even if there is oncoming
traffic.
Important safety notes
Night View Assist Plus is only an aid and is not
a substitute for attentive driving. Do not rely
on the Night View Assist Plus display. You are
responsible for the distance to the vehicle in
front, for vehicle speed and for braking in
good time. Drive carefully and always adapt
your driving style to suit the prevailing road
and traffic conditions.
The system may be impaired or may not
function if:
Rthere is poor visibility, e.g. due to snow,
rain, fog or spray
Rthe windshield is dirty, fogged up or
covered, for instance by a sticker, in the
vicinity of the camera
Ron bends, on uphill gradients or downhill
gradients
240Driving systems
Driving and parking
Page 243 of 462
Pedestrian recognition may be impaired or
inoperative if:
Rpedestrians are partially or entirely
obscured by objects, e.g. parked vehicles
Rthe silhouette of the pedestrian in the Night
View Assist Plus display is incomplete or
interrupted, e.g. by powerful light
reflections
Rpedestrians do not contrast adequately
from the background
Rpedestrians are not in an upright position,
e.g. sitting, squatting or lying
Activating Night View Assist Plus
Activation conditions
You can only activate Night View Assist Plus
if:
Rthe SmartKey is in position2in the ignition
lock.
Rit is dark.
Rthe light switch is in theXorX
position.
Rreverse gear has not been engaged.
Activating Night View Assist Plus
XMake sure that COMAND is switched on.
XPress buttonC.
The Night View Assist Plus display appears
in the COMAND display.
You can read about how to adjust the
brightness of the COMAND display in the
COMAND operating instructions.
iThe infrared headlamps only switch on
when the vehicle is being driven at speeds
of approximately 6 mph (10 km/h). This
means that you do not have the full visual
range while the vehicle is stationary and
cannot check whether Night View Assist
Plus is working.
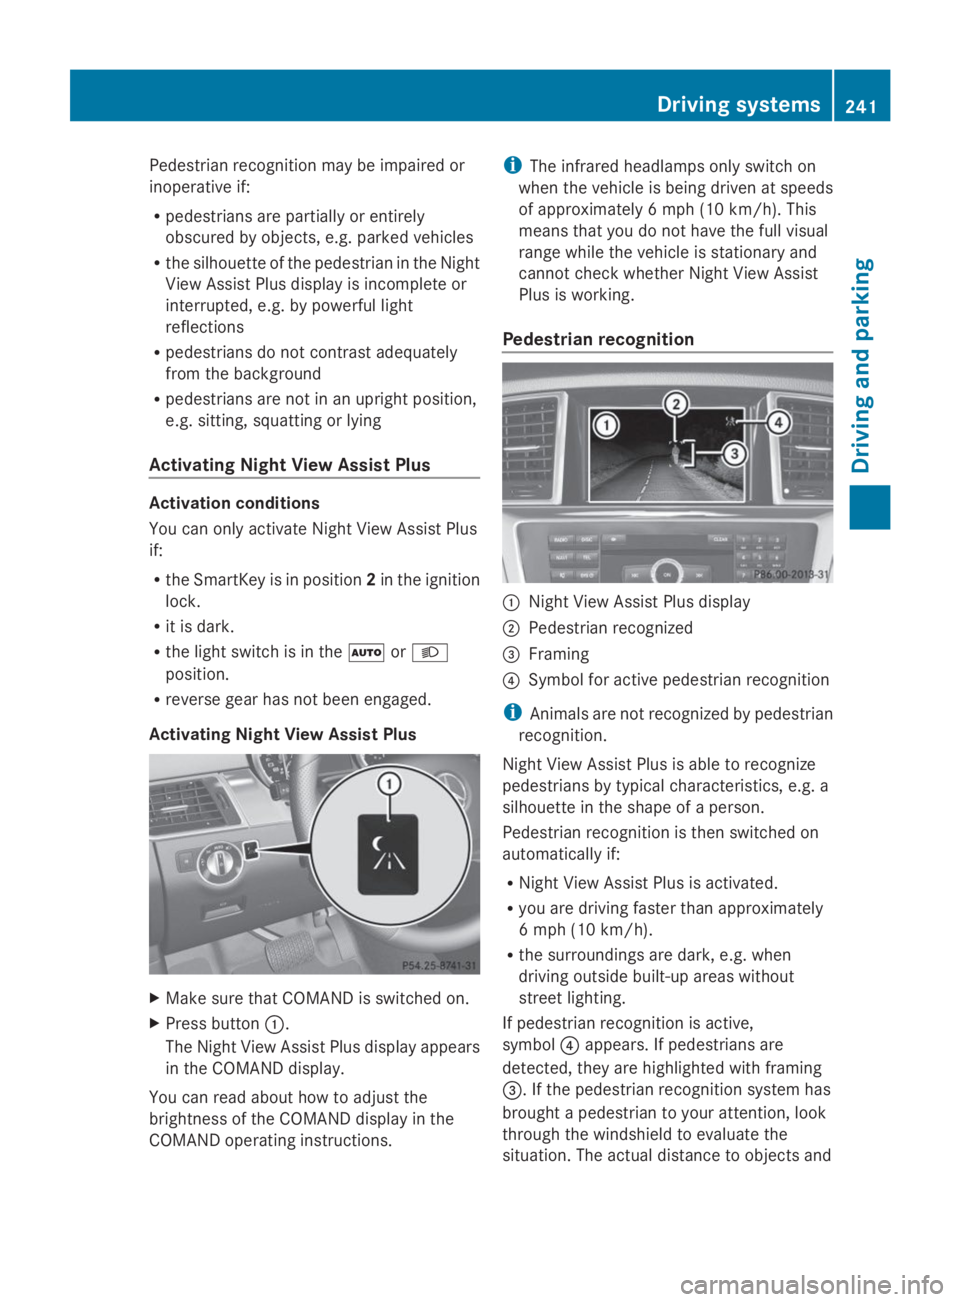
Pedestrian recognition
CNight View Assist Plus display
DPedestrian recognized
Page 244 of 462
pedestrians cannot be gaged accurately by
looking at a screen.
It may be the case that objects are highlighted
as well as pedestrians.
Fogged up or dirty windshield
If the windshield in front of the camera is
fogged up or dirty on the inside or outside, the
Night View Assist Plus display is affected.
XTo defrost:check the automatic air
conditioning settings (Ypage 160)and fold
down the camera cover (Ypage 381).
XTo defrost the inside of the windshield:
fold down the camera cover (Ypage 381)
and clean the windshield (Ypage 379).
242Driving systems
Driving an d parking
Page 246 of 462
warranties, and is not permitted by the
FCC. Do not tamper with, alter, or use in
any non-approved way.
Any unauthorized modification to this
device could void the user’s authority to
operate the equipment.
Monitoring range of the sensors
In particular, the detection of obstacles can
be impaired if:
Rdirt on the sensors or anything else
covering the sensors
Rpoor visibility, e.g. due to fog, heavy rain,
snow or spray
Rnarrow vehicles, e.g. motorcycles or
bicycles
Rthe road has very wide lanes
Rthe road has narrow lanes
Ryou are not driving in the middle of the lane
Rthere are barriers or similar lane borders
Vehicles in the monitoring range are then not
indicated.
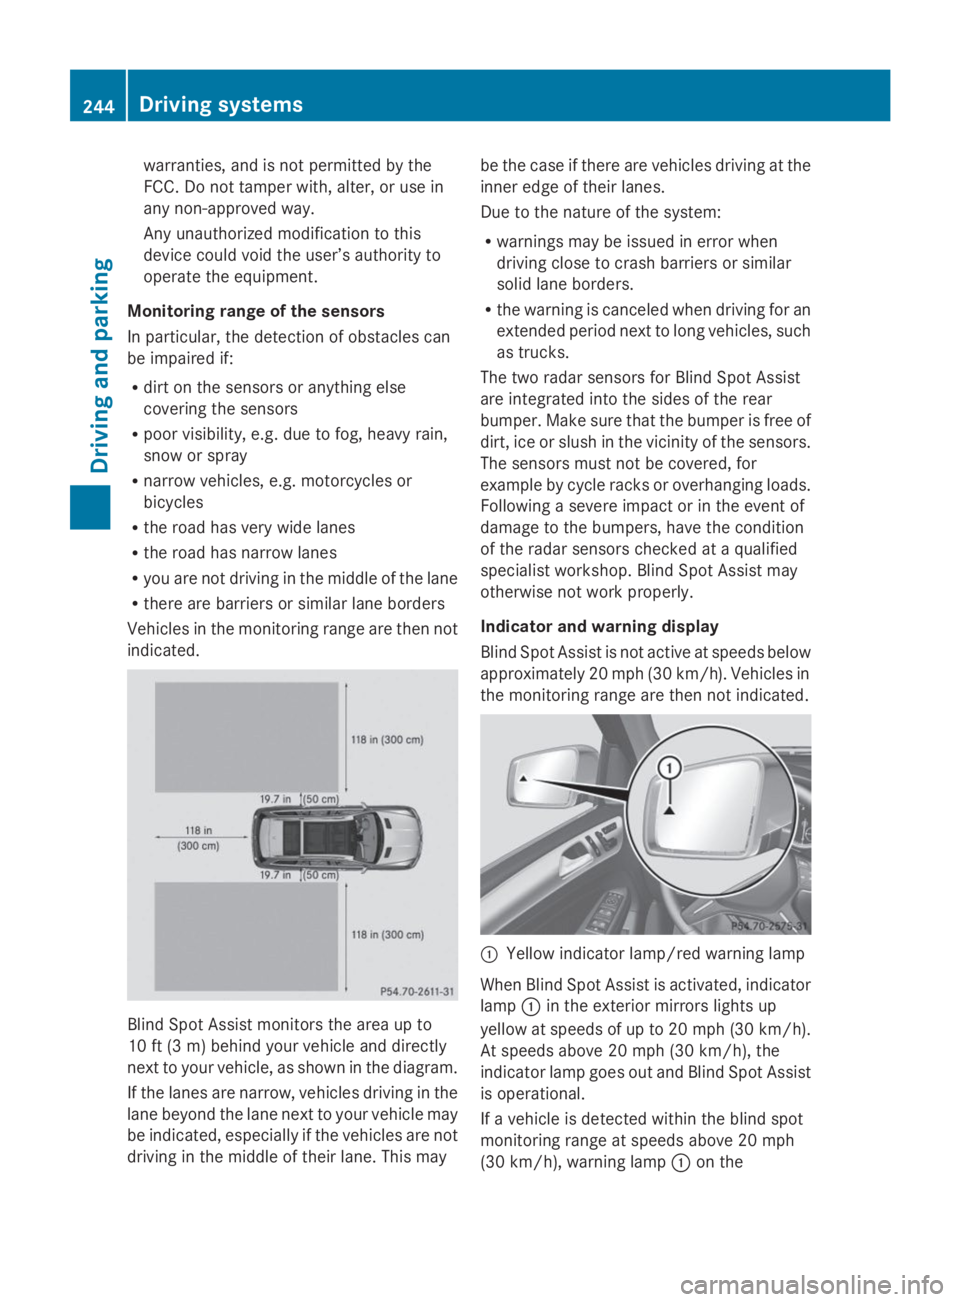
Blind Spot Assist monitors the area up to
10 ft (3 m) behind your vehicle and directly
next to your vehicle, as shown in the diagram.
If the lanes are narrow, vehicles driving in the
lane beyond the lane next to your vehicle may
be indicated, especially if the vehicles are not
driving in the middle of their lane. This may
be the case if there are vehicles driving at the
inner edge of their lanes.
Due to the nature of the system:
Rwarnings may be issued in error when
driving close to crash barriers or similar
solid lane borders.
Rthe warning is canceled when driving for an
extended period next to long vehicles, such
as trucks.
The two radar sensors for Blind Spot Assist
are integrated into the sides of the rear
bumper. Make sure that the bumper is free of
dirt, ice or slush in the vicinity of the sensors.
The sensors must not be covered, for
example by cycle racks or overhanging loads.
Following a severe impact or in the event of
damage to the bumpers, have the condition
of the radar sensors checked at a qualified
specialist workshop. Blind Spot Assist may
otherwise not work properly.
Indicator and warning display
Blind Spot Assist is not active at speeds below
approximately 20 mph (30 km/h). Vehicles in
the monitoring range are then not indicated.
CYellow indicator lamp/red warning lamp
When Blind Spot Assist is activated, indicator
lampCin the exterior mirrors lights up
yellow at speeds of up to 20 mph(30 km/h).
At speeds above 20 mph (30 km/h), the
indicator lamp goes out and Blind Spot Assist
is operational.
If a vehicle is detected within the blind spot
monitoring range at speeds above 20 mph
(30 km/h), warning lampCon the
244Driving systems
Driving and parking