2014 MERCEDES-BENZ GL-Class reset
[x] Cancel search: resetPage 105 of 462

Problems with the sliding sunroof
Your vehicle may be equipped with a sliding sunroof or a panorama roof with power tilt/sliding
panel. In this section, the term "sliding sunroof" refers to both types of sliding sunroof. G
WARNING
If you close the sliding sunroof again immediately after it has been blocked or reset, the sliding
sunroof closes with increased or maximum force. The reversing feature is then not active. Parts
of the body could be trapped in the closing area in the process. This poses an increased risk of
injury or even fatal injury.
Make sure that no parts of the body are in the closing area.
If somebody becomes trapped:
R release the switch immediately, or
R during automatic operation, push the switch briefly in any direction
The closing process is stopped.
! If the sliding sunroof still cannot be opened or closed as a result of a malfunction, contact
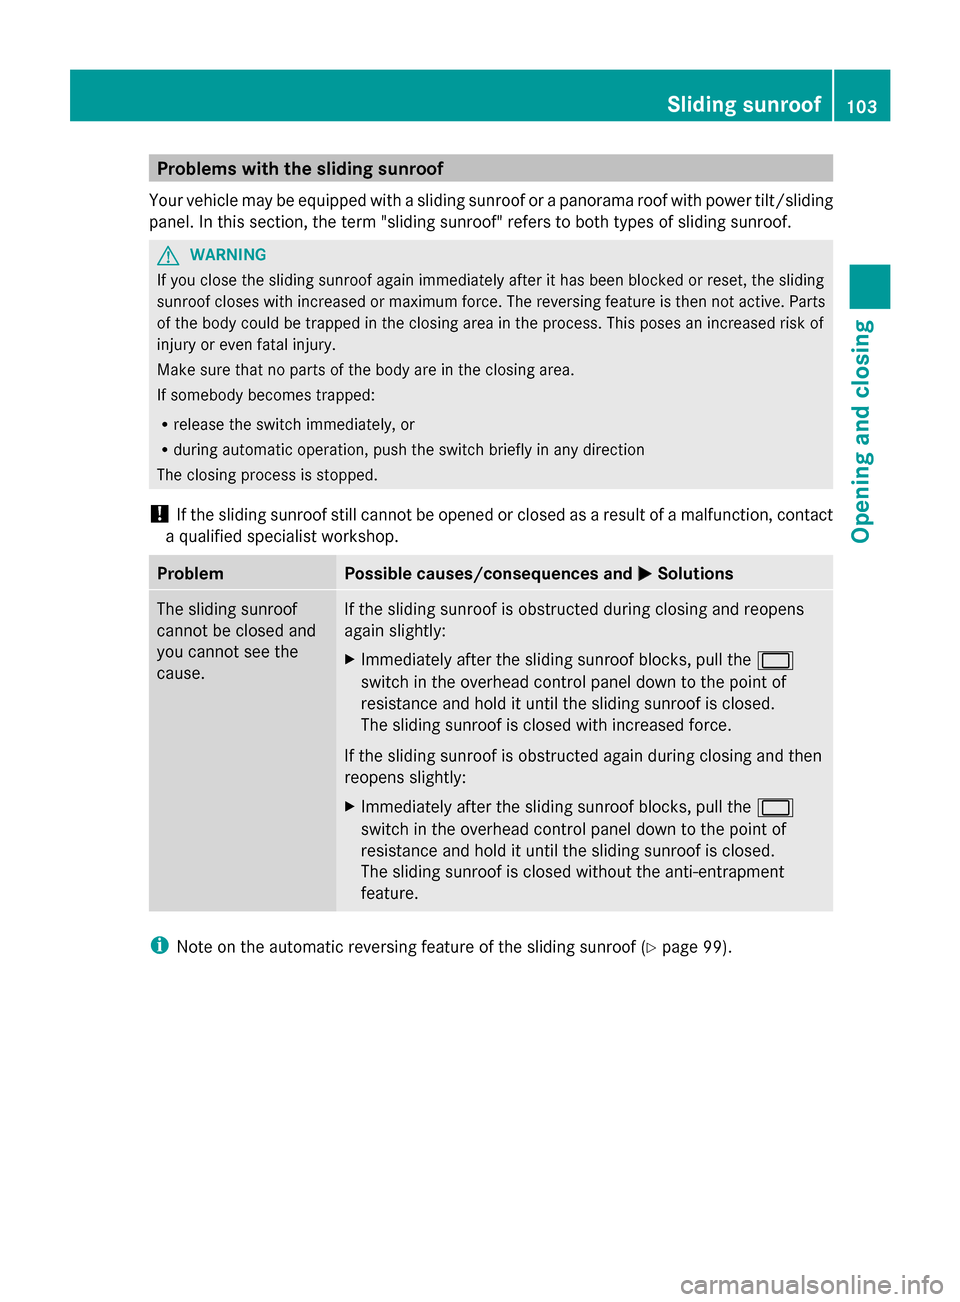
a qualified specialist workshop. Problem Possible causes/consequences and
M MSolutions The sliding sunroof
cannot be closed and
you cannot see the
cause. If the sliding sunroof is obstructed during closing and reopens
again slightly:
X
Immediately after the sliding sunroof blocks, pull the 2
switch in the overhead control panel down to the point of
resistance and hold it until the sliding sunroof is closed.
The sliding sunroof is closed with increased force.
If the sliding sunroof is obstructed again during closing and then
reopens slightly:
X Immediately after the sliding sunroof blocks, pull the 2
switch in the overhead control panel down to the point of
resistance and hold it until the sliding sunroof is closed.
The sliding sunroof is closed without the anti-entrapment
feature. i
Note on the automatic reversing feature of the sliding sunroof (Y page 99). Sliding sunroof
103Opening and closing Z
Page 110 of 462

we strongly recommend that children be
placed in the rear seat whenever possible.
Regardless of seating position, children 12
years old and under must be seated and
properly secured in an appropriately sized
child restraint system or booster seat
recommended for the size and weight of the
child. For additional information, see the
"Children in the vehicle" section.
A child's risk of serious or fatal injuries is
significantly increased if the child restraints
are not properly secured in the vehicle and/
or the child is not properly secured in the child
restraint.
! To avoid damage to the seats and the seat
heating, observe the following information:
R keep liquids from spilling on the seats. If
liquid is spilled on the seats, dry them as
soon as possible.
R if the seat covers are damp or wet, do not
switch on the seat heating. The seat
heating should also not be used to dry
the seats.
R clean the seat covers as recommended;
see "Interior care".
R do not transport heavy loads on the
seats. Do not place sharp objects on the
seat cushions, e.g. knives, nails or tools.
The seats should only be occupied by
passengers, if possible.
R when the seat heating is in operation, do
not cover the seats with insulating
materials, e.g. blankets, coats, bags,
seat covers, child seats or booster seats.
! Make sure that there are no objects in the
footwell or behind the seats when resetting
the seats. There is a risk that the seats
and/or the objects could be damaged.
i It is not possible to remove the head
restraints from the front seats. The rear-
compartment head restraints, however,
can be removed (Y page 110).
For more information, contact a qualified
specialist workshop. i
Further related subjects:
R Important safety notes on air bags
(Y page 44)
R Cargo compartment enlargement
(folding down the rear bench seat)
(Y page 344)
R Securing children in the vehicle
(Y page 60) Adjusting the seats electrically
:
Head restraint height
; Seat cushion angle
= Seat height
? Seat fore-and-aft adjustment
A Backrest angle
i Vehicles with memory function: if PRE-
SAFE ®
has been triggered, the front-
passenger seat will be moved to a better
position if it was previously in an
unfavorable position.
i You can store the seat settings using the
memory function (Y page 125). Adjusting the head restraints
General notes Pay attention to the important safety notes
(Y
page 107).
Do not rotate the head restraints of the front
and rear seats. Otherwise, you cannot adjust 108
SeatsSeats, steering wheel and mirrors
Page 125 of 462

Folding the exterior mirrors in or out
electrically X
Make sure that the SmartKey is in position
1or 2in the ignition lock.
X Briefly press button :.
Both exterior mirrors fold in or out.
i Make sure that the exterior mirrors are
always folded out fully while driving. They
could otherwise vibrate.
i If you are driving faster than 30 mph
(47 km/h), you can no longer fold in the
exterior mirrors.
Setting the exterior mirrors If the battery has been disconnected or
completely discharged, the exterior mirrors
must be reset. The exterior mirrors will
otherwise not fold in when you select the
"Fold in mirrors when locking" function in the
on-board computer (Y page 286).
X Make sure that the SmartKey is in
position 1in the ignition lock.
X Briefly press button :.
Folding the exterior mirrors in or out
automatically If the "Fold in mirrors when locking" function
is activated in the on-board computer:
(Y
page 286) R
the exterior mirrors fold in automatically as
soon as you lock the vehicle from the
outside.
R the exterior mirrors fold out again
automatically as soon as you unlock the
vehicle and then open the driver's or front-
passenger door.
Exterior mirror pushed out of position If an exterior mirror has been pushed out of
position, proceed as follows:
X
Vehicles without electrically folding
exterior mirrors: move the exterior mirror
into the correct position manually.
X Vehicles with electrically folding
exterior mirrors: press and hold button for
folding the mirrors :(Ypage 123) until
you hear a click and then the mirror engage
in position.
The mirror housing is engaged again and
you can adjust the exterior mirrors as usual
(Y page 122). Automatic anti-glare mirrors
The rear-view mirror and the exterior mirror
on the driver's side automatically go into anti-
glare mode if the following conditions are met
simultaneously:
R the ignition is switched on and
R incident light from headlamps strikes the
sensor in the rear-view mirror.
i The mirrors do not go into anti-glare mode
if reverse gear is engaged or if the interior
lighting is switched on. Mirrors
123Seats, steering wheel and mirrors Z
Page 126 of 462

Parking position for the exterior
mirror on the front-passenger side
Setting and storing the parking position Using reverse gear
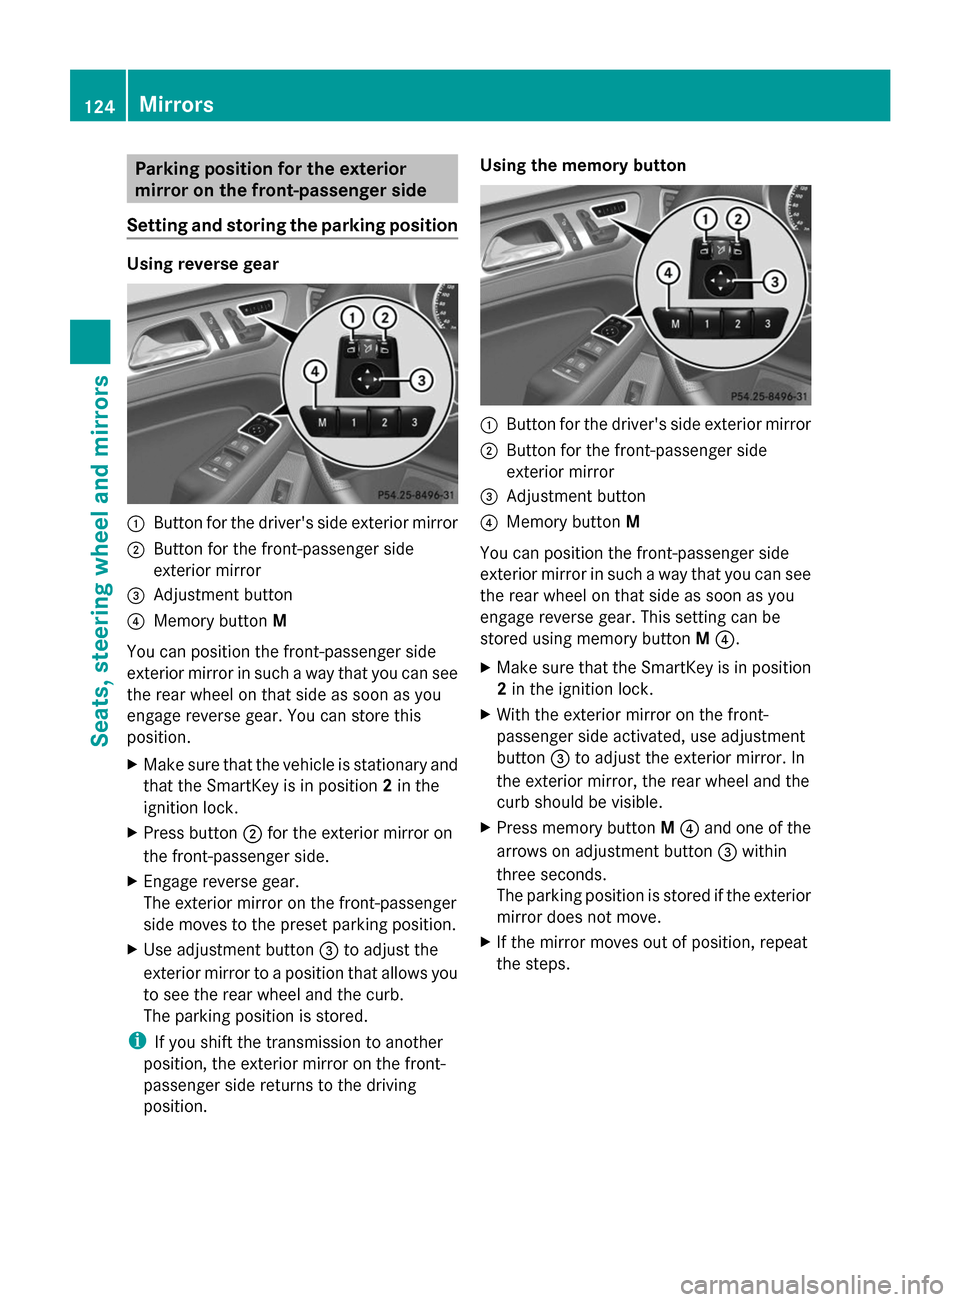
:
Button for the driver's side exterior mirror
; Button for the front-passenger side
exterior mirror
= Adjustment button
? Memory button M
You can position the front-passenger side
exterior mirror in such a way that you can see
the rear wheel on that side as soon as you
engage reverse gear. You can store this
position.
X Make sure that the vehicle is stationary and
that the SmartKey is in position 2in the
ignition lock.
X Press button ;for the exterior mirror on
the front-passenger side.
X Engage reverse gear.
The exterior mirror on the front-passenger
side moves to the preset parking position.
X Use adjustment button =to adjust the
exterior mirror to a position that allows you
to see the rear wheel and the curb.
The parking position is stored.
i If you shift the transmission to another
position, the exterior mirror on the front-
passenger side returns to the driving
position. Using the memory button
:
Button for the driver's side exterior mirror
; Button for the front-passenger side
exterior mirror
= Adjustment button
? Memory button M
You can position the front-passenger side
exterior mirror in such a way that you can see
the rear wheel on that side as soon as you
engage reverse gear. This setting can be
stored using memory button M?.
X Make sure that the SmartKey is in position
2in the ignition lock.
X With the exterior mirror on the front-
passenger side activated, use adjustment
button =to adjust the exterior mirror. In
the exterior mirror, the rear wheel and the
curb should be visible.
X Press memory button M? and one of the
arrows on adjustment button =within
three seconds.
The parking position is stored if the exterior
mirror does not move.
X If the mirror moves out of position, repeat
the steps. 124
MirrorsSeats, steering wheel and mirrors
Page 127 of 462

Calling up a stored parking position
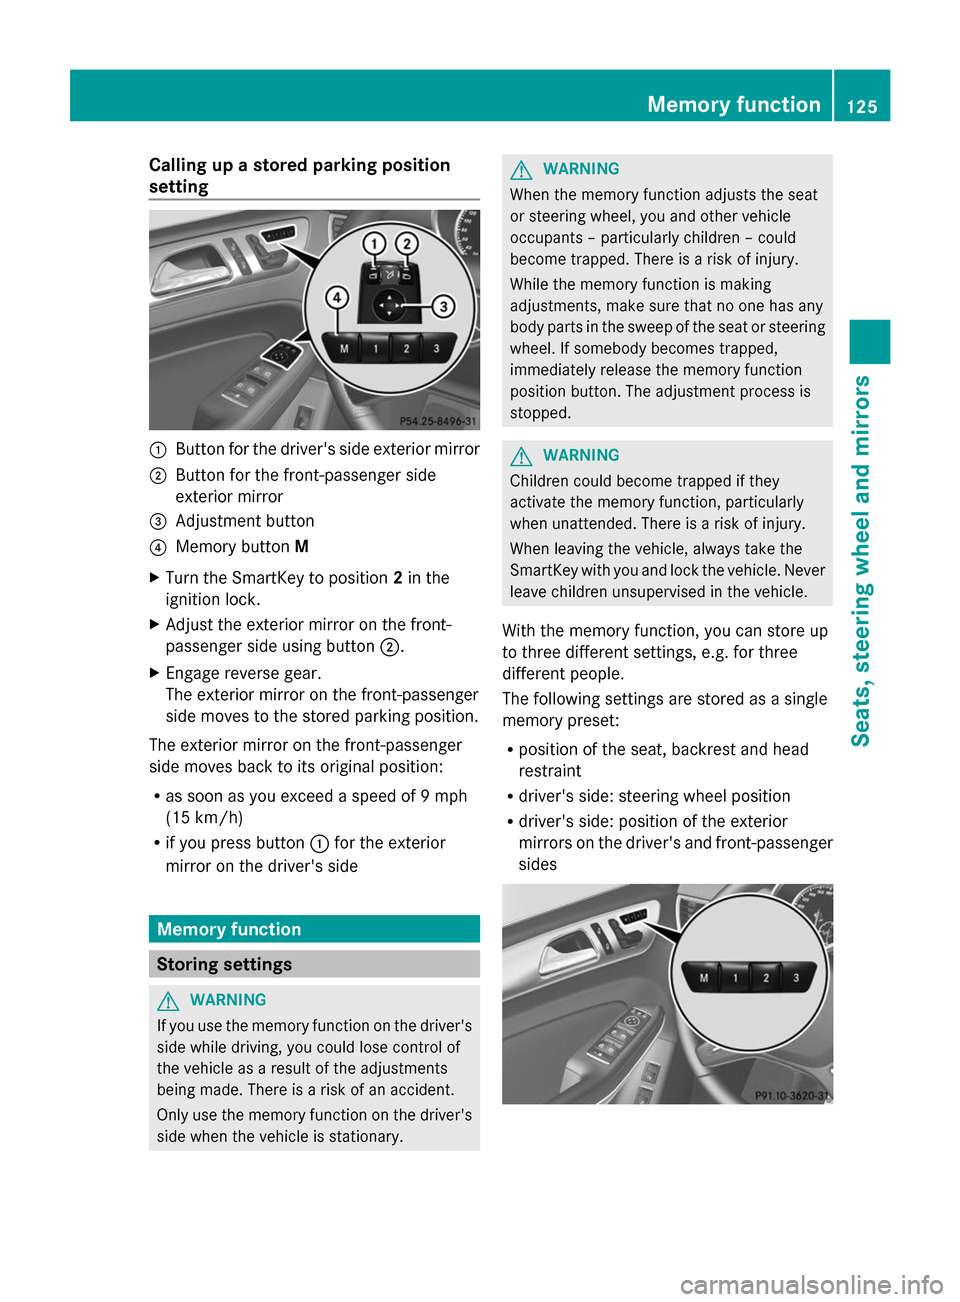
setting :
Button for the driver's side exterior mirror
; Button for the front-passenger side
exterior mirror
= Adjustment button
? Memory button M
X Turn the SmartKey to position 2in the
ignition lock.
X Adjust the exterior mirror on the front-
passenger side using button ;.
X Engage reverse gear.
The exterior mirror on the front-passenger
side moves to the stored parking position.
The exterior mirror on the front-passenger
side moves back to its original position:
R as soon as you exceed a speed of 9 mph
(15 km/h)
R if you press button :for the exterior
mirror on the driver's side Memory function
Storing settings
G
WARNING
If you use the memory function on the driver's
side while driving, you could lose control of
the vehicle as a result of the adjustments
being made. There is a risk of an accident.
Only use the memory function on the driver's
side when the vehicle is stationary. G
WARNING
When the memory function adjusts the seat
or steering wheel, you and other vehicle
occupants – particularly children – could
become trapped. There is a risk of injury.
While the memory function is making
adjustments, make sure that no one has any
body parts in the sweep of the seat or steering
wheel. If somebody becomes trapped,
immediately release the memory function
position button. The adjustment process is
stopped. G
WARNING
Children could become trapped if they
activate the memory function, particularly
when unattended. There is a risk of injury.
When leaving the vehicle, always take the
SmartKey with you and lock the vehicle. Never
leave children unsupervised in the vehicle.
With the memory function, you can store up
to three different settings, e.g. for three
different people.
The following settings are stored as a single
memory preset:
R position of the seat, backrest and head
restraint
R driver's side: steering wheel position
R driver's side: position of the exterior
mirrors on the driver's and front-passenger
sides Memory function
125Seats, steering wheel and mirrors Z
Page 128 of 462

X
Adjust the seat ( Ypage 108).
X On the driver's side, adjust the steering
wheel (Y page 120) and the exterior mirrors
(Y page 122).
X Press the Mmemory button and then press
one of the storage position buttons 1,2or
3 within three seconds.
The settings are stored in the selected
preset position. A tone sounds when the
settings have been completed.
The memory function can still be used if the
SmartKey has been removed. Calling up a stored setting
X Press the button for storage position 1,2
or 3. Keep pressing until the seat, steering
wheel and exterior mirrors are in the stored
position.
i The setting procedure is interrupted as
soon as you release the storage position
buttons. 126
Memory functionSeats, steering
wheel and mirrors
Page 195 of 462

in the ECO display does not indicate a fixed
consumption.
Apart from driving style, consumption is
dependent on many factors such as, e.g.:
R Load
R Tire pressure
R Cold start
R Choice of route
R Electrical consumers switched on
These factors are not included in the ECO
display.
The evaluation of your driving style is carried
out using the following three categories:
R Acceleration
Acceleration (evaluation of all
acceleration processes):
- The bar fills up: moderate acceleration,
especially at higher speeds
- The bar empties: sporty acceleration
R Constant Constant (assessment of driving behavior
at all times):
- The bar fills up: constant speed and
avoidance of unnecessary acceleration
and deceleration
- The bar empties: fluctuations in speed
R Coasting
Coasting (assessment of all deceleration
processes):
- The bar fills up: anticipatory driving,
keeping your distance and early release
of the accelerator. The vehicle can coast
without use of the brakes.
- The bar empties: frequent braking
i An economical driving style specially
requires driving at moderate engine
speeds.
To achieve a higher value in the categories
Acceleration
Acceleration andConstant Constant , observe the
gearshift recommendations.
i On long journeys at a constant speed, e.g.
on the highway, only the bar for Constant
Constant
will change.
i The ECO display summarizes the driving
characteristics from the start of the journey
to its completion. For this reason, the bars change dynamically at the beginning of the
journey. On longer journeys, there are
fewer changes. For more dynamic changes,
carry out a manual reset.
For further information on the ECO display,
see (Y page 276). Braking
Important safety notes G
WARNING
If you shift down on a slippery road surface in
an attempt to increase the engine's braking
effect, the drive wheels could lose their grip.
There is an increased danger of skidding and
accidents.
Do not shift down for additional engine
braking on a slippery road surface.
Downhill gradients !
On long and steep gradients, you must
reduce the load on the brakes by shifting
early to a lower gear. This allows you to take
advantage of the engine braking effect and
helps avoid overheating and excessive
wear of the brakes.
When you take advantage of the engine
braking effect, a drive wheel may not turn
for some time, e.g. on a slippery road
surface. This could cause damage to the
drive train. This type of damage is not
covered by the Mercedes-Benz warranty.
Do not depress the brake pedal continuously
while the vehicle is in motion, e.g. causing the
brakes to rub by constantly applying light
pressure to the pedal. This results in
excessive and premature wear to the brake
pads.
Heavy and light loads G
WARNING
If you rest your foot on the brake pedal while
driving, the braking system can overheat. This Driving tips
193Driving and parking
Z
Page 206 of 462

You must select a lower gear in good time on
long and steep downhill gradients, especially
if the vehicle is laden or towing a trailer. By
doing so, you will make use of the braking
effect of the engine. This relieves the load on
the brake system and prevents the brakes
from overheating and wearing too quickly.
If DISTRONIC PLUS detects a slower-moving
vehicle in front, your vehicle is braked in order
to maintain the preset distance to the vehicle
in front.
If DISTRONIC PLUS detects that there is a risk
of a collision, you will be warned visually and
acoustically. DISTRONIC PLUS cannot
prevent a collision without your intervention.
An intermittent warning tone will then sound
and the distance warning lamp will light up in
the instrument cluster. Brake immediately in
order to increase the distance to the vehicle
in front or take evasive action provided it is
safe to do so.
For DISTRONIC PLUS to assist you, the radar
sensor system must be operational.
If there is no vehicle in front, DISTRONIC
PLUS operates in the same way as cruise
control in the speed range between 20 mph
(Canada: 30 km/h) and 120 mph (Canada:
200 km/h). If a vehicle is driving in front of
you, it operates in the speed range between
0 mph (0 km/h) and 120 mph (Canada:
200 km/h).
Do not use DISTRONIC PLUS while driving on
roads with steep gradients.
As DISTRONIC PLUS transmits radar waves,
it can resemble the radar detectors of the
responsible authorities. You can refer to the
relevant chapter in the Operator's Manual if
questions are asked about this.
i USA only:
This device has been approved by the FCC
as a "Vehicular Radar System". The radar
sensor is intended for use in an automotive
radar system only. Removing, tampering
with, or altering the device will void any
warranties, and is not permitted by the FCC. Do not tamper with, alter, or use in
any non-approved way.
Any unauthorized modification to this
device could void the user’s authority to
operate the equipment.
i Canada only: This device complies with
RSS-210 of Industry Canada. Operation is
subject to the following two conditions:
1. This device may not cause harmful
interference, and
2. this device must accept any interference
received, including interference that may
cause undesired operation of the device.
Removal, tampering, or altering of the
device will void any warranties, and is not
permitted. Do not tamper with, alter, or use
in any non-approved way.
Any unauthorized modification to this
device could void the user's authority to
operate the equipment.
Important safety notes G
WARNING
DISTRONIC PLUS does not react to:
R people or animals
R stationary obstacles on the road, e.g.
stopped or parked vehicles
R oncoming and crossing traffic
As a result, DISTRONIC PLUS may neither give
warnings nor intervene in such situations.
There is a risk of an accident.
Always pay careful attention to the traffic
situation and be ready to brake. G
WARNING
DISTRONIC PLUS cannot always clearly
identify other road users and complex traffic
situations.
In such cases, DISTRONIC PLUS may:
R give an unnecessary warning and then
brake the vehicle
R neither give a warning nor intervene
R accelerate unexpectedly 204
Driving systemsDriving and parking