2014 MERCEDES-BENZ GL-Class remote control
[x] Cancel search: remote controlPage 216 of 270
Only use genuine Mercedes-Benz connec-
tion cables.
i iPod ®
and iPhone ®
are registered trade-
marks of Apple Inc., Cupertino, California,
USA.
i MP3 players that support MTP ( Media
Transfer Protocol) can be used.
This allows the MP3 player to be easily con-
nected to the Media Interface and removed
after use. Audio data is played without
problem.
On some MP3 players, you have to activate
the relevant function; see the MP3 player
operating instructions.
Supported devices For details and a list of supported devices,
visit http://www.mbusa-mobile.com. Or
call the Mercedes-Benz Customer Assistance
Center at 1-800-FOR-MERCedes
(1-800-367-6372) (for the USA) or Customer
Relations at 1-800-387-0100 (for Canada). Connecting an external device
Do not leave external devices in the vehicle.
They may malfunction in extreme tempera-
tures; see the operating instructions for the
respective device. Examples of extreme tem-
peratures are direct sunlight or very low out-
side temperatures. Mercedes-Benz USA, LLC
accepts no liability for damage to external
devices.
i Never connect more than one device at a
time. You will otherwise not be able to play
back from the external device.
USB hubs (devices with several USB con-
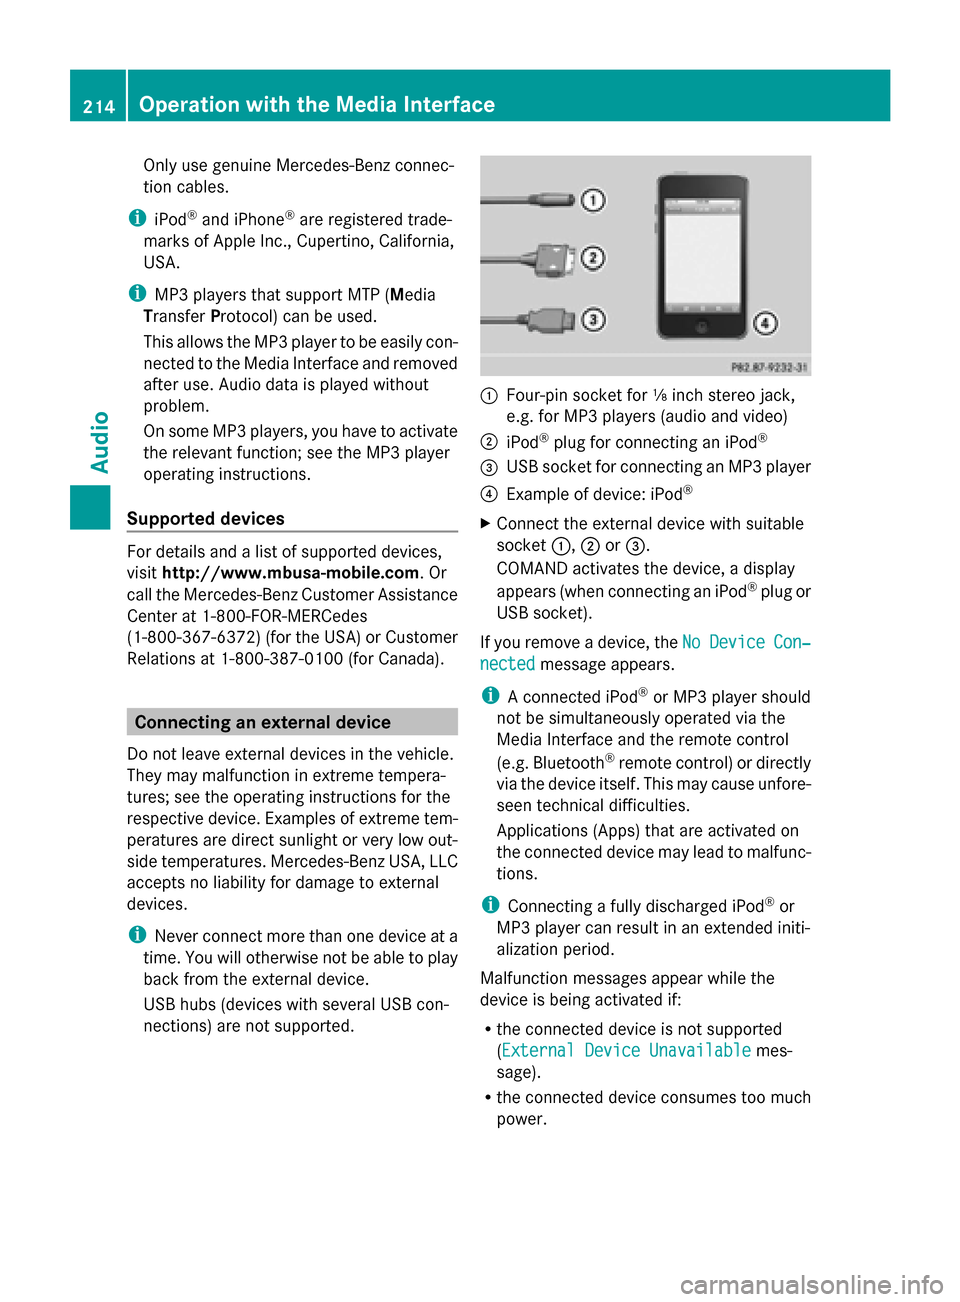
nections) are not supported. 0043
Four-pin socket for ⅛ inch stereo jack,
e.g. for MP3 players (audio and video)
0044 iPod ®
plug for connecting an iPod ®
0087 USB socket for connecting an MP3 player
0085 Example of device: iPod ®
X Connect the external device with suitable
socket 0043,0044or0087.
COMAND activates the device, a display
appears (when connecting an iPod ®
plug or
USB socket).
If you remove a device, the No NoDevice
Device Con‐
Con‐
nected
nected message appears.
i A connected iPod ®
or MP3 player should
not be simultaneously operated via the
Media Interface and the remote control
(e.g. Bluetooth ®
remote control) or directly
via the device itself. This may cause unfore-
seen technical difficulties.
Applications (Apps) that are activated on
the connected device may lead to malfunc-
tions.
i Connecting a fully discharged iPod ®
or
MP3 player can result in an extended initi-
alization period.
Malfunction messages appear while the
device is being activated if:
R the connected device is not supported
(External Device UnavailableExternal Device Unavailable mes-
sage).
R the connected device consumes too much
power. 214
Operation with the Media InterfaceAudio
Page 236 of 270
Your COMAND equipment
These operating instructions describe all the
standard and optional equipment for your
COMAND system, as available at the time of
going to print. Country-specific differences
are possible. Please note that your
COMAND system may not be equipped with
all the features described. Overview
Important safety notes
G
WARNING
The CD/DVD drive is a class 1 laser product.
If you open the CD/DVD drive housing, you
could be exposed to invisible laser radiation.
This laser radiation could damage your retina.
There is a risk of injury.
Never open the housing. Always have main-
tenance and repair work carried out at a quali-
fied specialist workshop. G
WARNING
If objects such as headphones/headsets or
external audio/video sources are not secured
in the passenger compartment, they can be
flung around and hit vehicle occupants. There
is a risk of injury, for example in the event of
sudden braking or a sudden change in direc-
tion.
Always stow these items or similar objects
carefully so that they cannot be flung around,
for example in a lockable vehicle stowage
compartment. Components
The Rear Seat Entertainment System
includes:
R two screens for the rear behind the front-
seat head restraints
R two remote controls
R a CD/DVD drive R
AUX jacks on both screens (AUX display)
and on the CD/DVD drive (AUX drive)
R two sets of cordless headphones 234
OverviewRea
r Seat Entertainment System
Page 237 of 270
Rear-compartment screens
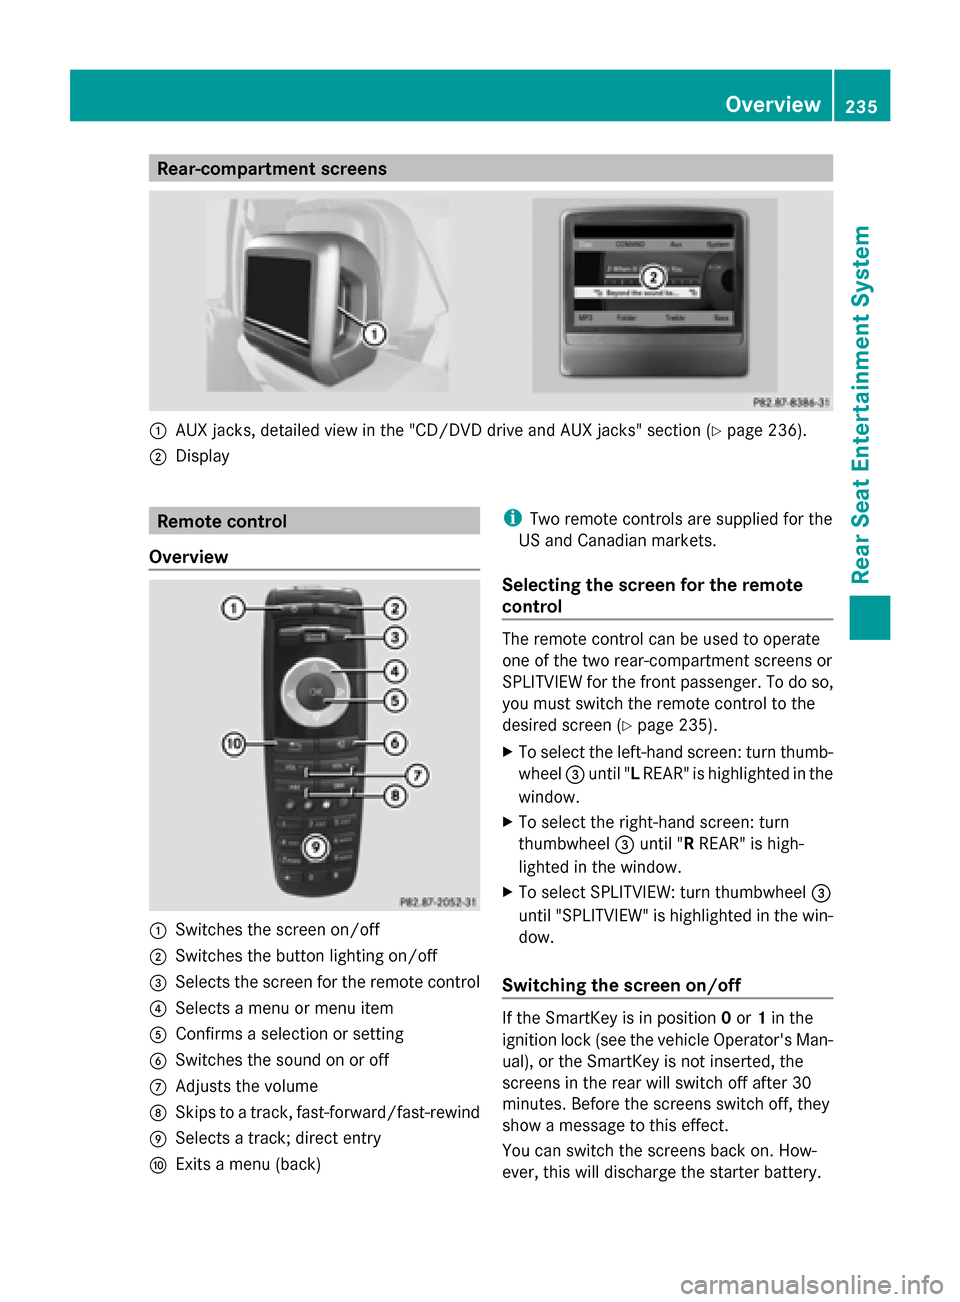
0043
AUX jacks, detailed view in the "CD/DVD drive and AUX jacks" section (Y page 236).
0044 Display Remote control
Overview 0043
Switches the screen on/off
0044 Switches the button lighting on/off
0087 Selects the screen for the remote control
0085 Selects a menu or menu item
0083 Confirms a selection or setting
0084 Switches the sound on or off
006B Adjusts the volume
006C Skips to a track, fast-forward/fast-rewind
006D Selects a track; direct entry
006E Exits a menu (back) i
Two remote controls are supplied for the
US and Canadian markets.
Selecting the screen for the remote
control The remote control can be used to operate
one of the two rear-compartment screens or
SPLITVIEW for the front passenger. To do so,
you must switch the remote control to the
desired screen (Y
page 235).
X To select the left-hand screen: turn thumb-
wheel 0087until " LREAR" is highlighted in the
window.
X To select the right-hand screen: turn
thumbwheel 0087until "R REAR" is high-
lighted in the window.
X To select SPLITVIEW: turn thumbwheel 0087
until "SPLITVIEW" is highlighted in the win-
dow.
Switching the screen on/off If the SmartKey is in position
0or 1in the
ignition lock (see the vehicle Operator's Man-
ual), or the SmartKey is not inserted, the
screens in the rear will switch off after 30
minutes. Before the screens switch off, they
show a message to this effect.
You can switch the screens back on. How-
ever, this will discharge the starter battery. Overview
235Rear Seat Entertainment System Z
Page 238 of 270
X
Point the remote control at the rear-com-
partment screen which has been selected
for remote operation.
X Press button 0043on the remote control
(Y page 235).
The respective rear-compartment screen
switches on or off.
i You can only switch the screens on using
the remote control if the ignition is
switched on.
Switching the button lighting on/off X
Press button 0044on the remote control
(Y page 235).
Depending on the previous status, the but-
ton lighting is switched on or off.
i If you do not use the remote control for
about 15 seconds, the button lighting
switches off automatically.
Switching the sound on or off X
Press button 0084on the remote control
(Y page 235).
The sound is switched on/off.
Selecting a menu/menu item and con-
firming your selection X
Select a menu/menu item using the
0059006500630064 buttons on the
remote control and press the 008Bbutton to
confirm. CD/DVD drive and AUX jacks
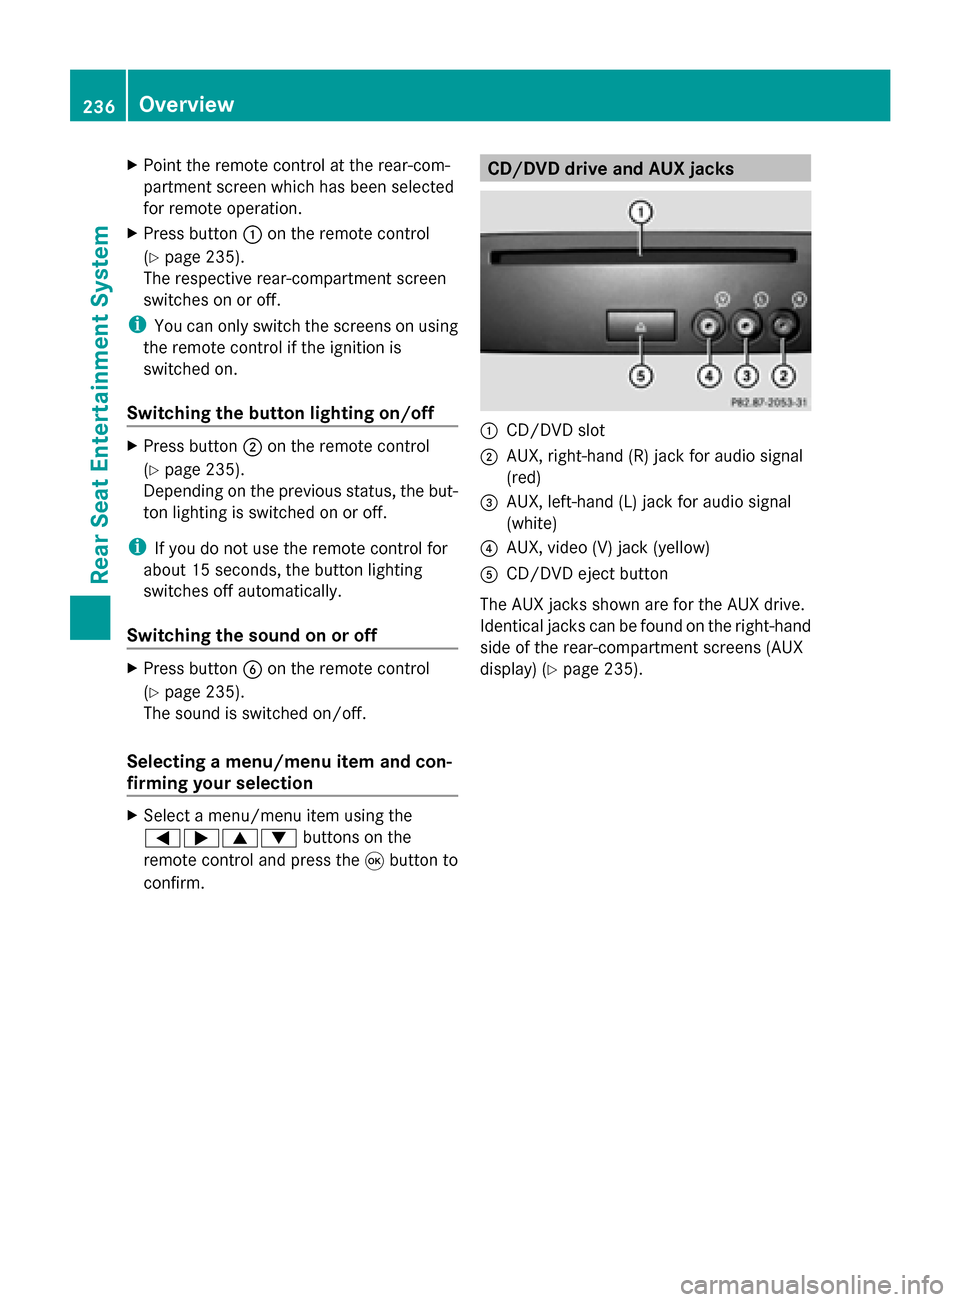
0043
CD/DVD slot
0044 AUX, right-hand (R) jack for audio signal
(red)
0087 AUX, left-hand (L) jack for audio signal
(white)
0085 AUX, video (V) jack (yellow)
0083 CD/DVD eject button
The AUX jacks shown are for the AUX drive.
Identical jacks can be found on the right-hand
side of the rear-compartment screens (AUX
display) (Y page 235).236
OverviewRear Seat Entertainment System
Page 240 of 270
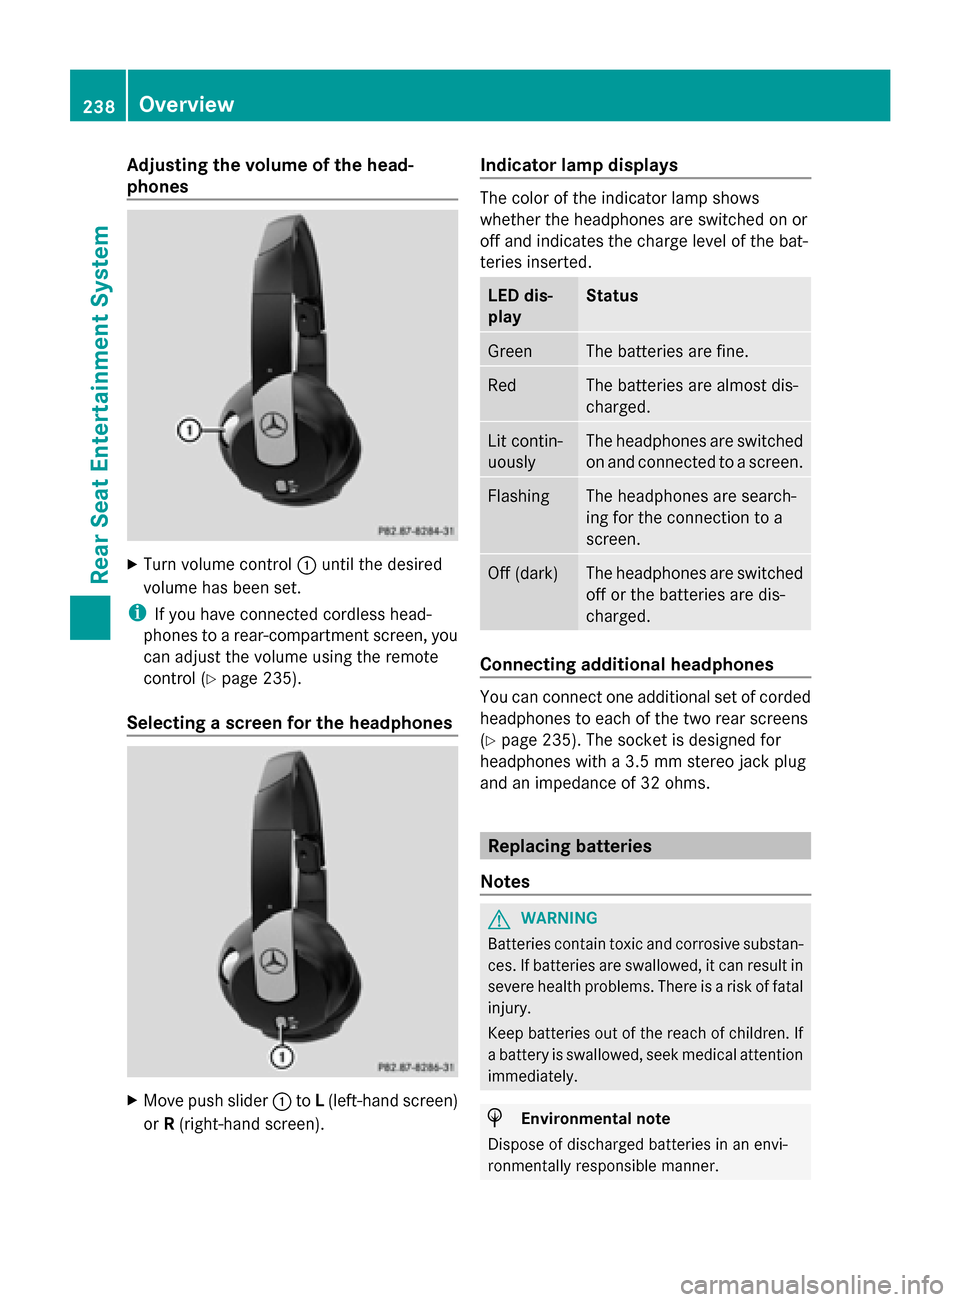
Adjusting the volume of the head-
phones X
Turn volume control 0043until the desired
volume has been set.
i If you have connected cordless head-
phones to a rear-compartment screen, you
can adjust the volume using the remote
control (Y page 235).
Selecting a screen for the headphones X
Move push slider 0043toL(left-hand screen)
or R(right-hand screen). Indicator lamp displays The color of the indicator lamp shows
whether the headphones are switched on or
off and indicates the charge level of the bat-
teries inserted. LED dis-
play Status
Green The batteries are fine.
Red The batteries are almost dis-
charged.
Lit contin-
uously The headphones are switched
on and connected to a screen.
Flashing The headphones are search-
ing for the connection to a
screen.
Off (dark) The headphones are switched
off or the batteries are dis-
charged.
Connecting additional headphones
You can connect one additional set of corded
headphones to each of the two rear screens
(Y page 235). The socket is designed for
headphones with a 3.5 mm stereo jack plug
and an impedance of 32 ohms. Replacing batteries
Notes G
WARNING
Batteries contain toxic and corrosive substan-
ces. If batteries are swallowed, it can result in
severe health problems. There is a risk of fatal
injury.
Keep batteries out of the reach of children. If
a battery is swallowed, seek medical attention
immediately. H
Environmental note
Dispose of discharged batteries in an envi-
ronmentally responsible manner. 238
OverviewRea
r Seat Entertainment System
Page 241 of 270

Batteries are required for the remote control
and for the two sets of cordless headphones.
The batteries can be replaced (Y page 238).
On the remote control 0043
Battery compartment
0044 Catch tab
0087 Battery compartment cover
0085 Retaining lugs
0083 Batteries
The remote control contains 2 type AAA,
1.5 V batteries.
X To open the battery compartment:
remove battery compartment cover 0087on
the back of the remote control.
X To do so, press down retaining lug 0044and
take off battery compartment cover 0087.
X Remove discharged batteries 0083from the
tray.
X Insert the new batteries. Observe the polar-
ity markings on the batteries and battery
compartment when doing so.
Left-hand battery: the positive pole (+)
must face upwards.
Right-hand battery: the positive pole (+)
must face downwards.
X To close the battery compartment:
insert battery compartment cover 0087start- ing with retaining lugs
0085into the battery
compartment and allow catch tab 0044to
engage in place.
On the cordless headphones 0043
Battery compartment cover
The cordless headphones contain two type
AAA, 1.5 V batteries.
X To open the battery compartment: flip
battery compartment cover 0043upwards.
As you do so, hold the left-hand side of the
headphones as shown to prevent the bat-
teries from falling out.
X Remove the discharged batteries from the
tray.
X Insert the new batteries. Observe the polar-
ity markings on the batteries and battery
compartment when doing so.
Left-hand battery: the positive pole (+)
must face upwards.
Right-hand battery: the positive pole (+)
must face downwards.
X To close the battery compartment:
press battery compartment cover down-
wards until it engages into place.
If the batteries have been inserted cor-
rectly, the indicator lamp will light up green
when the headphones are switched on.
i The operating duration of the headphones
with a set of batteries is up to 40 hours. Overview
239Rear Seat Entertainment System Z
Page 242 of 270

Basic functions
Using headphones
You can use the cordless headphones sup-
plied and/or up to two sets of corded head-
phones connected to the corresponding jack
of the rear-compartment screens
(Y page 235).
Information on the cordless headphones
(Y page 237). Using the main loudspeakers
This function is available in conjunction with
COMAND.
You can use the vehicle loudspeakers to lis-
ten to a disc inserted in the rear-compartment
drive. To do so, at least one of the rear-com-
partment screens must be set to disc mode.
X To set on COMAND: press the002Afunc-
tion button to switch on an audio mode.
X Select Audio
Audio by sliding 00970052the COMAND
controller and press 0098to confirm.
The Audio menu appears.
X Select Rear
Rear by turning 00790052007Athe COMAND
controller and press 0098to confirm.
i The headphones' volume setting does not
affect the main loudspeakers. Selecting sound settings
You can select the sound settings in the CD/
audio DVD/MP3, video DVD and AUX modes.
X Switch on an operating mode (e.g. audio
CD mode) (Y page 242).
X Select Treble
Treble orBass Bass using
the 006400590065 buttons on the remote
control and press the 008Bbutton to confirm.
An adjustment scale appears.
X Select a setting using the 00630064but-
tons and press the 008Bbutton to confirm. Multiple users
Simultaneous use of the rear-compart-
ment disc drive The two rear-compartment screens can be
operated almost entirely independently from
one another. However, there can be a conflict
in some menus if the two screens are used
simultaneously.
If the rear-compartment disc drive is being
used for both screens simultaneously, select-
ing certain menus or settings on one of the
screens also affects the other screen.
The following functions affect both screens:
R changing playback options
R selecting a track (from a track list or folder)
R using the play, pause and stop functions
R fast forwarding/rewinding or scrolling
R calling up the DVD menu and navigating
within it
R setting the language, subtitles and camera
angle
R calling up interactive DVD content
The following functions affect only one
screen:
R audio and video functions as well as picture
settings
R switching between full screen and the
menu
Switching between operating modes When you exit an operating mode (e.g. audio
CD mode), the current setting is saved. If you
call up this operating mode again later, there
are two possibilities:
R the operating mode has been changed on
the other screen.
R the operating mode has not been changed.
In the first case, the operating mode appears
as it is on the other screen.
In the second case, the setting appears on the
screen as it was when you last exited the
operating mode. 240
Basic functionsRear Seat Entertainment System
Page 243 of 270

Picture settings
Overview You can select picture settings in video DVD
and AUX mode (Y page 252).
Adjusting the brightness, contrast and
color Example: TV mode
0043
Brightness, contrast and color
0044 Picture formats
X Switch on video DVD mode (Y page 246).
X To show the menu: press the008Bbutton
on the remote control.
or
X While the navigation menu is shown,
(Y page 226) select Menu Menuand press the
008B button to confirm.
X Select DVD-Video
DVD-Video using
the 006400590065 buttons and press the
008B button to confirm.
X Select Brightness
Brightness, Contrast
ContrastorColor
Color
using the 00630064 buttons and press the
008B button to confirm.
An adjustment scale appears.
X Select a setting using the 00630064but-
tons and press the 008Bbutton to confirm. Changing the picture format
X To show the menu: press the008Bbutton
on the remote control.
or
X While the navigation menu is shown,
(Y page 226) select Menu Menuand press the
008B button to confirm.
X Select DVD-Video
DVD-Video using
the 006400590065 buttons and press the
008B button to confirm.
The dot in front of one of the menu items
16:9
16:9 Optimized Optimized ,4:3
4:3 orWidescreen
Widescreen indi-
cates the format currently selected.
X Select a format using the 00630064but-
tons and press the 008Bbutton to confirm. System settings
Note
You can adjust almost all system settings
individually for each screen without affecting
the other screen. You make these settings
using the remote control (Y page 235). Selecting the display language
X Select System System using the 006300590065
buttons on the remote control and press
008B to confirm.
You see the system menu on the selected
rear screen.
X Select Settings Settings using the0064button
and press 008Bto confirm.
X Select Language
Language using the00630064 but-
tons and press the 008Bbutton to confirm.
The list of languages appears. A 0036dot
indicates the current setting.
X Select a language using the 00630064but-
tons and press the 008Bbutton to confirm.
The Rear Seat Entertainment System acti-
vates the selected language. System settings
241Rear Seat Entertainment System Z