2014 MERCEDES-BENZ G-CLASS SUV steering
[x] Cancel search: steeringPage 212 of 272
X
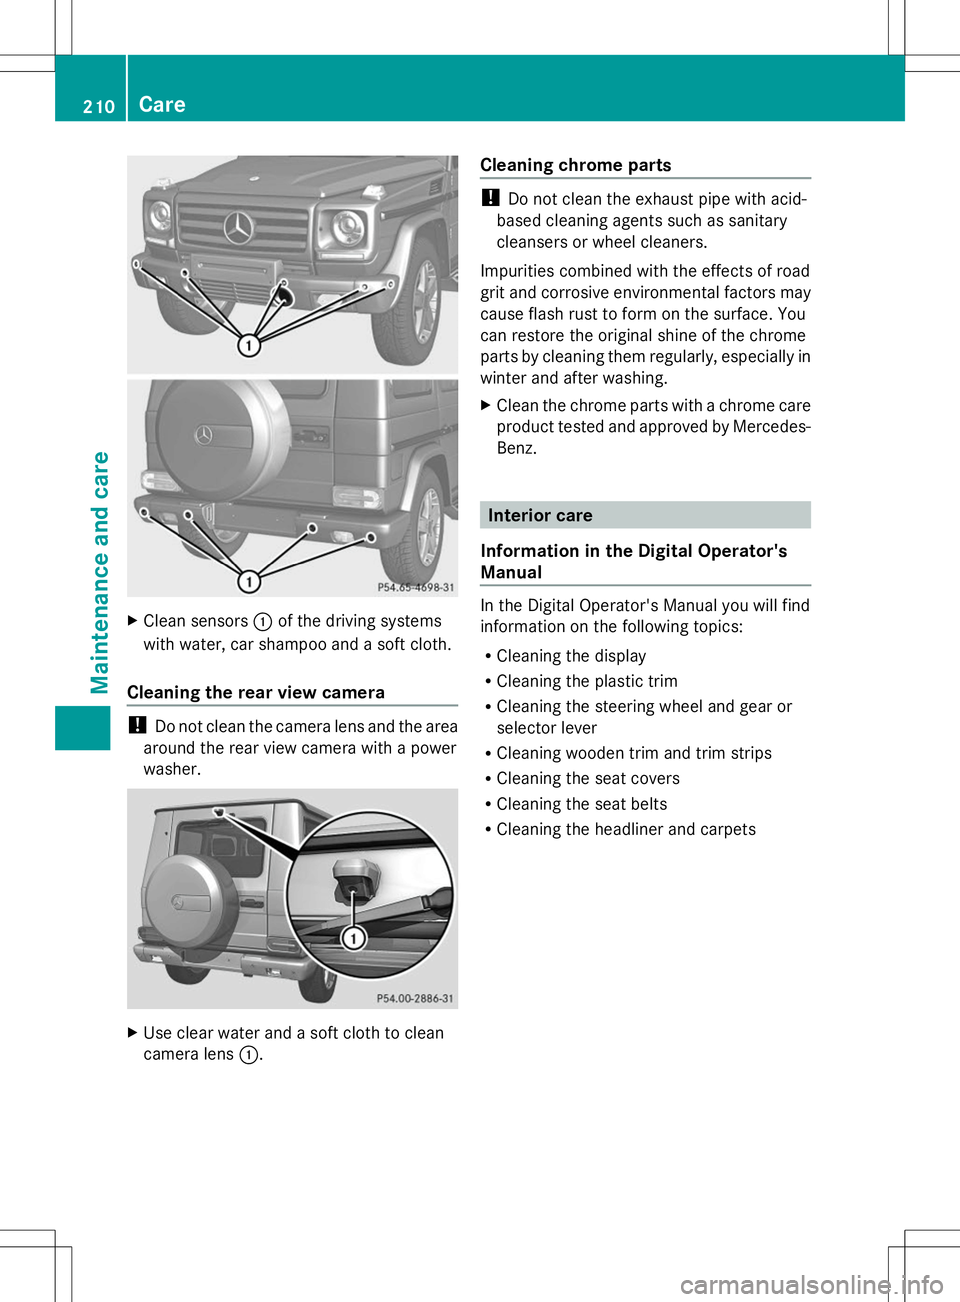
Clean sensors :of the driving systems
with water, car shampoo and a soft cloth.
Cleaning the rear view camera !
Do not clean the camera lens and the area
around the rear view camera with a power
washer. X
Use clear water and a soft cloth to clean
camera lens :. Cleaning chrome parts !
Do not clean the exhaust pipe with acid-
based cleaning agents such as sanitary
cleansers or wheel cleaners.
Impurities combined with the effects of road
grit and corrosive environmental factors may
cause flash rust to form on the surface. You
can restore the original shine of the chrome
parts by cleaning them regularly, especially in
winter and after washing.
X Clean the chrome parts with a chrome care
product tested and approved by Mercedes-
Benz. Interior care
Information in the Digital Operator's
Manual In the Digital Operator's Manual you will find
information on the following topics:
R Cleaning the display
R Cleaning the plastic trim
R Cleaning the steering wheel and gear or
selector lever
R Cleaning wooden trim and trim strips
R Cleaning the seat covers
R Cleaning the seat belts
R Cleaning the headliner and carpets 210
CareMaintenance and care
Page 216 of 272

X
Pull cover ring :apart and remove it.
X Pull off cover panel ?.i
When re-installing cover panel ?, make
sure that retainer Aengages in recess
B.
Removing the spare wheel The spare wheel is heavy. Take particular note
of this when removing the spare wheel. X
Remove wheel nuts :.
X Remove the spare wheel. Mounting the wheel After changing a wheel:
X
Repair or replace the damaged wheel as
soon as possible and secure the spare
wheel in place again.
X Secure the damaged wheel on the spare
wheel bracket with wheel nuts :. When
doing so, make sure that the wheel cannot
come loose.
X When re-installing cover panel ?, make
sure that retainer Bengages in recess
A(Y page 213).
X Make sure that tab ;is below when re-
installing cover ring :(Ypage 213).
X For safety reasons, regularly check to
ensure that the wheel is securely fastened. Flat tire
Preparing the vehicle
X Stop the vehicle on solid, non-slippery and
level ground, as far away as possible from
traffic.
X Switch on the hazard warning lamps
(Y page 82).
X Apply the parking brake.
X Bring the front wheels into the straight-
ahead position.
X Move the selector lever to position P.
X Switch off the engine.
X Remove the SmartKey from the ignition
lock.
The steering wheel lock stays active for as
long as the SmartKey is removed.
X All occupants must get out of the vehicle.
Make sure that they are not endangered as
they do so.
X Make sure that no one is near the danger
area while a wheel is being changed.
Anyone who is not directly assisting in the
wheel change should, for example, stand
behind the barrier. 214
Flat tireBreakdown assistance
Page 217 of 272

X
Get out of the vehicle. Pay attention to
traffic conditions when doing so.
X Close the driver's door. Battery (vehicle)
Important safety notes
Special tools and expert knowledge are
required when working on the battery, e.g.
removal and installing. You should therefore
have all work involving the battery carried out
at a qualified specialist workshop. G
WARNING
Work carried out incorrectly on the battery
can lead, for example, to a short circuit and
thus damage the vehicle electronics. This can
lead to function restrictions applying to
safety-relevant systems, e.g. the lighting
system, ABS (anti-lock braking system) or
ESP ®
(Electronic Stability Program). The
operating safety of your vehicle may be
restricted. You could lose control of the
vehicle, for example:
R braking
R in the event of abrupt steering maneuver
and/or when the vehicle's speed is not
adapted to the road conditions
There is a risk of an accident.
In the event of a short circuit or a similar
incident, contact a qualified specialist
workshop immediately. Do not drive any
further. You should have all work involving the
battery carried out at a qualified specialist
workshop.
If ABS malfunctions, the wheels can lock
during braking. This limits the steerability of
the vehicle when braking and may increase
the braking distance.
If ESP ®
malfunctions, the vehicle will not be
stabilized if it starts to skid or a wheel starts
to spin. G
WARNING
Work carried out incorrectly on the battery
can, for example, lead to a short circuit and
damage your vehicle's electronic system. This
can disrupt driving safety systems such as
ABS (anti-lock braking system) or ESP ®
(Electronic Stability Program).
R If ABS malfunctions, the wheels can lock
during braking. This limits the steerability
of the vehicle when braking and the braking
distance may increase. There is a risk of
accident.
R If ESP ®
malfunctions, the vehicle will not be
stabilized if it starts to skid or a wheel starts
to spin. There is a risk of accident.
You should therefore have all work involving
the battery carried out at a qualified specialist
workshop. G
WARNING
During the charging process, a battery
produces hydrogen gas. If a short circuit
occurs or sparks are created, the hydrogen
gas can ignite. There is a risk of an explosion.
R Make sure that the positive terminal of a
connected battery does not come into
contact with vehicle parts.
R Never place metal objects or tools on a
battery.
R It is important that you observe the
described order of the battery terminals
when connecting and disconnecting a
battery.
R When jump-starting, make sure that the
battery poles with identical polarity are
connected.
R It is particularly important to observe the
described order when connecting and
disconnecting the jumper cables.
R Never connect or disconnect the battery
terminals while the engine is running. G
WARNING
Electrostatic build-up can lead to the creation
of sparks, which could ignite the highly Battery (vehicle)
215Breakdown assistance
Z
Page 225 of 272

Rear towing eye
:is located under the
bumper, on the left-hand side when viewed in
the direction of travel. Towing a vehicle with both axles on
the ground
It is important that you observe the safety
instructions when towing away your vehicle
(Y page 221).
X Switch on the hazard warning lamps
(Y page 82).
i In order to signal a change of direction
when towing the vehicle with the hazard
warning lamps switched on, use the
combination switch as usual. In this case,
only the turn signals for the desired
direction flash. When you reset the
combination switch, the hazard warning
lamps start flashing again.
X Turn the SmartKey to position 2in the
ignition lock (Y page 97).
X When the vehicle is stationary, depress the
brake pedal and keep it depressed.
X Shift the transfer case to
neutral(Y page 131).
X Shift the automatic transmission to
position N.
X Release the brake pedal.
X Release the parking brake (Y page 105).
i The transmission can only change gear if
the battery has sufficient charge.
If you cannot move the selector lever to N,
the propeller shafts to the driven axles
must be removed. Transporting the vehicle
! You may only secure the vehicle by the
wheels, not by parts of the vehicle such as
axle or steering components. Otherwise,
the vehicle could be damaged. Use the towing eyes to pull the vehicle if it
needs to be transported on a trailer or
transporter (Y
page 222).
X Apply the parking brake.
X Turn the SmartKey to position 2in the
ignition lock (Y page 97).
X Move the selector lever to N.
X Shift the transfer case to neutral
(Y page 131).
X Secure the towing cable to the towing eyes
(Y page 222).
X Make sure that the vehicle cannot roll
away.
X Release the parking brake.
X Load the vehicle onto the transporter.
As soon as the vehicle has been loaded:
X Apply the parking brake.
X Shift the automatic transmission to
position P.
X Turn the SmartKey to position 0in the
ignition lock (Y page 97) and remove it.
X Secure the vehicle. Recovering a vehicle that has become
stuck
! When recovering a vehicle that has
become stuck, pull it as smoothly and
evenly as possible. Excessive tractive
power could damage the vehicles.
If the drive wheels have become stuck in
loose or muddy ground, pull the vehicle out
with extreme caution, especially so if the
vehicle is loaded.
Never attempt to recover a stuck vehicle with
a trailer attached.
Pull out the vehicle backwards, if possible
using the tracks it made when it became
stuck. Towing and tow-starting
223Breakdown assistance Z
Page 230 of 272

Useful information
i This Operator's Manual describes all
models and all standard and optional
equipment of your vehicle available at the
time of publication of the Operator's
Manual. Country-specific differences are
possible. Please note that your vehicle may
not be equipped with all features
described. This also applies to safety-
related systems and functions.
i Read the information on qualified
specialist workshops: (Y page 27).Important safety notes
G
WARNING
Replace rims or tires with the same
designation, manufacturer and type as shown
on the original part. For further information
contact an authorized Mercedes-Benz Center.
If incorrectly sized rims and tires are
mounted, the wheel brakes or suspension
components can be damaged. Also, the
operating clearance of the wheels and the
tires may no longer be correct. G
WARNING
Worn, old tires can cause accidents. If the tire
tread is worn to minimum tread depth, or if
the tires have sustained damage, replace
them.
When replacing rims, only use genuine
Mercedes-Benz wheel bolts specified for the
particular rim type. Failure to do so can result
in the bolts loosening and possibly an
accident.
Retreaded tires are not tested or
recommended by Mercedes-Benz, since
previous damage cannot always be
recognized on retreads. The operating safety
of the vehicle cannot be assured when such
tires are used. G
WARNING
If you notice sudden significant vibrations or
unusual handling performance or if you
suspect that damage has occurred to the
vehicle, you should activate the hazard
warning lamps, gently reduce speed and
carefully head for an area that is located at a
safe distance from the road.
Check the tires and the underside of the
vehicle for damage. If the vehicle seems
unsafe, have the vehicle towed away to the
nearest Mercedes-Benz Center or tire dealer
to be repaired. G
WARNING
Do not drive with a flat tire. A flat tire affects
the ability to steer or brake the vehicle. You
might lose control of the vehicle. Continued
driving with a flat tire or driving at high speed
with a flat tire will cause excessive heat build-
up and possibly a fire. G
Warning
A flat tire severely impairs the driving,
steering and braking characteristics of the
vehicle. There is a risk of an accident.
do not drive with a flat tire. Immediately
replace the flat tire with your spare wheel, or
consult a qualified specialist workshop.
Consult an authorized Mercedes-Benz Center
if you require information on approved and
recommended tires and wheels for summer
and winter operation. Advice on purchasing
and caring for tires is also available there.
Accessories that are not approved for your
vehicle by Mercedes-Benz or are not being
used correctly can impair the operating
safety.
Before purchasing and using non-approved
accessories, visit a qualified specialist
workshop and ask about:
R suitability
R legal stipulations
R factory recommendations 228
Important safety notesWheels and tires
Page 231 of 272

Information on the dimensions and types of
wheels and tires for your vehicle can be found
in the "Wheel/tire combinations" section
(Y page 253).
Information on air pressure for the tires on
your vehicle can be found:
R on the tire pressure label on the fuel filler
flap
R in the "Tire pressure" section
i Further information on wheels and tires
can be obtained at any qualified specialist
workshop. Operation
Notes on driving
If the vehicle is heavily loaded, check the tire
pressures and correct them if necessary.
When parking your vehicle, make sure that
the tires do not get deformed by the curb or
other obstacles. If it is necessary to drive over
curbs, speed humps or similar elevations, try
to do so slowly and at an obtuse angle.
Otherwise, the tires, particularly the
sidewalls, may be damaged. Regular checking of wheels and tires
G
WARNING
Regularly check the tires for damage.
Damaged tires can cause tire inflation
pressure loss. As a result, you could lose
control of your vehicle.
Worn, old tires can cause accidents. If the tire
tread is worn to minimum tread depth, or if
the tires have sustained damage, replace
them.
R Regularly check the wheels and tires of
your vehicle for damage at least once a
month, as well as after driving off-road or
on rough roads. Damage includes bulges
and deformation on tires, cuts, punctures,
cracks or severe corrosion on wheels, for example. Damaged wheels can cause a
loss of tire pressure.
R Regularly check the tire tread depth and
the condition of the tread across the whole
width of the tire (Y page 229). In order to
inspect the inner side of the tire surface,
turn the steering wheel to full lock.
R All wheels must have a valve cap to protect
the valve against dirt and moisture. Do not
install anything onto the valve other than
the standard valve cap or a valve cap
approved by Mercedes-Benz for your
vehicle.
Do not install anything onto the valve, such
as tire pressure monitoring systems.
R You should regularly check the pressure of
all your tires including the spare wheel,
particularly prior to long trips. Adjust the
tire pressure as necessary (Y page 236).
The service life of tires depends, among other
things, on the following factors:
R driving style
R tire pressure
R distance covered Tire tread
G
WARNING
Although the applicable federal motor vehicle
safety laws consider a tire to be worn when
the treadwear indicators (TWI) become visible
at approximately áinches (1.6 mm), we
recommend that you do not allow your tires
to wear down to that level. As tread depth
approaches âinches (3 mm) the adhesion
properties on a wet road are sharply reduced.
Depending upon the weather and/or road
surface (conditions), the tire traction varies
widely. Operation
229Wheels and tires Z
Page 232 of 272

Marking
:shows the tread wear indicator
(TWI). The arrow indicates the placement of
the tire tread.
Do not drive with tires which have too little
tread depth. tire traction on wet road surfaces
decreases significantly when the tread depth
is less than 1
/ 8 in (3 mm).
Treadwear indicators (TWI) are required by
law. Six indicators are positioned over the tire
tread. They are visible once the tread depth
is approximately 1
/ 16 in (1.6 mm). If this is the
case, the tire is so worn that it must be
replaced.
The recommended tread depth for summer
tires is at least 1
/ 8 in (3 mm). The
recommended tread depth for winter tires is
at least 1
/ 6 in (4 mm). Selecting, mounting and replacing
tires
R Only mount tires and wheels of the same
type and make.
R Only mount approved tires of the correct
size onto the wheels.
R Tires are supplied with a protective layer
from the factory. Break in new tires at
moderate speeds for the first 60 miles
(100 km). They only reach their full
performance after this distance. R
Do not drive with tires which have too little
tread depth, as this significantly reduces
the traction on wet roads (hydroplaning).
R Replace the tires after six years at the
latest, regardless of wear. This also applies
to the spare wheel. Winter operation
You can find information about this in the
Digital Operator's Manual. Tire pressure
Tire pressure specifications
Important safety notes G
WARNING
Underinflated or overinflated tires pose the
following risks:
R the tires may burst, especially as the load
and vehicle speed increase.
R the tires may wear excessively and/or
unevenly, which may greatly impair tire
traction.
R the driving characteristics, as well as
steering and braking, may be greatly
impaired.
There is a risk of an accident.
Follow recommended tire inflation pressures
and check the pressure of all the tires
including the spare wheel:
R monthly, at least
R if the load changes
R before beginning a long journey
R under different operating conditions, e.g.
off-road driving
If necessary, correct the tire pressure.
i The specifications on the sample Tire and
Loading Information placard and tire
pressure tables are examples. Tire
pressure specifications are vehicle-specific 230
Tire pressureWheels and tires
Page 237 of 272

vehicle to ensure that the replacement or
alternate tires and wheels allow the TPMS to
continue to function properly.
It is the driver's responsibility to set the tire
pressure to the recommended cold tire
pressure suitable for the operating situation
(Y page 230). Note that the correct tire
pressure for the current operating situation
must first be taught-in to the tire pressure
monitor. If there is a substantial loss of
pressure, the warning threshold for the
warning message is aligned to the reference
values taught-in. Restart the tire pressure
monitor after adjusting to the cold tire
pressure (Y page 236). The current
pressures are saved as new reference values.
As a result, a warning message will appear if
the tire pressure drops significantly.
The tire pressure monitor does not warn you
of an incorrectly set tire pressure. Observe
the notes on the recommended tire pressure
(Y page 230).
The tire pressure monitor is not able to warn
you of a sudden loss of pressure, e.g. if the
tire is penetrated by a foreign object. In the
event of a sudden loss of pressure, bring the
vehicle to a halt by braking carefully. Avoid
abrupt steering maneuvers.
If a tire pressure monitor system is installed,
the vehicle's wheels have sensors installed
that monitor the tire pressures in all four tires.
The tire pressure monitor warns you if the
pressure drops in one or more of the tires. The
tire pressure monitor only functions if the
correct wheel electronics units are installed
on each wheel.
The tire pressure monitor has a yellow
warning lamp in the instrument cluster for
indicating pressure loss/malfunctions (USA)
or pressure loss (Canada). Whether the
warning lamp flashes or lights up indicates
whether a tire pressure is too low or the tire
pressure monitor is malfunctioning:
R if the warning lamp is lit continuously, the
tire pressure on one or more tires is significantly too low. The tire pressure
monitor is not malfunctioning.
R USA only: if the warning lamp flashes for
around a minute and then remains lit
constantly, the tire pressure monitor is
malfunctioning.
Information on tire pressures is displayed in
the multifunction display. After a few minutes
of driving, the current tire pressure of each
tire is shown in the multifunction display.
USA only: if there is a malfunction with the
tire pressure monitor it can take more than
ten minutes until the malfunction is shown by
the tire pressure warning lamp flashing for
approximately one minute and then lighting
up continuously. When the malfunction has
been rectified, the tire pressure warning lamp
goes out after a few minutes of driving.
The tire pressure values indicated by the on-
board computer may differ from those
measured at a gas station with a pressure
gauge. The tire pressures shown by the on-
board computer refer to those measured at
sea level. At high altitudes, the tire pressure
values indicated by a pressure gauge are
higher than those shown by the on-board
computer. In this case, do not reduce the tire
pressures.
The operation of the tire pressure monitor can
be affected by interference from radio
transmitting equipment (e.g. radio
headphones, two-way radios) that may be
being operated in or near the vehicle.
i USA only:
This device complies with part 15 of the
FCC Rules. Operation is subject to the
following two conditions:
1. This device may not cause interference,
and
2. this device must accept any interference
received, including interference that may
cause undesired operation of the device.
Any unauthorized modification to this
device could void the user's authority to
operate the equipment. Tire pressure
235Wheels and tires Z