2014 MERCEDES-BENZ G-CLASS SUV window
[x] Cancel search: windowPage 67 of 272

Useful information
..............................66
SmartKey ............................................. 66
Doors .................................................... 69
Rear door ............................................. 70
Side windows ...................................... 71
Sliding sunroof .................................... 71 65Opening and closing
Page 73 of 272
X
Press release button :and pull door
handle ;.
X Open the rear door. Closing
X Push the rear door closed from outside the
vehicle.
X If necessary, lock the vehicle with the
& button on the SmartKey. Side windows
Important safety notes
G
WARNING
While opening the side windows, body parts
in the closing area could become trapped.
There is a risk of injury.
Make sure that no body parts are in close
proximity during the closing procedure. If
somebody becomes trapped, release the
switch or press the switch to open the side
window again. G
WARNING
While opening the side windows, body parts
could become trapped between the side
window and the door frame as the side
window moves. There is a risk of injury.
Make sure that nobody touches the side
window during the opening procedure. If
somebody becomes trapped, release the
switch or pull the switch to close the side
window again. Information in the Digital Operator's
Manual
In the Digital Operator's Manual you will find
information on the following topics:
R Opening and closing the side windows
R Opening and closing all side windows Problems with the side windows
G
WARNING
Closing the side windows with increased force
or without the anti-entrapment feature could
lead to serious or even fatal injury. Make sure
that nobody can become trapped when
closing the side windows.
Problem: a side window cannot be closed
because objects are trapped between the
side window and the door frame.
X Remove the objects.
X Close the side window.
Problem: a side window cannot be closed
and you cannot see the cause.
If a side window is obstructed during closing
and reopens again slightly:
X Immediately after the window blocks, pull
the corresponding switch again until the
side window has closed.
If a side window is obstructed again during
closing and reopens again slightly:
X Immediately after the window blocks, pull
the corresponding switch again until the
side window has closed.
i If a side window no longer opens or closes
due to a malfunction, contact a qualified
specialist workshop. Sliding sunroof
Important safety notes
! Only open the sliding sunroof if it is free
of snow and ice. Otherwise, malfunctions
may occur.
Do not allow anything to protrude from the
sliding sunroof. Otherwise, the seals could
be damaged.
! If the sliding sunroof still cannot be
opened or closed as a result of a
malfunction, contact a qualified specialist
workshop. Sliding sunroof
71Opening and closing Z
Page 74 of 272
!
The weather can change abruptly. It could
start to rain or snow. Make sure that the
sliding sunroof is closed when you leave the
vehicle. The vehicle electronics can be
damaged if water enters the vehicle
interior.
i Resonance noises can occur in addition
to the usual airflow noises when the sliding
sunroof is open. They are caused by minor
pressure fluctuations in the vehicle interior.
Change the position of the sliding sunroof
or open a side window slightly to reduce or
eliminate these noises. Opening and closing the sliding
sunroof
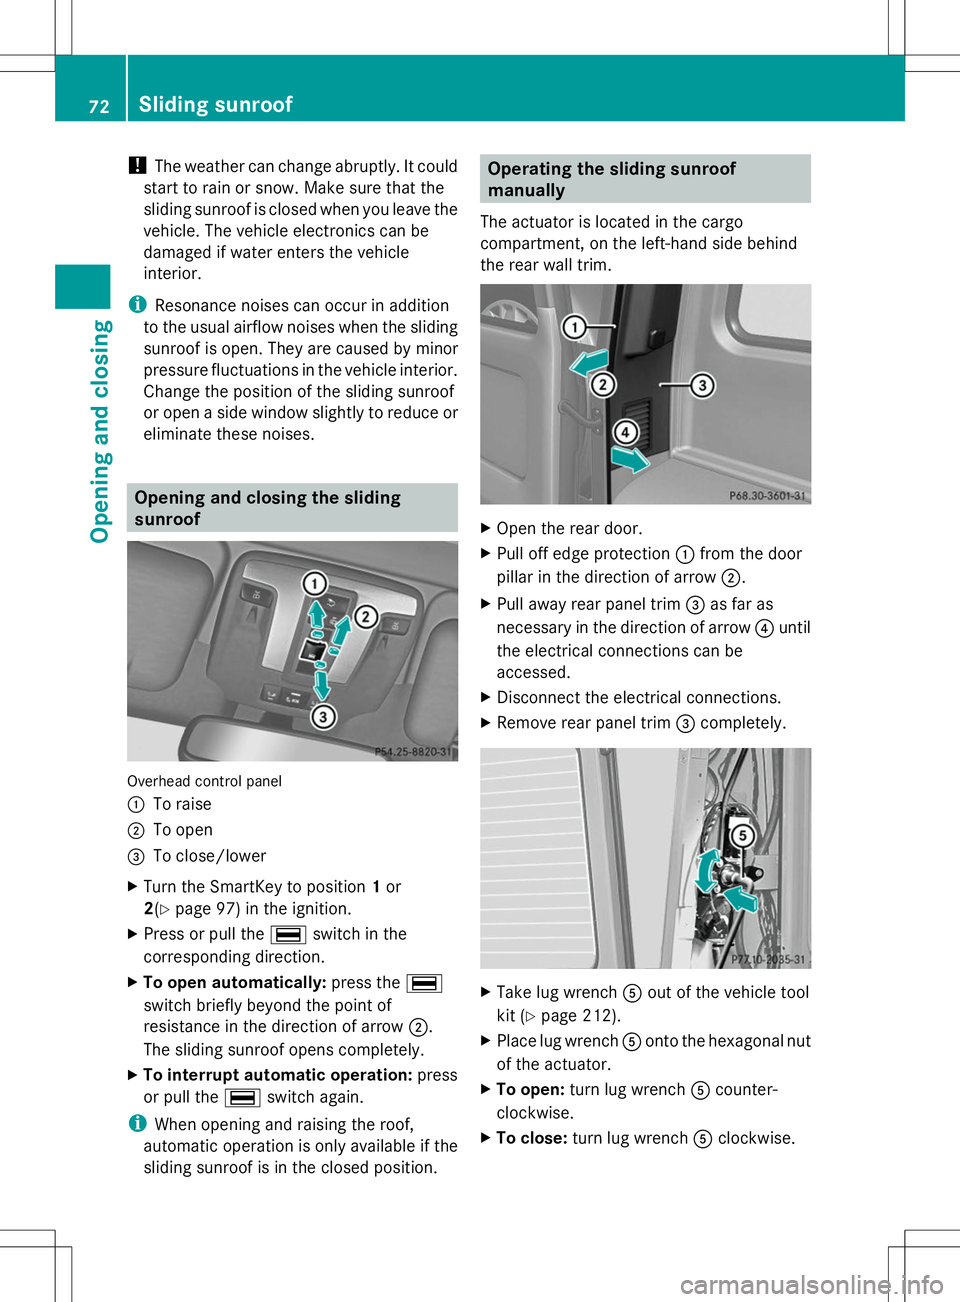
Overhead control panel
:
To raise
; To open
= To close/lower
X Turn the SmartKey to position 1or
2(Y page 97) in the ignition.
X Press or pull the ¡switch in the
corresponding direction.
X To open automatically: press the¡
switch briefly beyond the point of
resistance in the direction of arrow ;.
The sliding sunroof opens completely.
X To interrupt automatic operation: press
or pull the ¡switch again.
i When opening and raising the roof,
automatic operation is only available if the
sliding sunroof is in the closed position. Operating the sliding sunroof
manually
The actuator is located in the cargo
compartment, on the left-hand side behind
the rear wall trim. X
Open the rear door.
X Pull off edge protection :from the door
pillar in the direction of arrow ;.
X Pull away rear panel trim =as far as
necessary in the direction of arrow ?until
the electrical connections can be
accessed.
X Disconnect the electrical connections.
X Remove rear panel trim =completely. X
Take lug wrench Aout of the vehicle tool
kit (Y page 212).
X Place lug wrench Aonto the hexagonal nut
of the actuator.
X To open: turn lug wrench Acounter-
clockwise.
X To close: turn lug wrench Aclockwise. 72
Sliding sunroofOpening and closing
Page 90 of 272
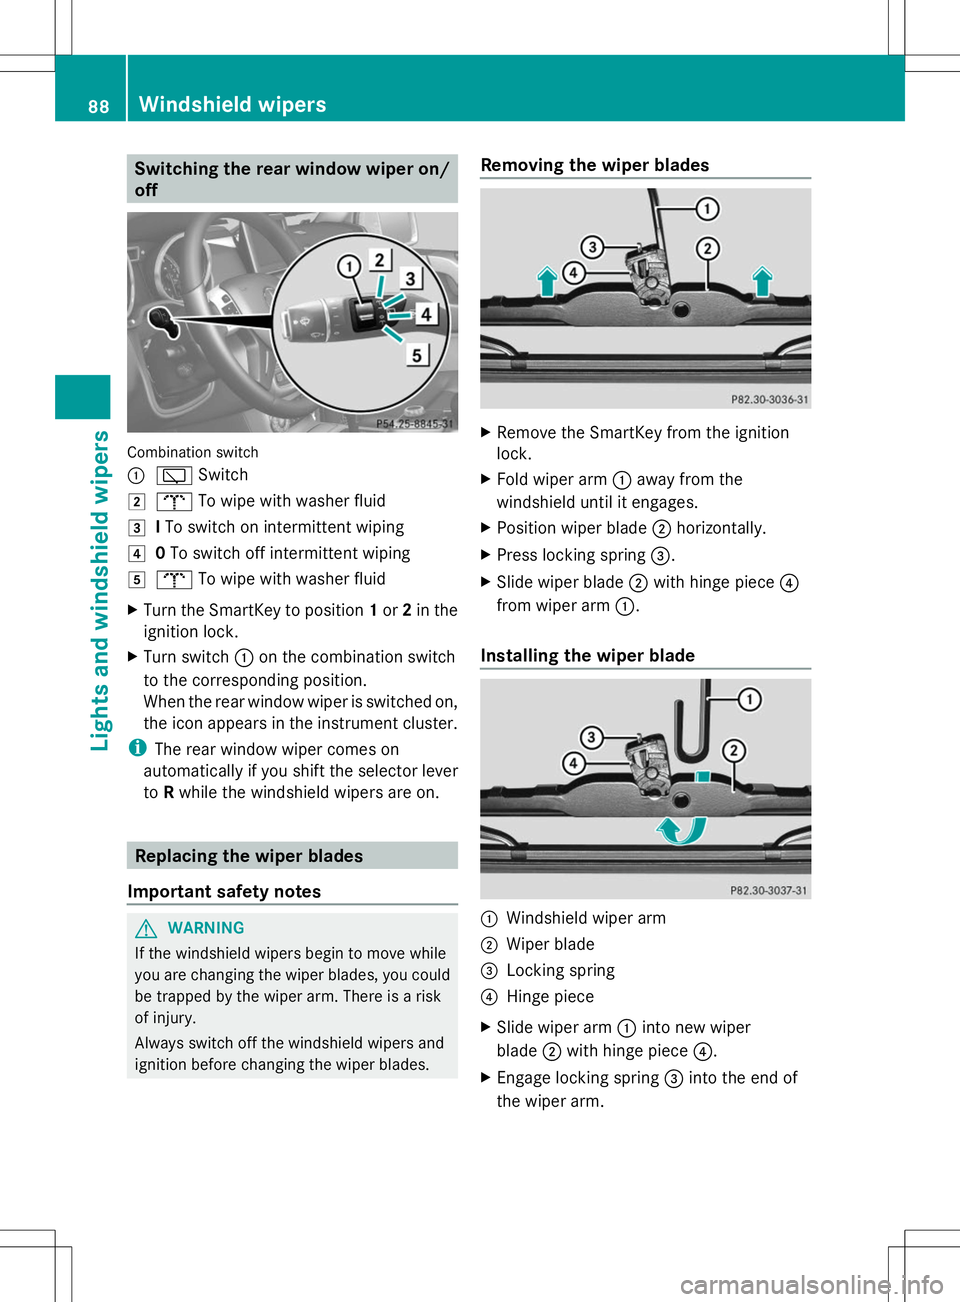
Switching the rear window wiper on/
off Combination switch
:
è Switch
2 b To wipe with washer fluid
3 ITo switch on intermittent wiping
4 0To switch off intermittent wiping
5 b To wipe with washer fluid
X Turn the SmartKey to position 1or 2in the
ignition lock.
X Turn switch :on the combination switch
to the corresponding position.
When the rear window wiper is switched on,
the icon appears in the instrument cluster.
i The rear window wiper comes on
automatically if you shift the selector lever
to Rwhile the windshield wipers are on. Replacing the wiper blades
Important safety notes G
WARNING
If the windshield wipers begin to move while
you are changing the wiper blades, you could
be trapped by the wiper arm. There is a risk
of injury.
Always switch off the windshield wipers and
ignition before changing the wiper blades. Removing the wiper blades
X
Remove the SmartKey from the ignition
lock.
X Fold wiper arm :away from the
windshield until it engages.
X Position wiper blade ;horizontally.
X Press locking spring =.
X Slide wiper blade ;with hinge piece ?
from wiper arm :.
Installing the wiper blade :
Windshield wiper arm
; Wiper blade
= Locking spring
? Hinge piece
X Slide wiper arm :into new wiper
blade ;with hinge piece ?.
X Engage locking spring =into the end of
the wiper arm. 88
Windshield wipersLights and windshield wipers
Page 94 of 272
Useful information
i This Operator's Manual describes all
models and all standard and optional
equipment of your vehicle available at the
time of publication of the Operator's
Manual. Country-specific differences are
possible. Please note that your vehicle may
not be equipped with all features
described. This also applies to safety-
related systems and functions.
i Read the information on qualified
specialist workshops: (Y page 27).Overview of climate control systems
Important safety notes
G
WARNING
Severe conditions (e.g. strong air pollution)
may require replacement of the filter before
its scheduled replacement interval. A clogged
filter will reduce the air volume to the interior
and the windows could fog up, impairing
visibility and endangering you and others.
Have a blocked filter replaced at a Mercedes-
Benz Center as soon as possible.
Observe the settings recommended on the
following pages. The windows could
otherwise fog up. This could prevent you from
observing the traffic conditions, thereby
causing an accident.
Dual-zone automatic climate control
regulates the temperature and the humidity
in the vehicle interior and filters undesirable
substances from the air.
Automatic climate control is only operational
when the engine is running. Optimum
operation is only achieved if you drive with the
side windows and sliding sunroof closed.
The climatic comfort deteriorates whilst the
sliding sunroof is open. The automatic climate
control cannot maintain the set temperature
with the sliding sunroof open. You have to
adjust the climate control manually. i
The residual heat function can only be
activated or deactivated with the ignition
switched off.
i Ventilate the vehicle for a brief period
during warm weather, e.g. using the
convenience opening feature (Y page 71).
This will speed up the cooling process and
the desired vehicle interior temperature
will be reached more quickly.
i The integrated filter can filter out most
particles of dust, and completely filters out
pollen. A clogged filter reduces the amount
of air supplied to the vehicle interior. For
this reason, you should always observe the
interval for replacing the filter, which is
specified in the Maintenance Booklet. As it
depends on environmental conditions, e.g.
heavy air pollution, the interval may be
shorter than stated in the Maintenance
Booklet. 92
Overview of climate control systemsClimate control
Page 95 of 272
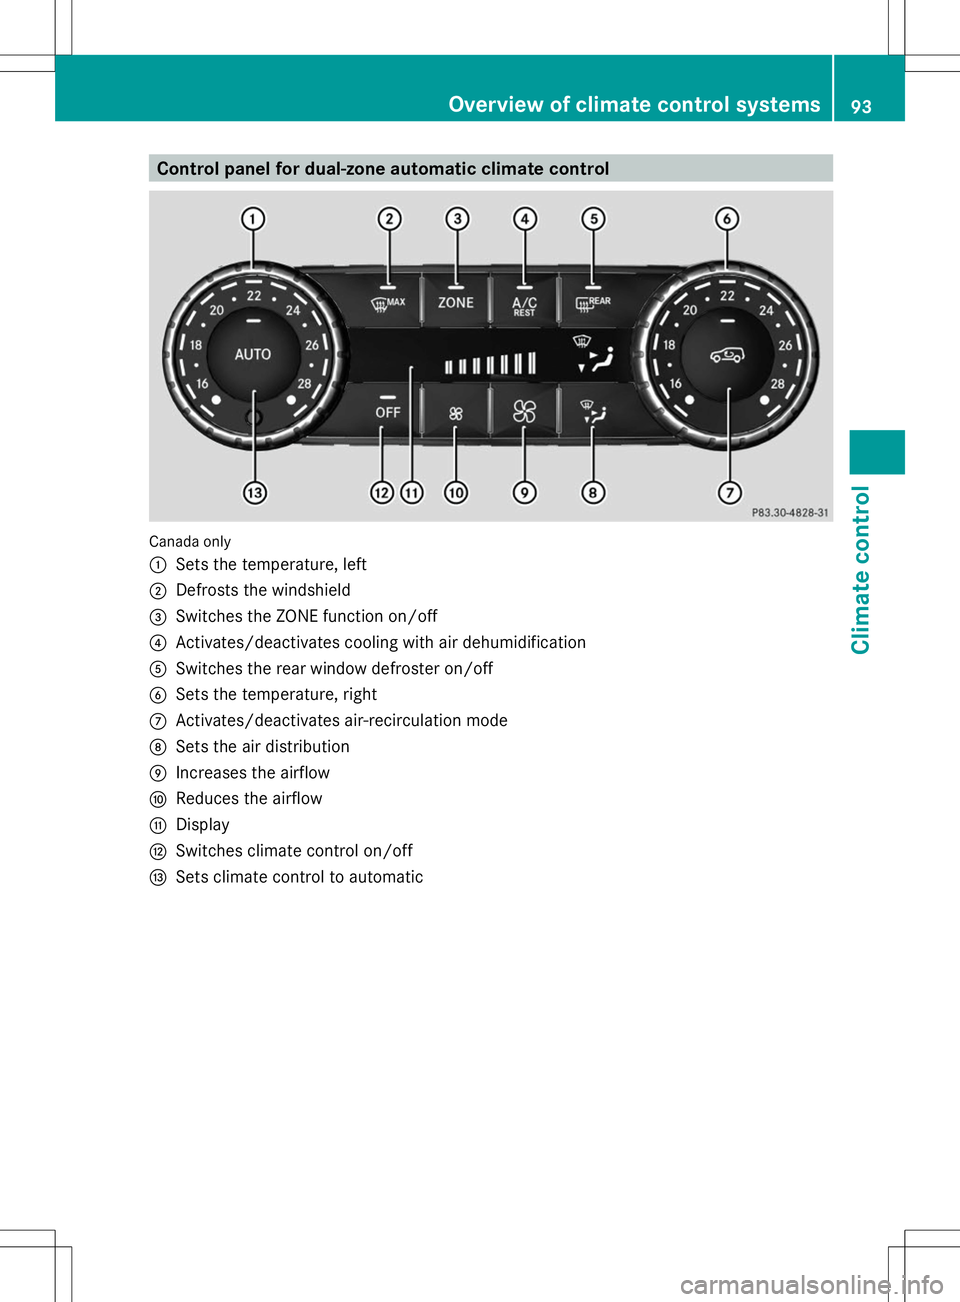
Control panel for dual-zone automatic climate control
Canada only
:
Sets the temperature, left
; Defrosts the windshield
= Switches the ZONE function on/off
? Activates/deactivates cooling with air dehumidification
A Switches the rear window defroster on/off
B Sets the temperature, right
C Activates/deactivates air-recirculation mode
D Sets the air distribution
E Increases the airflow
F Reduces the airflow
G Display
H Switches climate control on/off
I Sets climate control to automatic Overview of climate control systems
93Climate control Z
Page 96 of 272
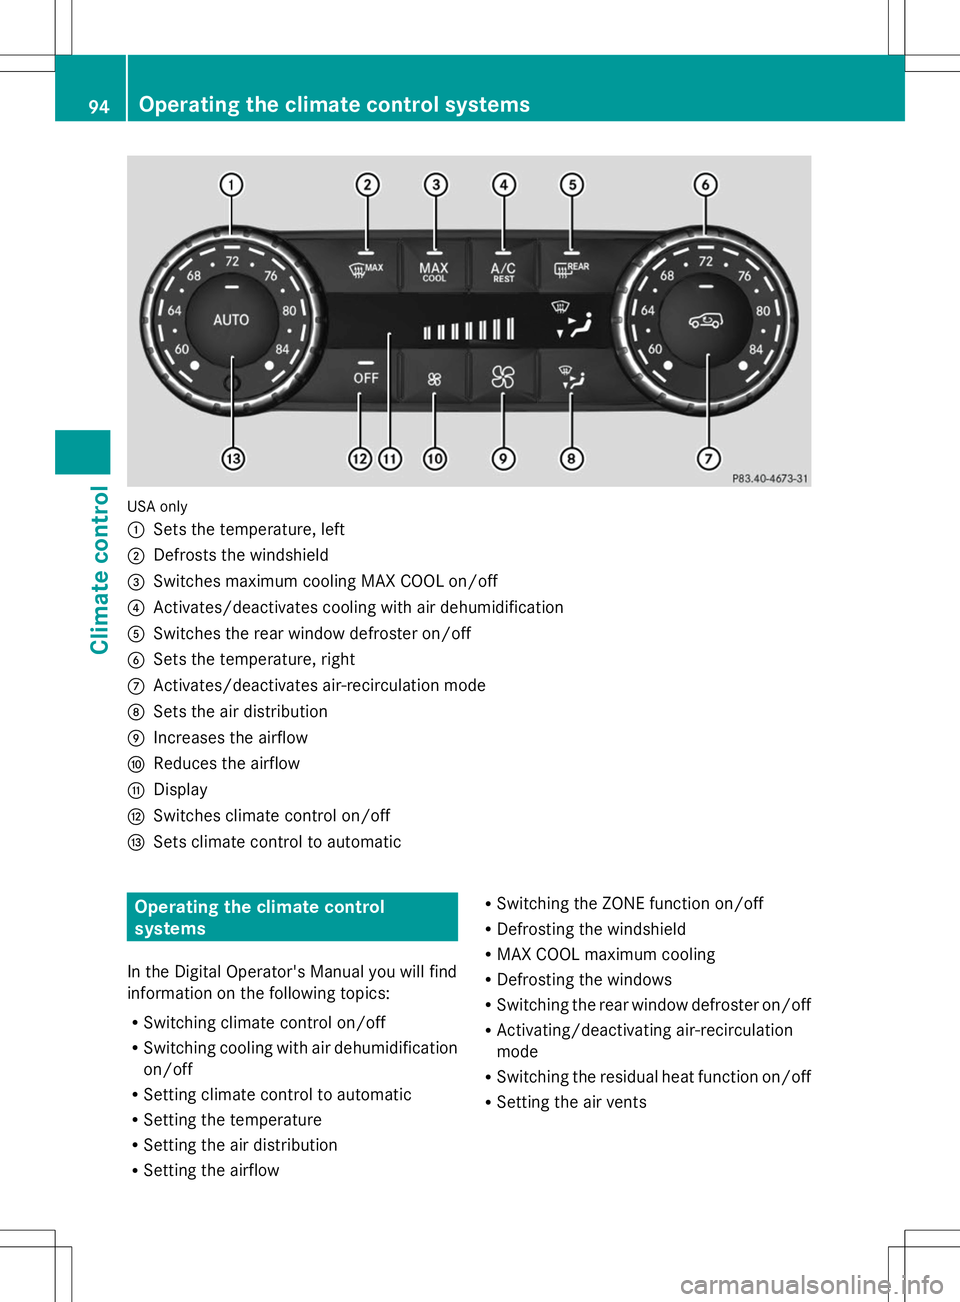
USA only
:
Sets the temperature, left
; Defrosts the windshield
= Switches maximum cooling MAX COOL on/off
? Activates/deactivates cooling with air dehumidification
A Switches the rear window defroster on/off
B Sets the temperature, right
C Activates/deactivates air-recirculation mode
D Sets the air distribution
E Increases the airflow
F Reduces the airflow
G Display
H Switches climate control on/off
I Sets climate control to automatic Operating the climate control
systems
In the Digital Operator's Manual you will find
information on the following topics:
R Switching climate control on/off
R Switching cooling with air dehumidification
on/off
R Setting climate control to automatic
R Setting the temperature
R Setting the air distribution
R Setting the airflow R
Switching the ZONE function on/off
R Defrosting the windshield
R MAX COOL maximum cooling
R Defrosting the windows
R Switching the rear window defroster on/off
R Activating/deactivating air-recirculation
mode
R Switching the residual heat function on/off
R Setting the air vents 94
Operating the climate control systemsClimate control
Page 100 of 272
X
Remove the SmartKey when the engine is
switched off.
The starter battery could otherwise be
discharged.
If you cannot turn the SmartKey in the ignition
lock, the starter battery may not be charged
sufficiently.
X Check the starter battery and charge it if
necessary (Y page 217).
or
X Jump-start the vehicle (Y page 219).
i You can only remove the SmartKey if:
R the SmartKey is in position 0in the
ignition lock.
R the automatic transmission selector
lever is in P. Starting the engine
Important safety notes G
WARNING
Combustion engines emit poisonous exhaust
gases such as carbon monoxide. Inhaling
these exhaust gases leads to poisoning. There
is a risk of fatal injury. Therefore never leave
the engine running in enclosed spaces
without sufficient ventilation. G
WARNING
Inhalation of exhaust gas is hazardous to your
health. All exhaust gas contains carbon
monoxide (CO), and inhaling it can cause
unconsciousness and possible death.
Do not run the engine in confined areas (such
as a garage) which are not properly ventilated.
If you think that exhaust gas fumes are
entering the vehicle while driving, have the
cause determined and corrected
immediately. If you must drive under these
conditions, drive only with at least one
window fully open at all times.
! Do not depress the accelerator pedal
when starting the engine. Starting procedure X
Shift the automatic transmission to
position P.
The transmission position display in the
multifunction display shows P.
i For further information about the
automatic transmission, see
(Y page 99).
i If you depress the brake when starting the
engine, pedal travel is unusually long and
there is less pedal resistance.
X Make sure that the parking brake is
applied.
X Turn the SmartKey to position 3in the
ignition lock (Y page 97) and release it as
soon as the engine is running.
i You can also use the touch-start function.
To do this, turn the SmartKey to position 3
(Y page 97 )and release it immediately. The
engine then starts automatically. Pulling away
Automatic transmission G
WARNING
If the engine speed is above the idling speed
and you engage transmission position Dor
R, the vehicle could pull away suddenly. There
is a risk of an accident.
When engaging transmission position Dor R,
always firmly depress the brake pedal and do
not simultaneously accelerate.
! Only shift the automatic transmission to
reverse gear Ror park position Pwhen the
vehicle is stationary. Otherwise, the
automatic transmission could be damaged.
! Do not depress the accelerator pedal
while depressing the brake pedal. This
impairs engine performance and results in
premature wear on the brake system and
drivetrain. 98
DrivingDriving an
d parking