2014 MERCEDES-BENZ E-SEDAN fuse
[x] Cancel search: fusePage 13 of 430
F
Filler cap see Fuel filler flap
First-aid kit ........................................ .352
Flat tire MOExtended tires ..........................354
Preparing the vehicle .....................354
TIREFIT kit ...................................... 355
Floormats ........................................... 334
Folding bench seat (cargo
compartment) .................................... 114
Fuel Additives ........................................ 420
Consumption statistics ..................241
Displaying the current
consumption .................................. 242
Displaying the range ......................242
Driving tips .................................... 184
Flexible fuel vehicles ......................420
Fuel gauge ....................................... 31
Grade (gasoline) ............................ 419
Important safety notes ..................418
Premium-grade unleaded gasoline .419
Problem (malfunction) ...................179
Quality (diesel )............................... 420
Refueling ........................................ 175
Tank content/reserve fuel .............419
Fuel filler flap
Emergency release ........................177
Opening/closing ............................ 176
Fuel filter (display message) ............272
Fuel level Calling up the range (on-board
computer) ...................................... 242
Fuel tank
Capacity ........................................ 419
Problem (malfunction) ...................179
Fuse allocation chart (vehicle tool
kit) ...................................................... 352
Fuses Allocation chart ............................. 367
Before changing ............................. 367
Fuse box in the cargo
compartment ................................. 369
Fuse box in the engine
compartment ................................. 368Fuse box in the trunk
.....................368
Important safety notes ..................367 G
Garage door opener Clearing the memory .....................333
Important safety notes ..................331
Opening/closing the garage door ..333
Programming (button in the rear-
view mirror) ................................... 331
Gear indicator (on-board computer) 253
Genuine parts ...................................... 22
Glove box ........................................... 299 H
Handbrake see Parking brake
HANDS-FREE ACCESS .......................... 93
Hazard warning lamps ......................132
Head bags Display message ............................ 263
Headlamps
Fogging up ..................................... 135
see Automatic headlamp mode
Head restraints
Adjusting ....................................... 110
Adjusting (angle) ............................ 111
Adjusting (electrically) ...................111
Adjusting (rear) .............................. 112
Installing/removing (rear) ..............112
Luxury ............................................ 111
Heating
see Climate control
High-beam headlamps
Changing bulbs .............................. 137
Display message ............................ 267
Switching on/off ........................... 132
Hill start assist .................................. 162
HOLD function Activating ....................................... 202
Deactivating ................................... 203
Display message ............................ 274
Function/notes ............................. 202
Hood
Closing .......................................... .337
Display message ............................ 283 Index
11ProCarManuals.com
Page 79 of 430
R
a narrow vehicle traveling in front, e.g. a
motorbike
R a vehicle traveling in front on a different line
relative to the center of your vehicle
Recognition by the camera system is also
impaired in the event of:
R dirt on the camera or if the camera is
covered
R there is glare on the camera system, e.g.
from the sun being low in the sky
R darkness
R if:
-pedestrians move quickly, e.g. into the
path of the vehicle
- the camera system no longer recognizes
a pedestrian as a person due to special
clothing or other objects
- a pedestrian is concealed by other
objects
- the typical outline of a person is not
distinguishable from the background
Following damage to the front end of the
vehicle, have the configuration and operation
of the radar sensors checked at a qualified
specialist workshop. This also applies to
collisions at low speeds where there is no
visible damage to the front of the vehicle.
Following damage to the windshield, have the
configuration and operation of the camera
system checked at a qualified specialist
workshop.
Function X
To activate/deactivate: activate or
deactivate PRE-SAFE ®
Brake in the on-
board computer (Y page 247).
If the PRE-SAFE ®
Brake is not activated, the
æ symbol appears in the multifunction
display.
Starting at a speed of around 4 mph
(7 km/h), this function warns you if you
rapidly approach a vehicle in front. An
intermittent warning tone will then sound and the
· distance warning lamp will light up
in the instrument cluster.
X Brake immediately to defuse the situation.
or
X Take evasive action provided it is safe to do
so.
PRE-SAFE ®
Brake can also brake the vehicle
automatically under the following conditions:
R the driver and front-passenger have their
seat belts fastened
and
R the vehicle speed is between
approximately 4 mph (7 km/h) and
124 mph (200 km/h)
At a speed of up to approximately 44 mph
(70 km/h), PRE-SAFE ®
Brake can also detect:
R stationary objects in the path of your
vehicle, e.g. stopped or parked vehicles
R pedestrians in the path of your vehicle
i If there is an increased risk of collision,
preventive passenger protection measures
(PRE-SAFE ®
) are activated.
If the risk of collision with the vehicle in front
remains and you do not brake, take evasive
action or accelerate significantly, the vehicle
may perform automatic emergency braking,
up to the point of full brake application.
Automatic emergency braking is not
performed until immediately prior to an
imminent accident.
You can prevent the intervention of the PRE-
SAFE ®
Brake at any time by:
R depressing the accelerator pedal further.
R activating kickdown.
R releasing the brake pedal.
The braking action of PRE-SAFE ®
Brake is
ended automatically if:
R you maneuver to avoid the obstacle.
R there is no longer a risk of collision.
R there is no longer an obstacle detected in
front of your vehicle. Driving safety systems
77Safety Z
ProCarManuals.com
Page 150 of 430
N
To reduce the airflow (Y page 152)
O To reduce the temperature (Y page 151)Information about using 3-zone
automatic climate control
Automatic climate control The 3-zone automatic climate control is only
available on vehicles for Canada.
The following contains instructions and
recommendations to enable you to get the
most out of your automatic climate control.
R Activate climate control using the Ãand
¿ buttons. The indicator lamps above
the à and¿ buttons light up.
R In automatic mode, you can also use the
ñ button to set a climate mode
(FOCUS/MEDIUM/DIFFUSE). The
MEDIUM level is recommended.
R Set the temperature to 72 ‡ (22 †).
R Only use the "Windshield defrosting"
function briefly until the windshield is clear
again.
R Only use air-recirculation mode briefly, e.g.
if there are unpleasant outside odors or
when in a tunnel. The windows could
otherwise fog up, since no fresh air is drawn
into the vehicle in air-recirculation mode.
R Use the ZONE function to adopt the
temperature settings on the driver's side
for the front-passenger side and the rear
compartment as well. The indicator lamp
above the ábutton goes out.
R Use the residual heat function if you want
to heat or ventilate the vehicle interior
when the ignition is switched off. The
residual heat function can only be activated
or deactivated with the ignition switched
off.
R Vehicles with COMAND: if you change the
settings of the climate control system, the
climate status display appears for
approximately three seconds at the bottom
of the screen in the COMAND display. See also the separate COMAND operating
instructions. You will see the current
settings of the various climate control
functions.
ECO start/stop function During automatic engine switch-off, the ECO
start/stop function only operates at a
reduced capacity. If you require the full
climate control output, you can switch off the
ECO start/stop function by pressing the ECO
button (Y page 164). Operating the climate control
systems
Switching climate control on/off
General notes When the climate control is switched off, the
air supply and air circulation are also
switched off. The windows could fog up.
Therefore, switch off climate control only
briefly
i
Activate climate control primarily using
the à button (Y page 150). 148
Operating the climate control systemsClimate control
ProCarManuals.com
Page 152 of 430
Problems with the "Cooling with air dehumidification" function
Problem Possible causes/consequences and
M
MSolutions The indicator lamp in
the
¿ button
flashes three times or
remains off. The
"Cooling with air
dehumidification"
function cannot be
switched on. Cooling with air dehumidification has been deactivated due to a
malfunction.
X
Visit a qualified specialist workshop. Setting climate control to automatic
General notes In automatic mode, the set temperature is
maintained automatically at a constant level.
The system automatically regulates the
temperature of the dispensed air, the airflow
and the air distribution.
The automatic mode functions optimally
when the "Cooling with air dehumidification"
function is activated. If necessary, cooling
with air dehumidification can be deactivated.
If you deactivate the "Cooling with air-
dehumidification" function, the air inside the
vehicle will not be cooled. The air inside the
vehicle will also not be dehumidified. The
windows can fog up more quickly. Therefore,
deactivate the cooling with air-
dehumidification function only briefly.
Activating/switching X
Turn the SmartKey to position 2in the
ignition lock (Y page 159).
X Set the desired temperature.
X To activate: press theÃbutton.
The indicator lamp above the Ãbutton
lights up. Automatic air distribution and
airflow are activated.
i 3-zone automatic climate control: when
automatic mode is activated, you can
select a climate mode (Y page 150).
X To switch to manual mode: Dual-zone automatic climate control: press
air distribution adjustment button
F(Y
page 145).
3-zone automatic climate control: press air
distribution adjustment button
I(Y page 147).
The indicator lamp above the Ãbutton
goes out.
or
X Dual-zone automatic climate control: press
airflow adjustment button G(Ypage 145).
3-zone automatic climate control: press
airflow adjustment button H(Ypage 147).
The indicator lamp above the Ãbutton
goes out. Adjusting the climate mode settings
The "Set climate mode" function is only
available with 3-zone automatic climate
control.
You can select the following climate mode
settings in automatic mode:
FOCUS high airflow that is set slightly cooler
MEDIUM medium airflow, standard setting
DIFFUSE low airflow that is set slightly warmer and with less draft 150
Operating the climate control systemsClimate control
ProCarManuals.com
Page 197 of 430
Driving with DISTRONIC PLUS
Pulling away and driving
X
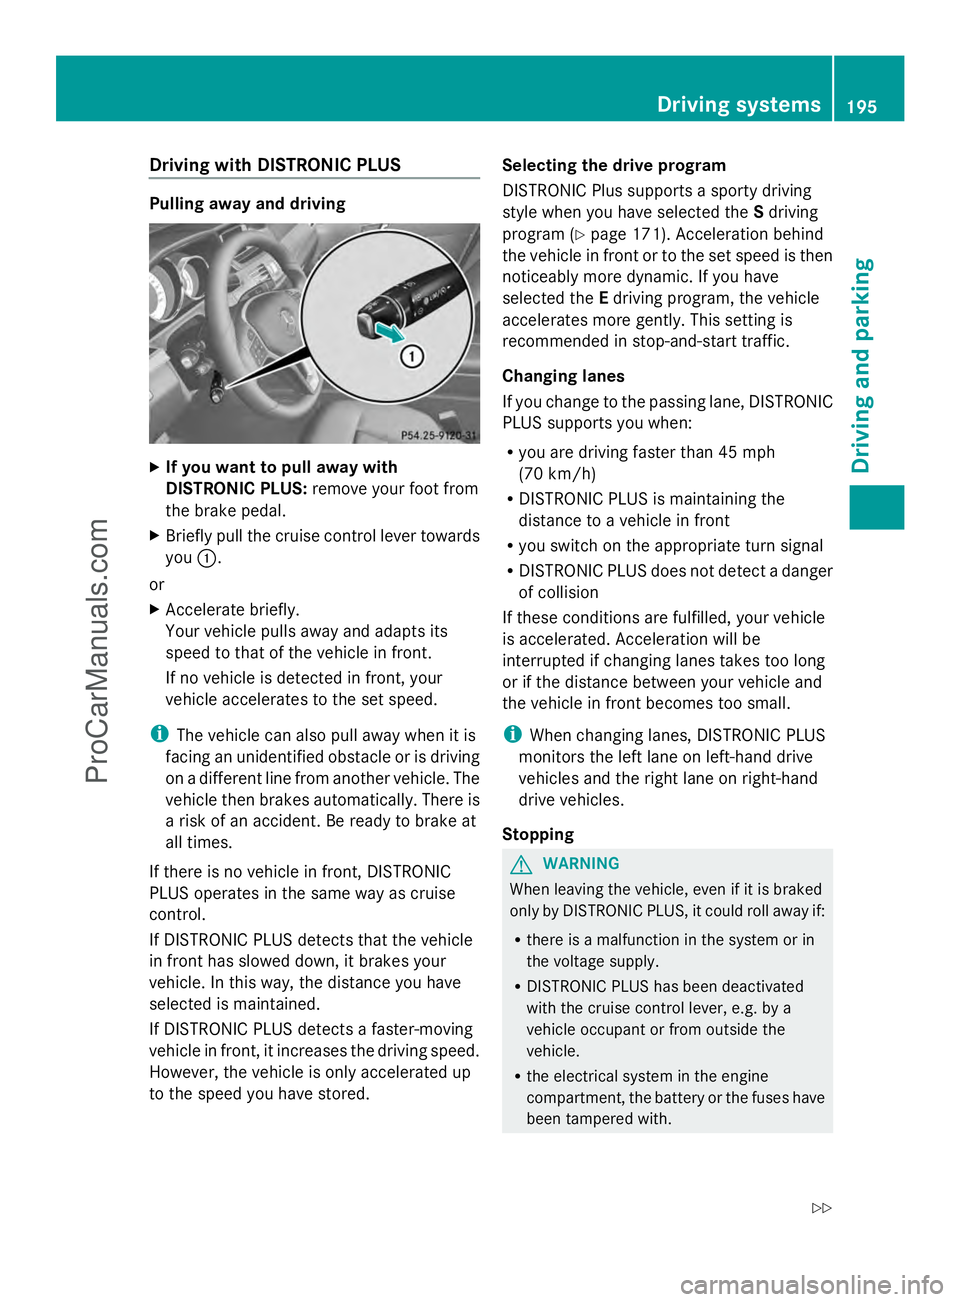
If you want to pull away with
DISTRONIC PLUS: remove your foot from
the brake pedal.
X Briefly pull the cruise control lever towards
you :.
or
X Accelerate briefly.
Your vehicle pulls away and adapts its
speed to that of the vehicle in front.
If no vehicle is detected in front, your
vehicle accelerates to the set speed.
i The vehicle can also pull away when it is
facing an unidentified obstacle or is driving
on a different line from another vehicle. The
vehicle then brakes automatically. There is
a risk of an accident. Be ready to brake at
all times.
If there is no vehicle in front, DISTRONIC
PLUS operates in the same way as cruise
control.
If DISTRONIC PLUS detects that the vehicle
in front has slowed down, it brakes your
vehicle. In this way, the distance you have
selected is maintained.
If DISTRONIC PLUS detects a faster-moving
vehicle in front, it increases the driving speed.
However, the vehicle is only accelerated up
to the speed you have stored. Selecting the drive program
DISTRONIC Plus supports a sporty driving
style when you have selected the
Sdriving
program (Y page 171). Acceleration behind
the vehicle in front or to the set speed is then
noticeably more dynamic. If you have
selected the Edriving program, the vehicle
accelerates more gently. This setting is
recommended in stop-and-start traffic.
Changing lanes
If you change to the passing lane, DISTRONIC
PLUS supports you when:
R you are driving faster than 45 mph
(70 km/h)
R DISTRONIC PLUS is maintaining the
distance to a vehicle in front
R you switch on the appropriate turn signal
R DISTRONIC PLUS does not detect a danger
of collision
If these conditions are fulfilled, your vehicle
is accelerated. Acceleration will be
interrupted if changing lanes takes too long
or if the distance between your vehicle and
the vehicle in front becomes too small.
i When changing lanes, DISTRONIC PLUS
monitors the left lane on left-hand drive
vehicles and the right lane on right-hand
drive vehicles.
Stopping G
WARNING
When leaving the vehicle, even if it is braked
only by DISTRONIC PLUS, it could roll away if:
R there is a malfunction in the system or in
the voltage supply.
R DISTRONIC PLUS has been deactivated
with the cruise control lever, e.g. by a
vehicle occupant or from outside the
vehicle.
R the electrical system in the engine
compartment, the battery or the fuses have
been tampered with. Driving syste
ms
195Driving an d parking
Z
ProCarManuals.com
Page 204 of 430
Deactivating Steering Assist
X
Deactivate the DISTRONIC PLUS with
Steering Assist function using the on-board
computer (Y page 248).
The DTR+ Steering Assistant Off
DTR+ Steering Assistant Off
message appears in the multifunction
display. DISTRONIC PLUS Steering Assist
is deactivated.
When DISTRONIC PLUS is deactivated,
DISTRONIC PLUS Steering Assist is
deactivated automatically. HOLD function
General notes The HOLD function can assist the driver in the
following situations:
R when pulling away, especially on steep
slopes
R when maneuvering on steep slopes
R when waiting in traffic
The vehicle is kept stationary without the
driver having to depress the brake pedal.
The braking effect is canceled and the HOLD
function deactivated when you depress the
accelerator pedal to pull away.
Important safety notes G
WARNING
When leaving the vehicle, it can still roll away
despite being braked by the HOLD function if:
R there is a malfunction in the system or in
the voltage supply.
R the HOLD function has been deactivated by
pressing the accelerator pedal or the brake
pedal, e.g. by a vehicle occupant.
R the electrical system in the engine
compartment, the battery or the fuses have
been tampered with.
R the battery is disconnected
There is a risk of an accident. If you wish to exit the vehicle, always turn off
the HOLD function and secure the vehicle
against rolling away.
! If DISTRONIC PLUS or the HOLD function
is activated, the vehicle brakes
automatically in certain situations. To
prevent damage to the vehicle, deactivate
DISTRONIC PLUS and the HOLD function in
the following or other similar situations:
R when towing the vehicle
R in the car wash
Activation conditions You can activate the HOLD function if:
R
the vehicle is stationary
R the engine is running or if it has been
automatically switched off by the ECO
start/stop function
R the driver's door is closed or your seat belt
is fastened
R the parking brake is released
R the transmission is in position D,Ror N
R DISTRONIC PLUS is deactivated
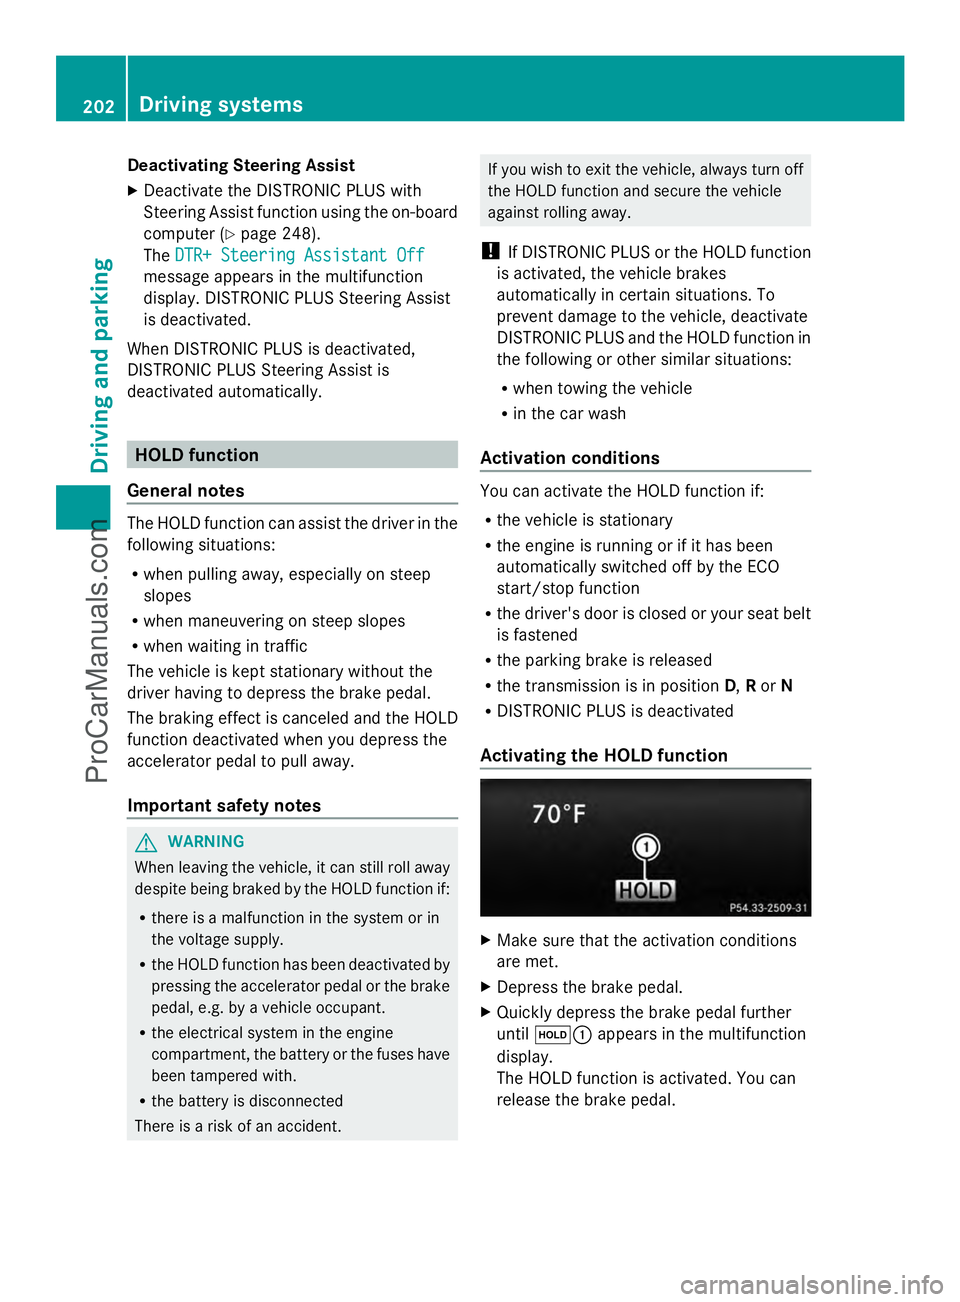
Activating the HOLD function X
Make sure that the activation conditions
are met.
X Depress the brake pedal.
X Quickly depress the brake pedal further
until ë: appears in the multifunction
display.
The HOLD function is activated. You can
release the brake pedal. 202
Driving syste
msDriving and parking
ProCarManuals.com
Page 353 of 430
Useful information
............................352
Where will I find...? ...........................352
Flat tire .............................................. 354
Battery (vehicle) ................................ 358
Jump-starting .................................... 362
Towing and tow-starting ..................364
Fuses .................................................. 367 351Breakdown assistance
ProCarManuals.com
Page 355 of 430
stowage well under the trunk floor/cargo
compartment floor.
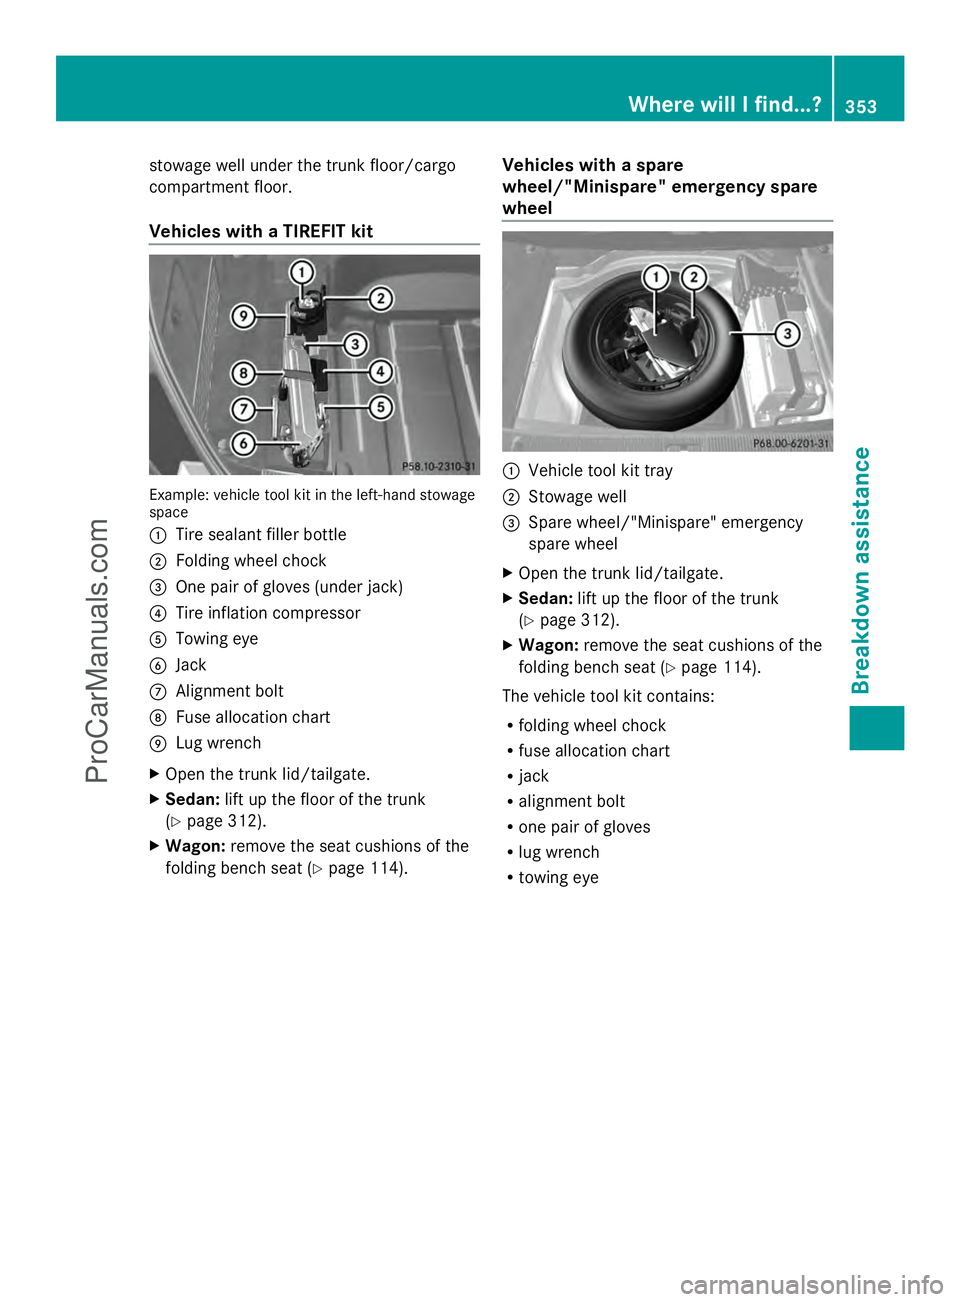
Vehicles with a TIREFIT kit
Example: vehicle tool kit in the left-hand stowage
space
: Tire sealant filler bottle
; Folding wheel chock
= One pair of gloves (under jack)
? Tire inflation compressor
A Towing eye
B Jack
C Alignment bolt
D Fuse allocation chart
E Lug wrench
X Open the trunk lid/tailgate.
X Sedan: lift up the floor of the trunk
(Y page 312).
X Wagon: remove the seat cushions of the
folding bench seat (Y page 114). Vehicles with a spare
wheel/"Minispare" emergency spare
wheel :
Vehicle tool kit tray
; Stowage well
= Spare wheel/"Minispare" emergency
spare wheel
X Open the trunk lid/tailgate.
X Sedan: lift up the floor of the trunk
(Y page 312).
X Wagon: remove the seat cushions of the
folding bench seat (Y page 114).
The vehicle tool kit contains:
R folding wheel chock
R fuse allocation chart
R jack
R alignment bolt
R one pair of gloves
R lug wrench
R towing eye Where will I find...?
353Breakdown assistance
ProCarManuals.com