2014 MERCEDES-BENZ CLS SHOOTING BRAKE steering wheel
[x] Cancel search: steering wheelPage 283 of 417
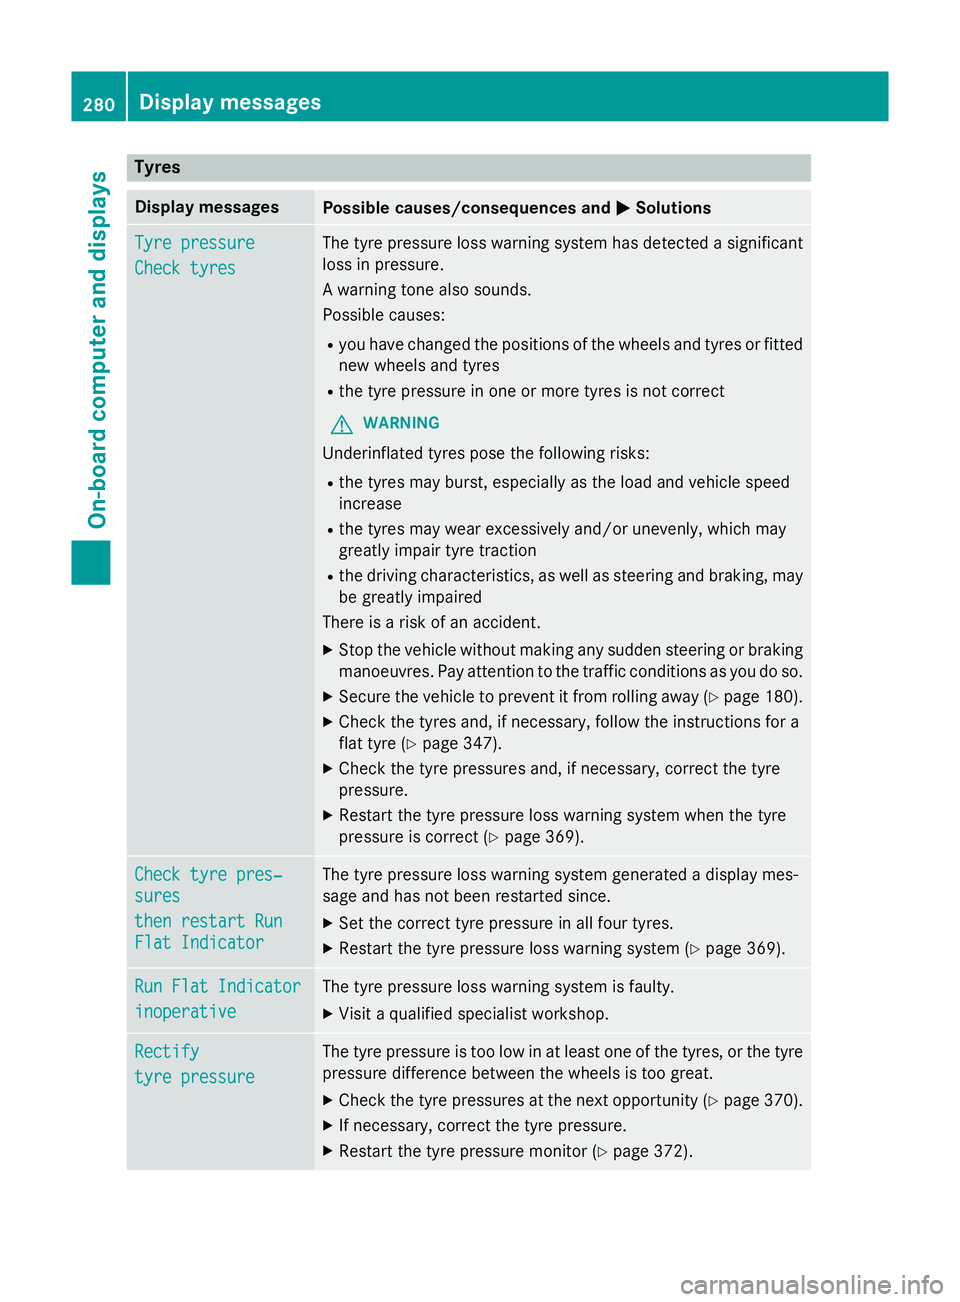
Tyres
Display messages
Possible causes/consequences and
M
MSolutions Tyre pressure
Tyre pressure
Check tyres Check tyres The tyre pressure loss warning system has detected a significant
loss in pressure.
A warning tone also sounds.
Possible causes:
R you have changed the positions of the wheels and tyres or fitted
new wheels and tyres
R the tyre pressure in one or more tyres is not correct
G WARNING
Underinflated tyres pose the following risks:
R the tyres may burst, especially as the load and vehicle speed
increase
R the tyres may wear excessively and/or unevenly, which may
greatly impair tyre traction
R the driving characteristics, as well as steering and braking, may
be greatly impaired
There is a risk of an accident.
X Stop the vehicle without making any sudden steering or braking
manoeuvres. Pay attention to the traffic conditions as you do so.
X Secure the vehicle to prevent it from rolling away (Y page 180).
X Check the tyres and, if necessary, follow the instructions for a
flat tyre (Y page 347).
X Check the tyre pressures and, if necessary, correct the tyre
pressure.
X Restart the tyre pressure loss warning system when the tyre
pressure is correct (Y page 369).Check tyre pres‐ Check tyre pres‐
sures sures
then restart Run then restart Run
Flat Indicator Flat Indicator The tyre pressure loss warning system generated a display mes-
sage and has not been restarted since.
X Set the correct tyre pressure in all four tyres.
X Restart the tyre pressure loss warning system (Y page 369).Run Flat Indicator Run Flat Indicator
inoperative inoperative The tyre pressure loss warning system is faulty.
X Visit a qualified specialist workshop. Rectify
Rectify
tyre pressure tyre pressure The tyre pressure is too low in at least one of the tyres, or the tyre
pressure difference between the wheels is too great.
X Check the tyre pressures at the next opportunity (Y page 370).
X If necessary, correct the tyre pressure.
X Restart the tyre pressure monitor (Y page 372).280
Display
messagesOn-board computer and displays
Page 284 of 417
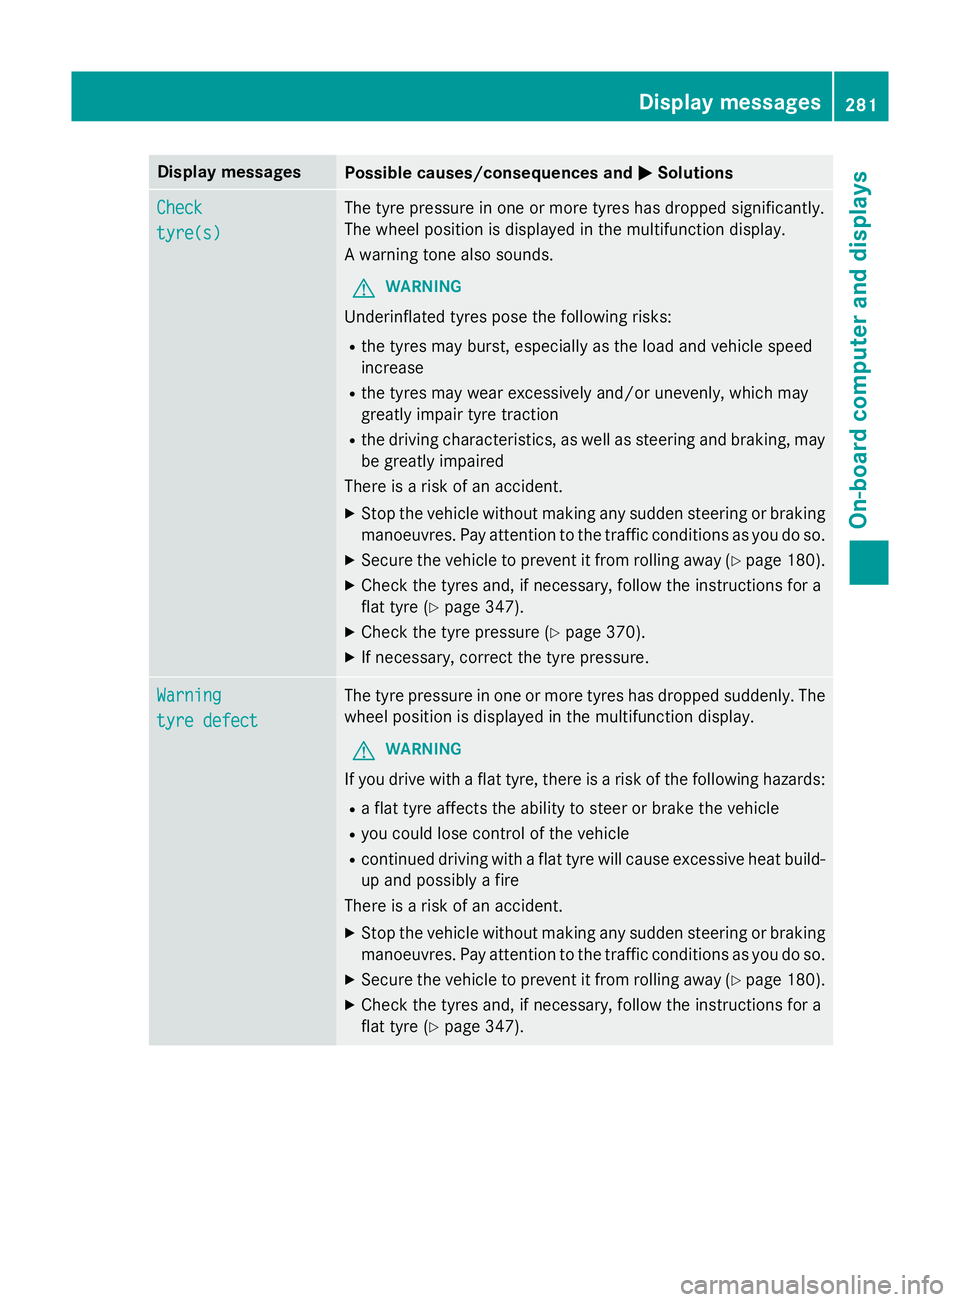
Display messages
Possible causes/consequences and
M
MSolutions Check
Check
tyre(s) tyre(s) The tyre pressure in one or more tyres has dropped significantly.
The wheel position is displayed in the multifunction display.
A warning tone also sounds.
G WARNING
Underinflated tyres pose the following risks:
R the tyres may burst, especially as the load and vehicle speed
increase
R the tyres may wear excessively and/or unevenly, which may
greatly impair tyre traction
R the driving characteristics, as well as steering and braking, may
be greatly impaired
There is a risk of an accident.
X Stop the vehicle without making any sudden steering or braking
manoeuvres. Pay attention to the traffic conditions as you do so.
X Secure the vehicle to prevent it from rolling away (Y page 180).
X Check the tyres and, if necessary, follow the instructions for a
flat tyre (Y page 347).
X Check the tyre pressure (Y page 370).
X If necessary, correct the tyre pressure. Warning Warning
tyre defect tyre defect The tyre pressure in one or more tyres has dropped suddenly. The
wheel position is displayed in the multifunction display.
G WARNING
If you drive with a flat tyre, there is a risk of the following hazards:
R a flat tyre affects the ability to steer or brake the vehicle
R you could lose control of the vehicle
R continued driving with a flat tyre will cause excessive heat build-
up and possibly a fire
There is a risk of an accident.
X Stop the vehicle without making any sudden steering or braking
manoeuvres. Pay attention to the traffic conditions as you do so.
X Secure the vehicle to prevent it from rolling away (Y page 180).
X Check the tyres and, if necessary, follow the instructions for a
flat tyre (Y page 347). Display
messages
281On-board computer and displays Z
Page 323 of 417
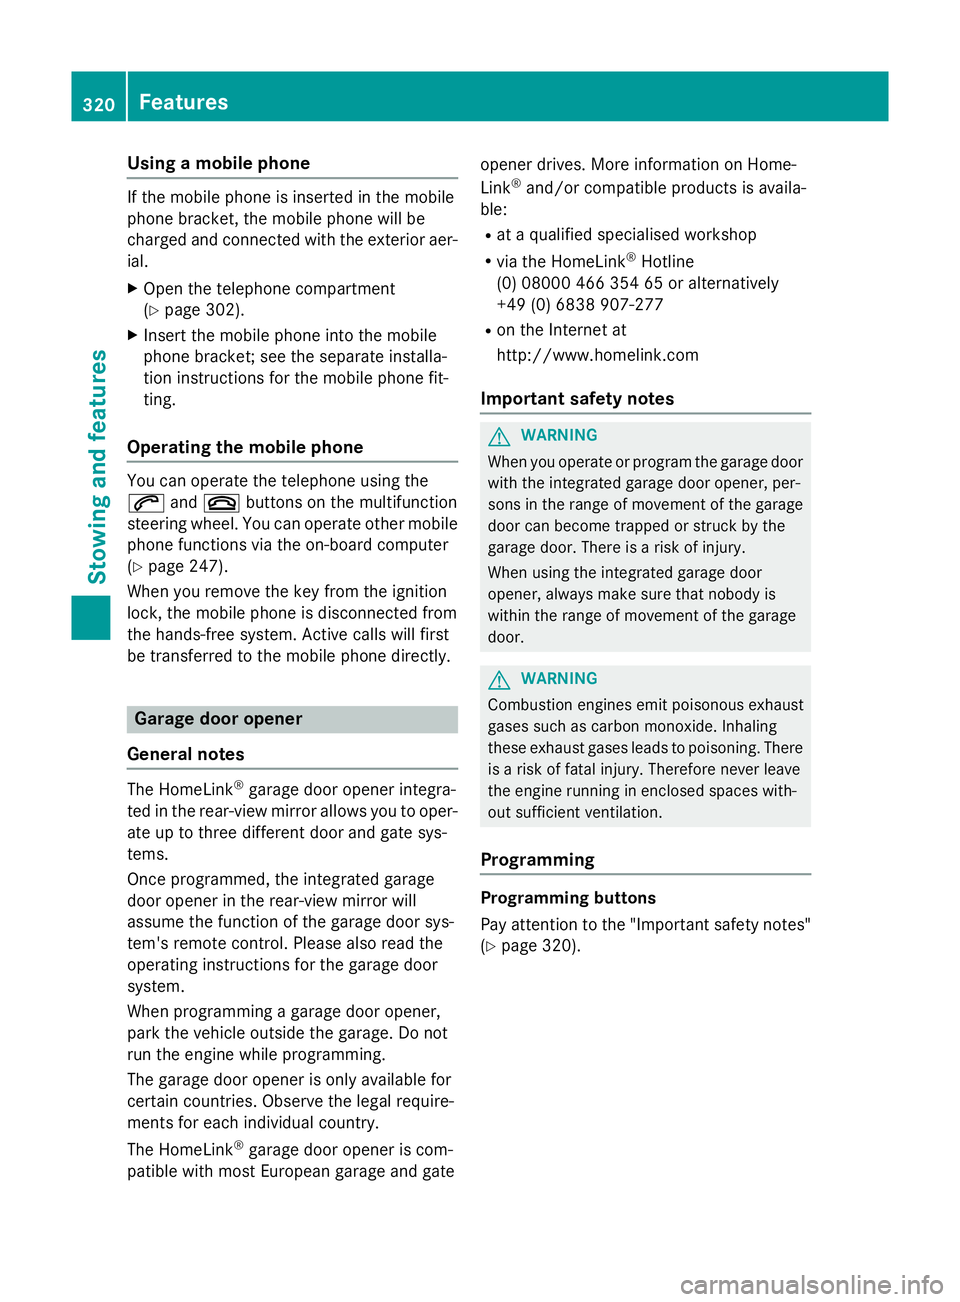
Using a mobile phone
If the mobile phone is inserted in the mobile
phone bracket, the mobile phone will be
charged and connected with the exterior aer- ial.
X Open the telephone compartment
(Y page 302).
X Insert the mobile phone into the mobile
phone bracket; see the separate installa-
tion instructions for the mobile phone fit-
ting.
Operating the mobile phone You can operate the telephone using the
6 and~ buttons on the multifunction
steering wheel. You can operate other mobile
phone functions via the on-board computer
(Y page 247).
When you remove the key from the ignition
lock, the mobile phone is disconnected from
the hands-free system. Active calls will first
be transferred to the mobile phone directly. Garage door opener
General notes The HomeLink
®
garage door opener integra-
ted in the rear-view mirror allows you to oper-
ate up to three different door and gate sys-
tems.
Once programmed, the integrated garage
door opener in the rear-view mirror will
assume the function of the garage door sys-
tem's remote control. Please also read the
operating instructions for the garage door
system.
When programming a garage door opener,
park the vehicle outside the garage. Do not
run the engine while programming.
The garage door opener is only available for
certain countries. Observe the legal require-
ments for each individual country.
The HomeLink ®
garage door opener is com-
patible with most European garage and gate opener drives. More information on Home-
Link
®
and/or compatible products is availa-
ble:
R at a qualified specialised workshop
R via the HomeLink ®
Hotline
(0) 08000 466 354 65 or alternatively
+49 (0) 6838 907-277
R on the Internet at
http://www.homelink.com
Important safety notes G
WARNING
When you operate or program the garage door with the integrated garage door opener, per-
sons in the range of movement of the garage
door can become trapped or struck by the
garage door. There is a risk of injury.
When using the integrated garage door
opener, always make sure that nobody is
within the range of movement of the garage
door. G
WARNING
Combustion engines emit poisonous exhaust
gases such as carbon monoxide. Inhaling
these exhaust gases leads to poisoning. There is a risk of fatal injury. Therefore never leave
the engine running in enclosed spaces with-
out sufficient ventilation.
Programming Programming buttons
Pay attention to the "Important safety notes"
(Y page 320). 320
FeaturesStowing and features
Page 343 of 417
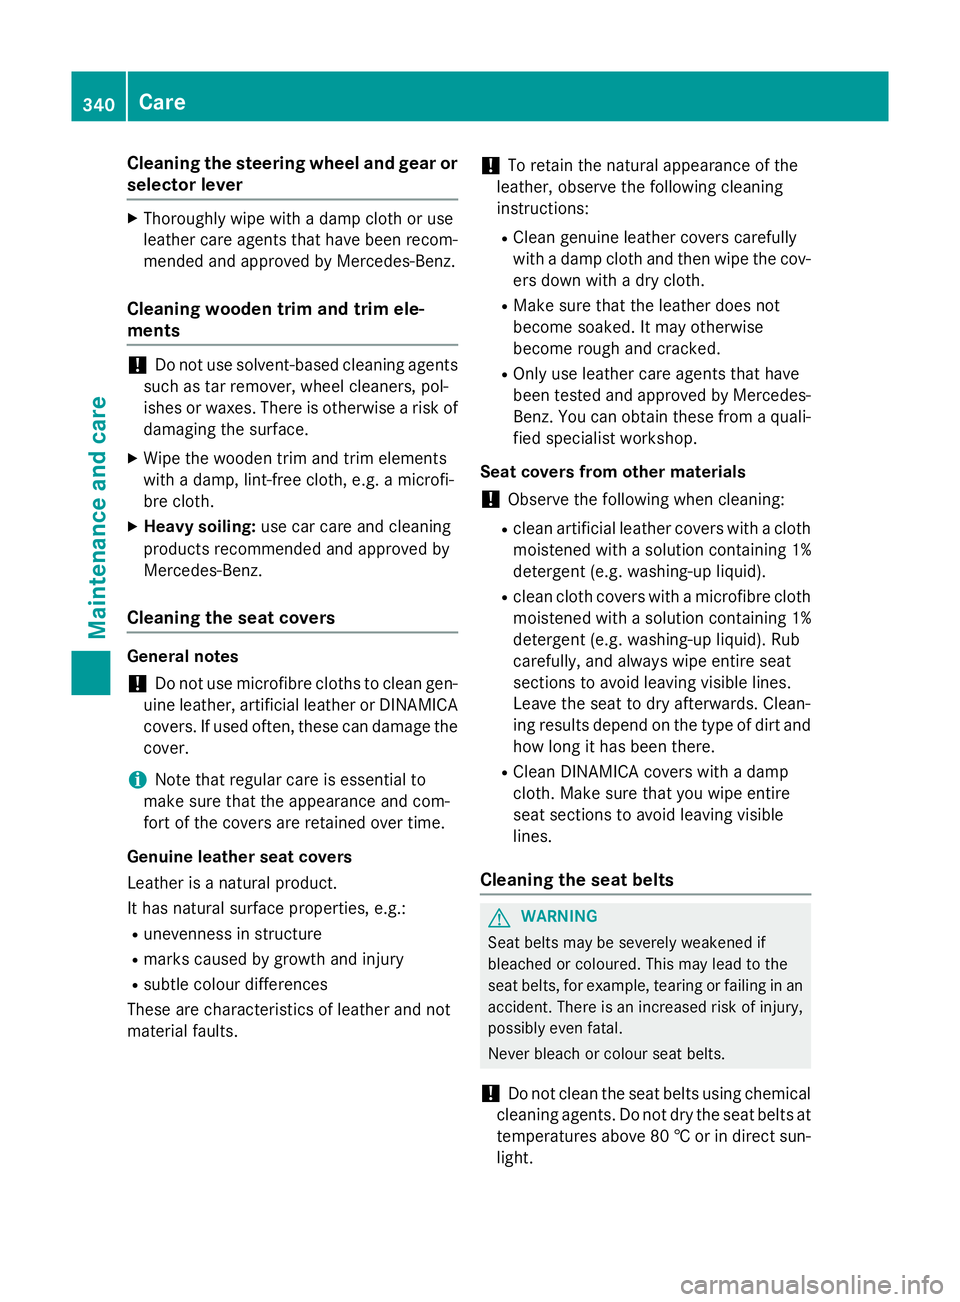
Cleaning the steering wheel and gear or
selector lever X
Thoroughly wipe with a damp cloth or use
leather care agents that have been recom-
mended and approved by Mercedes-Benz.
Cleaning wooden trim and trim ele-
ments !
Do not use solvent-based cleaning agents
such as tar remover, wheel cleaners, pol-
ishes or waxes. There is otherwise a risk of
damaging the surface.
X Wipe the wooden trim and trim elements
with a damp, lint-free cloth, e.g. a microfi-
bre cloth.
X Heavy soiling: use car care and cleaning
products recommended and approved by
Mercedes-Benz.
Cleaning the seat covers General notes
! Do not use microfibre cloths to clean gen-
uine leather, artificial leather or DINAMICA
covers. If used often, these can damage the cover.
i Note that regular care is essential to
make sure that the appearance and com-
fort of the covers are retained over time.
Genuine leather seat covers
Leather is a natural product.
It has natural surface properties, e.g.: R unevenness in structure
R marks caused by growth and injury
R subtle colour differences
These are characteristics of leather and not
material faults. !
To retain the natural appearance of the
leather, observe the following cleaning
instructions:
R Clean genuine leather covers carefully
with a damp cloth and then wipe the cov-
ers down with a dry cloth.
R Make sure that the leather does not
become soaked. It may otherwise
become rough and cracked.
R Only use leather care agents that have
been tested and approved by Mercedes-
Benz. You can obtain these from a quali- fied specialist workshop.
Seat covers from other materials
! Observe the following when cleaning:
R clean artificial leather covers with a cloth
moistened with a solution containing 1% detergent (e.g. washing-up liquid).
R clean cloth covers with a microfibre cloth
moistened with a solution containing 1%
detergent (e.g. washing-up liquid). Rub
carefully, and always wipe entire seat
sections to avoid leaving visible lines.
Leave the seat to dry afterwards. Clean-
ing results depend on the type of dirt and how long it has been there.
R Clean DINAMICA covers with a damp
cloth. Make sure that you wipe entire
seat sections to avoid leaving visible
lines.
Cleaning the seat belts G
WARNING
Seat belts may be severely weakened if
bleached or coloured. This may lead to the
seat belts, for example, tearing or failing in an accident. There is an increased risk of injury,
possibly even fatal.
Never bleach or colour seat belts.
! Do not clean the seat belts using chemical
cleaning agents. Do not dry the seat belts at
temperatures above 80 † or in direct sun-
light. 340
CareMaintenance and care
Page 351 of 417
The maximum permissible distance which
can be driven in run-flat mode is counted from the moment the tyre pressure loss warning
appears in the multifunction display.
You must not exceed a maximum speed of
80 km/h.
i When replacing one or all tyres, make
sure that you use only:
R the tyre size specified for the vehicle and
R tyre(s) marked "MOExtended"
If a tyre has gone flat and cannot be
replaced with an MOExtended tyre, a
standard tyre may be used as a temporary
measure. Make sure that you use the
proper size and type (summer or winter
tyre).
i Vehicles with MOExtended tyres are not
equipped with a TIREFIT kit at the factory. It
is therefore recommended that you addi-
tionally equip your vehicle with a TIREFIT kit if you fit tyres that do not feature run-flat
characteristics, e.g. winter tyres. A TIREFIT
kit can be obtained from a qualified spe-
cialist workshop.
Important safety notes G
WARNING
When driving in emergency mode, the driving characteristics deteriorate, e.g. when corner-
ing, accelerating quickly and when braking.
There is a risk of accident.
Do not exceed the stated maximum speed.
Avoid abrupt steering and driving manoeu-
vres, and driving over obstacles (kerbs, pot-
holes, off-road). This applies in particular to a laden vehicle.
Stop driving in emergency mode if:
R you hear banging noises.
R the vehicle starts to shake.
R you see smoke and smell rubber.
R ESP ®
is intervening constantly.
R there are tears in the sidewalls of the tyre. After driving in emergency mode, have the
wheel rims checked at a qualified specialist
workshop with regard to their further use. The faulty tyre must be replaced. TIREFIT kit
Important safety notes TIREFIT is a tyre sealant.
You can use TIREFIT to seal punctures of up to
4 mm, particularly those in the tyre tread. You
can use TIREFIT at outside temperatures
down to Ò20 †. G
WARNING
In the following situations, the tyre sealant is
unable to provide sufficient breakdown assis- tance, as it is unable to seal the tyre properly:
R there are cuts or punctures in the tyre
larger than those mentioned above.
R the wheel rim is damaged.
R you have driven at very low tyre pressures
or on a flat tyre.
There is a risk of an accident.
Do not drive any further. Contact a qualified
specialist workshop. G
WARNING
The tyre sealant is harmful and causes irrita-
tion. It must not come into contact with your
skin, eyes or clothing or be swallowed. Do not inhale TIREFIT fumes. Keep tyre sealant away
from children. There is a risk of injury.
If you come into contact with the tyre sealant,
observe the following:
R Rinse off the tyre sealant from your skin
immediately with water.
R If the tyre sealant comes into contact with
your eyes, immediately rinse them thor-
oughly with clean water.
R If tyre sealant is swallowed, immediately
rinse your mouth out thoroughly and drink
plenty of water. Do not induce vomiting,
and seek medical attention immediately. 348
Flat tyreBreakdown assistance
Page 362 of 417
The mountings for the removable towing eyes
are located in the bumpers. They are at the
front and at the rear under the covers.
X Remove the towing eye from the vehicle
tool kit (Y page 345).
X Pull cover :out of the bumper in the
direction of the arrow by inserting your fin-
gers into the recess.
X Press the mark on cover ;inwards in the
direction of the arrow.
X Remove cover ;from the opening.
X Screw the towing eye in clockwise to the
stop and tighten it.
Removing the towing eye X
Loosen the towing eye and unscrew it.
X Position cover :on top of the bumper and
press it in at the bottom until it engages.
X Attach cover ;to the bumper and press
until it engages.
X Place the towing eye in the vehicle tool kit. Towing the vehicle with the rear axle
raised
! The ignition must be switched off if you
are towing the vehicle with the rear axle
raised. Intervention by ESP ®
could other-
wise damage the brake system.
Only possible on vehicles without
4MATIC.
X Switch on the hazard warning lamps
(Y page 126).
X Turn the key in the ignition lock to position
0 and remove the key from the ignition
lock.
X When leaving the vehicle, take the key or
the KEYLESS-GO key with you.
When towing your vehicle with the rear axle
raised, it is important that you observe the
safety instructions (Y page 357). Towing the vehicle with both axles on
the ground
It is important that you observe the safety
instructions when towing away your vehicle
(Y page 357).
The automatic transmission automatically
shifts to position Pwhen you open the driver's
or front-passenger door or when you remove the key from the ignition lock. In order to
ensure that the automatic transmission stays
in position Nwhen towing the vehicle, you
must observe the following points:
X Make sure that the vehicle is stationary and
that the key is in position 0in the ignition
lock.
X Turn the key to position 2in the ignition
lock.
On vehicles with KEYLESS-GO, use the key instead of the Start/Stop button
(Y page 159).
X Depress and hold the brake pedal.
X Shift the automatic transmission to posi-
tion N.
X Release the brake pedal.
X Release the parking brake.
X Switch on the hazard warning lamps
(Y page 126).
X Leave the key in position 2in the ignition
lock.
i When towing with the hazard warning
lamps switched on, use the combination
switch as usual to signal a change of direc- tion. In this case, only the turn signals for
the desired direction flash. When you reset
the combination switch, the hazard warn-
ing lamps start flashing again. Transporting the vehicle
! You may only secure the vehicle by the
wheels, not by parts of the vehicle such as
axle or steering components. Otherwise,
the vehicle could be damaged. Towing and tow-starting
359Breakdown assistance Z
Page 370 of 417
Always observe the maximum permissible
speed specified for the M+S tyres you have
fitted.
If you fit M+S tyres that have a lower maxi-
mum permissible speed than that of the vehi-
cle, affix a corresponding warning label in the driver's field of vision. This can be obtained at
a qualified specialist workshop.
Under these circumstances, you should also
restrict the maximum speed of the vehicle
using permanent SPEEDTRONIC so that it
does not exceed the maximum permissible
speed for the M+S tyres (Y page 191).
When you have fitted the M+S tyres:
X Check the tyre pressures (Y page 367).
X Restart the tyre pressure loss warning sys-
tem (Y page 369).
X Restart the tyre pressure monitor
(Y page 372).
For more information on driving with the
emergency spare wheel, see (Y page 390).Snow chains
G
WARNING
If you have fitted snow chains to the front
wheels, they may scrape against the vehicle
body or chassis components. This could
cause damage to the vehicle or the tyres.
There is a risk of an accident.
To avoid hazardous situations:
R never fit snow chains on the front wheels
R fit snow chains to the rear wheels in pairs.
For safety reasons, Mercedes-Benz recom-
mends that you only use snow chains that
have been specifically approved for your vehi-
cle by Mercedes-Benz, or that are of a corre-
sponding standard of quality. If you intend to fit snow chains, please bear
the following points in mind:
R snow chains cannot be fitted to all wheel-
tyre combinations. Permissible wheel-tyre
combinations (Y page 378).
R only use snow chains if the road surface is
completely snow-covered. Remove the
snow chains as soon as possible when you
come to a road that is not snow-covered.
R local regulations may restrict the use of
snow chains. Observe the appropriate reg-
ulations if you wish to fit snow chains.
R do not exceed the maximum permissible
speed of 50 km/h.
R on vehicles with AIRMATIC, you must drive
at raised vehicle level if snow chains have
been fitted (Y page 202).
i You may wish to deactivate ESP ®
when
pulling away with snow chains fitted
(Y page 73). This way you can allow the
wheels to spin in a controlled manner, ach-
ieving an increased driving force (cutting
action).
For more information on driving with the
emergency spare wheel, see (Y page 390). Tyre pressure
Tyre pressure specifications
G
WARNING
Tyres with insufficient or excessive tyre pres- sure harbour the following hazards:
R the tyres may burst, especially as the load
and vehicle speed increase.
R the tyres may wear excessively or unevenly
which can severely impair tyre traction.
R the handling as well as steering and braking
characteristics may be severely affected.
There is a risk of an accident. Tyre pressure
367Wheels and tyres
Z
Page 372 of 417
10 kPa (0.1 bar/1.5 psi) per 10 †. Take this
into account when checking the pressure of
warm tyres. Only correct the tyre pressure if it
is too low for the current operating condi-
tions.
Driving with tyre pressure that is too high or
too low can:
R shorten the service life of the tyres
R cause increased tyre damage
R have a negative effect on handling charac-
teristics and thus driving safety (e.g. aqua-
planing)
i The tyre pressure values given for low
loads are minimum values which offer you
good ride comfort characteristics.
However, you can also use the values given for higher loads. These are permissible and
will not adversely affect the running of the
vehicle.
For speeds up to 210 km/h (does not
apply to AMG vehicles): for speeds up to
210 km/h, the values given on the tyre pres- sure information label (fuel filler flap) may be
reduced by 20 kPa (0.2 bar/3 psi) without a
reduction in safety.
This improves the ride comfort of your vehi-
cle; however, fuel consumption may increase
slightly. Tyre pressure loss warning system
General notes While the vehicle is in motion, the tyre pres-
sure loss warning system monitors the set
tyre pressure using the rotational speed of
the wheels. This enables the system to detect significant pressure loss in a tyre. If the speed
of rotation of a wheel changes as a result of a loss of pressure, a corresponding warning
message will appear in the multifunction dis- play.
You can recognise the tyre pressure loss
warning by the Run Flat Indicator
Run Flat Indicator
active Restart with OK active Restart with OK message whichappears in the
Serv.
Serv.menu of the multifunc-
tion display. Information on the message dis- play can be found in the "Restarting the tyre
pressure loss warning system" section
(Y page 369).
Important safety notes The tyre pressure warning system does not
warn you of an incorrectly set tyre pressure.
Observe the notes on the recommended tyre
pressure (Y page 367).
The tyre pressure loss warning does not
replace the need to regularly check the tyre
pressures. An even loss of pressure on sev-
eral tyres at the same time cannot be detec-
ted by the tyre pressure loss warning system.
The tyre pressure monitor is not able to warn you of a sudden loss of pressure, e.g. if the
tyre is penetrated by a foreign object. In the
event of a sudden loss of pressure, bring the
vehicle to a halt by braking carefully. Avoid
abrupt steering manoeuvres.
The function of the tyre pressure loss warning
system is limited or delayed if:
R snow chains are fitted to your vehicle's
tyres
R road conditions are wintry
R you are driving on sand or gravel
R you adopt a very sporty driving style (cor-
nering at high speeds or driving with high
rates of acceleration)
R you are towing a very heavy or large trailer
R you are driving with a heavy load (in the
vehicle or on the roof)
Restarting the tyre pressure loss warn-
ing system Restart the tyre pressure loss warning system
if you have:
R changed the tyre pressure
R changed the wheels or tyres
R fitted new wheels or tyres
X Before restarting, make sure that the tyre
pressures are set properly on all four tyres Tyre pressure
369Wheels and tyres Z