2014 MERCEDES-BENZ CLS SHOOTING BRAKE roof
[x] Cancel search: roofPage 152 of 417
between the side window and window frame.
There is a risk of injury.
When opening, make sure that nobody is
touching the side window. If someone
becomes trapped, press the Wswitch
immediately to open/close the side window
in the door. The side window stops. To con-
tinue closing the side window, pull on the
W switch.
X Convenience closing feature: press and
hold the gbutton until the side win-
dows and the sliding sunroof are closed.
The indicator lamp in the gbutton lights
up. Air-recirculation mode is activated.
If parts of the body are in the closing area
during convenience closing, proceed as fol-
lows:
X Press the Wbutton for opening/closing
the side windows.
The side windows stop.
X To then open the side windows, press the
W button again.
X Press the 3button to open/close the
sliding sunroof.
The sliding sunroof stops.
X To then open the sliding sunroof, pull back
on the 3button.
i Notes on the automatic reversing feature
for:
R the side windows (Y page 96)
R the sliding sunroof (Y page 100)
X Convenience opening feature: press and
hold the gbutton until the side win-
dows and the sliding sunroof have opened. The side windows and the sliding sunroof
move back to their original position.
The indicator lamp in the gbutton goes
out. Air-recirculation mode is deactivated.
i If you open the side windows or the sliding
sunroof manually after closing with the
convenience closing feature, they will
remain in this position when opened using
the convenience opening feature. Activating/deactivating the residual
heat function
General notes The residual heat function is only available
with THERMOTRONIC automatic climate con- trol.
It is possible to make use of the residual heat
of the engine to continue heating the vehicle
for approximately 30 minutes after the engine
has been switched off. The heating time
depends on the temperature that has been
set for the vehicle interior.
Activating/deactivating X
Turn the key to position 0in the ignition
lock or remove it (Y page 159).
X To activate: press theÌbutton.
The indicator lamp in the Ìbutton lights
up.
i If the residual heat function is activated,
the windows may mist up on the inside.
i The blower will run at a low speed regard-
less of the airflow setting.
i If you activate the residual heat function
at high temperatures, only the ventilation
will be activated. The blower runs at
medium speed.
X To deactivate: press theÌbutton.
The indicator lamp in the Ìbutton goes
out.
Residual heat is deactivated automatically: R after approximately 30 minutes
R when the ignition is switched on
R if the battery voltage drops
R when the auxiliary heating is switched on Operating the climate control system
149Climate control Z
Page 188 of 417
information about this from your Mercedes-
Benz Service Centre.
Brake pads/linings and discs that are either
new or have been replaced only achieve opti- mum braking effect after several hundred kil-
ometres of driving. Compensate for the
reduced braking effect by applying greater
force to the brake pedal. Always be aware of
this and adapt your driving and braking
accordingly during the running-in period.
Excessive heavy braking results in corre-
spondingly high brake wear. Observe the
brake wear warning lamp in the instrument
cluster and note any brake status messages
in the multifunction display. If you regularly
drive at high speeds, it is particularly impor-
tant to have the brake system checked and
maintained regularly. Driving on wet roads
Aquaplaning If water has accumulated to a certain depth
on the road surface, there is a danger of aqua- planing occurring, even if:
R you are driving at low speeds
R the tyres have adequate tread depth
For this reason, drive in the following manner in the event of heavy rain or in conditions in
which aquaplaning can occur:
R lower your speed
R avoid tyre ruts
R avoid sudden steering movements
R brake carefully
Driving on flooded roads !
Bear in mind that vehicles travelling in
front or in the opposite direction create
waves. This may cause the maximum per-
missible water depth to be exceeded.
These notes must be observed under all
circumstances. You could otherwise dam-
age the engine, the electronics or the trans- mission. If you must drive on stretches of road on
which water has collected, please bear in
mind that:
R the maximum permissible fording depth in
still water is 25 cm
R you should drive no faster than walking
pace Winter driving
G
WARNING
If you shift down on a slippery road surface in an attempt to increase the engine's braking
effect, the drive wheels could lose their grip.
This increases the risk of skidding and having
an accident.
Do not shift down for additional engine brak-
ing on a slippery road surface. G
DANGER
If the exhaust pipe is blocked or adequate
ventilation is not possible, poisonous gases
such as carbon monoxide (CO) may enter the vehicle. This is the case, e.g. if the vehicle
becomes trapped in snow. There is a risk of
fatal injury.
If you leave the engine or the auxiliary heating
running, make sure the exhaust pipe and area
around the vehicle are clear of snow. To
ensure an adequate supply of fresh air, open a window on the side of the vehicle that is not
facing into the wind.
Have your vehicle winterproofed at a qualified specialist workshop at the onset of winter.
You should drive particularly carefully on slip-
pery road surfaces. Avoid sudden accelera-
tion, steering and braking manoeuvres.
If the vehicle threatens to skid or cannot be
stopped when moving at low speed:
X Move the transmission to position N.
X Try to bring the vehicle under control by
using corrective steering.
The outside temperature indicator is not
designed to serve as an ice-warning device Driving tips
185Driving and parking Z
Page 211 of 417

Example: top view
Front sensors
Centre Approx. 100 cm
Corners Approx. 60 cm
Rear sensors
Centre Approx. 120 cm
Corners Approx. 80 cm
Minimum distance
Centre Approx. 20 cm
Corners Approx. 15 cm
If there is an obstacle within this range, the
relevant warning displays light up and a warn- ing tone sounds. If the distance falls below
the minimum, the distance may no longer be
shown. Warning displays Warning display for the front area
:
Segments on the left-hand side of the
vehicle
; Segments on the right-hand side of the
vehicle
= Segments showing operational readiness
The warning displays show the distance
between the sensors and the obstacle. The
warning display for the front area is located
on the dashboard above the centre air vents.
The warning display for the rear area is loca-
ted on the roof lining in the rear compart-
ment.
The warning display for each side of the vehi-
cle is divided into five yellow and two red seg- ments. PARKTRONIC is operational if yellow
segments showing operational readiness =
light up.
The selected transmission position and the
direction in which the vehicle is rolling deter- mine which warning display is active when the
engine is running. Transmission
position Warning display
D
Front area activated
R,
Nor the vehicle
is rolling back-
wards Rear and front areas
activated
P
No areas activated208
Driving systemsDriving an
d parking
Page 304 of 417
thrown around and hit vehicle occupants.
There is a risk of injury, particularly in the
event of sudden braking or a sudden change
in direction.
R Always stow objects so that they cannot be
thrown around in such situations.
R Always make sure that objects do not pro-
trude from stowage spaces, luggage nets or
stowage nets.
R Close the lockable stowage spaces while
driving.
R Always stow and secure heavy, hard, poin-
ted, sharp-edged, fragile or bulky objects in
the boot/luggage compartment.
Observe the loading guidelines (Y page 300).
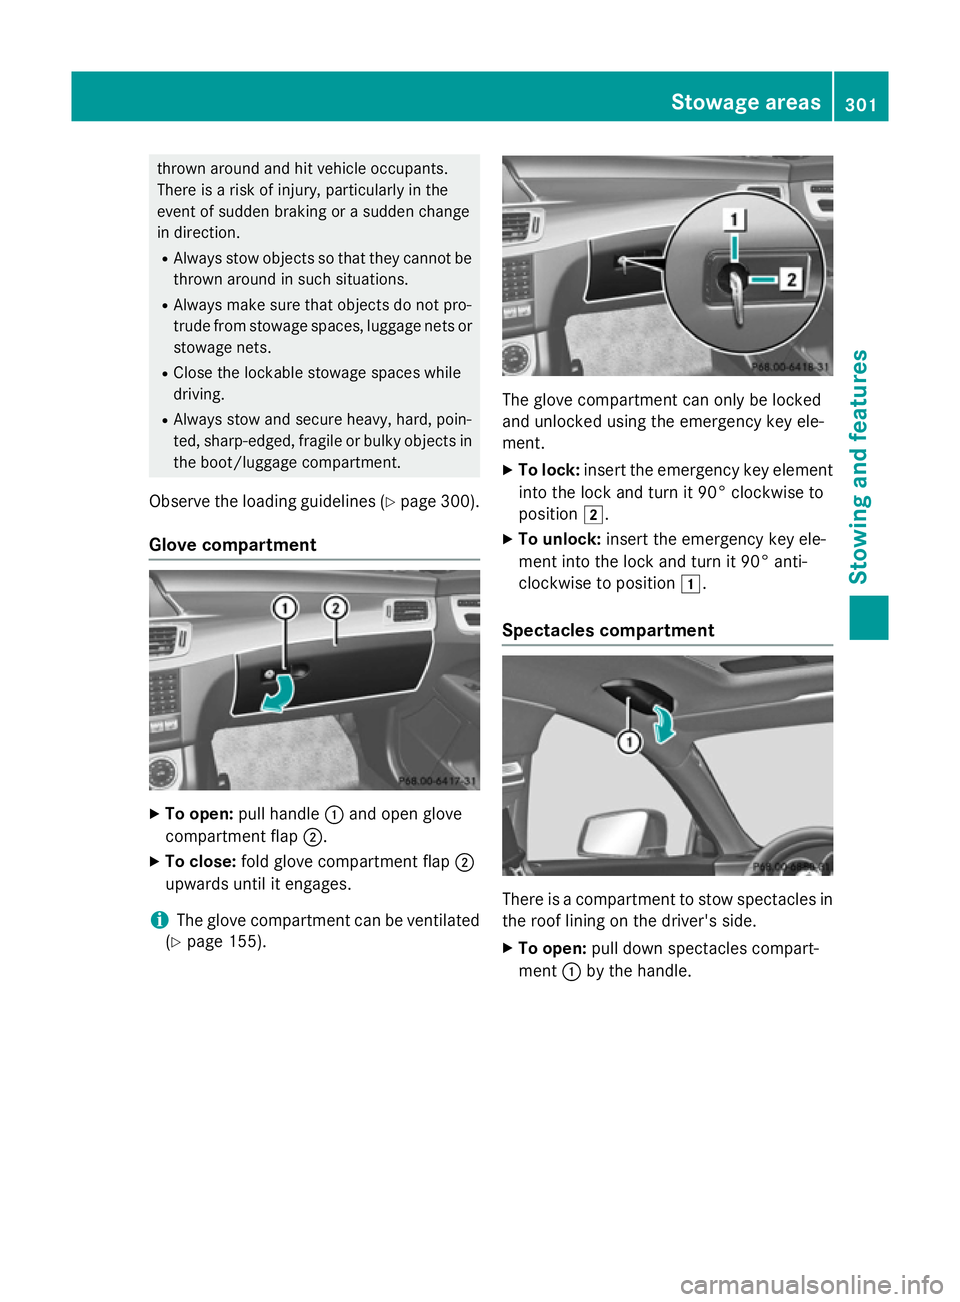
Glove compartment X
To open: pull handle :and open glove
compartment flap ;.
X To close: fold glove compartment flap ;
upwards until it engages.
i The glove compartment can be ventilated
(Y page 155). The glove compartment can only be locked
and unlocked using the emergency key ele-
ment.
X To lock: insert the emergency key element
into the lock and turn it 90° clockwise to
position 2.
X To unlock: insert the emergency key ele-
ment into the lock and turn it 90° anti-
clockwise to position 1.
Spectacles compartment There is a compartment to stow spectacles in
the roof lining on the driver's side.
X To open: pull down spectacles compart-
ment :by the handle. Sto
wage areas
301Stowing and features Z
Page 315 of 417
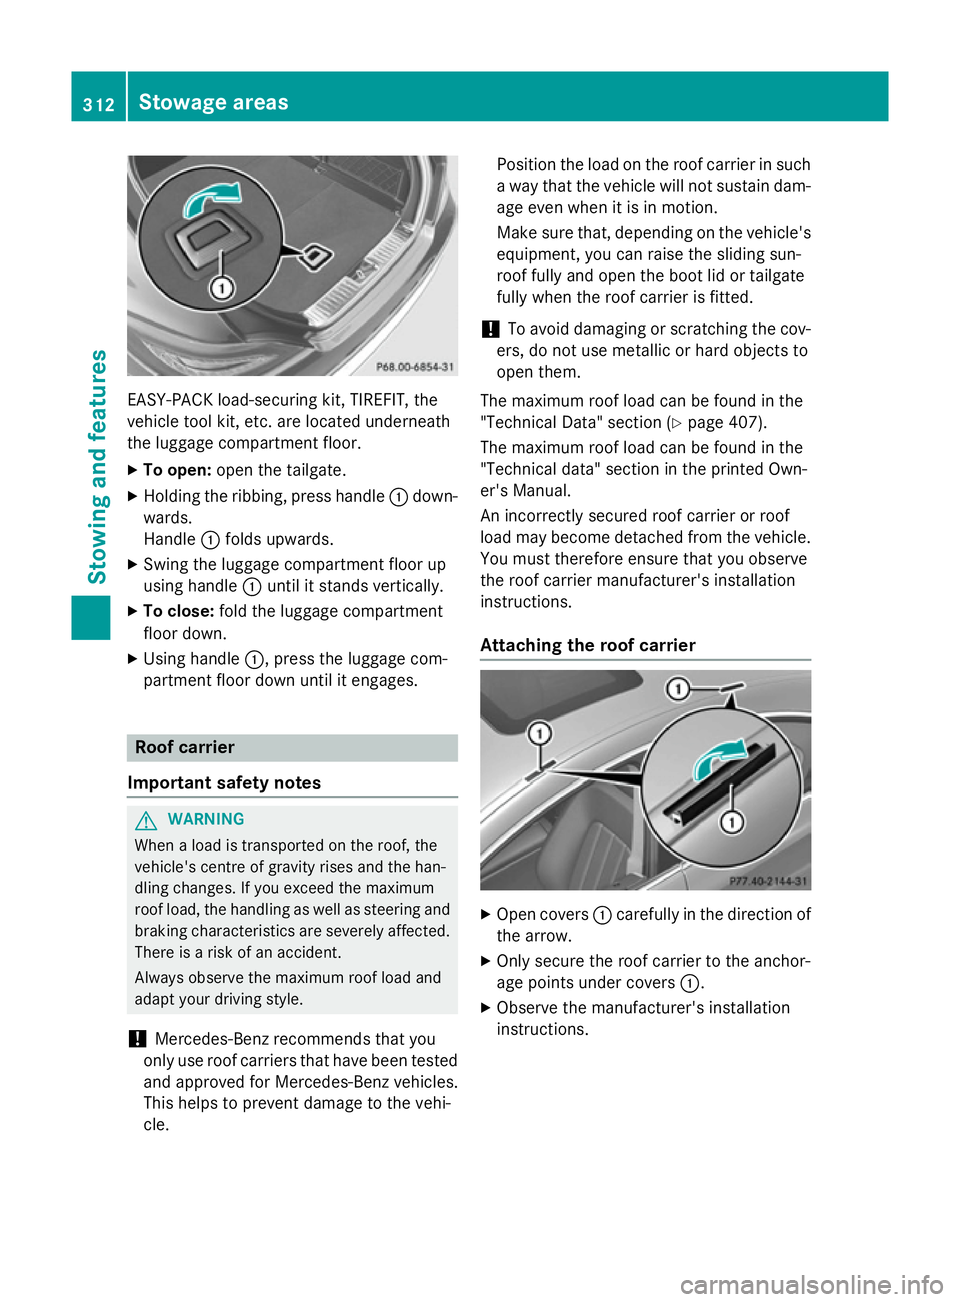
EASY-PACK load-securing kit, TIREFIT, the
vehicle tool kit, etc. are located underneath
the luggage compartment floor.
X To open: open the tailgate.
X Holding the ribbing, press handle :down-
wards.
Handle :folds upwards.
X Swing the luggage compartment floor up
using handle :until it stands vertically.
X To close: fold the luggage compartment
floor down.
X Using handle :, press the luggage com-
partment floor down until it engages. Roof carrier
Important safety notes G
WARNING
When a load is transported on the roof, the
vehicle's centre of gravity rises and the han-
dling changes. If you exceed the maximum
roof load, the handling as well as steering and braking characteristics are severely affected.
There is a risk of an accident.
Always observe the maximum roof load and
adapt your driving style.
! Mercedes-Benz recommends that you
only use roof carriers that have been tested and approved for Mercedes-Benz vehicles.
This helps to prevent damage to the vehi-
cle. Position the load on the roof carrier in such
a way that the vehicle will not sustain dam-
age even when it is in motion.
Make sure that, depending on the vehicle's equipment, you can raise the sliding sun-
roof fully and open the boot lid or tailgate
fully when the roof carrier is fitted.
! To avoid damaging or scratching the cov-
ers, do not use metallic or hard objects to
open them.
The maximum roof load can be found in the
"Technical Data" section (Y page 407).
The maximum roof load can be found in the
"Technical data" section in the printed Own-
er's Manual.
An incorrectly secured roof carrier or roof
load may become detached from the vehicle.
You must therefore ensure that you observe
the roof carrier manufacturer's installation
instructions.
Attaching the roof carrier X
Open covers :carefully in the direction of
the arrow.
X Only secure the roof carrier to the anchor-
age points under covers :.
X Observe the manufacturer's installation
instructions. 312
Sto
wage areasStowing an d features
Page 337 of 417
Refill AdBlue at workshop See Own‐
Refill AdBlue at workshop See Own‐
er's Manual
er's Manual
Refill AdBlue at workshop No start Refill AdBlue at workshop No start
in .. km
in .. km
A warning signal also sounds.
You can no longer start the engine when the
AdBlue ®
supply has been used up
(Y page 273).
! Have the AdBlue ®
tank topped up at a
qualified specialist workshop only. The
vehicle may otherwise be damaged or
soiled.
Before taking a trip with your vehicle outside
Europe, have the AdBlue ®
supply checked at
a qualified specialist workshop. If necessary,
have AdBlue ®
topped up. Before a prolonged
stay outside of Europe, consult a qualified
specialist workshop.
Observe the notes on AdBlue ®
(Y page 403).
Further information about BlueTEC exhaust
gas aftertreatment and AdBlue ®
can be
obtained at a qualified specialist workshop,
e.g. a Mercedes-Benz Service Centre. Care
General notes
H
Environmental note
Dispose of empty packaging and cleaning
cloths in an environmentally responsible man-
ner.
! For cleaning your vehicle, do not use any
of the following:
R dry, rough or hard cloths
R abrasive cleaning agents
R solvents
R cleaning agents containing solvents
Do not scrub.
Do not touch the surfaces or protective
films with hard objects, e.g. a ring or ice
scraper. You could otherwise scratch or
damage the surfaces and protective film. !
Do not park up the vehicle for an extended
period straight after cleaning it, particularly after having cleaned the wheels with wheel
cleaner. Wheel cleaners could cause
increased corrosion of the brake discs and
brake pads/linings. For this reason, you
should drive for a few minutes after clean-
ing. Braking heats the brake discs and the
brake pads/linings, thus drying them. The
vehicle can then be parked up.
Regular care of your vehicle is a condition for
retaining the quality in the long term.
Use care products and cleaning agents rec-
ommended and approved by Mercedes-Benz. Washing the vehicle and cleaning the
paintwork
Automatic car wash G
WARNING
Braking efficiency is reduced after the vehicle has been washed. There is a risk of an acci-
dent.
After washing the vehicle, brake carefully
while paying attention to the traffic conditions in order to restore full braking efficiency.
! If DISTRONIC PLUS or the HOLD function
is activated, the vehicle brakes automati-
cally in certain situations. To prevent dam-
age to the vehicle, deactivate DISTRONIC
PLUS and the HOLD function in the follow-
ing or other similar situations:
R when towing the vehicle
R in the car wash
! Make sure that:
R the side windows and sliding sunroof are
closed completely.
R the blower for the ventilation/heating is
switched off (OFF button is depressed).
R the windscreen wiper switch is at posi-
tion 0.
The vehicle could otherwise be damaged. 334
CareMaintenance and care
Page 339 of 417
Do not aim directly at any of the following:
R tyres
R door gaps, roof gaps, joints etc.
R electrical components
R battery
R connectors
R lights
R seals
R trim elements
R ventilation slots
Damaged seals or electrical components
can lead to leaks or failures.
Cleaning the paintwork !
Do not affix:
R stickers
R films
R magnetic plates or similar items
to painted surfaces. You could otherwise
damage the paintwork.
Scratches, corrosive deposits, areas affected
by corrosion and damage caused by inade-
quate care cannot always be completely
repaired. In such cases, visit a qualified spe-
cialist workshop.
X Remove impurities immediately, where
possible, whilst avoiding rubbing too hard.
X Soak insect remains with insect remover
and rinse off the treated areas afterwards.
X Soak bird droppings with water and rinse
off the treated areas afterwards.
X Remove coolant, brake fluid, tree resin,
oils, fuels and greases by rubbing gently
with a cloth soaked in petroleum ether or
lighter fluid.
X Use tar remover to remove tar stains.
X Use silicone remover to remove wax.
Care and treatment of matt paintwork !
Never polish the vehicle or the light alloy
wheels. Polishing makes the paintwork
shiny. !
The following may cause the paint to
become shiny and thus reduce the matt
effect:
R Vigorous rubbing with unsuitable mate-
rials.
R Frequent use of car washes.
R Washing the vehicle in direct sunlight.
! Never use paint cleaner, buffing or pol-
ishing products, or gloss preserver, e.g.
wax. These products are only suitable for
high-gloss surfaces. Their use on vehicles
with matt finish leads to considerable sur-
face damage (shiny, spotted areas).
Always have paintwork repairs carried out
at a qualified specialist workshop.
! Do not use wash programs with a hot wax
treatment under any circumstances.
Observe these notes if your vehicle has a
clear matt finish. This will help you to avoid
damage to the paintwork due to incorrect
treatment.
These notes also apply to light-alloy wheels
with a clear matt finish.
i The vehicle should preferably be washed
by hand using a soft sponge, car shampoo
and plenty of water.
i Use only insect remover and car shampoo
from the range of recommended and
approved Mercedes-Benz care products. Cleaning vehicle parts
Cleaning the wheels !
Do not use acidic wheel cleaning products
to remove brake dust. This could damage
wheel bolts and brake components.
! Do not park up the vehicle for an extended
period straight after cleaning it, particularly after having cleaned the wheels with wheel cleaner. Wheel cleaners could cause
increased corrosion of the brake discs and
brake pads/linings. For this reason, you 336
CareMaintenance and care
Page 344 of 417
X
Use clean, lukewarm water and soap solu-
tion.
Cleaning the roof lining and carpets X
Roof lining: if it is very dirty, use a soft
brush or dry shampoo.
X Carpets: use the carpet and textile clean-
ing agents recommended and approved by
Mercedes-Benz.
Cleaning the designo wooden luggage
compartment floor (CLS Shooting
Brake) !
For cleaning and treating the wooden lug-
gage compartment floor, do not use any of the following:
R microfibre cloth
R household cleaning agents
R commercially available furniture pol-
ishes, sprays or similar items
R steam cleaners
Otherwise, the surface of the wooden lug-
gage compartment floor will be damaged.
! Do not apply self-adhesive films or mask-
ing strips to the wooden luggage compart-
ment floor; the solvent residue and plasti-
cisers contained in them may destroy the
paintwork.
Use a lint-free cotton cloth to remove dust,
dirt and fingerprints. If necessary, dampen
the lint-free cotton cloth with a small amount of clear water.
Use wood oil recommended and approved byMercedes-Benz to treat and protect the
wooden luggage compartment floor. This
revitalises the wooden surface and increases
the resilience of the wood.
To apply the wood oil:
X Using the sanding pad that comes with the
care set, sand the wooden surface in the
direction of the grain.
X Remove the wood dust. X
With a lint-free cotton cloth, distribute a
thin layer of wood oil evenly over the
wooden surface using a simple wiping
motion. Always wipe in the direction of the
grain.
X Then, using a second lint-free cotton cloth,
apply the remaining wood oil.
A new protective coating forms within
approximately four hours.
i A second treatment with the wood oil is
recommended for extremely worn wooden
luggage compartment floor surfaces. Care
341Maintenance and care Z