2014 MERCEDES-BENZ CLS SHOOTING BRAKE change wheel
[x] Cancel search: change wheelPage 248 of 417
i
If you reset the values in the "ECO dis-
play", the values in the "From start" trip
computer are also reset. If you reset the
values in the "From start" trip computer,
the values in the "ECO display" are also
reset. Navigation menu
Displaying navigation instructions In the
Navi Navimenu, the multifunction display
shows navigation instructions. For more
information on navigation, see the separate
operating instructions.
X Switch on the audio system with Becker ®
MAP PILOT or COMAND Online, see the
separate operating instructions.
X Press the =or; button on the steer-
ing wheel to select the Navi
Navi menu.
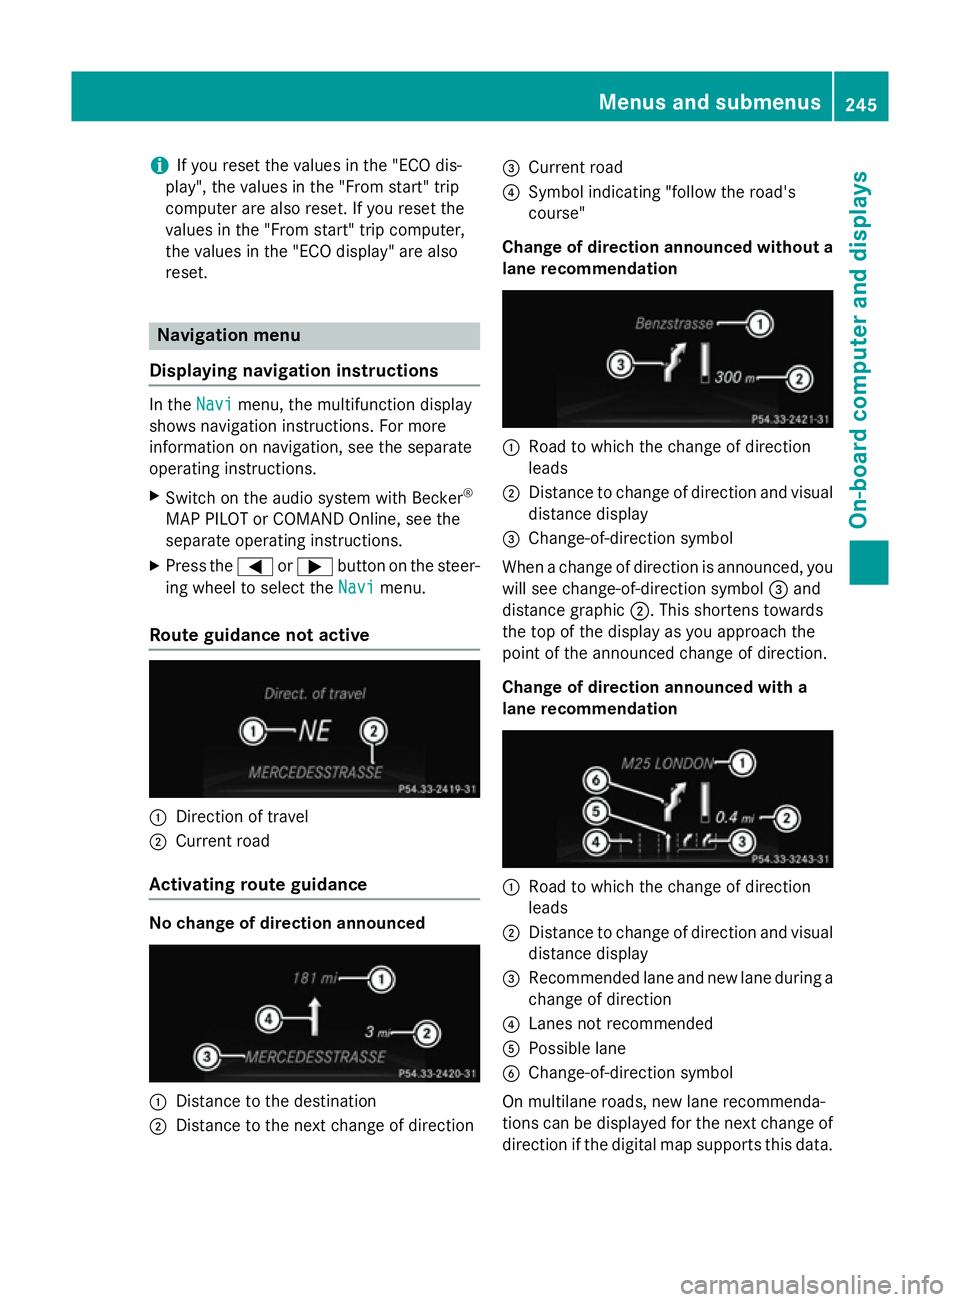
Route guidance not active :
Direction of travel
; Current road
Activating route guidance No change of direction announced
:
Distance to the destination
; Distance to the next change of direction =
Current road
? Symbol indicating "follow the road's
course"
Change of direction announced without a lane recommendation :
Road to which the change of direction
leads
; Distance to change of direction and visual
distance display
= Change-of-direction symbol
When a change of direction is announced, you
will see change-of-direction symbol =and
distance graphic ;. This shortens towards
the top of the display as you approach the
point of the announced change of direction.
Change of direction announced with a
lane recommendation :
Road to which the change of direction
leads
; Distance to change of direction and visual
distance display
= Recommended lane and new lane during a
change of direction
? Lanes not recommended
A Possible lane
B Change-of-direction symbol
On multilane roads, new lane recommenda-
tions can be displayed for the next change of
direction if the digital map supports this data. Menus and submenus
245On-board computer and displays Z
Page 249 of 417
During the change of direction, new lanes
may be added.
Recommended lane =: in this lane, you will
be able to complete the next two changes of
direction without changing lane.
Lane not recommended ?: you will not be
able to complete the next change of direction
if you stay in this lane.
Possible lane A: in this lane, you will only be
able to complete the next change of direction without changing lane.
Other status indicators of the naviga-
tion system R
O: you have reached the destination or an
intermediate destination.
R New route... New route... orCalculating route
Calculating route:
calculating a new route
R Off map
Off map orOff road
Off road : the vehicle position
is outside the area of the digital map (off-
map position)
R No route
No route : no route could be calculated to
the selected destination. Audio menu
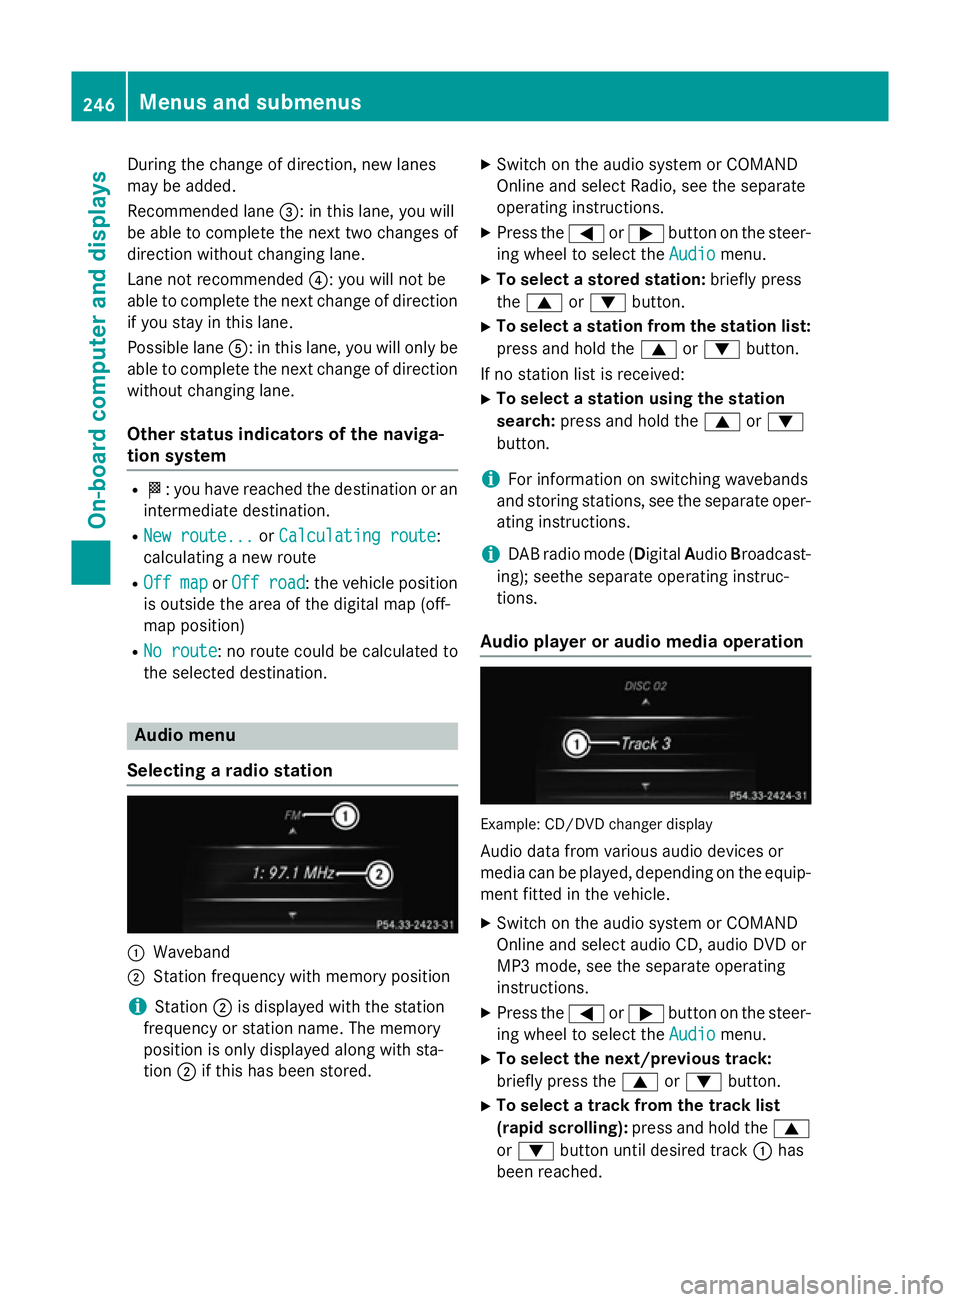
Selecting a radio station :
Waveband
; Station frequency with memory position
i Station
;is displayed with the station
frequency or station name. The memory
position is only displayed along with sta-
tion ;if this has been stored. X
Switch on the audio system or COMAND
Online and select Radio, see the separate
operating instructions.
X Press the =or; button on the steer-
ing wheel to select the Audio
Audio menu.
X To select a stored station: briefly press
the 9 or: button.
X To select a station from the station list:
press and hold the 9or: button.
If no station list is received: X To select a station using the station
search: press and hold the 9or:
button.
i For information on switching wavebands
and storing stations, see the separate oper-
ating instructions.
i DAB radio mode (D
igitalAudio Broadcast-
ing); seethe separate operating instruc-
tions.
Audio player or audio media operation Example: CD/DVD changer display
Audio data from various audio devices or
media can be played, depending on the equip- ment fitted in the vehicle.
X Switch on the audio system or COMAND
Online and select audio CD, audio DVD or
MP3 mode, see the separate operating
instructions.
X Press the =or; button on the steer-
ing wheel to select the Audio Audiomenu.
X To select the next/previous track:
briefly press the 9or: button.
X To select a track from the track list
(rapid scrolling): press and hold the 9
or : button until desired track :has
been reached. 246
Menus and submenusOn-board computer and displays
Page 250 of 417
If you press and hold the
9or:
button, the rapid scrolling speed is
increased. Not all audio devices or media
support this function.
If track information is stored on the audio
player or medium, the multifunction display
will show the number and title of the track.
The current track does not appear in audio
AUX mode (Auxiliary audio mode: external
audio source connected).
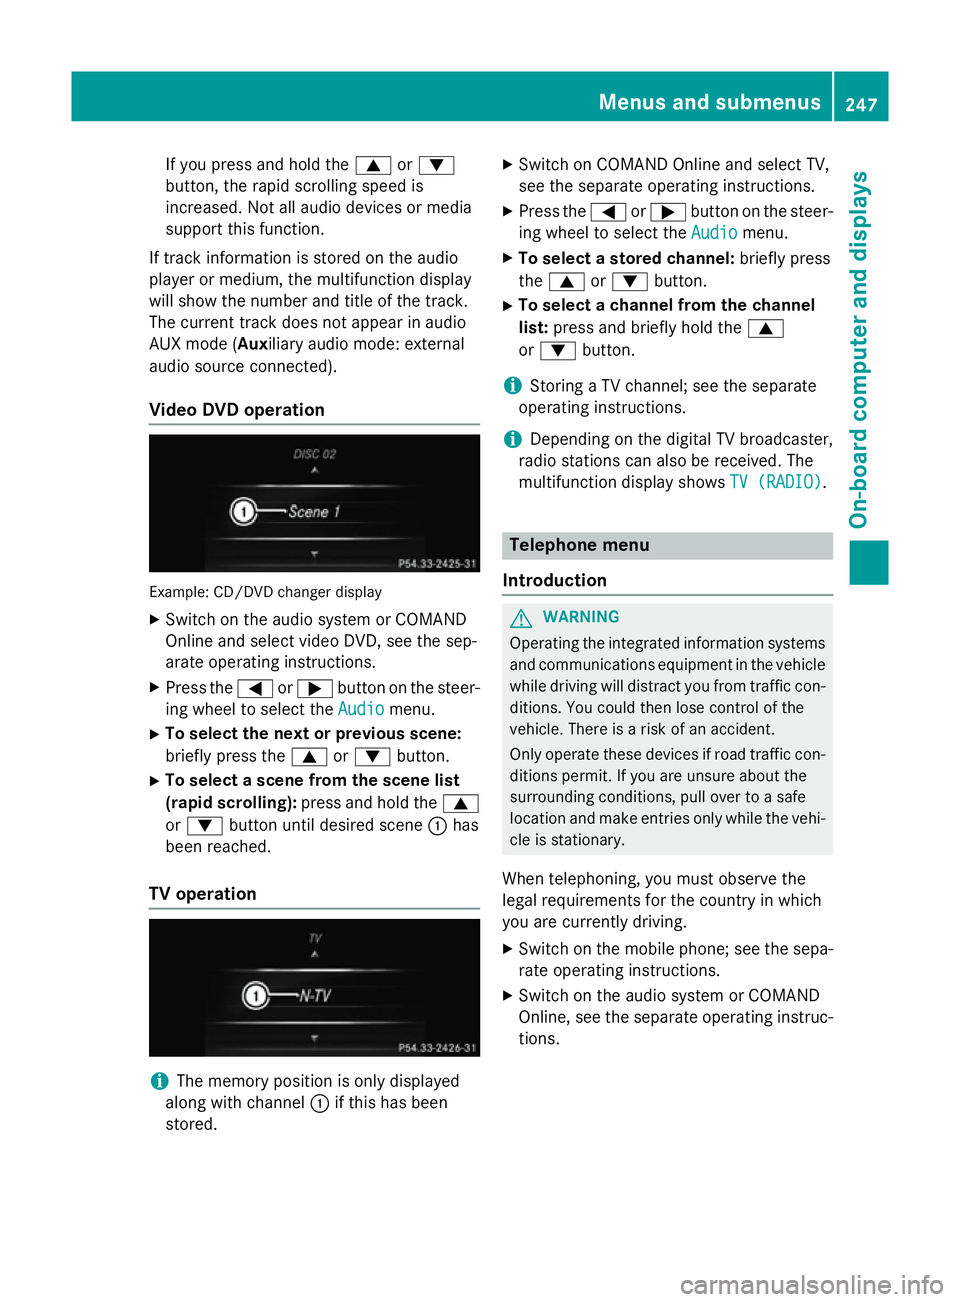
Video DVD operation Example: CD/DVD changer display
X Switch on the audio system or COMAND
Online and select video DVD, see the sep-
arate operating instructions.
X Press the =or; button on the steer-
ing wheel to select the Audio
Audio menu.
X To select the next or previous scene:
briefly press the 9or: button.
X To select a scene from the scene list
(rapid scrolling): press and hold the 9
or : button until desired scene :has
been reached.
TV operation i
The memory position is only displayed
along with channel :if this has been
stored. X
Switch on COMAND Online and select TV,
see the separate operating instructions.
X Press the =or; button on the steer-
ing wheel to select the Audio
Audio menu.
X To select a stored channel: briefly press
the 9 or: button.
X To select a channel from the channel
list: press and briefly hold the 9
or : button.
i Storing a TV channel; see the separate
operating instructions.
i Depending on the digital TV broadcaster,
radio stations can also be received. The
multifunction display shows TV (RADIO) TV (RADIO). Telephone menu
Introduction G
WARNING
Operating the integrated information systems and communications equipment in the vehicle
while driving will distract you from traffic con-
ditions. You could then lose control of the
vehicle. There is a risk of an accident.
Only operate these devices if road traffic con-
ditions permit. If you are unsure about the
surrounding conditions, pull over to a safe
location and make entries only while the vehi-
cle is stationary.
When telephoning, you must observe the
legal requirements for the country in which
you are currently driving.
X Switch on the mobile phone; see the sepa-
rate operating instructions.
X Switch on the audio system or COMAND
Online, see the separate operating instruc-
tions. Menus and submenus
247On-board computer and displays Z
Page 256 of 417
In daylight, the displays in the instrument
cluster are not illuminated.
Switching the daytime driving lights
on/off
The Day lights Day lights function can only be
switched on with the engine turned off.
X Press the =or; button on the steer-
ing wheel to select the Settings
Settings menu.
X Press the :or9 button to select the
Light
Light submenu.
X Press ato confirm.
X Press the :or9 button to select the
Day lights
Day lights function.
If the Day lights
Day lights function has been
switched on, the cone of light and the W
symbol in the multifunction display are
shown in orange.
X Press the abutton to save the setting.
Further information on daytime driving lights
(Y page 123).
Switching the Intelligent Light System
on/off
X Press the =or; button on the steer-
ing wheel to select the Settings
Settings menu.
X Press the :or9 button to select the
Light
Light submenu.
X Press ato confirm.
X Press the :or9 button to select the
Intell. Light Sys. Intell. Light Sys. function.
If the Intell. Light Sys.
Intell. Light Sys. function has
been switched on, the cone of light and the L symbol in the multifunction display
are shown in orange.
X Press the abutton to save the setting.
When you activate Intell. Light Sys.
Intell. Light Sys.,
you activate the following functions:
R Motorway mode
R Active light function
R Cornering light function
R Extended range foglamps
If you set the dipped-beam headlamps for
driving on the right/left, the multifunction
display shows the Intell. Intell.Light
LightSystem:
System: System inoperative Inactive for
System inoperative Inactive for
left-side traffic left-side traffic
orIntell. Light
Intell. Light
System:
System: System
Systeminoperative
inoperative Inactive
Inactive
for right-side traffic
for right-side traffic display message
instead of the Intell.
Intell.Light
LightSys.
Sys.function
in the Light
Light submenu (Y page 253).
Further information on the Intelligent Light
System (Y page 127).
Setting the dipped-beam headlamps for
driving on the left/right
X Press the =or; button on the steer-
ing wheel to select the Settings
Settingsmenu.
X Press the :or9 button to select the
Light
Light submenu.
X Press ato confirm.
X Press the :or9 button to select the
Dipped beams Setting for:
Dipped beams Setting for: function.
You will see the selected setting: Right-
Right-
side traffic
side traffic orLeft-side traffic
Left-side traffic.
X Press the abutton to save the setting.
If you change the setting, conversion does
not take place until the next time the vehi-
cle is stationary.
This function is only available on vehicles with
the Intelligent Light System.
You can use this function to switch between
symmetrical and asymmetrical dipped beam
(Y page 122).
If you set the dipped-beam headlamps for
driving on the right/left, then motorway
mode and the extended range foglamps are
unavailable.
A qualified specialist workshop can set the
dipped-beam headlamps for driving on the
left/right.
Setting the brightness of the ambient
lighting
X Press the =or; button on the steer-
ing wheel to select the Settings
Settings menu.
X Press the :or9 button to select the
Lights Lights submenu.
X Press ato confirm. Menus and submenus
253On-board computer and displays Z
Page 259 of 417
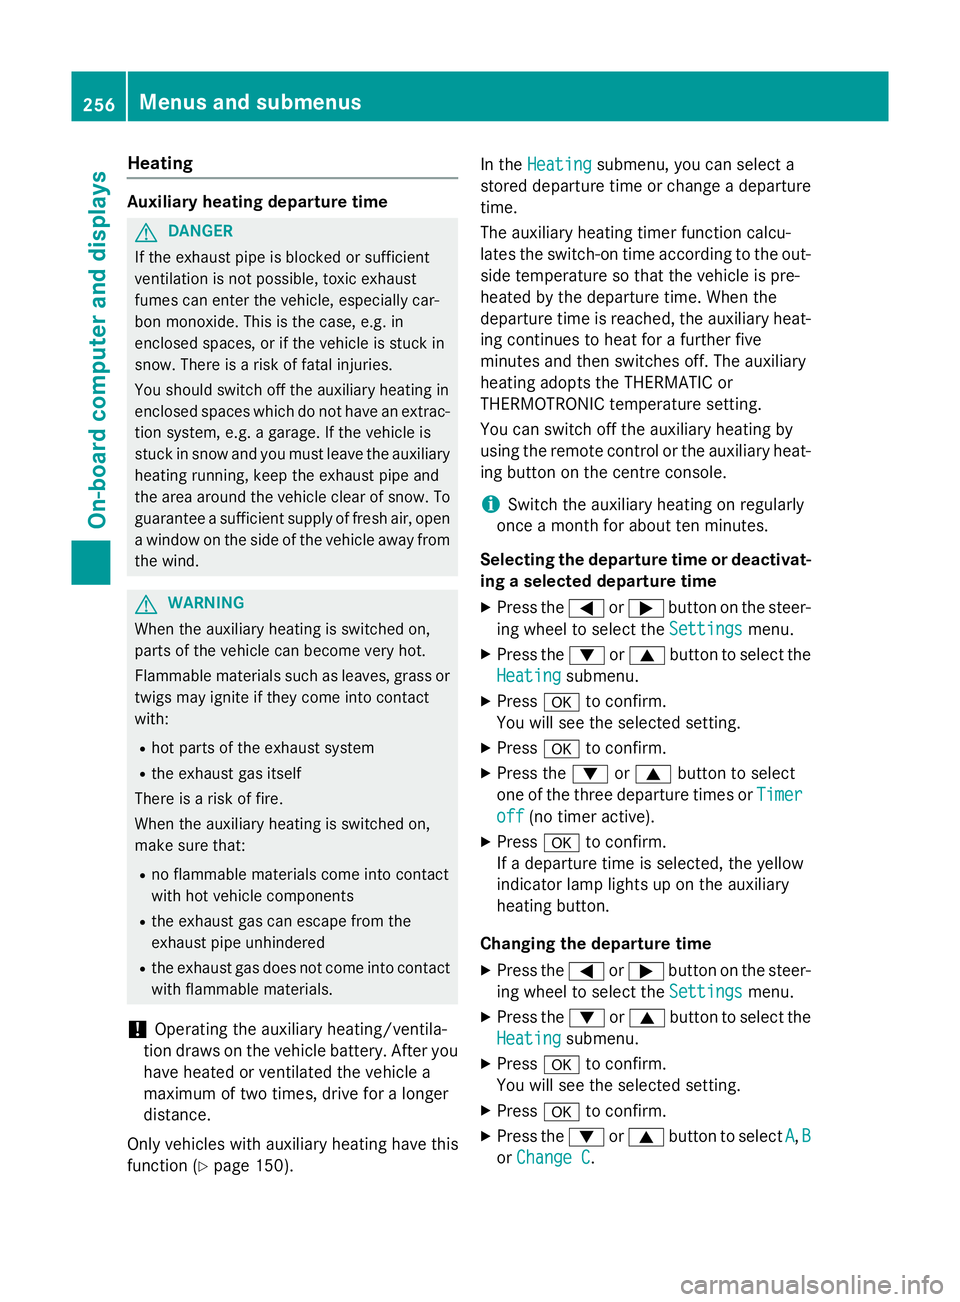
Heating
Auxiliary heating departure time
G
DANGER
If the exhaust pipe is blocked or sufficient
ventilation is not possible, toxic exhaust
fumes can enter the vehicle, especially car-
bon monoxide. This is the case, e.g. in
enclosed spaces, or if the vehicle is stuck in
snow. There is a risk of fatal injuries.
You should switch off the auxiliary heating in
enclosed spaces which do not have an extrac- tion system, e.g. a garage. If the vehicle is
stuck in snow and you must leave the auxiliary
heating running, keep the exhaust pipe and
the area around the vehicle clear of snow. To guarantee a sufficient supply of fresh air, open
a window on the side of the vehicle away from the wind. G
WARNING
When the auxiliary heating is switched on,
parts of the vehicle can become very hot.
Flammable materials such as leaves, grass or twigs may ignite if they come into contact
with:
R hot parts of the exhaust system
R the exhaust gas itself
There is a risk of fire.
When the auxiliary heating is switched on,
make sure that:
R no flammable materials come into contact
with hot vehicle components
R the exhaust gas can escape from the
exhaust pipe unhindered
R the exhaust gas does not come into contact
with flammable materials.
! Operating the auxiliary heating/ventila-
tion draws on the vehicle battery. After you
have heated or ventilated the vehicle a
maximum of two times, drive for a longer
distance.
Only vehicles with auxiliary heating have this
function (Y page 150). In the
Heating
Heating submenu, you can select a
stored departure time or change a departure
time.
The auxiliary heating timer function calcu-
lates the switch-on time according to the out-
side temperature so that the vehicle is pre-
heated by the departure time. When the
departure time is reached, the auxiliary heat- ing continues to heat for a further five
minutes and then switches off. The auxiliary
heating adopts the THERMATIC or
THERMOTRONIC temperature setting.
You can switch off the auxiliary heating by
using the remote control or the auxiliary heat- ing button on the centre console.
i Switch the auxiliary heating on regularly
once a month for about ten minutes.
Selecting the departure time or deactivat-
ing a selected departure time
X Press the =or; button on the steer-
ing wheel to select the Settings
Settings menu.
X Press the :or9 button to select the
Heating Heating submenu.
X Press ato confirm.
You will see the selected setting.
X Press ato confirm.
X Press the :or9 button to select
one of the three departure times or Timer
Timer
off
off (no timer active).
X Press ato confirm.
If a departure time is selected, the yellow
indicator lamp lights up on the auxiliary
heating button.
Changing the departure time
X Press the =or; button on the steer-
ing wheel to select the Settings Settingsmenu.
X Press the :or9 button to select the
Heating
Heating submenu.
X Press ato confirm.
You will see the selected setting.
X Press ato confirm.
X Press the :or9 button to select A
A,B
B
or Change C
Change C. 256
Menus and submenusOn-board computer and displays
Page 260 of 417
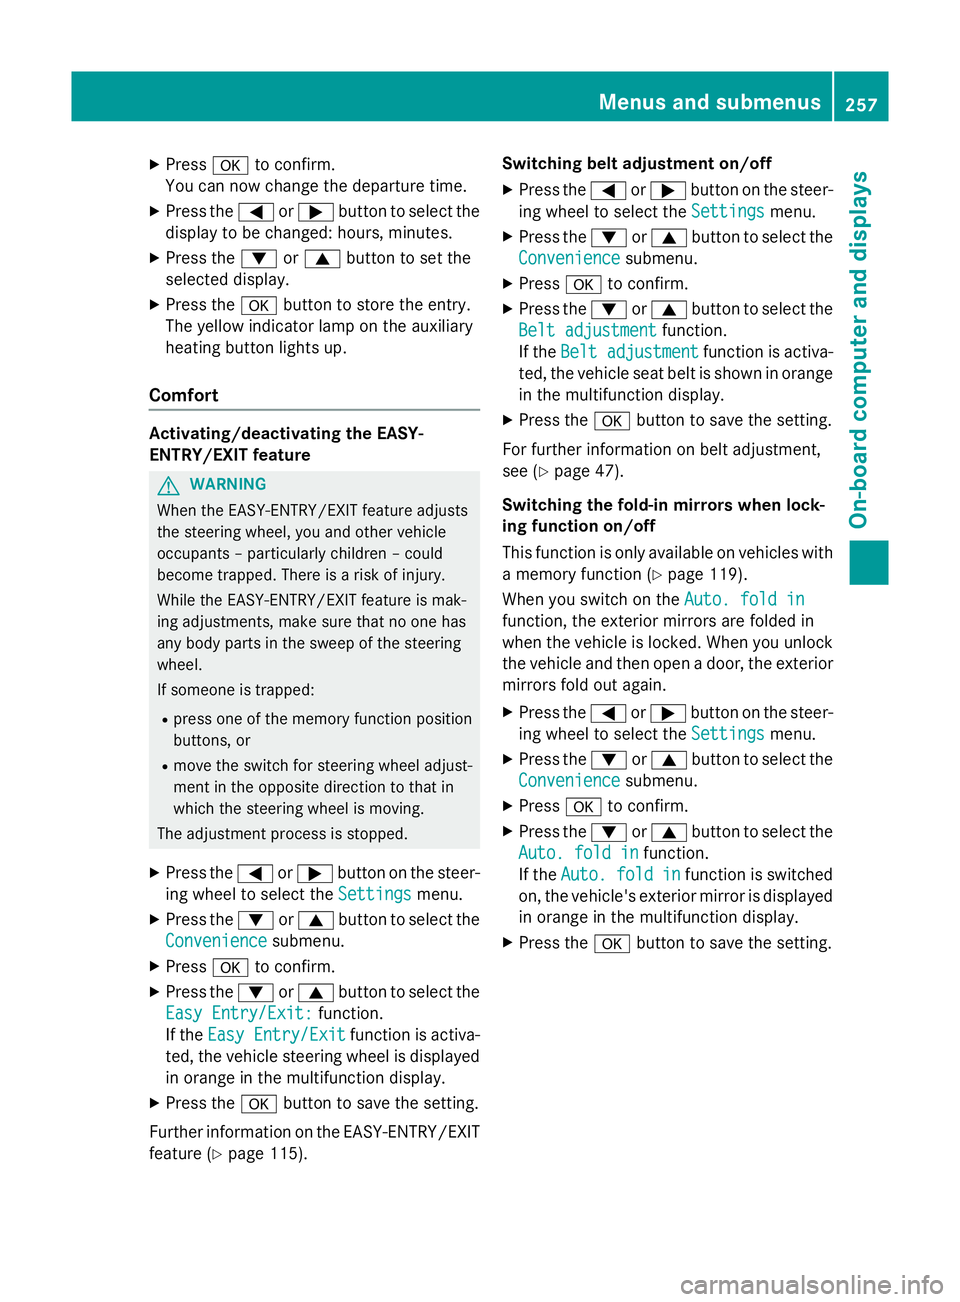
X
Press ato confirm.
You can now change the departure time.
X Press the =or; button to select the
display to be changed: hours, minutes.
X Press the :or9 button to set the
selected display.
X Press the abutton to store the entry.
The yellow indicator lamp on the auxiliary
heating button lights up.
Comfort Activating/deactivating the EASY-
ENTRY/EXIT feature
G
WARNING
When the EASY-ENTRY/EXIT feature adjusts
the steering wheel, you and other vehicle
occupants – particularly children – could
become trapped. There is a risk of injury.
While the EASY-ENTRY/EXIT feature is mak-
ing adjustments, make sure that no one has
any body parts in the sweep of the steering
wheel.
If someone is trapped:
R press one of the memory function position
buttons, or
R move the switch for steering wheel adjust-
ment in the opposite direction to that in
which the steering wheel is moving.
The adjustment process is stopped.
X Press the =or; button on the steer-
ing wheel to select the Settings
Settings menu.
X Press the :or9 button to select the
Convenience
Convenience submenu.
X Press ato confirm.
X Press the :or9 button to select the
Easy Entry/Exit: Easy Entry/Exit: function.
If the Easy Entry/Exit
Easy Entry/Exit function is activa-
ted, the vehicle steering wheel is displayed
in orange in the multifunction display.
X Press the abutton to save the setting.
Further information on the EASY-ENTRY/EXIT feature (Y page 115). Switching belt adjustment on/off
X Press the =or; button on the steer-
ing wheel to select the Settings
Settings menu.
X Press the :or9 button to select the
Convenience
Convenience submenu.
X Press ato confirm.
X Press the :or9 button to select the
Belt adjustment
Belt adjustment function.
If the Belt adjustment
Belt adjustment function is activa-
ted, the vehicle seat belt is shown in orange
in the multifunction display.
X Press the abutton to save the setting.
For further information on belt adjustment,
see (Y page 47).
Switching the fold-in mirrors when lock-
ing function on/off
This function is only available on vehicles with
a memory function (Y page 119).
When you switch on the Auto. fold in
Auto. fold in
function, the exterior mirrors are folded in
when the vehicle is locked. When you unlock
the vehicle and then open a door, the exterior mirrors fold out again.
X Press the =or; button on the steer-
ing wheel to select the Settings Settingsmenu.
X Press the :or9 button to select the
Convenience
Convenience submenu.
X Press ato confirm.
X Press the :or9 button to select the
Auto. fold in
Auto. fold in function.
If the Auto.
Auto. fold
foldin
infunction is switched
on, the vehicle's exterior mirror is displayed
in orange in the multifunction display.
X Press the abutton to save the setting. Menus and submenus
257On-board computer and displays Z
Page 283 of 417
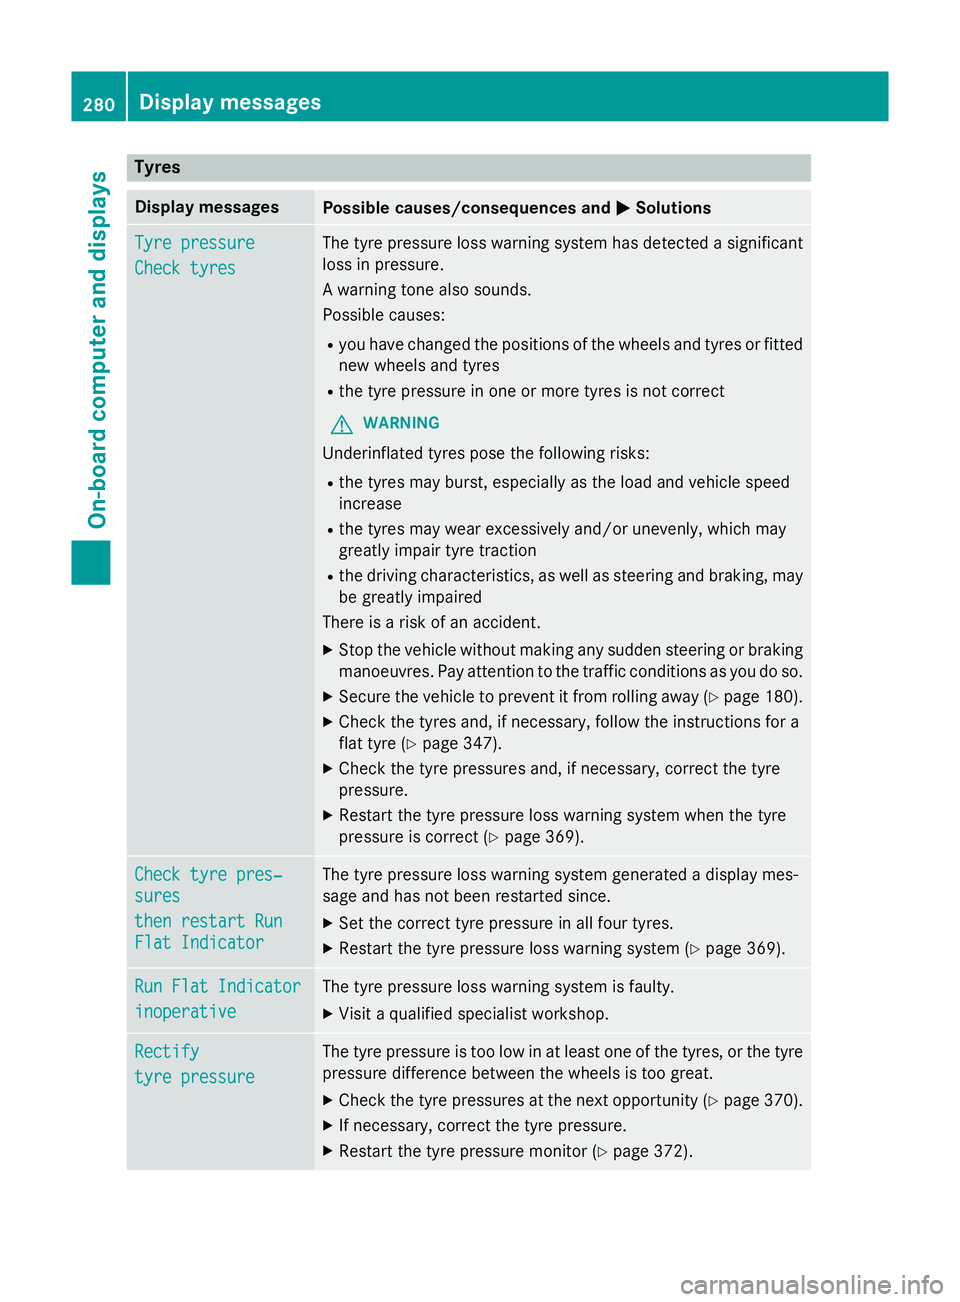
Tyres
Display messages
Possible causes/consequences and
M
MSolutions Tyre pressure
Tyre pressure
Check tyres Check tyres The tyre pressure loss warning system has detected a significant
loss in pressure.
A warning tone also sounds.
Possible causes:
R you have changed the positions of the wheels and tyres or fitted
new wheels and tyres
R the tyre pressure in one or more tyres is not correct
G WARNING
Underinflated tyres pose the following risks:
R the tyres may burst, especially as the load and vehicle speed
increase
R the tyres may wear excessively and/or unevenly, which may
greatly impair tyre traction
R the driving characteristics, as well as steering and braking, may
be greatly impaired
There is a risk of an accident.
X Stop the vehicle without making any sudden steering or braking
manoeuvres. Pay attention to the traffic conditions as you do so.
X Secure the vehicle to prevent it from rolling away (Y page 180).
X Check the tyres and, if necessary, follow the instructions for a
flat tyre (Y page 347).
X Check the tyre pressures and, if necessary, correct the tyre
pressure.
X Restart the tyre pressure loss warning system when the tyre
pressure is correct (Y page 369).Check tyre pres‐ Check tyre pres‐
sures sures
then restart Run then restart Run
Flat Indicator Flat Indicator The tyre pressure loss warning system generated a display mes-
sage and has not been restarted since.
X Set the correct tyre pressure in all four tyres.
X Restart the tyre pressure loss warning system (Y page 369).Run Flat Indicator Run Flat Indicator
inoperative inoperative The tyre pressure loss warning system is faulty.
X Visit a qualified specialist workshop. Rectify
Rectify
tyre pressure tyre pressure The tyre pressure is too low in at least one of the tyres, or the tyre
pressure difference between the wheels is too great.
X Check the tyre pressures at the next opportunity (Y page 370).
X If necessary, correct the tyre pressure.
X Restart the tyre pressure monitor (Y page 372).280
Display
messagesOn-board computer and displays
Page 336 of 417
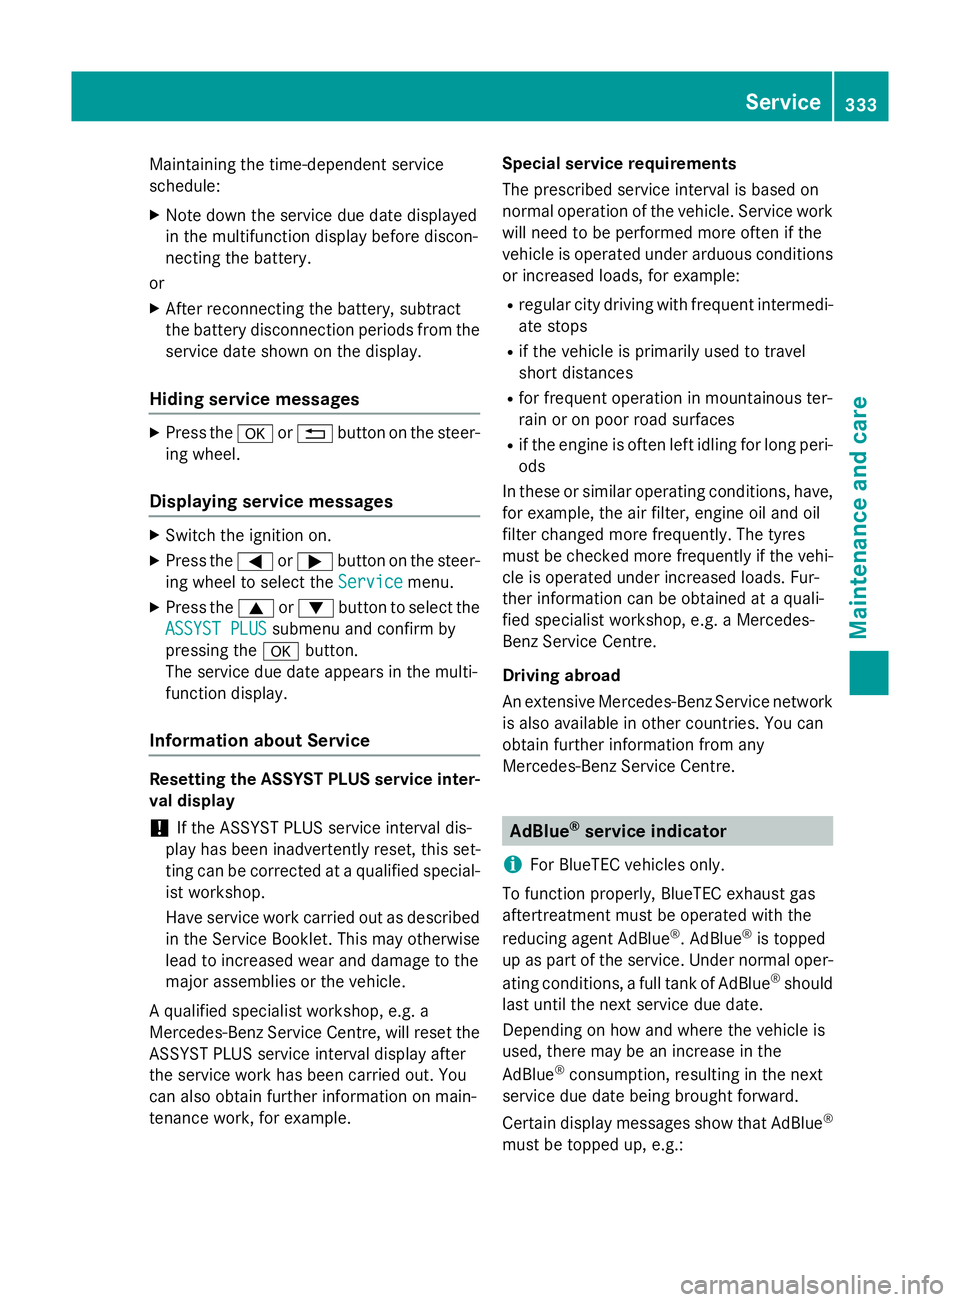
Maintaining the time-dependent service
schedule:
X Note down the service due date displayed
in the multifunction display before discon-
necting the battery.
or X After reconnecting the battery, subtract
the battery disconnection periods from the service date shown on the display.
Hiding service messages X
Press the aor% button on the steer-
ing wheel.
Displaying service messages X
Switch the ignition on.
X Press the =or; button on the steer-
ing wheel to select the Service
Service menu.
X Press the 9or: button to select the
ASSYST PLUS
ASSYST PLUS submenu and confirm by
pressing the abutton.
The service due date appears in the multi-
function display.
Information about Service Resetting the ASSYST PLUS service inter-
val display
! If the ASSYST PLUS service interval dis-
play has been inadvertently reset, this set-
ting can be corrected at a qualified special-
ist workshop.
Have service work carried out as described in the Service Booklet. This may otherwise
lead to increased wear and damage to the
major assemblies or the vehicle.
A qualified specialist workshop, e.g. a
Mercedes-Benz Service Centre, will reset the ASSYST PLUS service interval display after
the service work has been carried out. You
can also obtain further information on main-
tenance work, for example. Special service requirements
The prescribed service interval is based on
normal operation of the vehicle. Service work
will need to be performed more often if the
vehicle is operated under arduous conditions or increased loads, for example:
R regular city driving with frequent intermedi-
ate stops
R if the vehicle is primarily used to travel
short distances
R for frequent operation in mountainous ter-
rain or on poor road surfaces
R if the engine is often left idling for long peri-
ods
In these or similar operating conditions, have,
for example, the air filter, engine oil and oil
filter changed more frequently. The tyres
must be checked more frequently if the vehi-
cle is operated under increased loads. Fur-
ther information can be obtained at a quali-
fied specialist workshop, e.g. a Mercedes-
Benz Service Centre.
Driving abroad
An extensive Mercedes-Benz Service network is also available in other countries. You can
obtain further information from any
Mercedes-Benz Service Centre. AdBlue
®
service indicator
i For BlueTEC vehicles only.
To function properly, BlueTEC exhaust gas
aftertreatment must be operated with the
reducing agent AdBlue ®
. AdBlue ®
is topped
up as part of the service. Under normal oper-
ating conditions, a full tank of AdBlue ®
should
last until the next service due date.
Depending on how and where the vehicle is
used, there may be an increase in the
AdBlue ®
consumption, resulting in the next
service due date being brought forward.
Certain display messages show that AdBlue ®
must be topped up, e.g.: Service
333Maintenance and care Z