2014 MERCEDES-BENZ CLS SHOOTING BRAKE AUX
[x] Cancel search: AUXPage 154 of 417
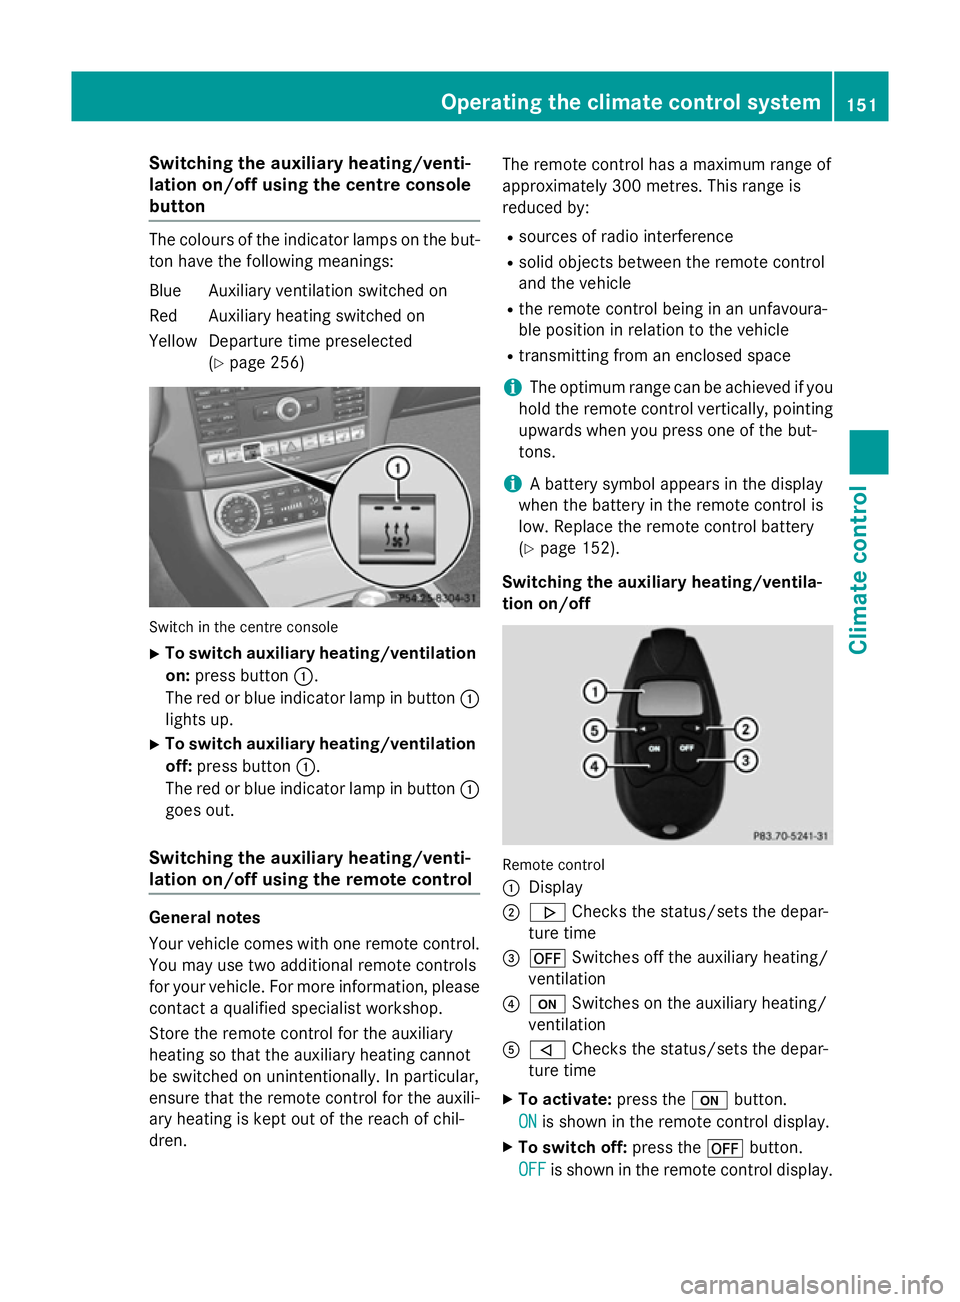
Switching the auxiliary heating/venti-
lation on/off using the centre console
button The colours of the indicator lamps on the but-
ton have the following meanings:
Blue Auxiliary ventilation switched on
Red Auxiliary heating switched on
Yellow Departure time preselected (Ypage 256) Switch in the centre console
X To switch auxiliary heating/ventilation
on: press button :.
The red or blue indicator lamp in button :
lights up.
X To switch auxiliary heating/ventilation
off: press button :.
The red or blue indicator lamp in button :
goes out.
Switching the auxiliary heating/venti-
lation on/off using the remote control General notes
Your vehicle comes with one remote control.
You may use two additional remote controls
for your vehicle. For more information, please
contact a qualified specialist workshop.
Store the remote control for the auxiliary
heating so that the auxiliary heating cannot
be switched on unintentionally. In particular,
ensure that the remote control for the auxili-
ary heating is kept out of the reach of chil-
dren. The remote control has a maximum range of
approximately 300 metres. This range is
reduced by:
R sources of radio interference
R solid objects between the remote control
and the vehicle
R the remote control being in an unfavoura-
ble position in relation to the vehicle
R transmitting from an enclosed space
i The optimum range can be achieved if you
hold the remote control vertically, pointing
upwards when you press one of the but-
tons.
i A battery symbol appears in the display
when the battery in the remote control is
low. Replace the remote control battery
(Y page 152).
Switching the auxiliary heating/ventila-
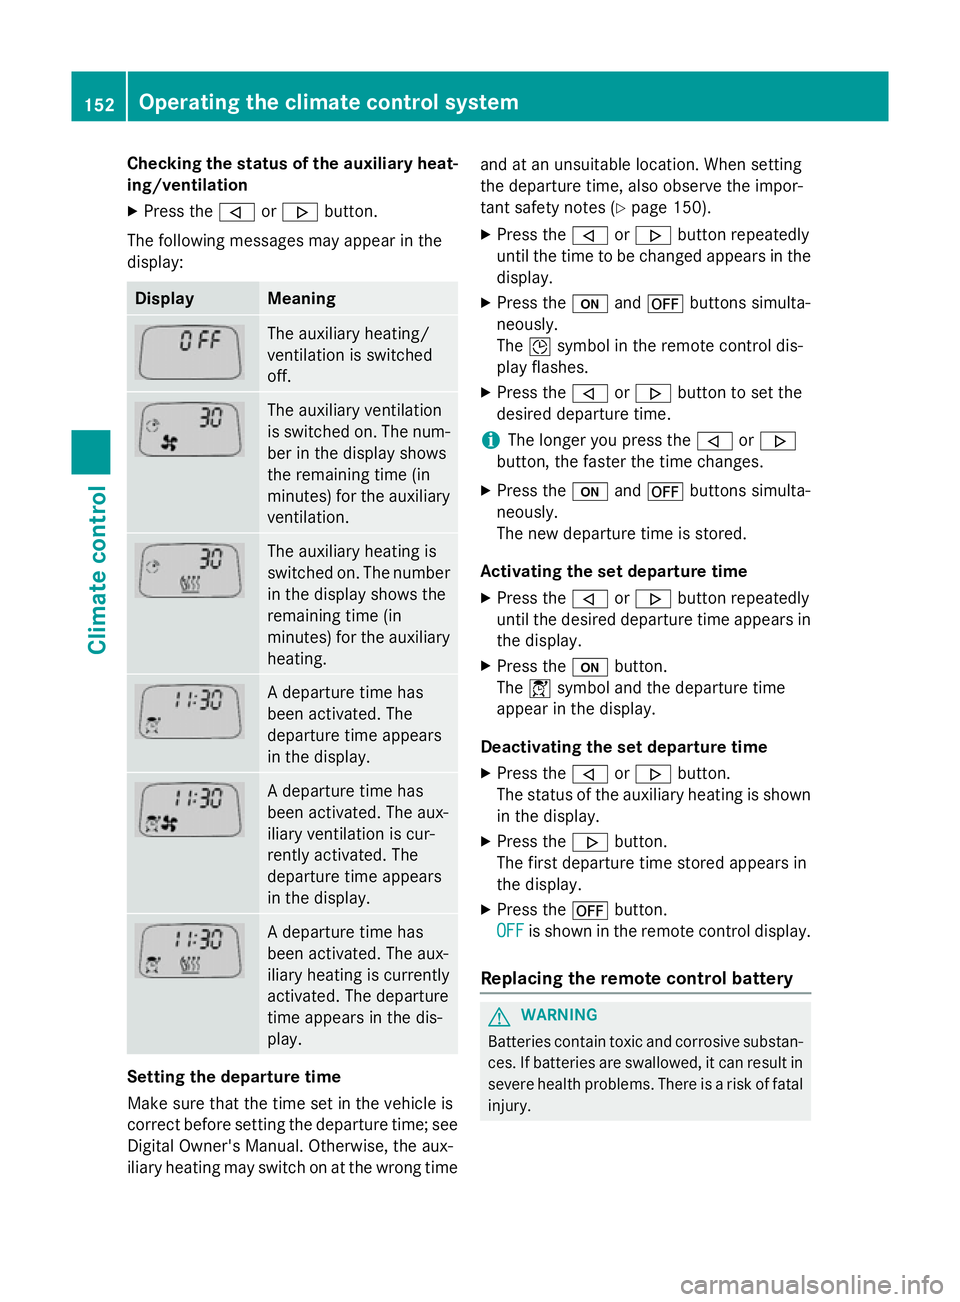
tion on/off Remote control
:
Display
; . Checks the status/sets the depar-
ture time
= ^ Switches off the auxiliary heating/
ventilation
? u Switches on the auxiliary heating/
ventilation
A , Checks the status/sets the depar-
ture time
X To activate: press theubutton.
ON
ON is shown in the remote control display.
X To switch off: press the^button.
OFF OFF is shown in the remote control display. Operating the climate control system
151Climate control Z
Page 155 of 417
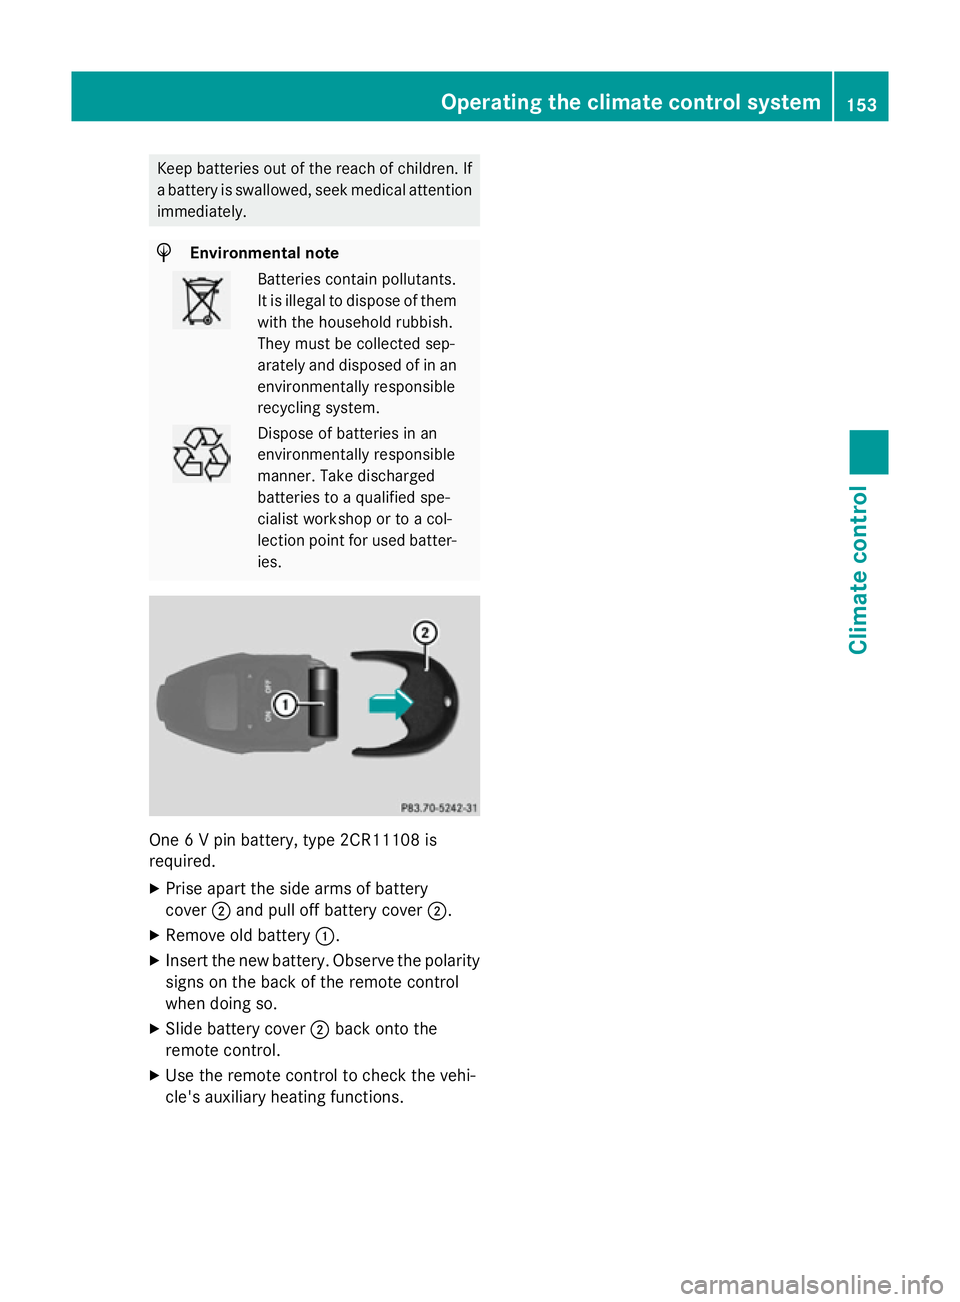
Checking the status of the auxiliary heat-
ing/ventilation
X Press the ,or. button.
The following messages may appear in the
display: Display Meaning
The auxiliary heating/
ventilation is switched
off.
The auxiliary ventilation
is switched on. The num-
ber in the display shows
the remaining time (in
minutes) for the auxiliary
ventilation. The auxiliary heating is
switched on. The number
in the display shows the
remaining time (in
minutes) for the auxiliary heating. A departure time has
been activated. The
departure time appears
in the display.
A departure time has
been activated. The aux-
iliary ventilation is cur-
rently activated. The
departure time appears
in the display.
A departure time has
been activated. The aux-
iliary heating is currently
activated. The departure
time appears in the dis-
play.
Setting the departure time
Make sure that the time set in the vehicle is
correct before setting the departure time; see Digital Owner's Manual. Otherwise, the aux-
iliary heating may switch on at the wrong time and at an unsuitable location. When setting
the departure time, also observe the impor-
tant safety notes (Y
page 150).
X Press the ,or. button repeatedly
until the time to be changed appears in the display.
X Press the uand^ buttons simulta-
neously.
The Îsymbol in the remote control dis-
play flashes.
X Press the ,or. button to set the
desired departure time.
i The longer you press the
,or.
button, the faster the time changes.
X Press the uand^ buttons simulta-
neously.
The new departure time is stored.
Activating the set departure time X Press the ,or. button repeatedly
until the desired departure time appears in
the display.
X Press the ubutton.
The Ísymbol and the departure time
appear in the display.
Deactivating the set departure time
X Press the ,or. button.
The status of the auxiliary heating is shown in the display.
X Press the .button.
The first departure time stored appears in
the display.
X Press the ^button.
OFF
OFF is shown in the remote control display.
Replacing the remote control battery G
WARNING
Batteries contain toxic and corrosive substan- ces. If batteries are swallowed, it can result in
severe health problems. There is a risk of fatal injury. 152
Operating the climate control systemClimate control
Page 156 of 417
Keep batteries out of the reach of children. If
a battery is swallowed, seek medical attention
immediately. H
Environmental note Batteries contain pollutants.
It is illegal to dispose of them with the household rubbish.
They must be collected sep-
arately and disposed of in anenvironmentally responsible
recycling system. Dispose of batteries in an
environmentally responsible
manner. Take discharged
batteries to a qualified spe-
cialist workshop or to a col-
lection point for used batter-
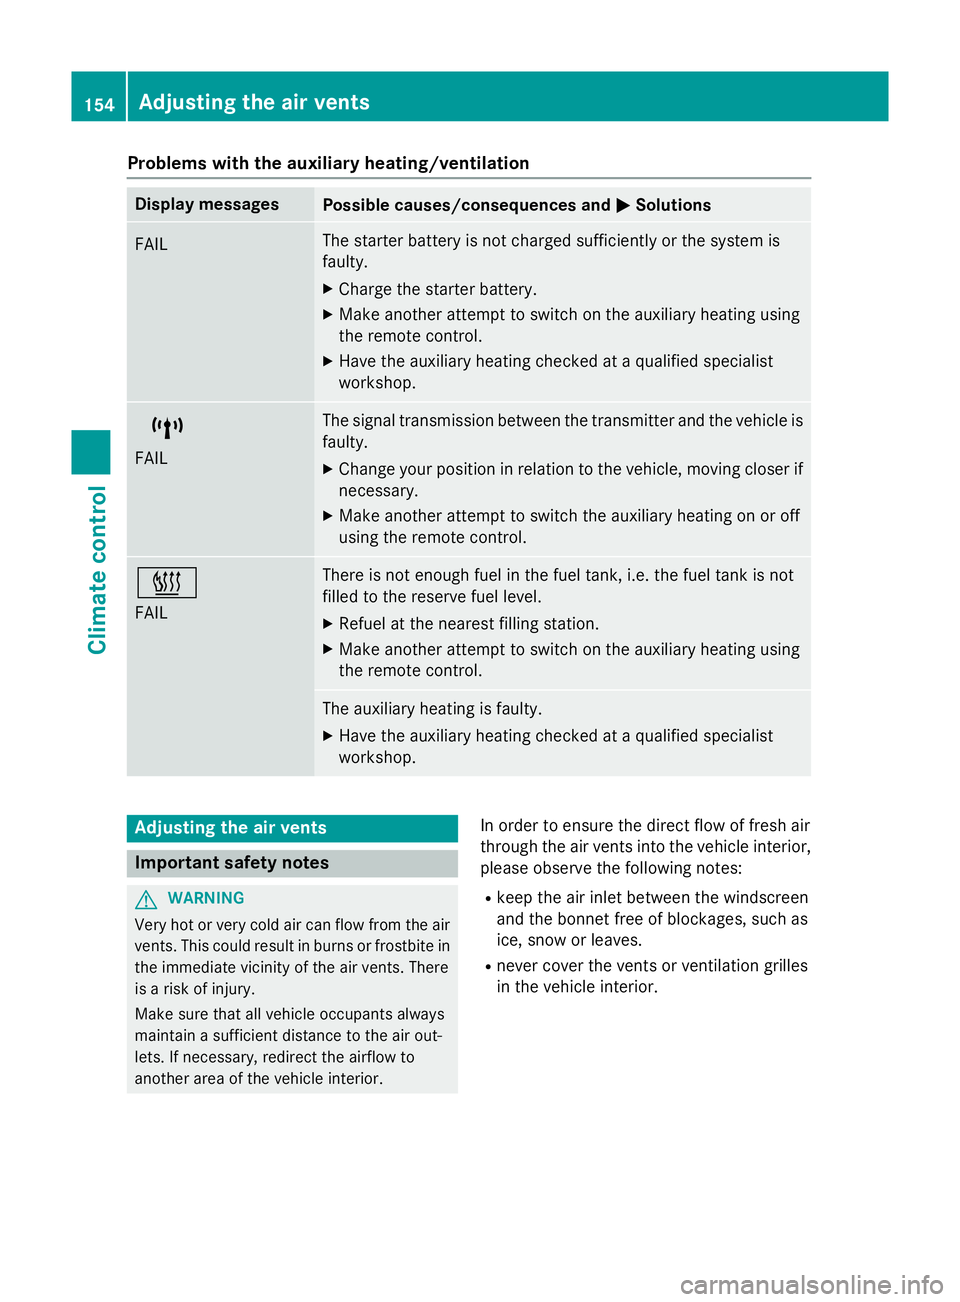
ies. One 6 V pin battery, type 2CR11108 is
required.
X Prise apart the side arms of battery
cover ;and pull off battery cover ;.
X Remove old battery :.
X Insert the new battery. Observe the polarity
signs on the back of the remote control
when doing so.
X Slide battery cover ;back onto the
remote control.
X Use the remote control to check the vehi-
cle's auxiliary heating functions. Operating the climate control system
153Climate control Z
Page 157 of 417
Problems with the auxiliary heating/ventilation
Display messages
Possible causes/consequences and
M
MSolutions FAIL The starter battery is not charged sufficiently or the system is
faulty.
X Charge the starter battery.
X Make another attempt to switch on the auxiliary heating using
the remote control.
X Have the auxiliary heating checked at a qualified specialist
workshop. $
FAIL The signal transmission between the transmitter and the vehicle is
faulty.
X Change your position in relation to the vehicle, moving closer if
necessary.
X Make another attempt to switch the auxiliary heating on or off
using the remote control. ©
FAIL There is not enough fuel in the fuel tank, i.e. the fuel tank is not
filled to the reserve fuel level.
X Refuel at the nearest filling station.
X Make another attempt to switch on the auxiliary heating using
the remote control. The auxiliary heating is faulty.
X Have the auxiliary heating checked at a qualified specialist
workshop. Adjusting the air vents
Important safety notes
G
WARNING
Very hot or very cold air can flow from the air vents. This could result in burns or frostbite in the immediate vicinity of the air vents. There
is a risk of injury.
Make sure that all vehicle occupants always
maintain a sufficient distance to the air out-
lets. If necessary, redirect the airflow to
another area of the vehicle interior. In order to ensure the direct flow of fresh air
through the air vents into the vehicle interior,
please observe the following notes:
R keep the air inlet between the windscreen
and the bonnet free of blockages, such as
ice, snow or leaves.
R never cover the vents or ventilation grilles
in the vehicle interior. 154
Adjusting the air ventsClimate control
Page 180 of 417
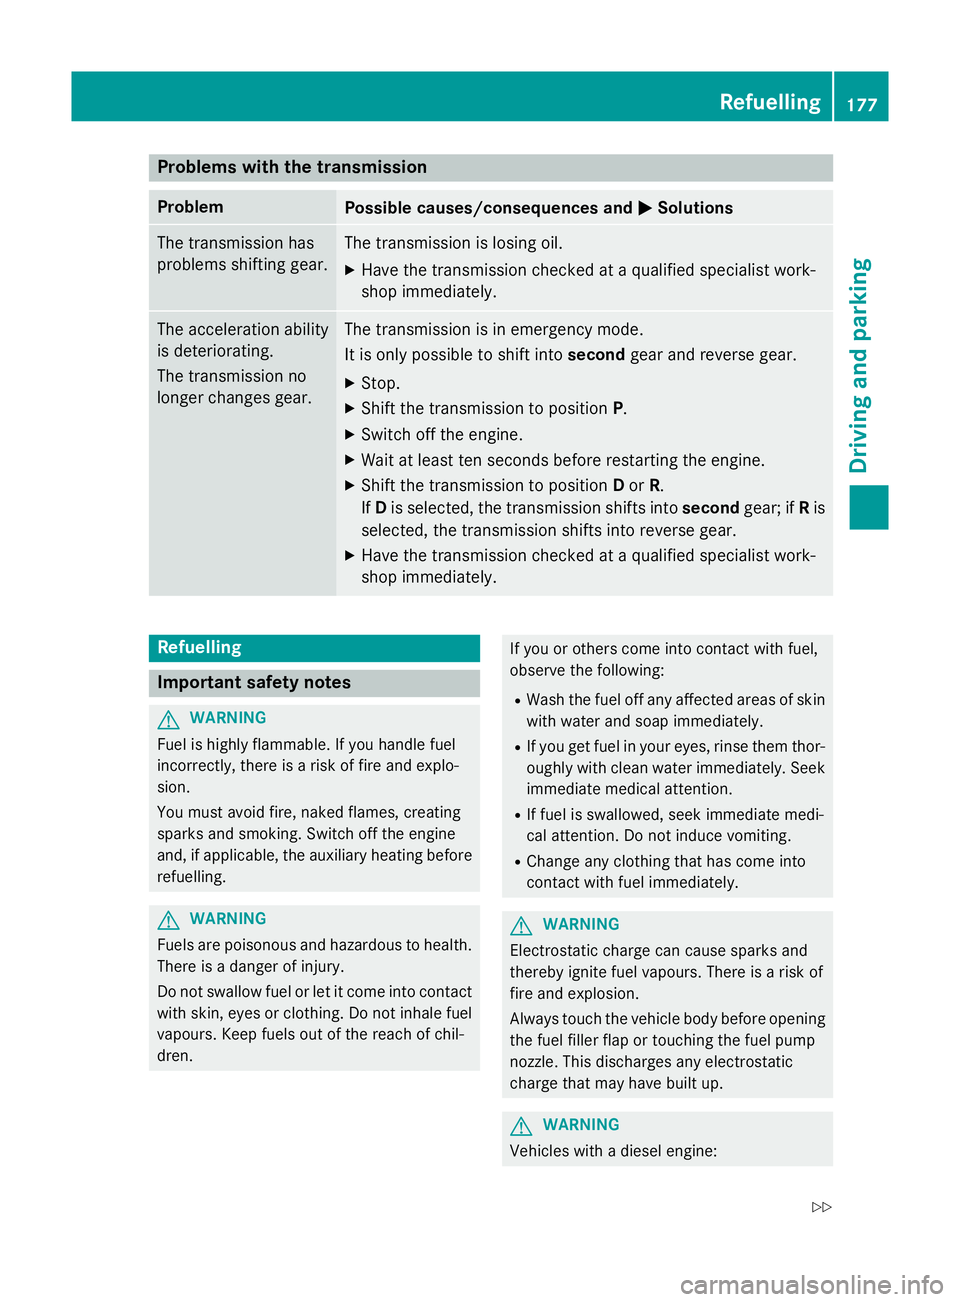
Problems with the transmission
Problem
Possible causes/consequences and
M
MSolutions The transmission has
problems shifting gear. The transmission is losing oil.
X Have the transmission checked at a qualified specialist work-
shop immediately. The acceleration ability
is deteriorating.
The transmission no
longer changes gear. The transmission is in emergency mode.
It is only possible to shift into
secondgear and reverse gear.
X Stop.
X Shift the transmission to position P.
X Switch off the engine.
X Wait at least ten seconds before restarting the engine.
X Shift the transmission to position Dor R.
If D is selected, the transmission shifts into secondgear; ifRis
selected, the transmission shifts into reverse gear.
X Have the transmission checked at a qualified specialist work-
shop immediately. Refuelling
Important safety notes
G
WARNING
Fuel is highly flammable. If you handle fuel
incorrectly, there is a risk of fire and explo-
sion.
You must avoid fire, naked flames, creating
sparks and smoking. Switch off the engine
and, if applicable, the auxiliary heating before refuelling. G
WARNING
Fuels are poisonous and hazardous to health. There is a danger of injury.
Do not swallow fuel or let it come into contact
with skin, eyes or clothing. Do not inhale fuel
vapours. Keep fuels out of the reach of chil-
dren. If you or others come into contact with fuel,
observe the following:
R Wash the fuel off any affected areas of skin
with water and soap immediately.
R If you get fuel in your eyes, rinse them thor-
oughly with clean water immediately. Seek
immediate medical attention.
R If fuel is swallowed, seek immediate medi-
cal attention. Do not induce vomiting.
R Change any clothing that has come into
contact with fuel immediately. G
WARNING
Electrostatic charge can cause sparks and
thereby ignite fuel vapours. There is a risk of
fire and explosion.
Always touch the vehicle body before opening the fuel filler flap or touching the fuel pump
nozzle. This discharges any electrostatic
charge that may have built up. G
WARNING
Vehicles with a diesel engine: Refuelling
177Driving and parking
Z
Page 188 of 417
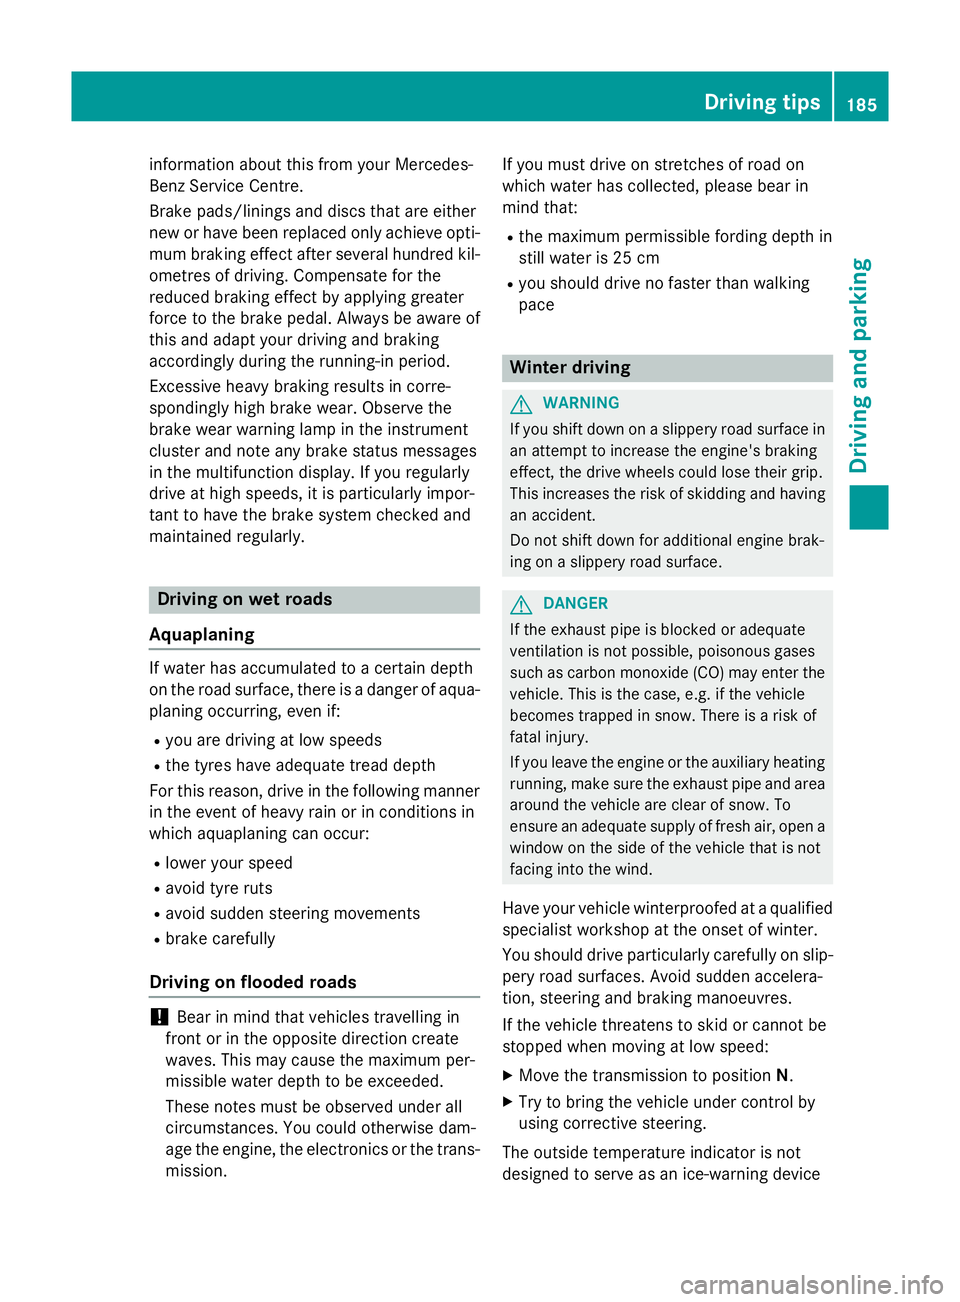
information about this from your Mercedes-
Benz Service Centre.
Brake pads/linings and discs that are either
new or have been replaced only achieve opti- mum braking effect after several hundred kil-
ometres of driving. Compensate for the
reduced braking effect by applying greater
force to the brake pedal. Always be aware of
this and adapt your driving and braking
accordingly during the running-in period.
Excessive heavy braking results in corre-
spondingly high brake wear. Observe the
brake wear warning lamp in the instrument
cluster and note any brake status messages
in the multifunction display. If you regularly
drive at high speeds, it is particularly impor-
tant to have the brake system checked and
maintained regularly. Driving on wet roads
Aquaplaning If water has accumulated to a certain depth
on the road surface, there is a danger of aqua- planing occurring, even if:
R you are driving at low speeds
R the tyres have adequate tread depth
For this reason, drive in the following manner in the event of heavy rain or in conditions in
which aquaplaning can occur:
R lower your speed
R avoid tyre ruts
R avoid sudden steering movements
R brake carefully
Driving on flooded roads !
Bear in mind that vehicles travelling in
front or in the opposite direction create
waves. This may cause the maximum per-
missible water depth to be exceeded.
These notes must be observed under all
circumstances. You could otherwise dam-
age the engine, the electronics or the trans- mission. If you must drive on stretches of road on
which water has collected, please bear in
mind that:
R the maximum permissible fording depth in
still water is 25 cm
R you should drive no faster than walking
pace Winter driving
G
WARNING
If you shift down on a slippery road surface in an attempt to increase the engine's braking
effect, the drive wheels could lose their grip.
This increases the risk of skidding and having
an accident.
Do not shift down for additional engine brak-
ing on a slippery road surface. G
DANGER
If the exhaust pipe is blocked or adequate
ventilation is not possible, poisonous gases
such as carbon monoxide (CO) may enter the vehicle. This is the case, e.g. if the vehicle
becomes trapped in snow. There is a risk of
fatal injury.
If you leave the engine or the auxiliary heating
running, make sure the exhaust pipe and area
around the vehicle are clear of snow. To
ensure an adequate supply of fresh air, open a window on the side of the vehicle that is not
facing into the wind.
Have your vehicle winterproofed at a qualified specialist workshop at the onset of winter.
You should drive particularly carefully on slip-
pery road surfaces. Avoid sudden accelera-
tion, steering and braking manoeuvres.
If the vehicle threatens to skid or cannot be
stopped when moving at low speed:
X Move the transmission to position N.
X Try to bring the vehicle under control by
using corrective steering.
The outside temperature indicator is not
designed to serve as an ice-warning device Driving tips
185Driving and parking Z
Page 250 of 417
If you press and hold the
9or:
button, the rapid scrolling speed is
increased. Not all audio devices or media
support this function.
If track information is stored on the audio
player or medium, the multifunction display
will show the number and title of the track.
The current track does not appear in audio
AUX mode (Auxiliary audio mode: external
audio source connected).
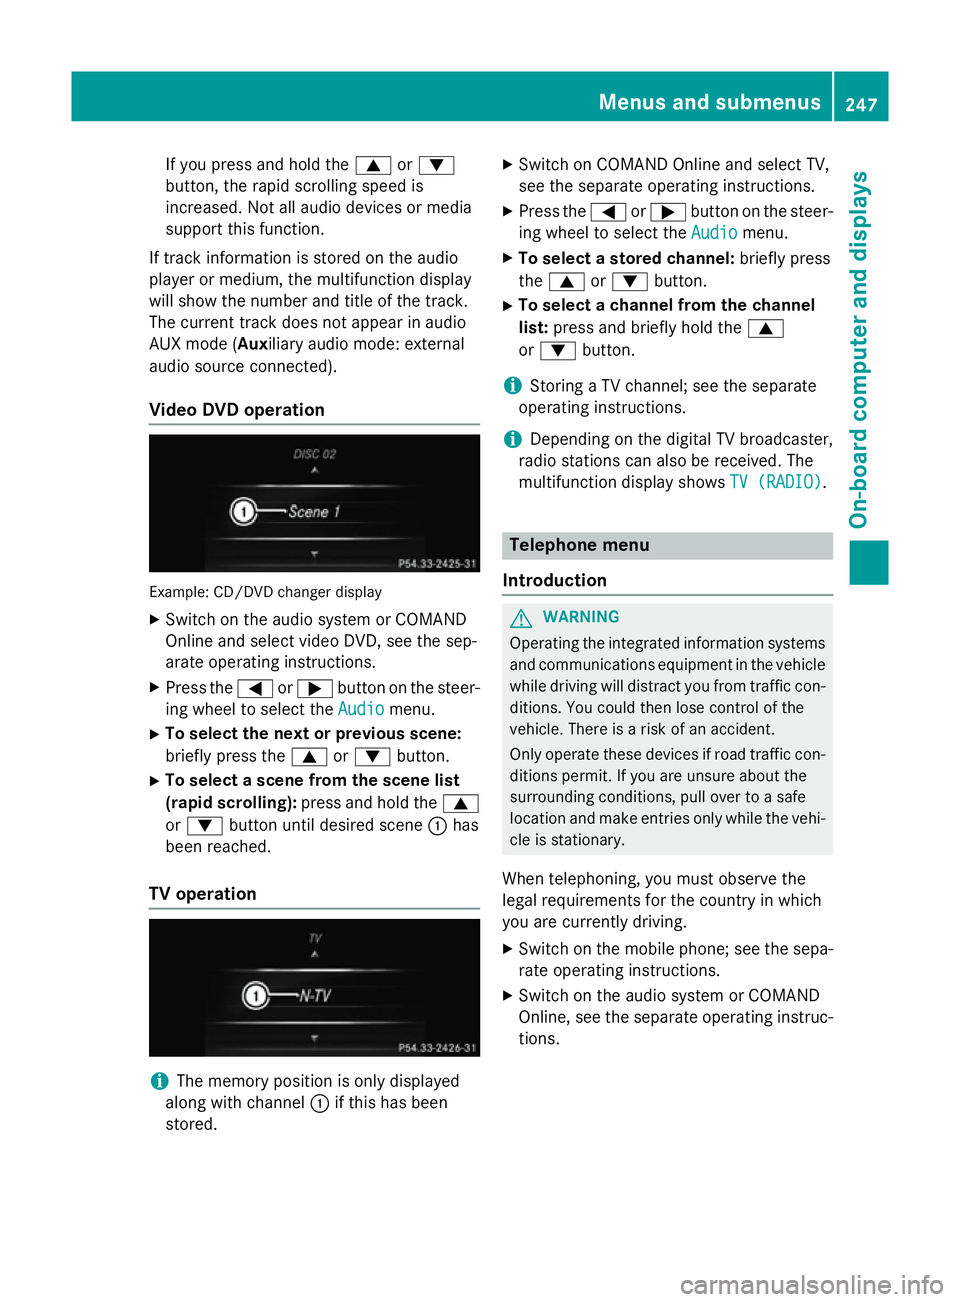
Video DVD operation Example: CD/DVD changer display
X Switch on the audio system or COMAND
Online and select video DVD, see the sep-
arate operating instructions.
X Press the =or; button on the steer-
ing wheel to select the Audio
Audio menu.
X To select the next or previous scene:
briefly press the 9or: button.
X To select a scene from the scene list
(rapid scrolling): press and hold the 9
or : button until desired scene :has
been reached.
TV operation i
The memory position is only displayed
along with channel :if this has been
stored. X
Switch on COMAND Online and select TV,
see the separate operating instructions.
X Press the =or; button on the steer-
ing wheel to select the Audio
Audio menu.
X To select a stored channel: briefly press
the 9 or: button.
X To select a channel from the channel
list: press and briefly hold the 9
or : button.
i Storing a TV channel; see the separate
operating instructions.
i Depending on the digital TV broadcaster,
radio stations can also be received. The
multifunction display shows TV (RADIO) TV (RADIO). Telephone menu
Introduction G
WARNING
Operating the integrated information systems and communications equipment in the vehicle
while driving will distract you from traffic con-
ditions. You could then lose control of the
vehicle. There is a risk of an accident.
Only operate these devices if road traffic con-
ditions permit. If you are unsure about the
surrounding conditions, pull over to a safe
location and make entries only while the vehi-
cle is stationary.
When telephoning, you must observe the
legal requirements for the country in which
you are currently driving.
X Switch on the mobile phone; see the sepa-
rate operating instructions.
X Switch on the audio system or COMAND
Online, see the separate operating instruc-
tions. Menus and submenus
247On-board computer and displays Z
Page 254 of 417
X
Press the abutton.
The current selection is displayed.
X To activate/deactivate: press thea
button again.
If the Blind Spot Assist Sensors deac‐
Blind Spot Assist Sensors deac‐
tivated
tivated orAct. B. Spot Assist Sen‐
Act. B. Spot Assist Sen‐
sors deactivated
sors deactivated message appears, the
radar sensor system is deactivated.
X Switch on the radar sensor system
(Y page 255).
Further information about Blind Spot Assist
(Y page 223).
Further information about Active Blind Spot
Assist (Y page 227).
Activating/deactivating Lane Keeping
Assist X
Press the =or; button on the steer-
ing wheel to select the Assist. Assist.menu.
X Press the 9or: button to select
Lane Keep. Assist
Lane Keep. Assist
X Press the abutton.
The current selection is displayed.
X Press ato confirm.
X Press the :or9 button to set Off
Off,
Standard
Standard orAdaptive
Adaptive.
X Press the abutton to save the setting.
When Lane Keeping Assist or Active Lane
Keeping Assist is activated, the multifunc-
tion display shows the lane markings as
bright lines in the assistance graphic.
For further information about Lane Keeping
Assist, see (Y page 225).
For further information about Active Lane
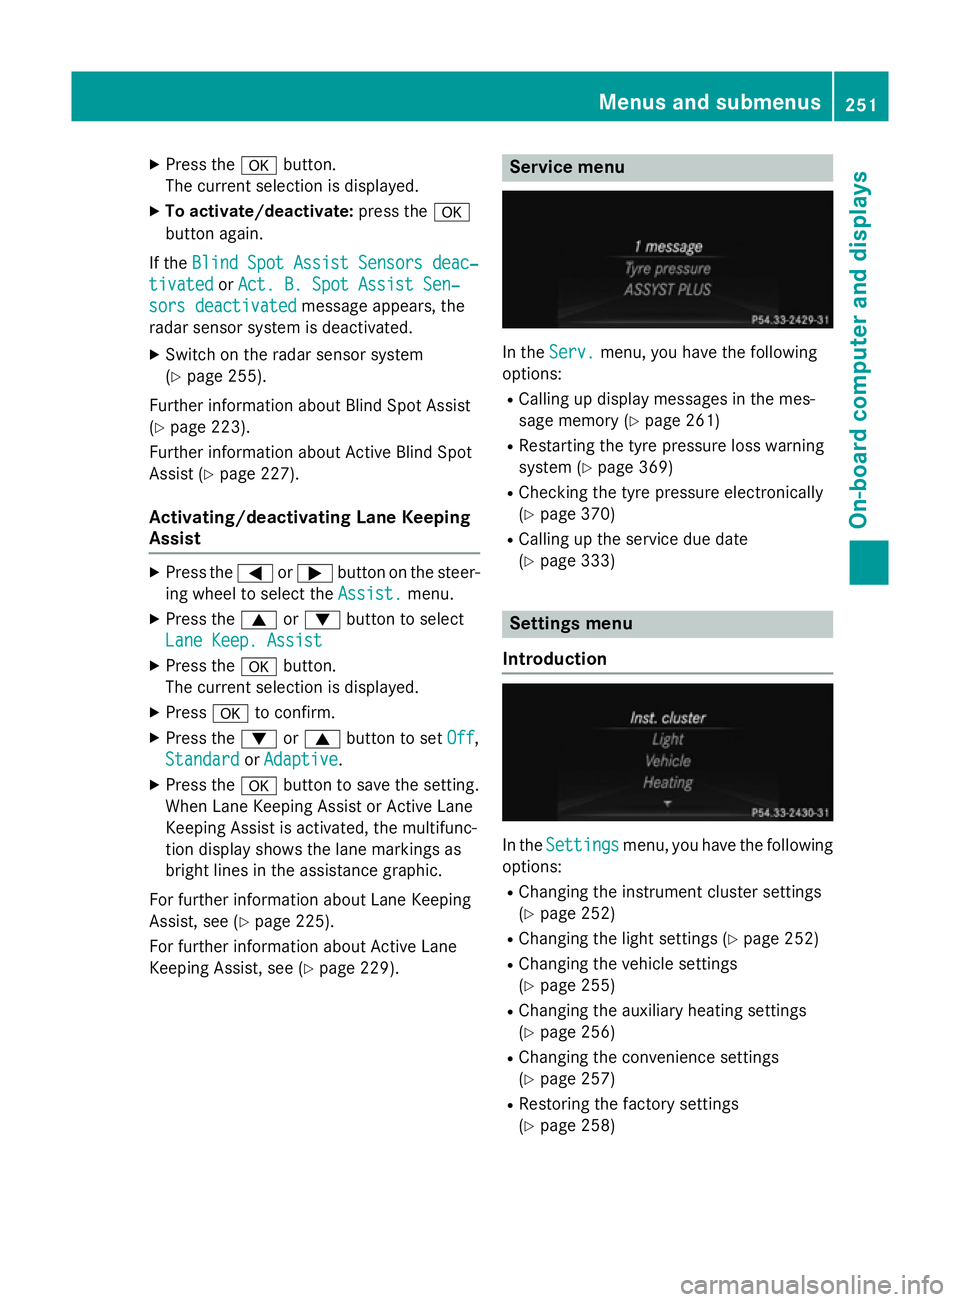
Keeping Assist, see (Y page 229). Service menu
In the
Serv. Serv. menu, you have the following
options:
R Calling up display messages in the mes-
sage memory (Y page 261)
R Restarting the tyre pressure loss warning
system (Y page 369)
R Checking the tyre pressure electronically
(Y page 370)
R Calling up the service due date
(Y page 333) Settings menu
Introduction In the
Settings Settings menu, you have the following
options:
R Changing the instrument cluster settings
(Y page 252)
R Changing the light settings (Y page 252)
R Changing the vehicle settings
(Y page 255)
R Changing the auxiliary heating settings
(Y page 256)
R Changing the convenience settings
(Y page 257)
R Restoring the factory settings
(Y page 258) Menus and submenus
251On-board computer and displays Z