2014 MERCEDES-BENZ CLS SHOOTING BRAKE display
[x] Cancel search: displayPage 298 of 417
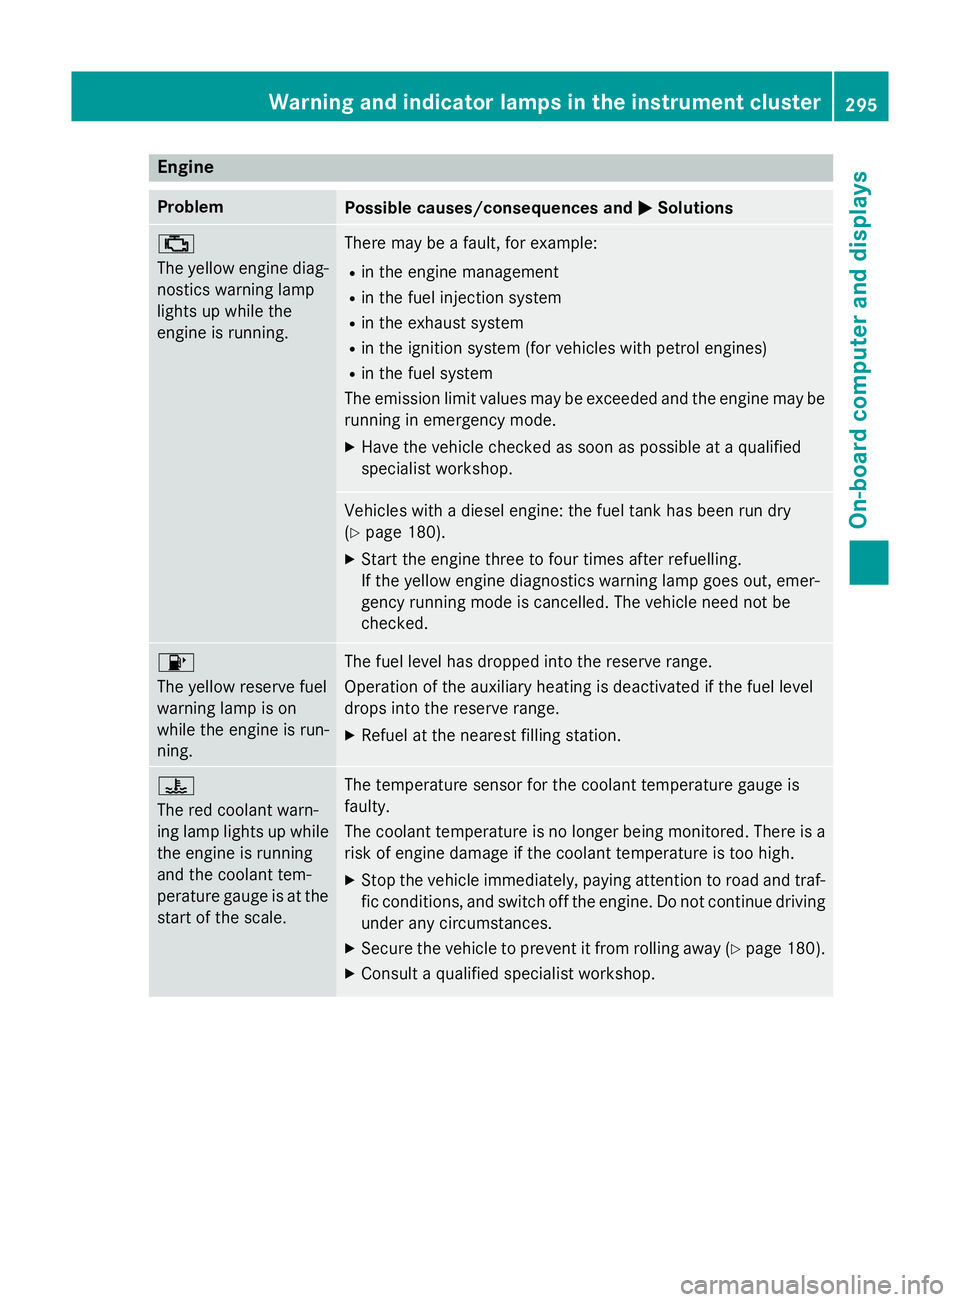
Engine
Problem
Possible causes/consequences and
M
MSolutions ;
The yellow engine diag-
nostics warning lamp
lights up while the
engine is running. There may be a fault, for example:
R in the engine management
R in the fuel injection system
R in the exhaust system
R in the ignition system (for vehicles with petrol engines)
R in the fuel system
The emission limit values may be exceeded and the engine may be running in emergency mode.
X Have the vehicle checked as soon as possible at a qualified
specialist workshop. Vehicles with a diesel engine: the fuel tank has been run dry
(Y
page 180).
X Start the engine three to four times after refuelling.
If the yellow engine diagnostics warning lamp goes out, emer-
gency running mode is cancelled. The vehicle need not be
checked. 8
The yellow reserve fuel
warning lamp is on
while the engine is run-
ning.
The fuel level has dropped into the reserve range.
Operation of the auxiliary heating is deactivated if the fuel level
drops into the reserve range.
X Refuel at the nearest filling station. ?
The red coolant warn-
ing lamp lights up while
the engine is running
and the coolant tem-
perature gauge is at the start of the scale. The temperature sensor for the coolant temperature gauge is
faulty.
The coolant temperature is no longer being monitored. There is a risk of engine damage if the coolant temperature is too high.
X Stop the vehicle immediately, paying attention to road and traf-
fic conditions, and switch off the engine. Do not continue driving
under any circumstances.
X Secure the vehicle to prevent it from rolling away (Y page 180).
X Consult a qualified specialist workshop. Warning and indicator lamps in the instrument cluster
295On-board computer and displays Z
Page 299 of 417
Problem
Possible causes/consequences and
M
MSolutions ?
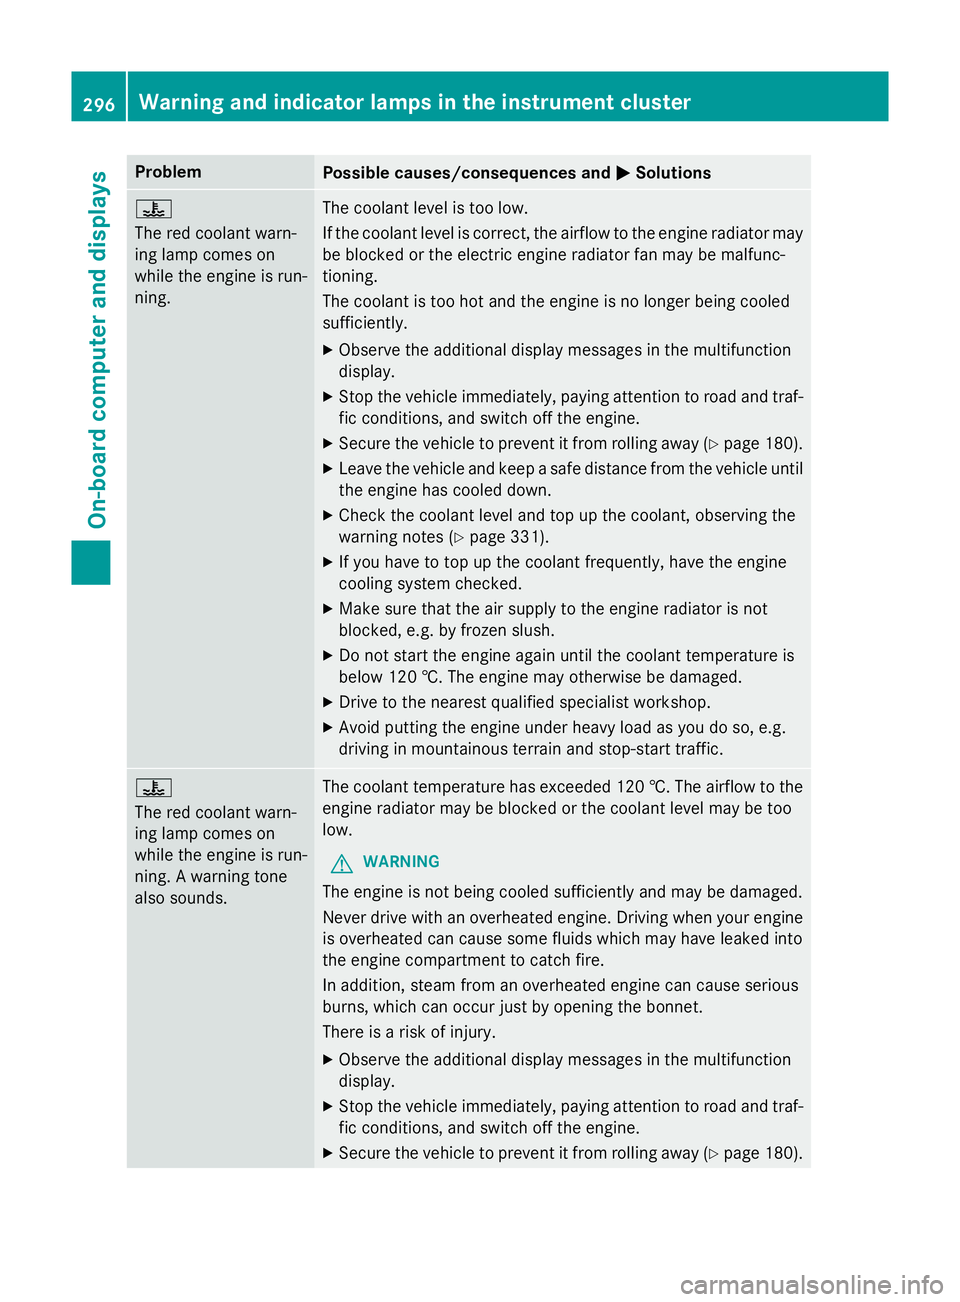
The red coolant warn-
ing lamp comes on
while the engine is run-
ning.
The coolant level is too low.
If the coolant level is correct, the airflow to the engine radiator may
be blocked or the electric engine radiator fan may be malfunc-
tioning.
The coolant is too hot and the engine is no longer being cooled
sufficiently.
X Observe the additional display messages in the multifunction
display.
X Stop the vehicle immediately, paying attention to road and traf-
fic conditions, and switch off the engine.
X Secure the vehicle to prevent it from rolling away (Y page 180).
X Leave the vehicle and keep a safe distance from the vehicle until
the engine has cooled down.
X Check the coolant level and top up the coolant, observing the
warning notes (Y page 331).
X If you have to top up the coolant frequently, have the engine
cooling system checked.
X Make sure that the air supply to the engine radiator is not
blocked, e.g. by frozen slush.
X Do not start the engine again until the coolant temperature is
below 120 †. The engine may otherwise be damaged.
X Drive to the nearest qualified specialist workshop.
X Avoid putting the engine under heavy load as you do so, e.g.
driving in mountainous terrain and stop-start traffic. ?
The red coolant warn-
ing lamp comes on
while the engine is run-
ning. A warning tone
also sounds.
The coolant temperature has exceeded 120 †. The airflow to the
engine radiator may be blocked or the coolant level may be too
low.
G WARNING
The engine is not being cooled sufficiently and may be damaged.
Never drive with an overheated engine. Driving when your engine is overheated can cause some fluids which may have leaked into
the engine compartment to catch fire.
In addition, steam from an overheated engine can cause serious
burns, which can occur just by opening the bonnet.
There is a risk of injury.
X Observe the additional display messages in the multifunction
display.
X Stop the vehicle immediately, paying attention to road and traf-
fic conditions, and switch off the engine.
X Secure the vehicle to prevent it from rolling away (Y page 180).296
Warning and indicator lamps in the instrument clusterOn-board computer and displays
Page 300 of 417
Problem
Possible causes/consequences and
M
MSolutions X
Leave the vehicle and keep a safe distance from the vehicle until
the engine has cooled down.
X Check the coolant level and top up the coolant, observing the
warning notes (Y page 331).
X If you have to top up the coolant frequently, have the engine
cooling system checked.
X Make sure that the air supply to the engine radiator is not
blocked, e.g. by frozen slush.
X If the coolant temperature is below 120 †, you can continue
driving to the nearest qualified specialist workshop.
X Avoid putting the engine under heavy load as you do so, e.g.
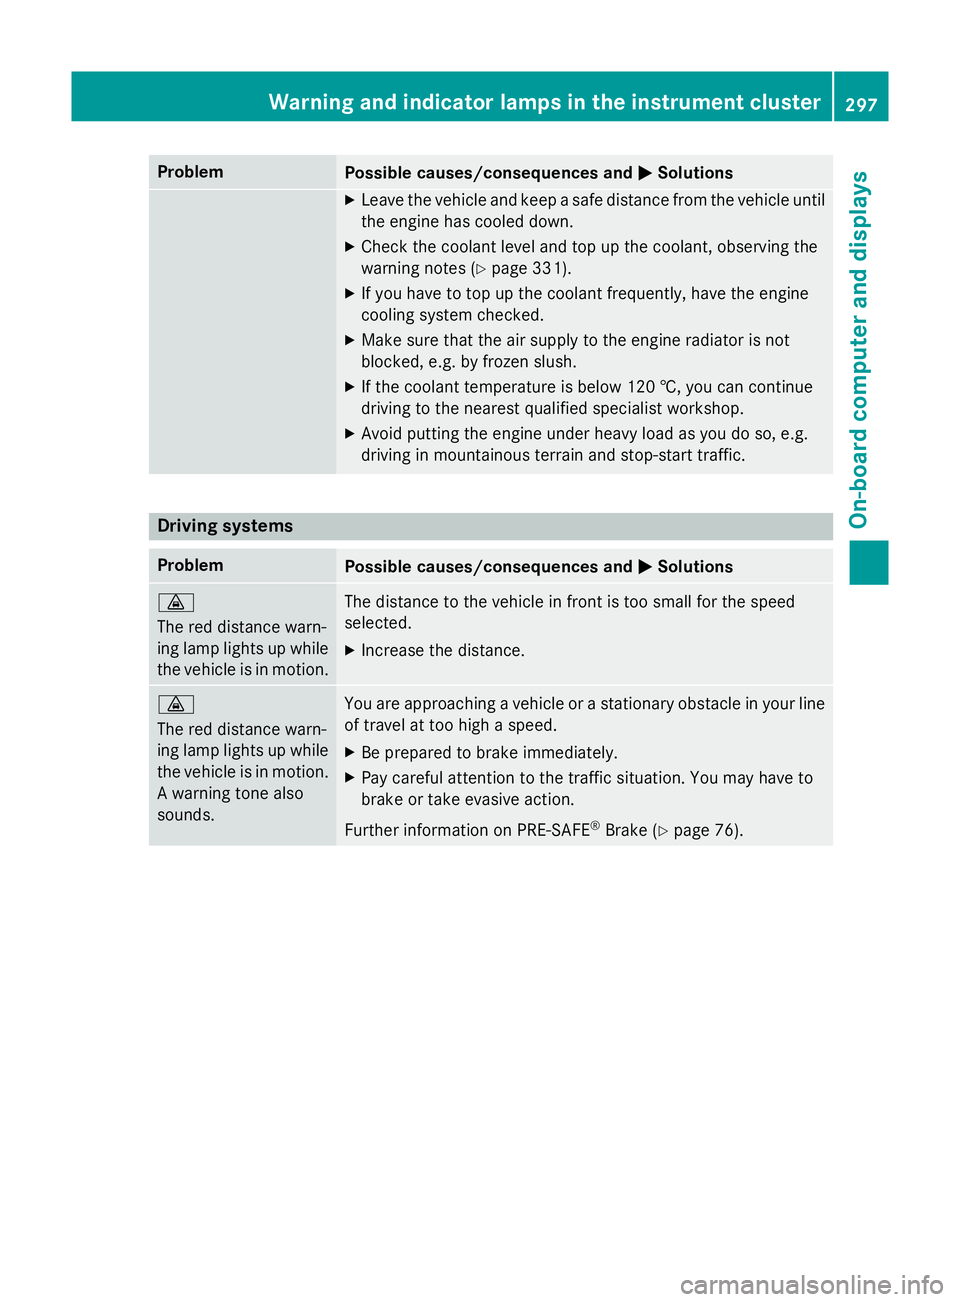
driving in mountainous terrain and stop-start traffic. Driving systems
Problem
Possible causes/consequences and
M MSolutions ·
The red distance warn-
ing lamp lights up while
the vehicle is in motion. The distance to the vehicle in front is too small for the speed
selected.
X Increase the distance. ·
The red distance warn-
ing lamp lights up while
the vehicle is in motion. A warning tone also
sounds. You are approaching a vehicle or a stationary obstacle in your line
of travel at too high a speed.
X Be prepared to brake immediately.
X Pay careful attention to the traffic situation. You may have to
brake or take evasive action.
Further information on PRE‑SAFE ®
Brake (Y page 76). Warning and indicator lamps in the instrument cluster
297On-board computer and displays Z
Page 301 of 417
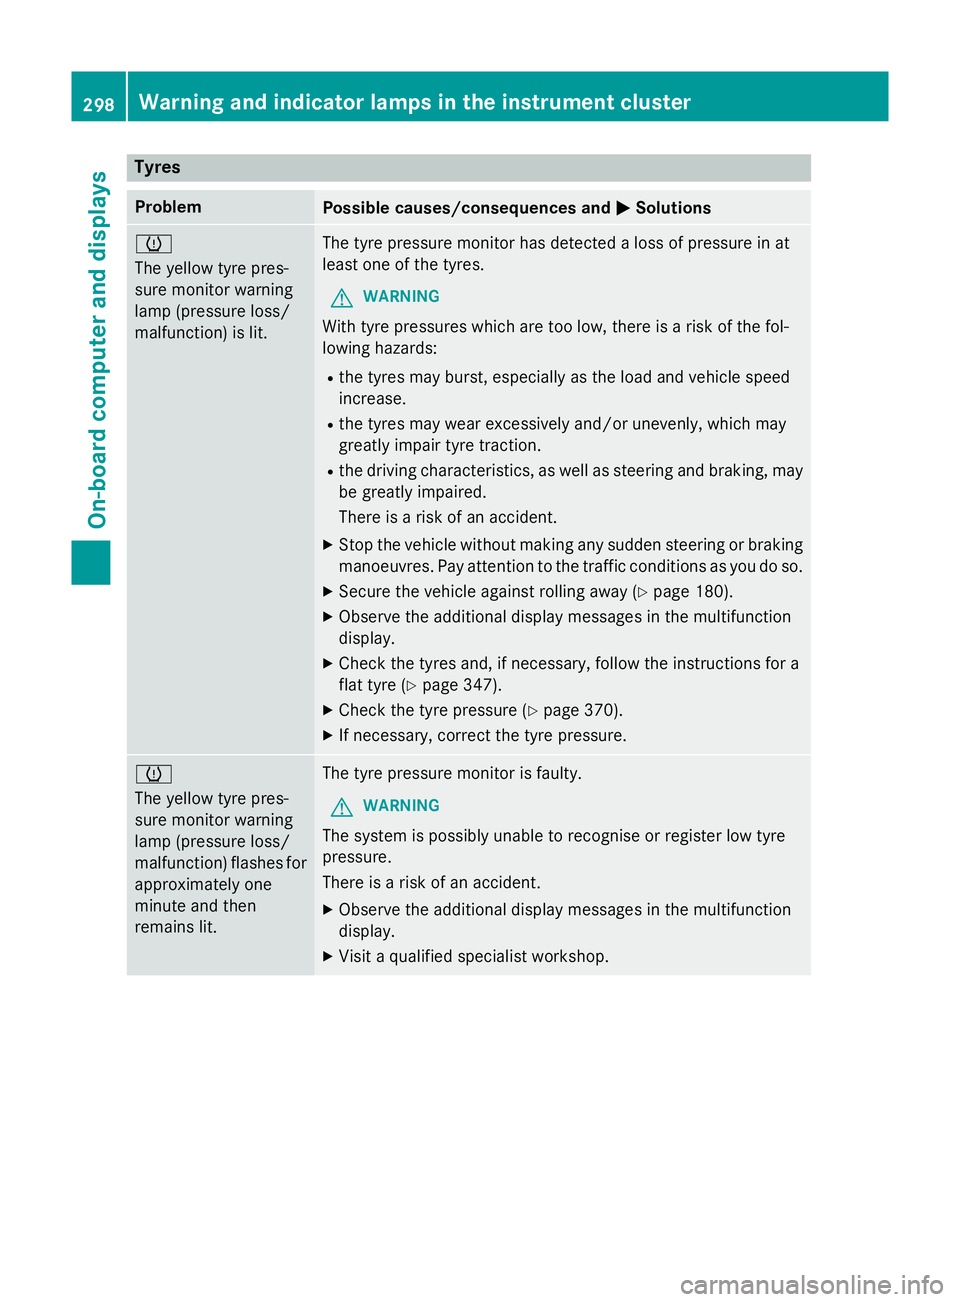
Tyres
Problem
Possible causes/consequences and
M
MSolutions h
The yellow tyre pres-
sure monitor warning
lamp (pressure loss/
malfunction) is lit.
The tyre pressure monitor has detected a loss of pressure in at
least one of the tyres.
G WARNING
With tyre pressures which are too low, there is a risk of the fol-
lowing hazards: R the tyres may burst, especially as the load and vehicle speed
increase.
R the tyres may wear excessively and/or unevenly, which may
greatly impair tyre traction.
R the driving characteristics, as well as steering and braking, may
be greatly impaired.
There is a risk of an accident.
X Stop the vehicle without making any sudden steering or braking
manoeuvres. Pay attention to the traffic conditions as you do so.
X Secure the vehicle against rolling away (Y page 180).
X Observe the additional display messages in the multifunction
display.
X Check the tyres and, if necessary, follow the instructions for a
flat tyre (Y page 347).
X Check the tyre pressure (Y page 370).
X If necessary, correct the tyre pressure. h
The yellow tyre pres-
sure monitor warning
lamp (pressure loss/
malfunction) flashes for
approximately one
minute and then
remains lit. The tyre pressure monitor is faulty.
G WARNING
The system is possibly unable to recognise or register low tyre
pressure.
There is a risk of an accident. X Observe the additional display messages in the multifunction
display.
X Visit a qualified specialist workshop. 298
Warning and indicator lamps in the instrument clusterOn-board computer and displays
Page 307 of 417
This poses an increased risk of injury.
Before every trip, make sure that the seat
backrests and the rear bench seat/rear seat
are engaged before every trip.
Observe the loading guidelines (Y page 300).
The left-hand and right-hand rear seat backr- ests can be folded down separately to
increase the boot capacity.
Folding the seat backrest forwards i
Vehicles with memory function: when you
fold one or both parts of the rear seat back- rest forwards, the respective front seat
moves forward slightly, when necessary, in
order to avoid contact.
X Vehicles without memory function: if nec-
essary, move the driver's or front-
passenger seat forwards.
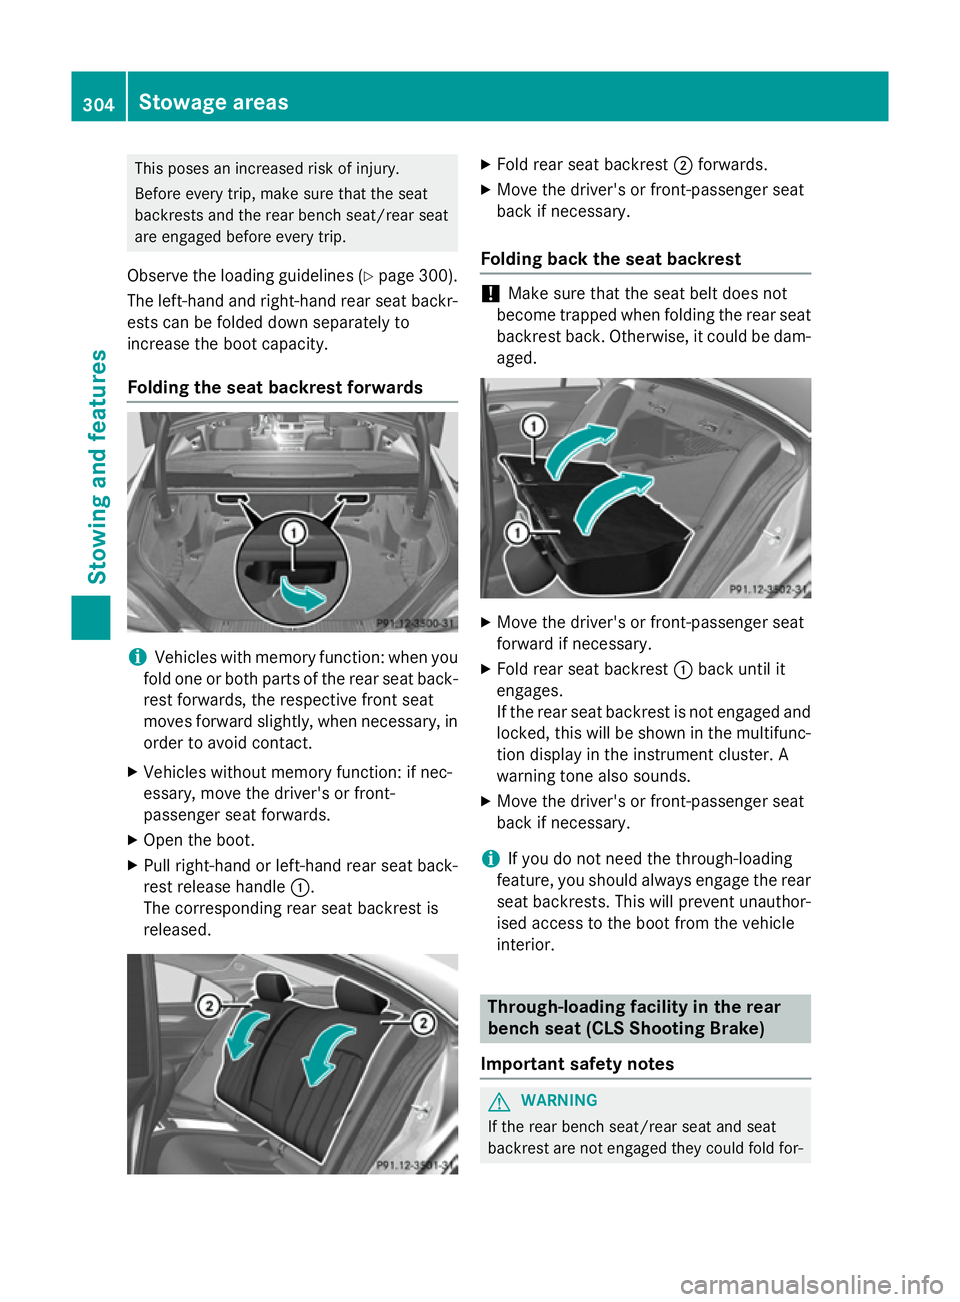
X Open the boot.
X Pull right-hand or left-hand rear seat back-
rest release handle :.
The corresponding rear seat backrest is
released. X
Fold rear seat backrest ;forwards.
X Move the driver's or front-passenger seat
back if necessary.
Folding back the seat backrest !
Make sure that the seat belt does not
become trapped when folding the rear seat backrest back. Otherwise, it could be dam- aged. X
Move the driver's or front-passenger seat
forward if necessary.
X Fold rear seat backrest :back until it
engages.
If the rear seat backrest is not engaged and
locked, this will be shown in the multifunc-
tion display in the instrument cluster. A
warning tone also sounds.
X Move the driver's or front-passenger seat
back if necessary.
i If you do not need the through-loading
feature, you should always engage the rear seat backrests. This will prevent unauthor-
ised access to the boot from the vehicle
interior. Through-loading facility in the rear
bench seat (CLS Shooting Brake)
Important safety notes G
WARNING
If the rear bench seat/rear seat and seat
backrest are not engaged they could fold for- 304
Stowage areasStowing and features
Page 308 of 417
wards, e.g. when braking suddenly or in the
event of an accident.
R The vehicle occupant would thereby be
pushed into the seat belt by the rear bench
seat/rear seat or by the seat backrest. The
seat belt cannot protect as intended and
could result in additional injury.
R Objects or loads in the boot/luggage com-
partment cannot be restrained by the seat
backrest.
This poses an increased risk of injury.
Before every trip, make sure that the seat
backrests and the rear bench seat/rear seat
are engaged before every trip.
Observe the loading guidelines (Y page 300).
Folding the seat backrest forwards !
When folding the rear seat backrest for-
wards, ensure that there are no items lying on the seat cushions. These items could
otherwise be damaged or could themselves
damage the rear seats. The left-hand and right-hand rear seat backr-
ests can be folded forwards separately to
increase the luggage compartment capacity.
i When you fold one or both parts of the
rear seat backrests forwards, the headr-
ests are also lowered if necessary. In the
case of vehicles with memory function, the respective front seat is moved forwards
slightly to avoid contact with the seat
behind it. X
Vehicles without memory function: if nec-
essary, move the driver's or front-
passenger seat forwards.
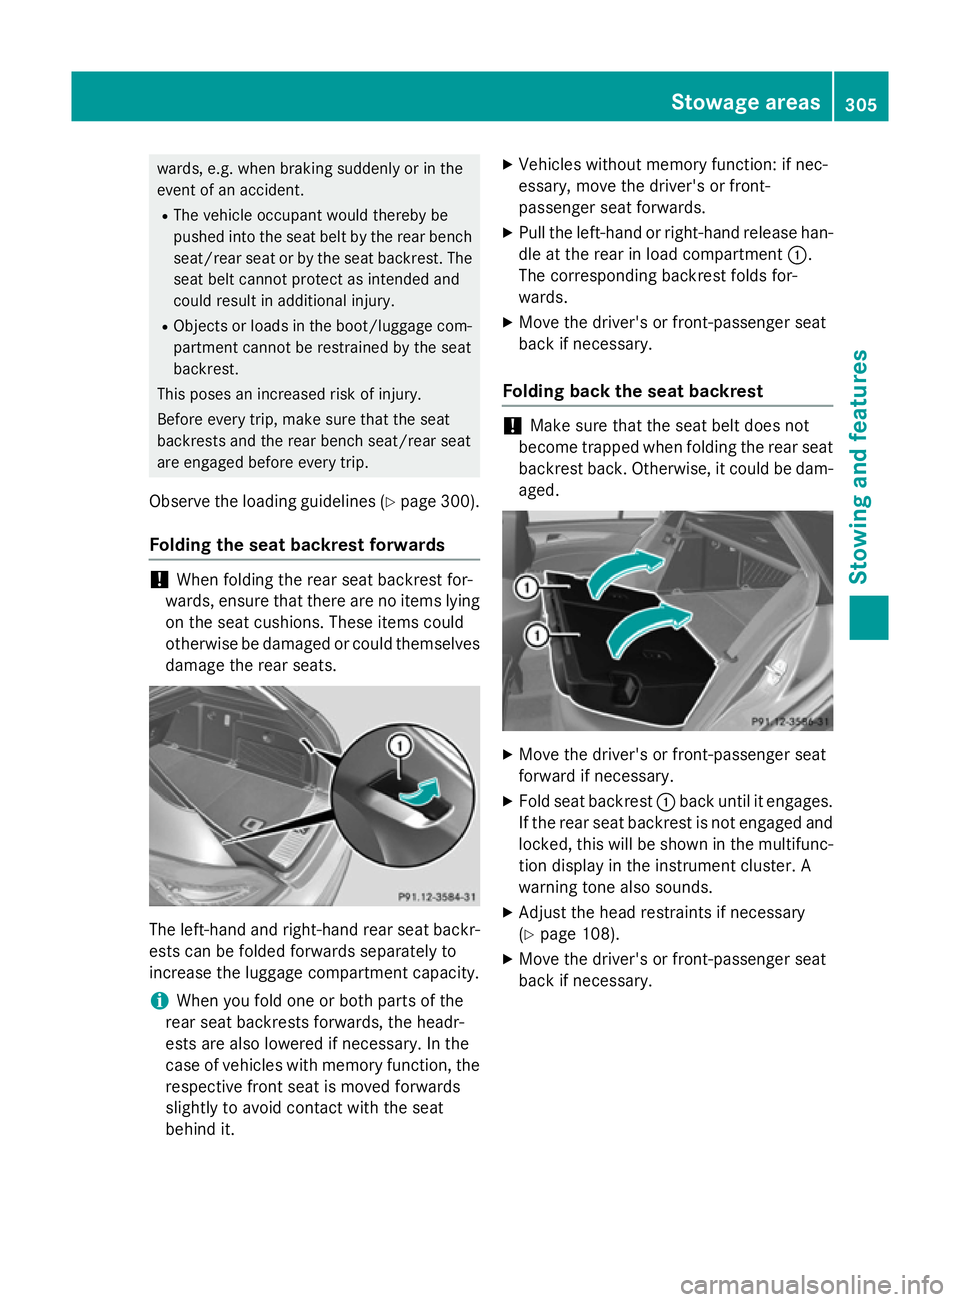
X Pull the left-hand or right-hand release han-
dle at the rear in load compartment :.
The corresponding backrest folds for-
wards.
X Move the driver's or front-passenger seat
back if necessary.
Folding back the seat backrest !
Make sure that the seat belt does not
become trapped when folding the rear seat backrest back. Otherwise, it could be dam- aged. X
Move the driver's or front-passenger seat
forward if necessary.
X Fold seat backrest :back until it engages.
If the rear seat backrest is not engaged and locked, this will be shown in the multifunc-
tion display in the instrument cluster. A
warning tone also sounds.
X Adjust the head restraints if necessary
(Y page 108).
X Move the driver's or front-passenger seat
back if necessary. Stowage areas
305Stowing and features Z
Page 332 of 417
!
Make sure that the windscreen wipers are
not folded away from the windscreen. Oth-
erwise, you could damage the windscreen
wipers or the bonnet. X
Make sure that the windscreen wipers are
switched off.
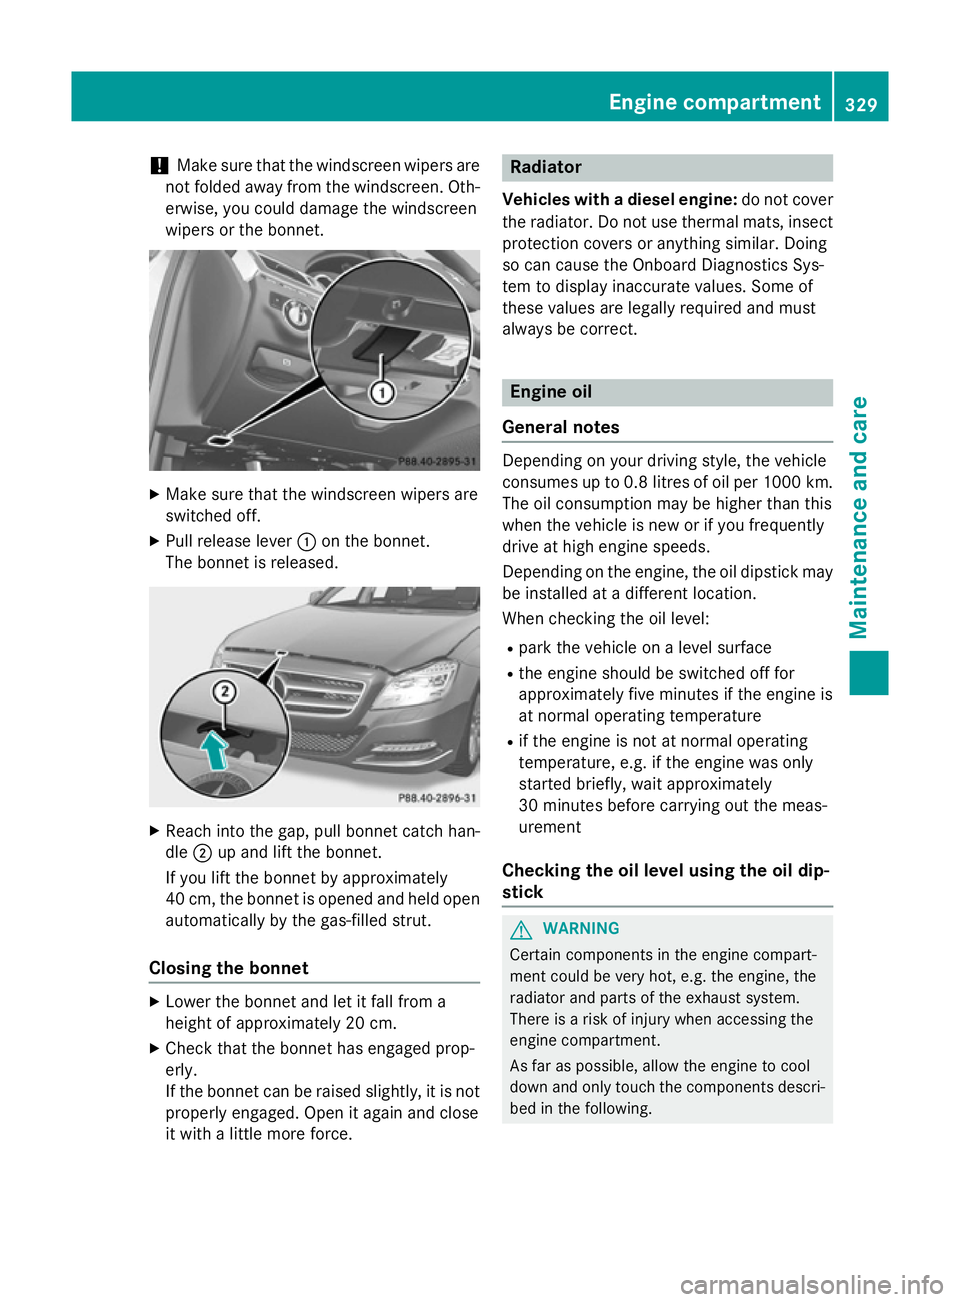
X Pull release lever :on the bonnet.
The bonnet is released. X
Reach into the gap, pull bonnet catch han-
dle ;up and lift the bonnet.
If you lift the bonnet by approximately
40 cm, the bonnet is opened and held open automatically by the gas-filled strut.
Closing the bonnet X
Lower the bonnet and let it fall from a
height of approximately 20 cm.
X Check that the bonnet has engaged prop-
erly.
If the bonnet can be raised slightly, it is not
properly engaged. Open it again and close
it with a little more force. Radiator
Vehicles with a diesel engine: do not cover
the radiator. Do not use thermal mats, insect
protection covers or anything similar. Doing
so can cause the Onboard Diagnostics Sys-
tem to display inaccurate values. Some of
these values are legally required and must
always be correct. Engine oil
General notes Depending on your driving style, the vehicle
consumes up to 0.8 litres of oil per 1000 km.
The oil consumption may be higher than this
when the vehicle is new or if you frequently
drive at high engine speeds.
Depending on the engine, the oil dipstick may be installed at a different location.
When checking the oil level:
R park the vehicle on a level surface
R the engine should be switched off for
approximately five minutes if the engine is
at normal operating temperature
R if the engine is not at normal operating
temperature, e.g. if the engine was only
started briefly, wait approximately
30 minutes before carrying out the meas-
urement
Checking the oil level using the oil dip-
stick G
WARNING
Certain components in the engine compart-
ment could be very hot, e.g. the engine, the
radiator and parts of the exhaust system.
There is a risk of injury when accessing the
engine compartment.
As far as possible, allow the engine to cool
down and only touch the components descri- bed in the following. Engine compartment
329Maintenance and care Z
Page 334 of 417
Example: engine oil filler cap
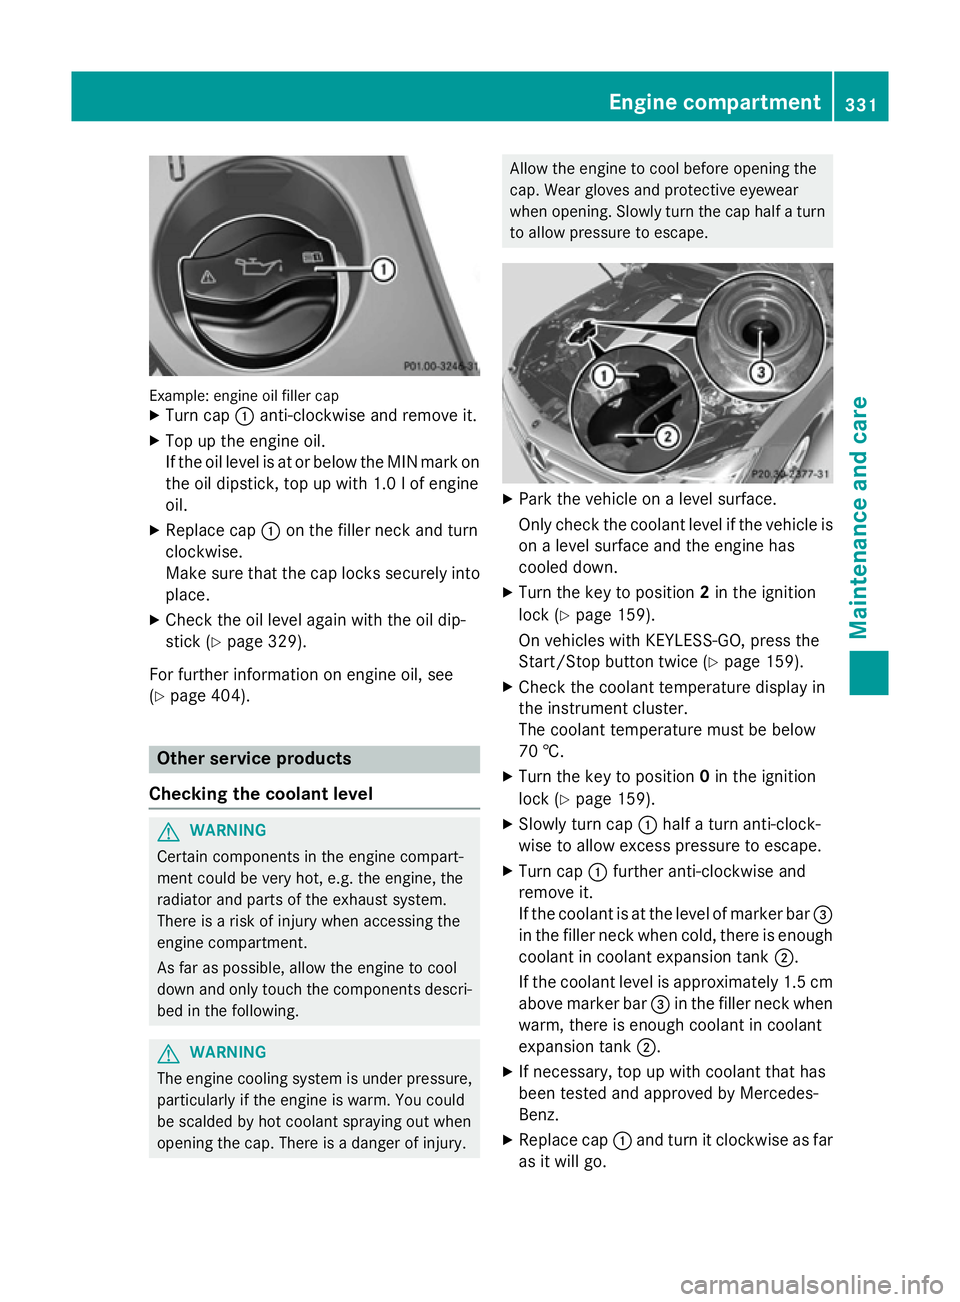
X Turn cap :anti-clockwise and remove it.
X Top up the engine oil.
If the oil level is at or below the MIN mark on
the oil dipstick, top up with 1.0 lof engine
oil.
X Replace cap :on the filler neck and turn
clockwise.
Make sure that the cap locks securely into place.
X Check the oil level again with the oil dip-
stick (Y page 329).
For further information on engine oil, see
(Y page 404). Other service products
Checking the coolant level G
WARNING
Certain components in the engine compart-
ment could be very hot, e.g. the engine, the
radiator and parts of the exhaust system.
There is a risk of injury when accessing the
engine compartment.
As far as possible, allow the engine to cool
down and only touch the components descri- bed in the following. G
WARNING
The engine cooling system is under pressure, particularly if the engine is warm. You could
be scalded by hot coolant spraying out when
opening the cap. There is a danger of injury. Allow the engine to cool before opening the
cap. Wear gloves and protective eyewear
when opening. Slowly turn the cap half a turn
to allow pressure to escape. X
Park the vehicle on a level surface.
Only check the coolant level if the vehicle is
on a level surface and the engine has
cooled down.
X Turn the key to position 2in the ignition
lock (Y page 159).
On vehicles with KEYLESS-GO, press the
Start/Stop button twice (Y page 159).
X Check the coolant temperature display in
the instrument cluster.
The coolant temperature must be below
70 †.
X Turn the key to position 0in the ignition
lock (Y page 159).
X Slowly turn cap :half a turn anti-clock-
wise to allow excess pressure to escape.
X Turn cap :further anti-clockwise and
remove it.
If the coolant is at the level of marker bar =
in the filler neck when cold, there is enough coolant in coolant expansion tank ;.
If the coolant level is approximately 1.5 cm above marker bar =in the filler neck when
warm, there is enough coolant in coolant
expansion tank ;.
X If necessary, top up with coolant that has
been tested and approved by Mercedes-
Benz.
X Replace cap :and turn it clockwise as far
as it will go. Engine compartment
331Maintenance and care Z