2014 MERCEDES-BENZ CLS COUPE boot
[x] Cancel search: bootPage 97 of 417
If KEYLESS-GO detects a second key out-
side the vehicle, the boot lid/tailgate
remains closed. Opening/closing automatically from
the inside
Important safety notes G
WARNING
Parts of the body could become trapped dur-
ing automatic closing of the boot lid or tail-
gate. Moreover, people, e.g. children, may be standing in the closing area or may enter the
closing area during the closing process. There
is a risk of injury.
Make sure that nobody is in the vicinity of the closing area during the closing process.
Use one of the following options to stop the
closing process:
R Press the Fbutton on the key.
R Press the remote operating switch on the
driver's door.
R Press the closing or locking button on the
boot lid/tailgate.
R Pull the handle on the boot lid/tailgate.
! The boot lid/tailgate swings upwards and
to the rear when opened. Therefore, make
sure that there is sufficient clearance
above and behind the boot lid/tailgate.
i Boot lid/tailgate opening dimensions
(Y page 407). Opening and closing X
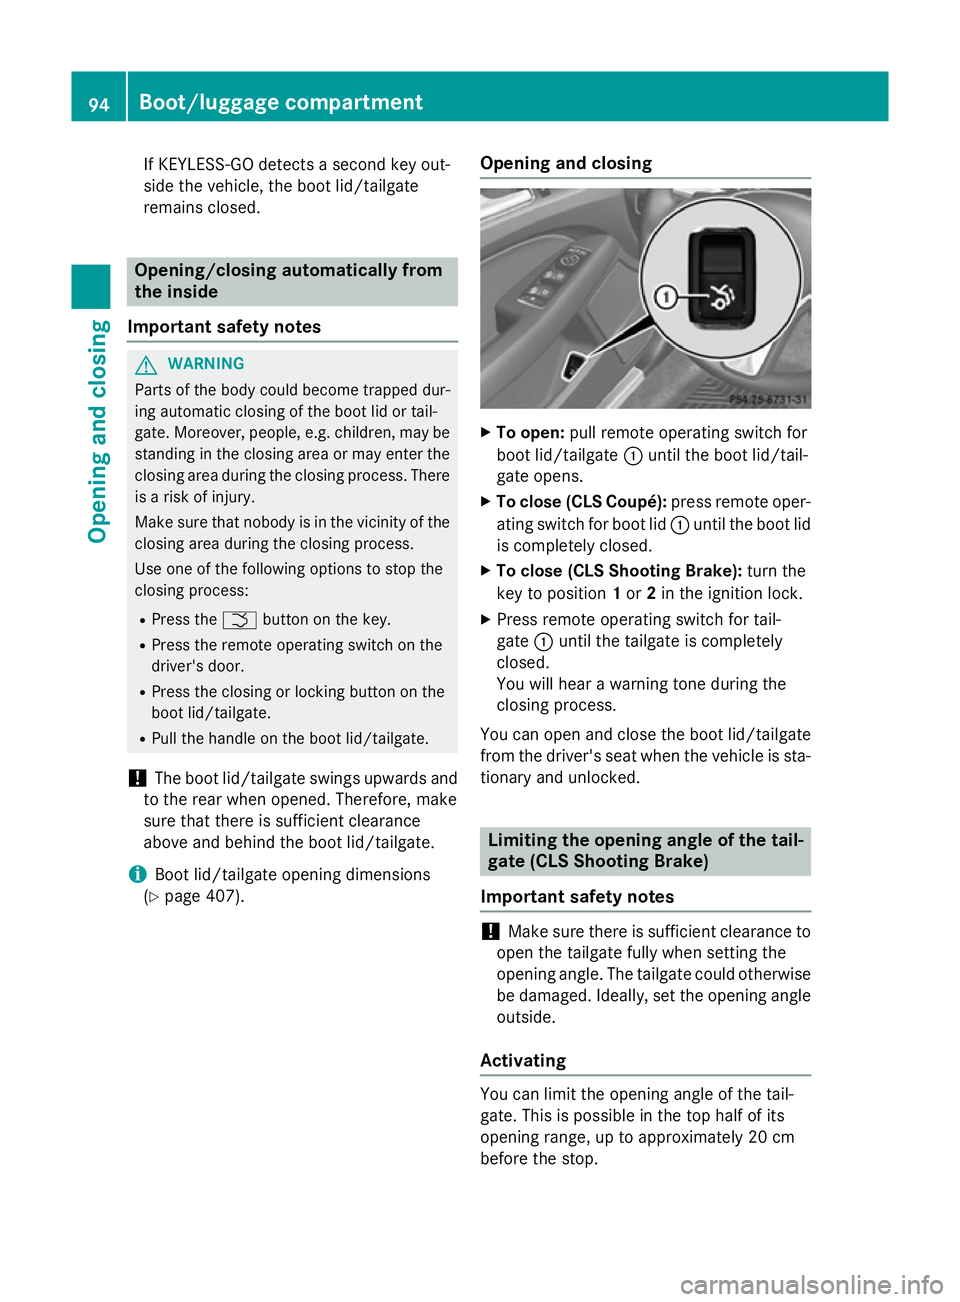
To open: pull remote operating switch for
boot lid/tailgate :until the boot lid/tail-
gate opens.
X To close (CLS Coupé): press remote oper-
ating switch for boot lid :until the boot lid
is completely closed.
X To close (CLS Shooting Brake): turn the
key to position 1or 2in the ignition lock.
X Press remote operating switch for tail-
gate :until the tailgate is completely
closed.
You will hear a warning tone during the
closing process.
You can open and close the boot lid/tailgate
from the driver's seat when the vehicle is sta-
tionary and unlocked. Limiting the opening angle of the tail-
gate (CLS Shooting Brake)
Important safety notes !
Make sure there is sufficient clearance to
open the tailgate fully when setting the
opening angle. The tailgate could otherwise
be damaged. Ideally, set the opening angle outside.
Activating You can limit the opening angle of the tail-
gate. This is possible in the top half of its
opening range, up to approximately 20 cm
before the stop. 94
Boot/luggage compartmentOpening and closing
Page 98 of 417
X
To open the tailgate: pull the handle on
the tailgate.
X To stop the opening procedure at the
desired position: press the closing button
(Y page 92) in the tailgate or pull the handle
on the outside of the tailgate again.
X To store the position: press and hold the
closing button in the tailgate until you hear a short tone.
The opening angle limiter is activated. The
tailgate then stops in the stored position
when opened.
Deactivating X
Press and hold the closing button
(Y page 92) in the tailgate until you hear
two short tones. Unlocking the boot (CLS Coupé)
! The boot lid swings upwards when
opened. Therefore, make sure that there is sufficient clearance above the boot lid.
If the boot cannot be unlocked with the key or
KEYLESS-GO, use the emergency key ele-
ment.
If you use the emergency key element to
unlock and open the boot lid, the anti-theft
alarm system will be triggered (Y page 78).
X Take the emergency key element out of the
key (Y page 85).
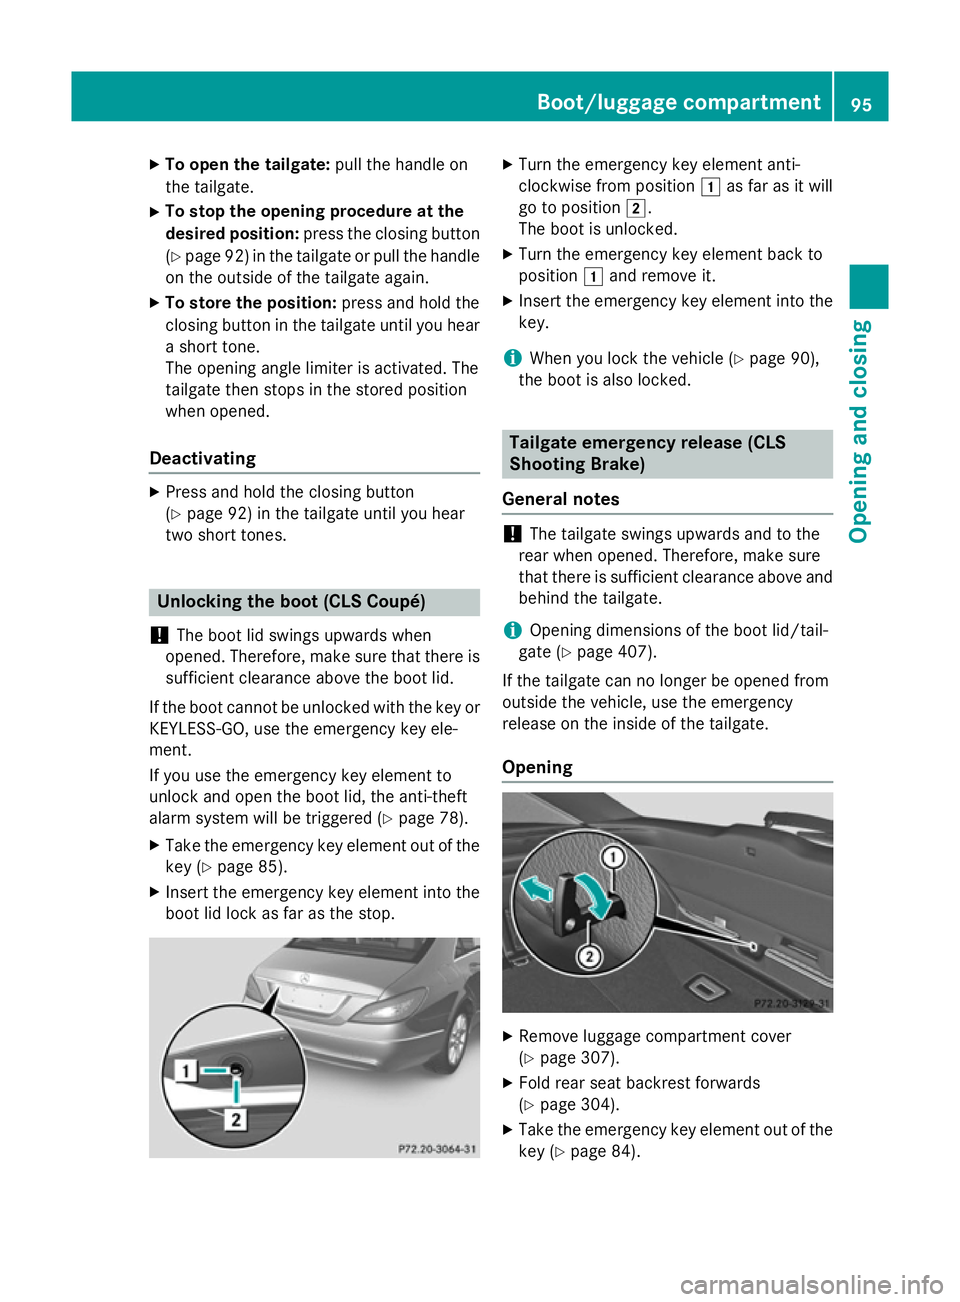
X Insert the emergency key element into the
boot lid lock as far as the stop. X
Turn the emergency key element anti-
clockwise from position 1as far as it will
go to position 2.
The boot is unlocked.
X Turn the emergency key element back to
position 1and remove it.
X Insert the emergency key element into the
key.
i When you lock the vehicle (Y
page 90),
the boot is also locked. Tailgate emergency release (CLS
Shooting Brake)
General notes !
The tailgate swings upwards and to the
rear when opened. Therefore, make sure
that there is sufficient clearance above and behind the tailgate.
i Opening dimensions of the boot lid/tail-
gate (Y page 407).
If the tailgate can no longer be opened from
outside the vehicle, use the emergency
release on the inside of the tailgate.
Opening X
Remove luggage compartment cover
(Y page 307).
X Fold rear seat backrest forwards
(Y page 304).
X Take the emergency key element out of the
key (Y page 84). Boot/luggage compartment
95Opening and closing Z
Page 135 of 417
R
you drop it
R you scratch it
Only operate bulbs in enclosed lamps
designed for that purpose. Only fit spare
bulbs of the same type and the specified volt- age.
Marks on the glass tube reduce the service
life of the bulbs. Do not touch the glass tube
with your bare hands. If necessary, clean the
glass tube when cold with alcohol or spirit and
rub it off with a lint-free cloth.
Protect bulbs from moisture during opera-
tion. Do not allow bulbs to come into contact
with liquids.
You can neither replace xenon bulbs nor LED bulbs. Have LED bulbs replaced at a qualified
specialist workshop.
Replace only the bulbs listed (Y page 132).
Have the bulbs that you cannot replace your-
self replaced at a qualified specialist work-
shop.
If you require assistance replacing bulbs, con-
sult a qualified specialist workshop.
If the new bulb still does not light up, consult a qualified specialist workshop.
Bulbs and lamps are an important aspect of
vehicle safety. You must therefore make sure
that these function correctly at all times.
Have the headlamp setting checked regularly. Overview of bulb replacement – bulbs
You can replace the following bulbs. The
details for the bulb type can be found in the
legend. Tail lamps
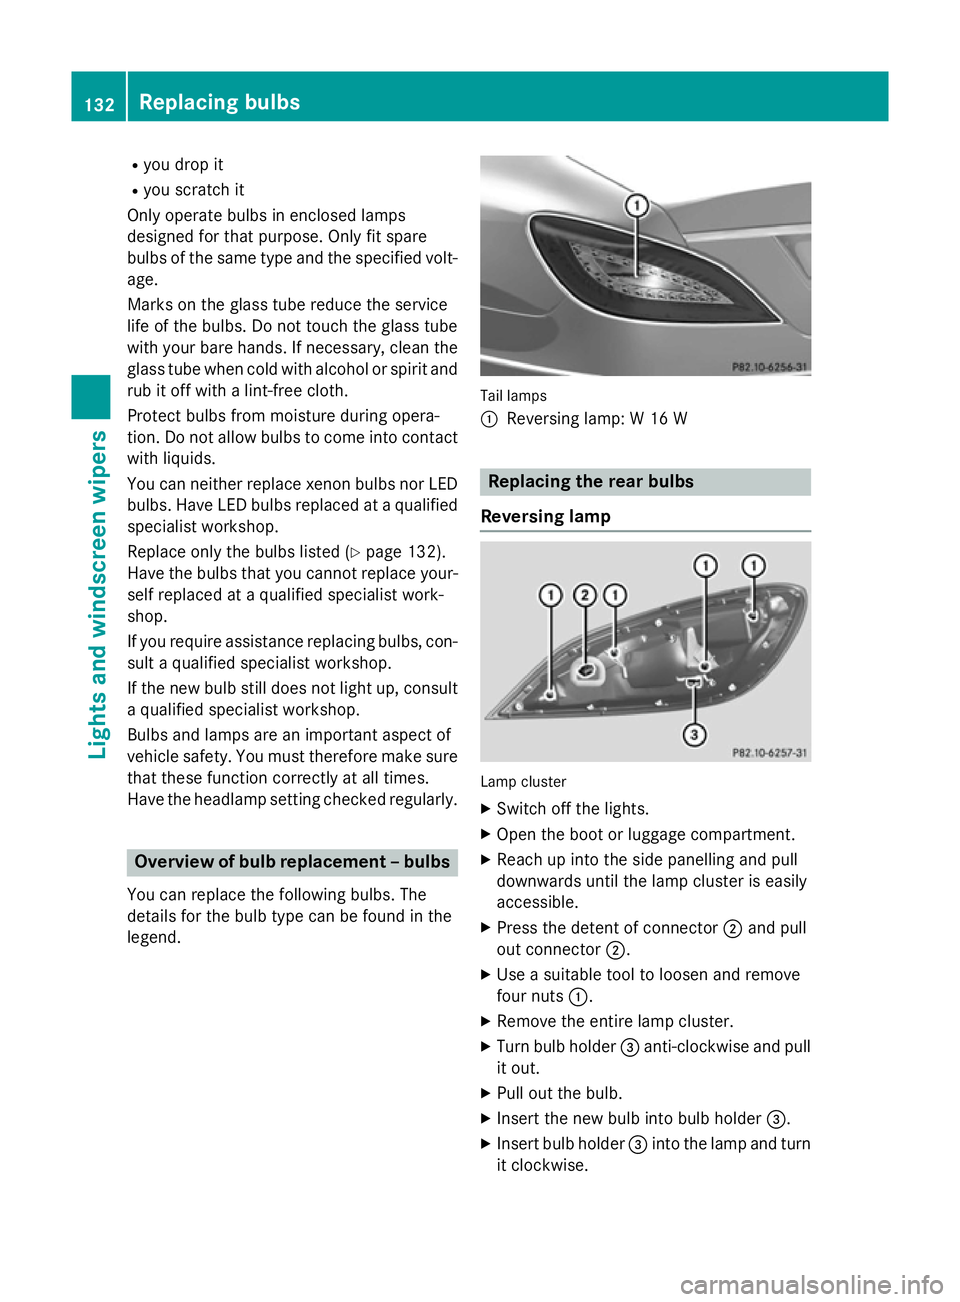
:
Reversing lamp: W 16 W Replacing the rear bulbs
Reversing lamp Lamp cluster
X
Switch off the lights.
X Open the boot or luggage compartment.
X Reach up into the side panelling and pull
downwards until the lamp cluster is easily
accessible.
X Press the detent of connector ;and pull
out connector ;.
X Use a suitable tool to loosen and remove
four nuts :.
X Remove the entire lamp cluster.
X Turn bulb holder =anti-clockwise and pull
it out.
X Pull out the bulb.
X Insert the new bulb into bulb holder =.
X Insert bulb holder =into the lamp and turn
it clockwise. 132
Replacing bulbsLigh
ts and windscreen wipers
Page 182 of 417
recesses in the fuel filler flap hinge arm
from above.
X Completely insert the filler neck of the fuel
pump nozzle into the tank, hook in place
and refuel.
X Only fill the tank until the pump nozzle
switches off.
i Vehicles with a diesel engine: the filler
neck is designed for refuelling at diesel fill-
ing pumps.
i Do not add any more fuel after the pump
stops filling for the first time. Otherwise,
fuel may leak out.
Closing the fuel filler flap X
Replace the cap on the filler neck and turn
clockwise until it engages audibly.
X Close the fuel filler flap.
i Close the fuel filler flap before locking the
vehicle. Otherwise, the locking pin of the
central locking prevents the fuel filler flap
from closing. Fuel filler flap emergency release
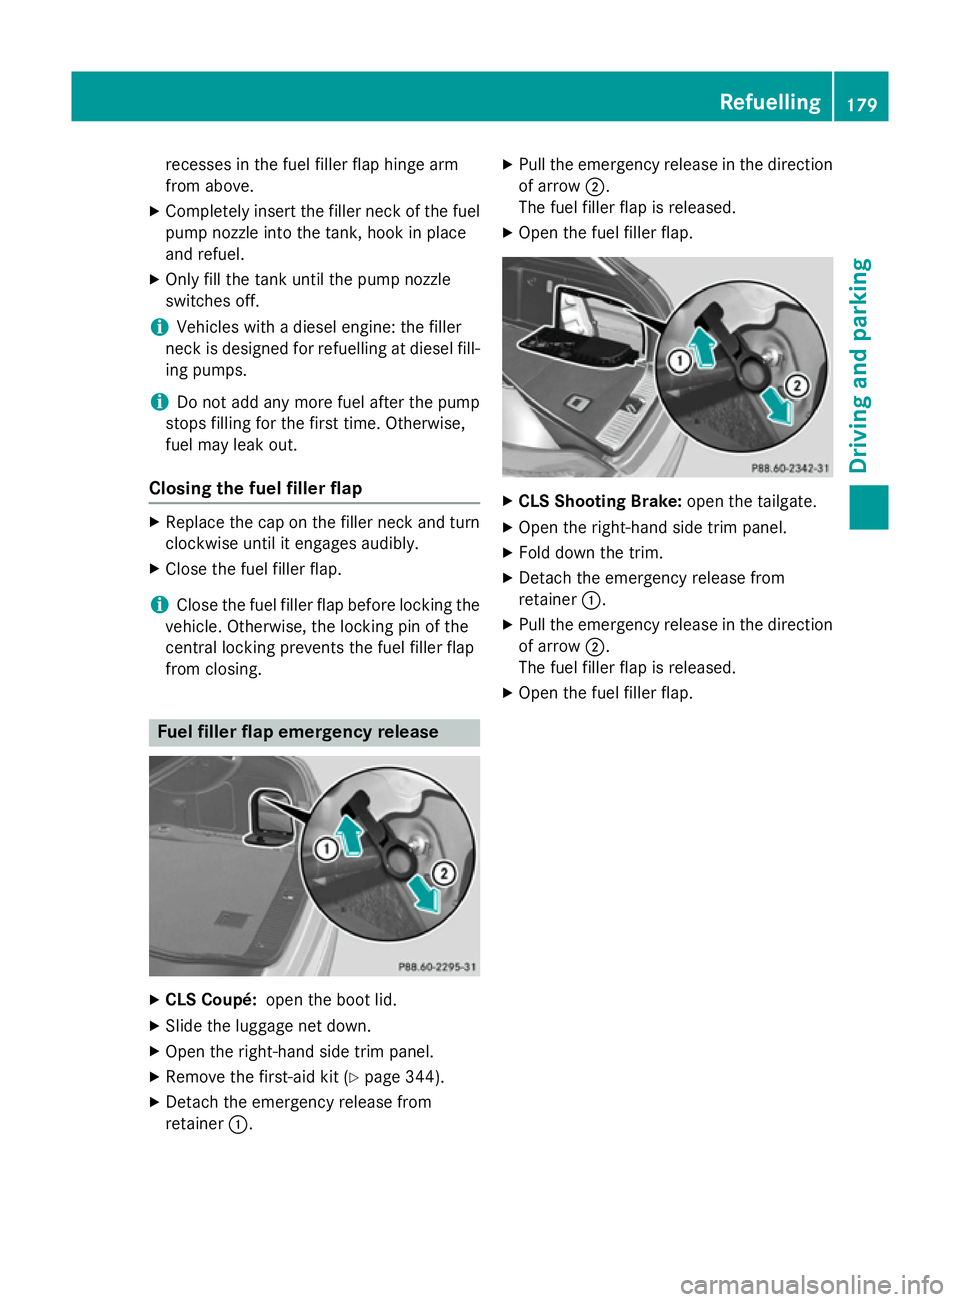
X
CLS Coupé: open the boot lid.
X Slide the luggage net down.
X Open the right-hand side trim panel.
X Remove the first-aid kit (Y page 344).
X Detach the emergency release from
retainer :. X
Pull the emergency release in the direction
of arrow ;.
The fuel filler flap is released.
X Open the fuel filler flap. X
CLS Shooting Brake: open the tailgate.
X Open the right-hand side trim panel.
X Fold down the trim.
X Detach the emergency release from
retainer :.
X Pull the emergency release in the direction
of arrow ;.
The fuel filler flap is released.
X Open the fuel filler flap. Refuelling
179Driving and parking Z
Page 209 of 417
Vehicle level
Important safety notes
G
WARNING
People's limbs may become trapped if they
are located underneath the vehicle or
between the vehicle body and the tyres when the vehicle is lowering. There is a danger of
injury.
When lowering the vehicle, make sure no one
is underneath the vehicle or in the immediate vicinity of the wheel arches.
The vehicle may be lowered if you press the
suspension tuning selector button or the
AMG button. The vehicle is lowered even if the
vehicle is at a standstill.
! If Sport or Sport + suspension tuning has
been selected, the vehicle's ground clear-
ance decreases. Make sure that no objects
become trapped or that the vehicle has not
been damaged, for example, on the kerb.
i The vehicle level at the rear axle may
change visibly if you park the vehicle and
the outside temperature changes. If the
temperature drops, the vehicle level low-
ers; with an increase in temperature, the
vehicle level rises.
Changing the rear axle level
This function is only available for the CLS 63
AMG 4MATIC and CLS 63 AMG Shooting
Brake.
The vehicle level at the rear axle depends on
the selected suspension mode and the vehi-
cle speed.
The vehicle level at the rear axle changes
while driving depending on which suspension mode is selected:
R Comfort: +10 mm
R Sport + and Sport: -15 mm
When changing from Comfort to Sport or
Sport +, the axle is lowered approximately
25 mm. When changing from Sport or Sport +
to Comfort, the axle is raised approximately 25 mm. The level change also occurs when
stationary.
If you drive faster than 170 km/h, the rear
axle level is set to a middle level. This increa- ses road safety and reduces air resistance. If
you then drive slower than 150 km/h, the
level of the rear axle is again adjusted to cor- respond to the selected suspension mode.
Load compensation
The vehicle can compensate differences in
the vehicle level by raising or lowering the
rear axle. This is the case, for example, when
people get out of the vehicle or when luggage is removed.
A load compensation occurs if:
R a door or the boot lid/tailgate is opened
R the parked vehicle is unlocked
The engine needs to be running for larger level
changes. 4MATIC (permanent all-wheel drive)
If you fail to adapt your driving style, 4MATIC
can neither reduce the risk of accident nor
override the laws of physics. 4MATIC cannot
take account of road, weather and traffic con- ditions. 4MATIC is only an aid. You are
responsible for the distance to the vehicle in
front, for vehicle speed, for braking in good
time, and for staying in the lane.
If a drive wheel spins due to insufficient grip:
R when pulling away, only depress the accel-
erator pedal as far as is necessary
R accelerate less when driving
! Never tow the vehicle with one axle
raised. This may damage the transfer case.
Damage of this sort is not covered by the
Mercedes-Benz implied warranty. All
wheels must remain either on the ground or be fully raised. Observe the instructions for
towing the vehicle with all wheels in full
contact with the ground.
i In wintry driving conditions, the maximum
effect of 4MATIC can only be achieved if 206
Driving systemsDriving an
d parking
Page 217 of 417
Reversing camera
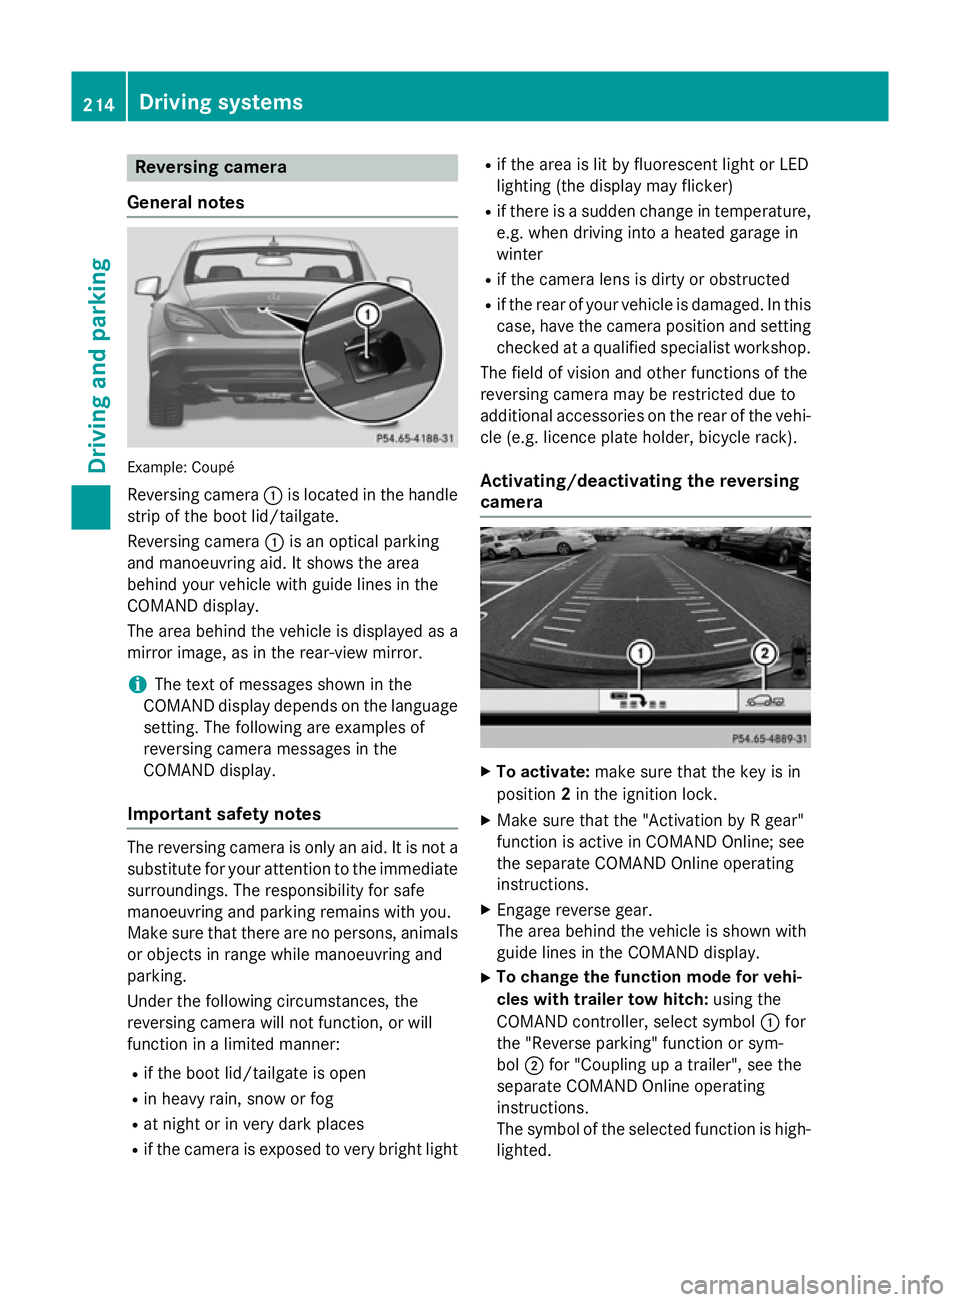
General notes Example: Coupé
Reversing camera :is located in the handle
strip of the boot lid/tailgate.
Reversing camera :is an optical parking
and manoeuvring aid. It shows the area
behind your vehicle with guide lines in the
COMAND display.
The area behind the vehicle is displayed as a
mirror image, as in the rear-view mirror.
i The text of messages shown in the
COMAND display depends on the language setting. The following are examples of
reversing camera messages in the
COMAND display.
Important safety notes The reversing camera is only an aid. It is not a
substitute for your attention to the immediate
surroundings. The responsibility for safe
manoeuvring and parking remains with you.
Make sure that there are no persons, animals
or objects in range while manoeuvring and
parking.
Under the following circumstances, the
reversing camera will not function, or will
function in a limited manner:
R if the boot lid/tailgate is open
R in heavy rain, snow or fog
R at night or in very dark places
R if the camera is exposed to very bright light R
if the area is lit by fluorescent light or LED
lighting (the display may flicker)
R if there is a sudden change in temperature,
e.g. when driving into a heated garage in
winter
R if the camera lens is dirty or obstructed
R if the rear of your vehicle is damaged. In this
case, have the camera position and setting checked at a qualified specialist workshop.
The field of vision and other functions of the
reversing camera may be restricted due to
additional accessories on the rear of the vehi-
cle (e.g. licence plate holder, bicycle rack).
Activating/deactivating the reversing
camera X
To activate: make sure that the key is in
position 2in the ignition lock.
X Make sure that the "Activation by R gear"
function is active in COMAND Online; see
the separate COMAND Online operating
instructions.
X Engage reverse gear.
The area behind the vehicle is shown with
guide lines in the COMAND display.
X To change the function mode for vehi-
cles with trailer tow hitch: using the
COMAND controller, select symbol :for
the "Reverse parking" function or sym-
bol ;for "Coupling up a trailer", see the
separate COMAND Online operating
instructions.
The symbol of the selected function is high- lighted. 214
Driving systemsDriving and parking
Page 218 of 417
To deactivate:
the reversing camera deacti-
vates if you shift the transmission to Por after
driving forwards a short distance.
Displays in the COMAND display The reversing camera may show a distorted
view of obstacles or show them incorrectly or
not at all. Obstacles are not shown by the
reversing camera in the following locations:
R very close to the rear bumper
R under the rear bumper
R in the area immediately above the tailgate/
boot
i The following reversing camera messages
in the COMAND display correspond to the
display in the CLS Coupé. The details of the
display of the guide lines differ slightly for
the CLS Shooting Brake.
! Objects not at ground level may appear to
be further away than they actually are, e.g.:
R the bumper of a parked vehicle
R the drawbar of a trailer
R the ball coupling of a trailer tow hitch
R the rear section of an HGV
R a slanted post
Use the guidelines only for orientation.
Approach objects no further than the bot-
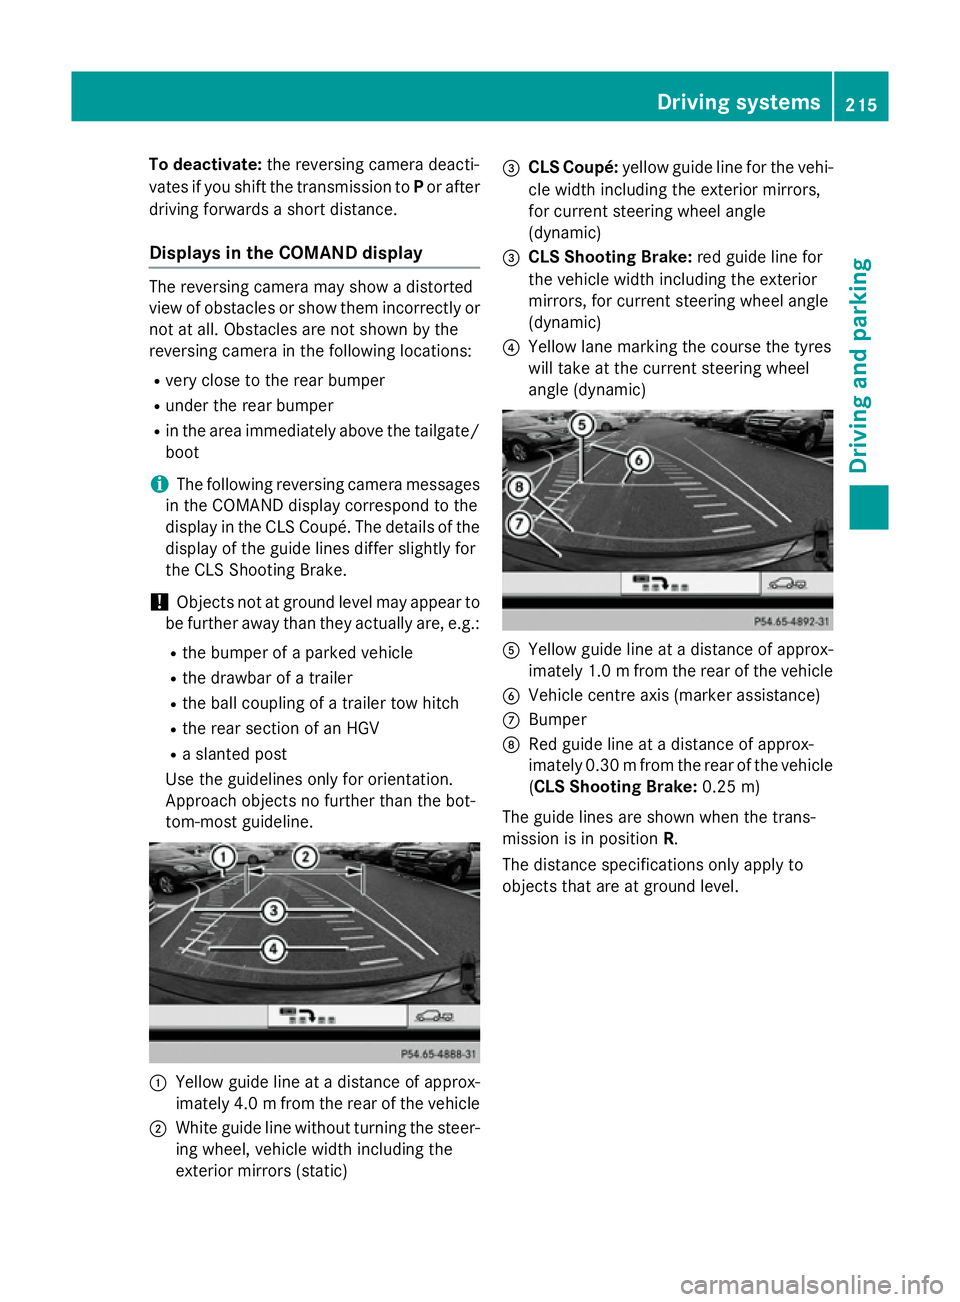
tom-most guideline. :
Yellow guide line at a distance of approx-
imately 4.0 mfrom the rear of the vehicle
; White guide line without turning the steer-
ing wheel, vehicle width including the
exterior mirrors (static) =
CLS Coupé: yellow guide line for the vehi-
cle width including the exterior mirrors,
for current steering wheel angle
(dynamic)
= CLS Shooting Brake: red guide line for
the vehicle width including the exterior
mirrors, for current steering wheel angle
(dynamic)
? Yellow lane marking the course the tyres
will take at the current steering wheel
angle (dynamic) A
Yellow guide line at a distance of approx-
imately 1.0 mfrom the rear of the vehicle
B Vehicle centre axis (marker assistance)
C Bumper
D Red guide line at a distance of approx-
imately 0.30 mfrom the rear of the vehicle
(CLS Shooting Brake: 0.25 m)
The guide lines are shown when the trans-
mission is in position R.
The distance specifications only apply to
objects that are at ground level. Driving systems
215Driving and parking Z
Page 237 of 417
prescribed maximum speed in the relevant
country.
For certain Mercedes-Benz vehicles, the max-
imum permissible rear axle load is increased
when towing a trailer. See "Technical data" to
find out whether this applies to your vehicle
(Y page 410). If you utilise any of the added
maximum rear axle load when towing a trailer, the vehicle/trailer combination may not
exceed a maximum speed of 100 km/ hfor
reasons concerning the operating permit.
This also applies in countries in which the
permissible maximum speed for vehicle/
trailer combinations is above 100 km/h.
When towing a trailer, your vehicle's handling
characteristics will be different in comparison
to when driving without a trailer and it will
consume more fuel.
Change into a lower gear in good time on long and steep downhill gradients.
i This also applies if you have activated
cruise control, SPEEDTRONIC or DIS-
TRONIC PLUS.
This will use the braking effect of the engine,
so less braking will be required to maintain
vehicle speed. This relieves the load on the
brake system and prevents the brakes from
overheating and wearing too quickly. If you
need additional braking, depress the brake
pedal repeatedly rather than continuously.
Driving tips If the trailer swings from side to side:
X Do not accelerate.
X Do not countersteer.
X Brake if necessary.
R Maintain a greater distance from the vehi-
cle in front than when driving without a
trailer.
R Avoid braking abruptly. If possible, brake
gently at first to allow the trailer to run on. Then, increase the braking force rapidly.
R The values given for gradient-climbing
capabilities from a standstill refer to sea level. When driving in mountainous areas,
note that the power output of the engine,
and consequently the vehicle's gradient-
climbing capability, decrease with increas-
ing altitude. Folding out the ball coupling
G
WARNING
If the ball coupling is not correctly engaged,
the trailer can detach. There is a risk of an
accident.
Always engage the ball coupling as described. G
WARNING
If you release the ball coupling or it does not
engage correctly when folding in, it will swing out. Within pivoting range of the ball coupling,
there is an increased risk of an accident and
injury.
Only release the ball coupling if the pivoting
range is unobstructed. Always make sure that the ball coupling engages when folding in. CLS Shooting Brake
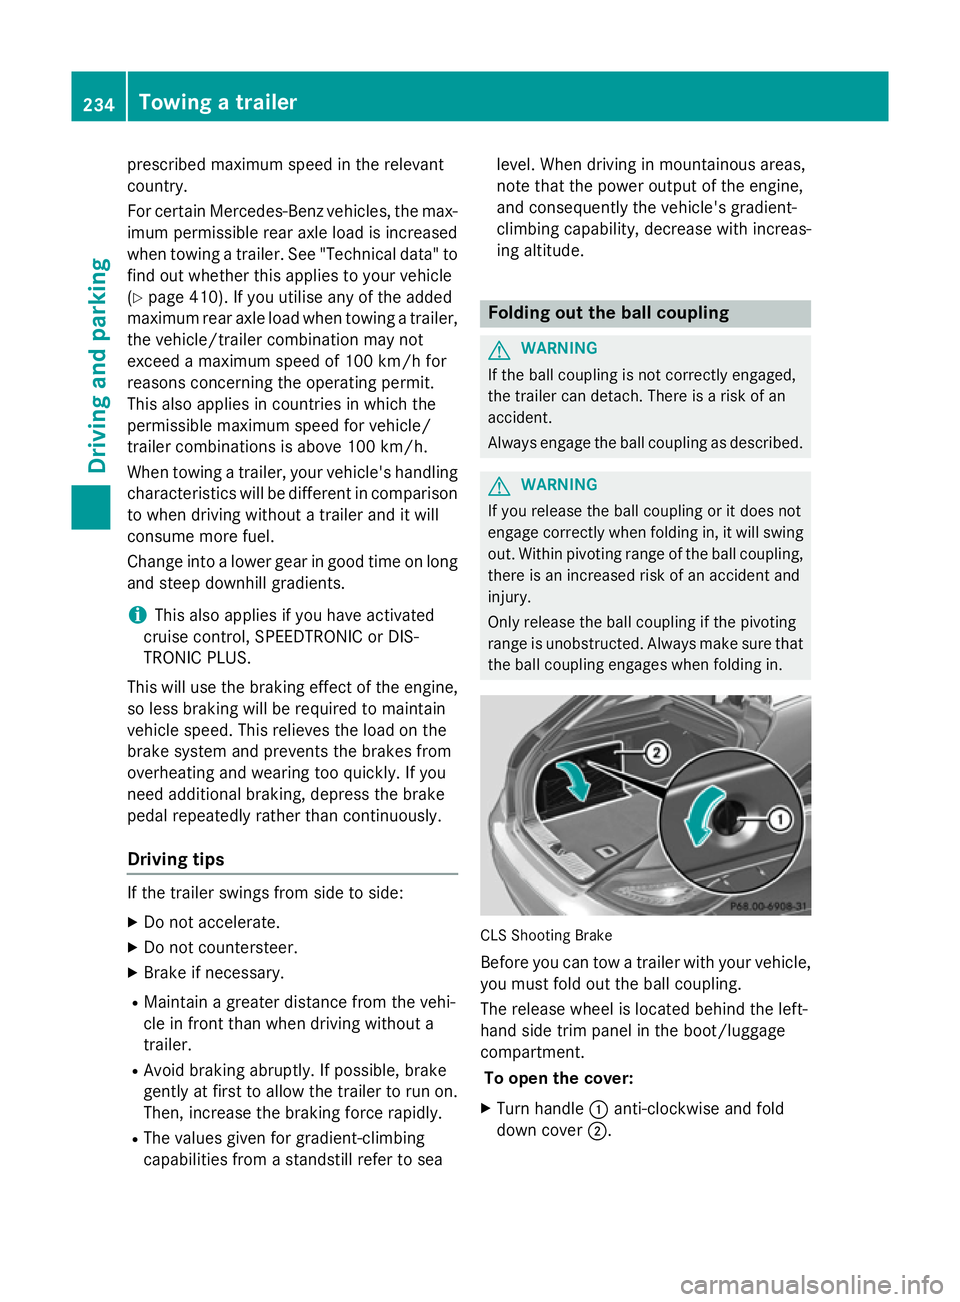
Before you can tow a trailer with your vehicle, you must fold out the ball coupling.
The release wheel is located behind the left-
hand side trim panel in the boot/luggage
compartment.
To open the cover:
X Turn handle :anti-clockwise and fold
down cover ;.234
Towing a trailerDriving and parking