2014 MERCEDES-BENZ CLS COUPE stop start
[x] Cancel search: stop startPage 63 of 417
G
WARNING
If you secure a child in a forward-facing child
restraint system on the front-passenger seat
and you position the front-passenger seat too close to the dashboard, in the event of an
accident, the child could:
R come into contact with the vehicle's inte-
rior if the PASSENGER AIR BAG OFF indi-
cator lamp is lit, for example
R be struck by the airbag if the PASSENGER
AIR BAG OFF indicator lamp is off
This poses an increased risk of injury or even fatal injury.
Move the front-passenger seat as far back as
possible. Always make sure that the shoulder belt strap is correctly routed from the vehicle
belt sash guide to the shoulder belt guide on
the child restraint system. The shoulder belt
strap must be routed forwards and down-
wards from the vehicle belt sash guide. If nec-
essary, adjust the vehicle belt sash guide and the front-passenger seat accordingly. Always
observe the information about suitable posi-
tioning of the child restraint system in this
Owner's Manual as well as the child restraint system manufacturer's installation instruc-
tions.
i Ensure that your vehicle is equipped with
automatic child seat recognition for the
front-passenger seat (Y page 61). If this
is not the case, always fit the child restraint
system on a suitable rear seat
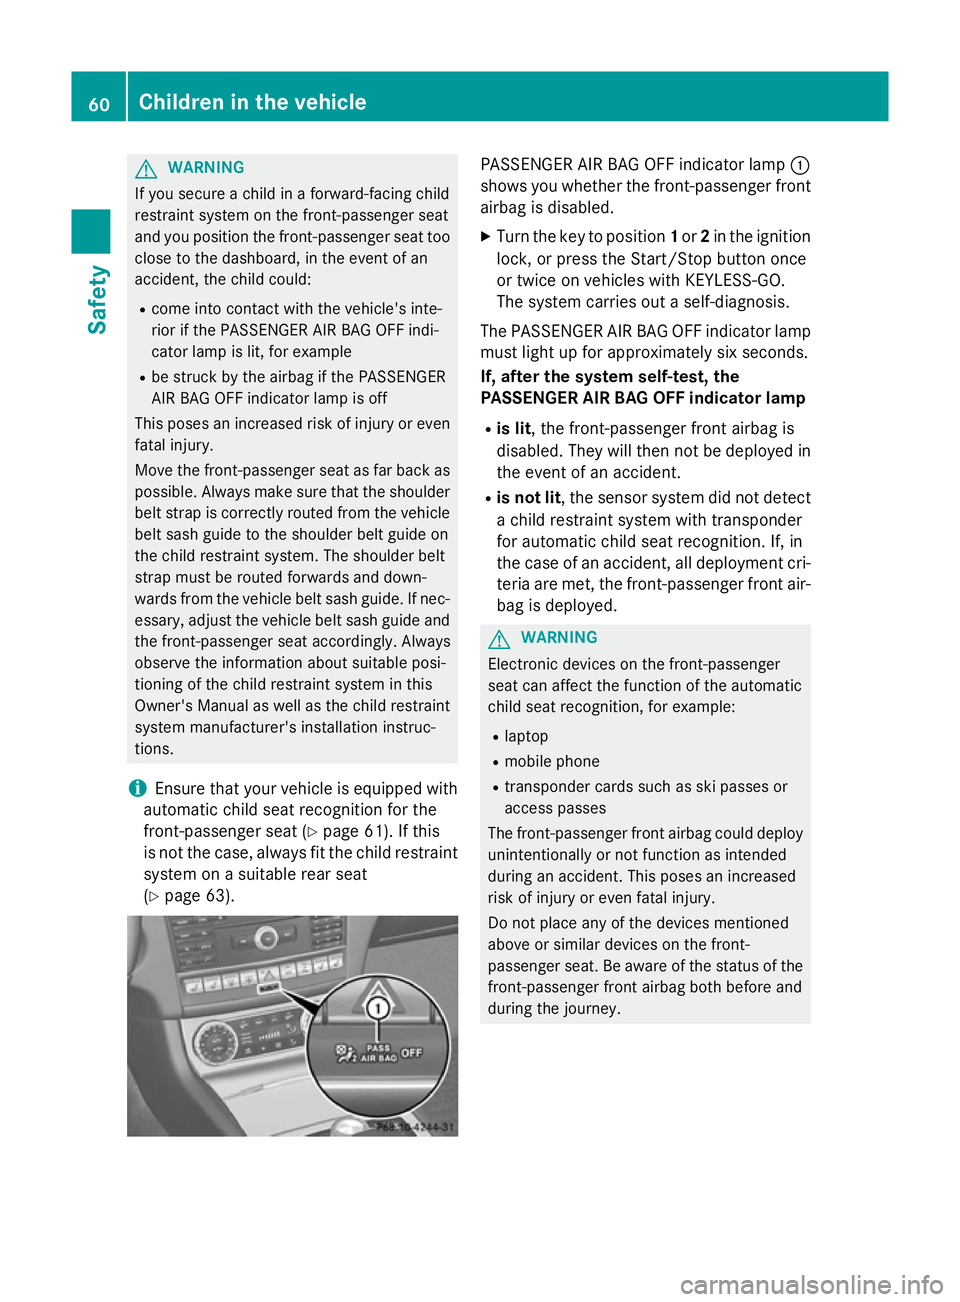
(Y page 63). PASSENGER AIR BAG OFF indicator lamp
:
shows you whether the front-passenger front airbag is disabled.
X Turn the key to position 1or 2in the ignition
lock, or press the Start/Stop button once
or twice on vehicles with KEYLESS-GO.
The system carries out a self-diagnosis.
The PASSENGER AIR BAG OFF indicator lamp
must light up for approximately six seconds.
If, after the system self-test, the
PASSENGER AIR BAG OFF indicator lamp
R is lit, the front-passenger front airbag is
disabled. They will then not be deployed in
the event of an accident.
R is not lit, the sensor system did not detect
a child restraint system with transponder
for automatic child seat recognition. If, in
the case of an accident, all deployment cri-
teria are met, the front-passenger front air-
bag is deployed. G
WARNING
Electronic devices on the front-passenger
seat can affect the function of the automatic
child seat recognition, for example:
R laptop
R mobile phone
R transponder cards such as ski passes or
access passes
The front-passenger front airbag could deploy unintentionally or not function as intended
during an accident. This poses an increased
risk of injury or even fatal injury.
Do not place any of the devices mentioned
above or similar devices on the front-
passenger seat. Be aware of the status of thefront-passenger front airbag both before and
during the journey. 60
Children in the vehicleSafety
Page 76 of 417

Important safety notes
i
Observe the "Important safety notes" sec-
tion (Y page 70). G
WARNING
If ESP ®
is malfunctioning, ESP ®
is unable to
stabilise the vehicle. In addition, other driving
safety systems are switched off. This increa-
ses the risk of skidding and an accident.
Drive on carefully. Have ESP ®
checked at a
qualified specialist workshop.
! Vehicles with 4MATIC: switch off the igni-
tion when the parking brake is being tested
using a dynamometer.
Application of the brakes by ESP ®
may oth-
erwise destroy the brake system.
! Vehicles with 4MATIC: function or per-
formance tests may only be carried out on
a 2-axle dynamometer. Before operating
the vehicle on such a dynamometer, please
consult a qualified specialist workshop.
You could otherwise damage the drive train
or the brake system.
Vehicles without 4MATIC: when towing your
vehicle with the rear axle raised, it is impor-
tant that you observe the notes on ESP ®
(Y page 359).
ESP ®
is deactivated if the åwarning lamp
in the instrument cluster lights up continu-
ously when the engine is running.
If the ÷ warning lamp and the åwarn-
ing lamp are lit continuously, ESP ®
is not
available due to a malfunction.
Observe the information on warning lamps
(Y page 291) and display messages which
may be shown in the instrument cluster
(Y page 262).
i Only use wheels with the recommended
tyre sizes. Only then will ESP ®
function
properly. Characteristics of ESP
® General notes
If the
÷ ESP warning lamp goes out before
beginning the journey, ESP ®
is automatically
active.
If ESP ®
intervenes, the ÷ESP®
warning
lamp flashes in the instrument cluster.
If ESP ®
intervenes:
X Do not deactivate ESP ®
under any circum-
stances.
X When pulling away, only depress the accel-
erator pedal as far as is necessary.
X Adapt your driving style to suit the prevail-
ing road and weather conditions.
ECO start/stop function
The ECO start/stop function switches the
engine off automatically if the vehicle stops
moving. When pulling away again, the engine
starts automatically. ESP ®
remains in its pre-
viously selected status. Example:if ESP®
was deactivated before the engine was
switched off, ESP ®
remains deactivated when
the engine is switched on again.
Deactivating/activating ESP ®
(except
AMG vehicles) Important safety notes
You can select between the following sta-
tuses of ESP:
R ESP ®
is activated
R ESP ®
is deactivated G
WARNING
If you deactivate ESP ®
, ESP ®
no longer sta-
bilises the vehicle. There is an increased risk
of skidding and an accident.
Only deactivate ESP ®
in the situations descri-
bed in the following. Driving safety systems
73Safety Z
Page 81 of 417
The braking action of PRE-SAFE
®
Brake is
ended automatically if:
R you manoeuvre to avoid the obstacle
R there is no longer any danger of a collision
R there is no longer an obstacle detected in
front of your vehicle
If you approach an obstacle and PRE-SAFE ®
Brake detects a risk of a collision, the system
will alert you both visually and acoustically. If you do not brake or take evasive action, the
system will warn you by automatically braking
the vehicle gently. If there is an increased risk
of collision, preventive passenger protection
measures (PRE-SAFE ®
) are activated
(Y page 54). If a risk of collision remains at
speeds over 30 km/h and you do not brake,
take evasive action or significantly acceler-
ate, automatic braking may be performed up
to a level of automatic emergency braking.
Automatic emergency braking is not per-
formed until immediately prior to an accident
that can no longer be avoided. Anti-theft systems
Immobiliser
The immobiliser prevents your vehicle from
being started without the correct key.
X To activate with the key: remove the key
from the ignition lock.
X To activate with KEYLESS-GO: switch the
ignition off and open the driver's door.
X To deactivate: switch on the ignition.
When leaving the vehicle, always take the key with you and lock the vehicle. Anyone can
start the engine if a valid key has been left
inside the vehicle.
i The immobiliser is always deactivated
when you start the engine. ATA (Anti-Theft Alarm system)
X
To prime: lock the vehicle with the key or
KEYLESS-GO.
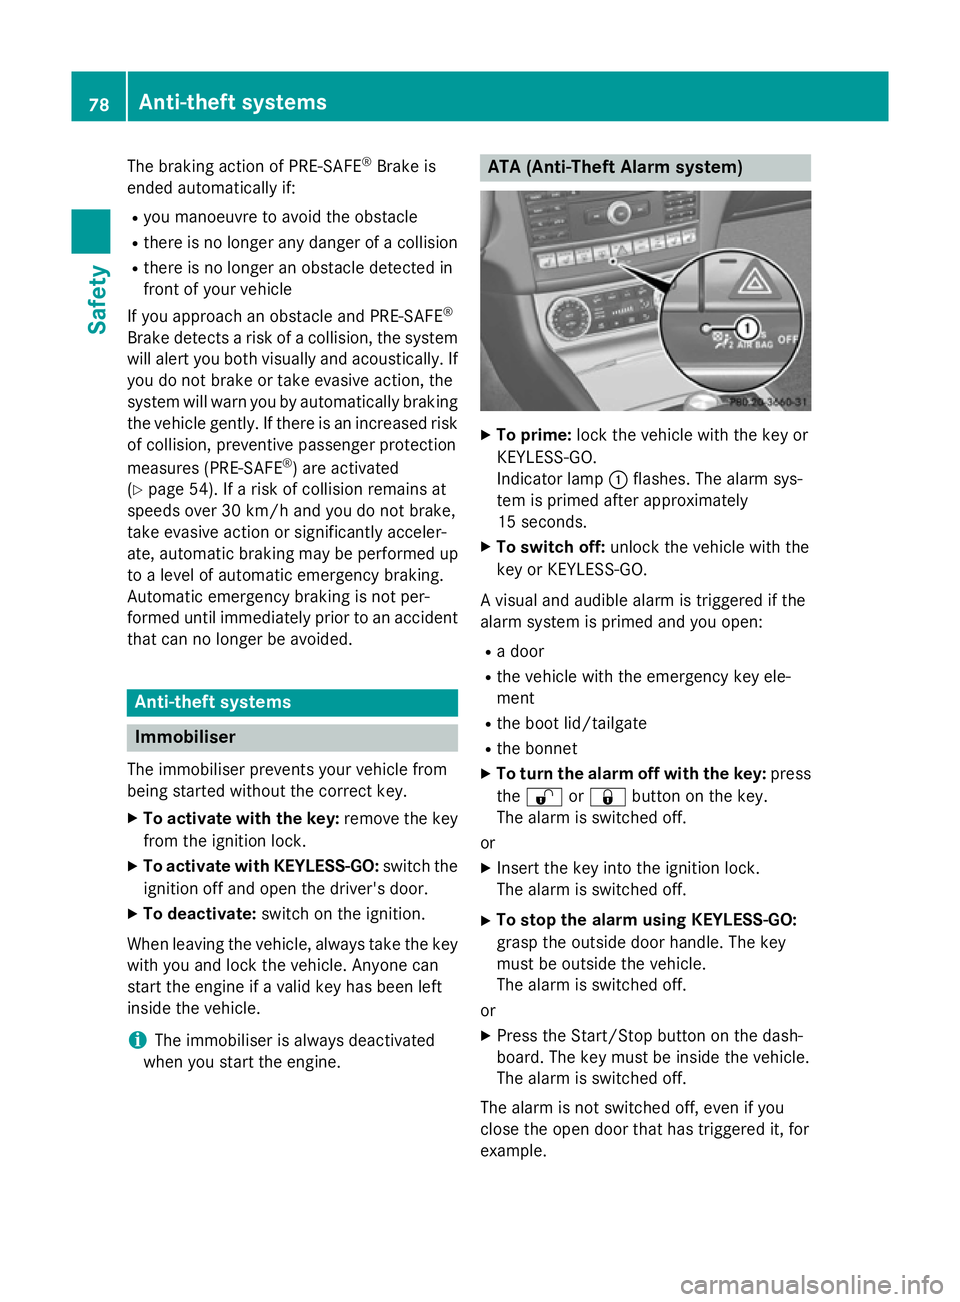
Indicator lamp :flashes. The alarm sys-
tem is primed after approximately
15 seconds.
X To switch off: unlock the vehicle with the
key or KEYLESS-GO.
A visual and audible alarm is triggered if the
alarm system is primed and you open: R a door
R the vehicle with the emergency key ele-
ment
R the boot lid/tailgate
R the bonnet
X To turn the alarm off with the key: press
the % or& button on the key.
The alarm is switched off.
or X Insert the key into the ignition lock.
The alarm is switched off.
X To stop the alarm using KEYLESS-GO:
grasp the outside door handle. The key
must be outside the vehicle.
The alarm is switched off.
or
X Press the Start/Stop button on the dash-
board. The key must be inside the vehicle.
The alarm is switched off.
The alarm is not switched off, even if you
close the open door that has triggered it, for
example. 78
Anti-theft systemsSafety
Page 87 of 417
X
To unlock the vehicle: touch the inner
surface of the door handle.
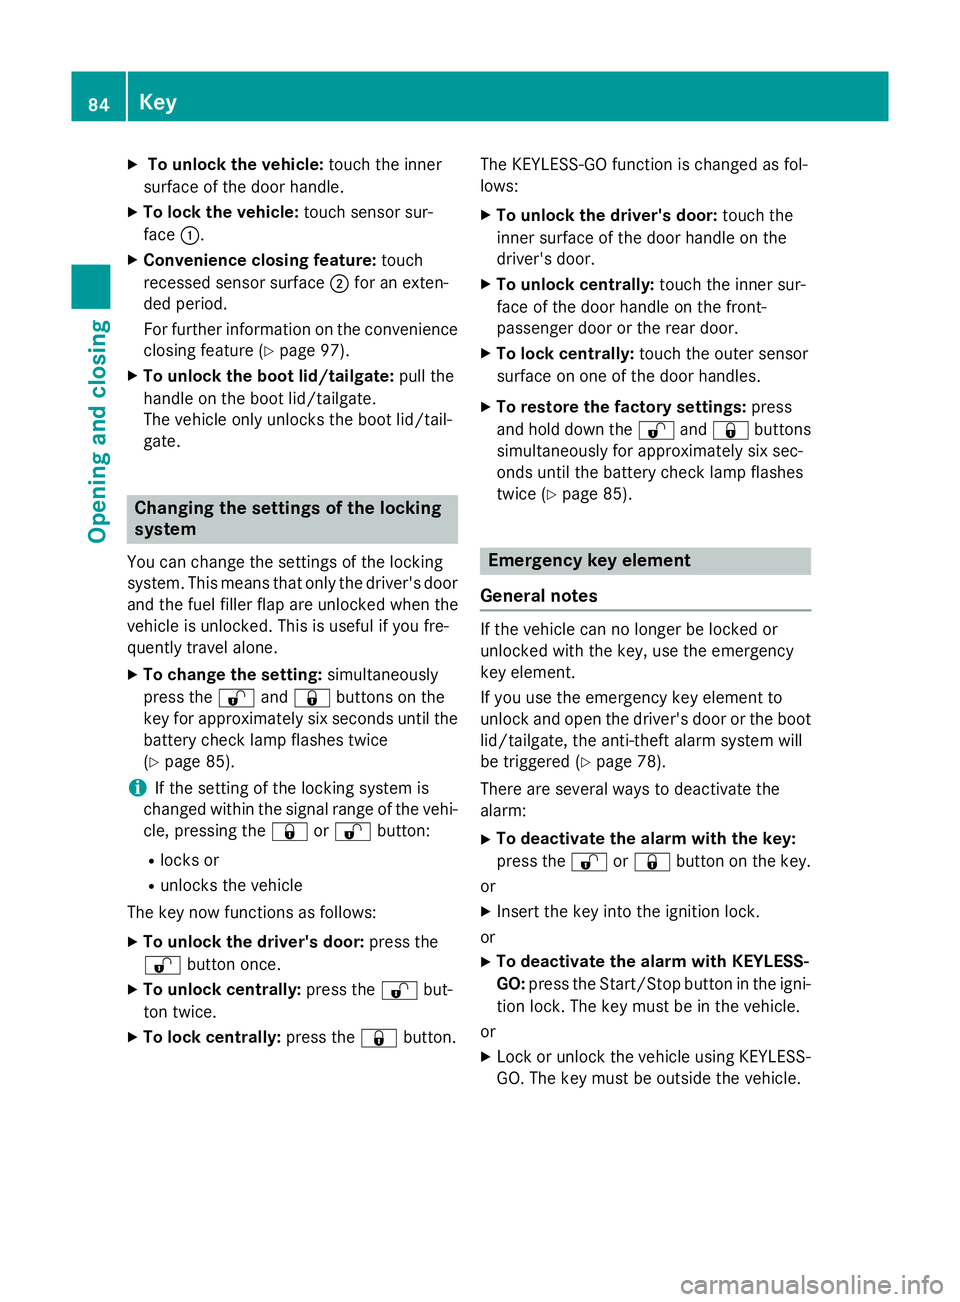
X To lock the vehicle: touch sensor sur-
face :.
X Convenience closing feature: touch
recessed sensor surface ;for an exten-
ded period.
For further information on the convenience
closing feature (Y page 97).
X To unlock the boot lid/tailgate: pull the
handle on the boot lid/tailgate.
The vehicle only unlocks the boot lid/tail-
gate. Changing the settings of the locking
system
You can change the settings of the locking
system. This means that only the driver's door
and the fuel filler flap are unlocked when the
vehicle is unlocked. This is useful if you fre-
quently travel alone.
X To change the setting: simultaneously
press the %and& buttons on the
key for approximately six seconds until the
battery check lamp flashes twice
(Y page 85).
i If the setting of the locking system is
changed within the signal range of the vehi- cle, pressing the &or% button:
R locks or
R unlocks the vehicle
The key now functions as follows:
X To unlock the driver's door: press the
% button once.
X To unlock centrally: press the%but-
ton twice.
X To lock centrally: press the&button. The KEYLESS-GO function is changed as fol-
lows:
X To unlock the driver's door: touch the
inner surface of the door handle on the
driver's door.
X To unlock centrally: touch the inner sur-
face of the door handle on the front-
passenger door or the rear door.
X To lock centrally: touch the outer sensor
surface on one of the door handles.
X To restore the factory settings: press
and hold down the %and& buttons
simultaneously for approximately six sec-
onds until the battery check lamp flashes
twice (Y page 85). Emergency key element
General notes If the vehicle can no longer be locked or
unlocked with the key, use the emergency
key element.
If you use the emergency key element to
unlock and open the driver's door or the boot
lid/tailgate, the anti-theft alarm system will
be triggered (Y page 78).
There are several ways to deactivate the
alarm:
X To deactivate the alarm with the key:
press the %or& button on the key.
or
X Insert the key into the ignition lock.
or
X To deactivate the alarm with KEYLESS-
GO: press the Start/Stop button in the igni-
tion lock. The key must be in the vehicle.
or
X Lock or unlock the vehicle using KEYLESS-
GO. The key must be outside the vehicle. 84
KeyOpening and closing
Page 100 of 417
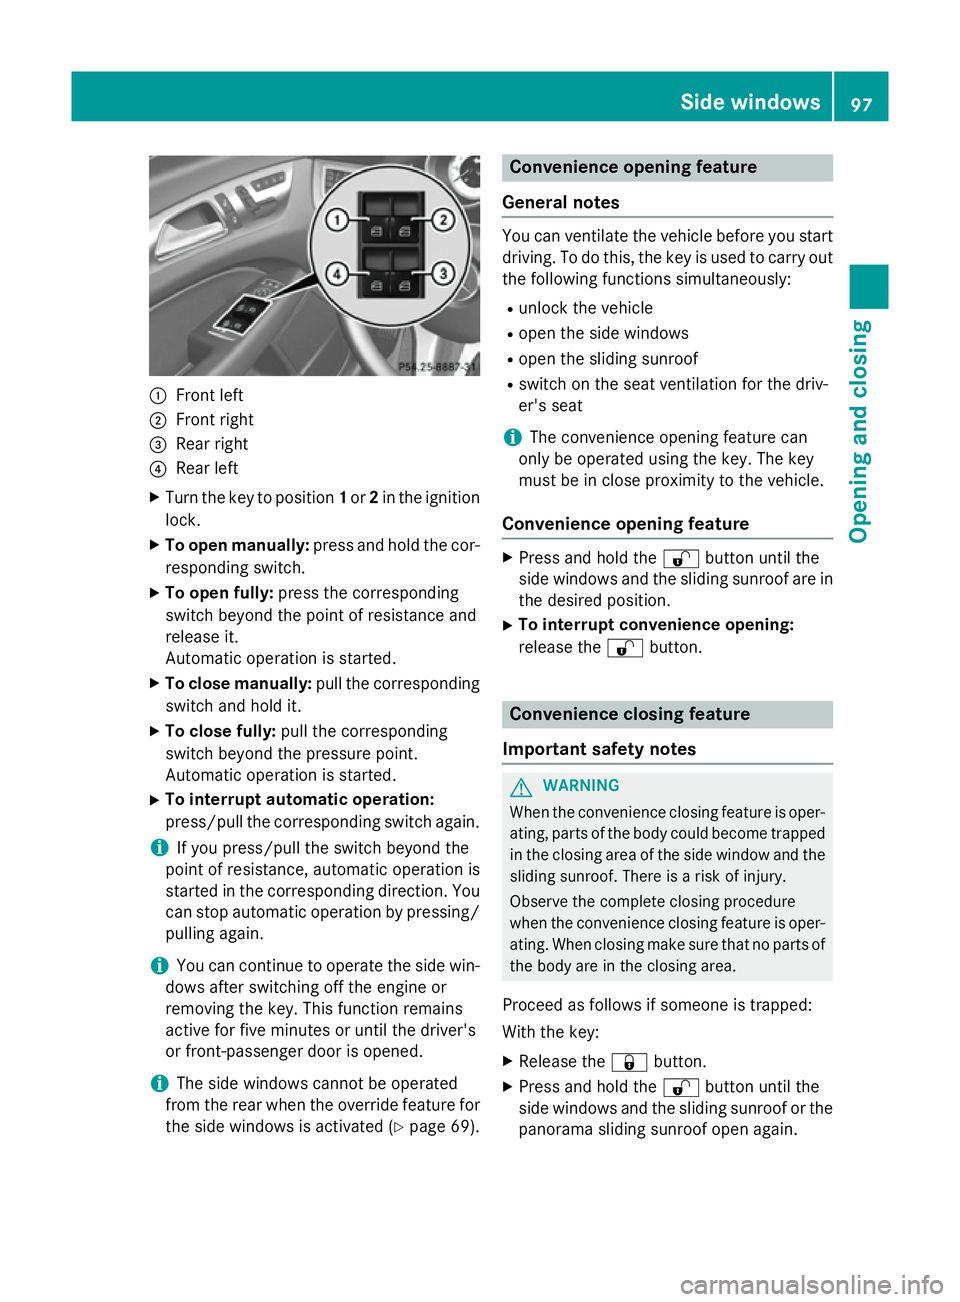
:
Front left
; Front right
= Rear right
? Rear left
X Turn the key to position 1or 2in the ignition
lock.
X To open manually: press and hold the cor-
responding switch.
X To open fully: press the corresponding
switch beyond the point of resistance and
release it.
Automatic operation is started.
X To close manually: pull the corresponding
switch and hold it.
X To close fully: pull the corresponding
switch beyond the pressure point.
Automatic operation is started.
X To interrupt automatic operation:
press/pull the corresponding switch again.
i If you press/pull the switch beyond the
point of resistance, automatic operation is
started in the corresponding direction. You
can stop automatic operation by pressing/ pulling again.
i You can continue to operate the side win-
dows after switching off the engine or
removing the key. This function remains
active for five minutes or until the driver's
or front-passenger door is opened.
i The side windows cannot be operated
from the rear when the override feature for
the side windows is activated (Y page 69). Convenience opening feature
General notes You can ventilate the vehicle before you start
driving. To do this, the key is used to carry out the following functions simultaneously:
R unlock the vehicle
R open the side windows
R open the sliding sunroof
R switch on the seat ventilation for the driv-
er's seat
i The convenience opening feature can
only be operated using the key. The key
must be in close proximity to the vehicle.
Convenience opening feature X
Press and hold the %button until the
side windows and the sliding sunroof are in the desired position.
X To interrupt convenience opening:
release the %button. Convenience closing feature
Important safety notes G
WARNING
When the convenience closing feature is oper- ating, parts of the body could become trapped
in the closing area of the side window and the
sliding sunroof. There is a risk of injury.
Observe the complete closing procedure
when the convenience closing feature is oper-
ating. When closing make sure that no parts of the body are in the closing area.
Proceed as follows if someone is trapped:
With the key:
X Release the &button.
X Press and hold the %button until the
side windows and the sliding sunroof or the
panorama sliding sunroof open again. Side windows
97Opening and closing Z
Page 103 of 417
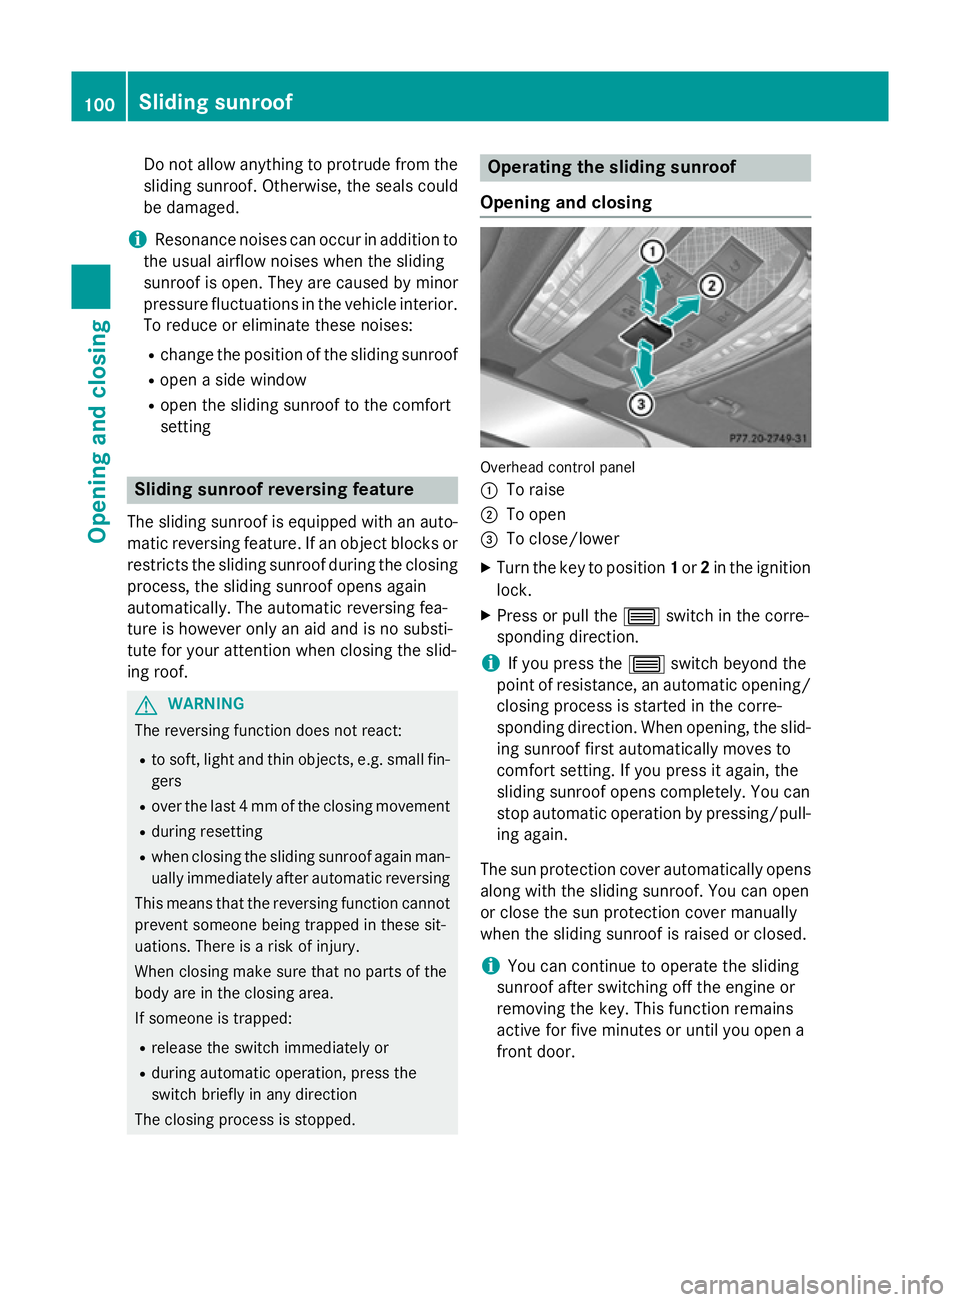
Do not allow anything to protrude from the
sliding sunroof. Otherwise, the seals could
be damaged.
i Resonance noises can occur in addition to
the usual airflow noises when the sliding
sunroof is open. They are caused by minor
pressure fluctuations in the vehicle interior.
To reduce or eliminate these noises:
R change the position of the sliding sunroof
R open a side window
R open the sliding sunroof to the comfort
setting Sliding sunroof reversing feature
The sliding sunroof is equipped with an auto-
matic reversing feature. If an object blocks or restricts the sliding sunroof during the closing
process, the sliding sunroof opens again
automatically. The automatic reversing fea-
ture is however only an aid and is no substi-
tute for your attention when closing the slid-
ing roof. G
WARNING
The reversing function does not react:
R to soft, light and thin objects, e.g. small fin-
gers
R over the last 4 mm of the closing movement
R during resetting
R when closing the sliding sunroof again man-
ually immediately after automatic reversing
This means that the reversing function cannot prevent someone being trapped in these sit-
uations. There is a risk of injury.
When closing make sure that no parts of the
body are in the closing area.
If someone is trapped:
R release the switch immediately or
R during automatic operation, press the
switch briefly in any direction
The closing process is stopped. Operating the sliding sunroof
Opening and closing Overhead control panel
:
To raise
; To open
= To close/lower
X Turn the key to position 1or 2in the ignition
lock.
X Press or pull the 3switch in the corre-
sponding direction.
i If you press the
3switch beyond the
point of resistance, an automatic opening/ closing process is started in the corre-
sponding direction. When opening, the slid-
ing sunroof first automatically moves to
comfort setting. If you press it again, the
sliding sunroof opens completely. You can
stop automatic operation by pressing/pull- ing again.
The sun protection cover automatically opens
along with the sliding sunroof. You can open
or close the sun protection cover manually
when the sliding sunroof is raised or closed.
i You can continue to operate the sliding
sunroof after switching off the engine or
removing the key. This function remains
active for five minutes or until you open a
front door. 100
Sliding sunroofOpening and closing
Page 139 of 417
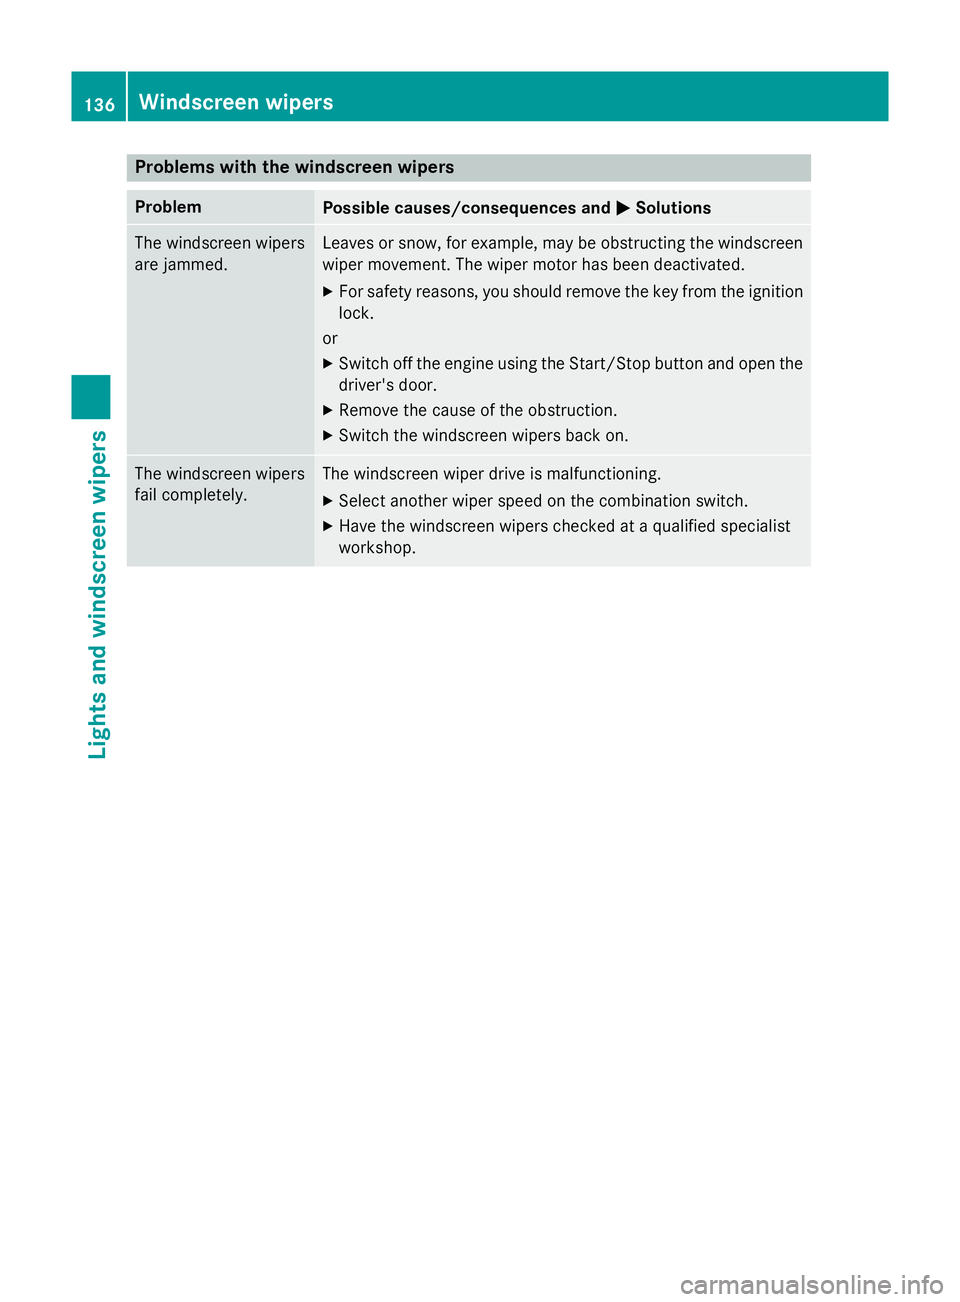
Problems with the windscreen wipers
Problem
Possible causes/consequences and
M
MSolutions The windscreen wipers
are jammed. Leaves or snow, for example, may be obstructing the windscreen
wiper movement. The wiper motor has been deactivated.
X For safety reasons, you should remove the key from the ignition
lock.
or
X Switch off the engine using the Start/Stop button and open the
driver's door.
X Remove the cause of the obstruction.
X Switch the windscreen wipers back on. The windscreen wipers
fail completely. The windscreen wiper drive is malfunctioning.
X Select another wiper speed on the combination switch.
X Have the windscreen wipers checked at a qualified specialist
workshop. 136
Windscreen wipersLights and windscreen wipers
Page 143 of 417

tom of the screen in the COMAND display.
See also the separate COMAND Online
operating instructions. You will see the cur- rent settings of the various climate controlfunctions.
ECO start/stop function During automatic engine switch-off, the cli-
mate control only operates at a reduced capa- city. If you require the full climate control out-
put, you can switch off the ECO start/stop
function by pressing the ECO button
(Y page 164). 140
Overvie
w of climate cont rol systemsClimate control