2014 MERCEDES-BENZ CLA-Class fold seats
[x] Cancel search: fold seatsPage 16 of 358

Operator's Manual
Vehicle equipment ........................... 22
Outside temperature display ........... 197
Overhead control panel ......................36
Override feature Rear side windows ........................... 63 P
Paint code number ............................346
Paintwork (cleaning instructions) ... 289
Panic alarm .......................................... 40
Panorama roof with power tilt/
sliding panel
Important safety notes .................... 90
Opening/closing the roller sun-
blind ................................................. 93
Problem (malfunction) ..................... 94
Rain closing feature ......................... 92
Resetting ......................................... 93
Parcel net .......................................... .259
Parking ............................................... 157
Important safety notes .................. 157
Parking brake ................................ 158
Position of exterior mirror, front-
passenger side ............................... 104
Rear view camera .......................... 186
see Active Parking Assist
see PARKTRONIC
Parking aid
Active Parking Assist ..................... 181
see Exterior mirrors
see PARKTRONIC
Parking assistance
see PARKTRONIC
Parking brake
Display message ............................ 217
Electric parking brake .................... 158
Warning lamp ................................. 250
Parking lamps
Switching on/off ........................... 110
PARKTRONIC
Deactivating/activating ................. 180
Driving system ............................... 178
Function/notes ............................ .178
Important safety notes .................. 178
Problem (malfunction) ................... 181 Range of the sensors ..................... 179
Warning displa y............................. 180
PASSENGER AIR BAG OFF
Problems (malfunction) .................. 225
PASSENGER AIR BAG OFF indicator
lamp ...................................................... 47
Plastic trim (cleaning instruc-
tions) .................................................. 292
Power washers .................................. 289
Power windows see Side windows
Program selector button .................. 150
Protection of the environment General notes .................................. 21
Pulling away
Automatic transmission ................. 142 Q
Qualified specialist workshop ........... 26 R
RACE START (AMG vehicles) ............. 177
RACETIMER (on-board computer) .... 211
Radar sensor system Activating/deactivating ................. 209
Display message ............................ 233
Radio
Selecting a station ......................... 202
see separate operating instructions
Radio-wave reception/transmis-
sion in the vehicle
Declaration of conformity ................ 25
Rain closing feature (panorama
roof with power tilt/sliding panel) .... 92
Reading lamp ..................................... 113
Rear compartment Setting the air vents ...................... 137
Rear fog lamp
Changing bulb s.............................. 117
Display message ............................ 228
Switching on/of f........................... 109
Rear lamps
see Lights
Rear seats
Folding the backrest forwards/
back ............................................... 260 14
Index
Page 17 of 358

Rear view camera
Cleaning instructions ..................... 291
Function/notes ............................ .186
Switching on/off ........................... 186
Rear-view mirror
Anti-glare (manual) ........................ 103
Dipping (automatic) ....................... 104
Rear window defroster
Problem (malfunction) ................... 135
Switching on/off ........................... 134
Refrigerant (air-conditioning sys-
tem)
Important safety notes .................. 352
Refueling
Fuel gauge ....................................... 31
Important safety notes .................. 155
Refueling process .......................... 156
see Fuel
Remote control
Garage door opene r....................... 274
Programming (garage door
opener) .......................................... 275
Replacing bulbs
Important safety notes .................. 114
Overview of bulb types .................. 115
Removing/replacing the cover
(front wheel arch) .......................... 116
Reporting safety defects .................... 26
Reserve (fuel tank) see Fuel
Reserve fuel
Display message ............................ 231
Warning lamp ................................. 251
see Fuel
Residual heat (climate control) ........ 135
Restraint system see SRS (Supplemental Restraint
System)
Reverse gear (selector lever) ........... 148
Reversing feature Panorama sliding sunroof ................ 91
Roller sunblind s............................... 92
Side windows ................................... 87
Roadside Assistance (breakdown) .... 23Roller sunblind
Opening/closing .............................. 93
Panorama roof with power tilt/
sliding panel ..................................... 92
Roof carrier ........................................ 261
Roof lining and carpets (cleaning
guidelines) ......................................... 294
Roof load (maximum) ........................ 353
Route (navigation) see Route guidance (navigation)
Route guidance (navigation) ............ 201 S
Safety Children in the vehicle ..................... 56
Child restraint systems .................... 56
Occupant Classification System
(OCS) ............................................... 47
Safety system
see Driving safety systems
Seat
Adjusting (Performance Seat) ........ 100
Seat belts
Adjusting the height ......................... 54
Belt force limiters ............................ 55
Cleaning ......................................... 294
Correct usage .................................. 52
Emergency Tensioning Devices ........ 55
Fastening ......................................... 53
Important safety guidelines ............. 52
Releasing ......................................... 54
Safety guidelines ............................. 42
Warning lamp ................................. 243
Warning lamp (function) ................... 55
Seats
Adjusting (electrically) ..................... 99
Adjusting (manually) ........................ 98
Adjusting the 4-way lumbar sup-
port ................................................ 100
Adjusting the head restraint ............ 99
Cleaning the cover ......................... 293
Correct driver's seat position ........... 96
Folding the backrest (rear com-
partment) forwards/back .............. 260
Important safety notes .................... 97
Seat heating problem .................... 102 Index
15
Page 39 of 358

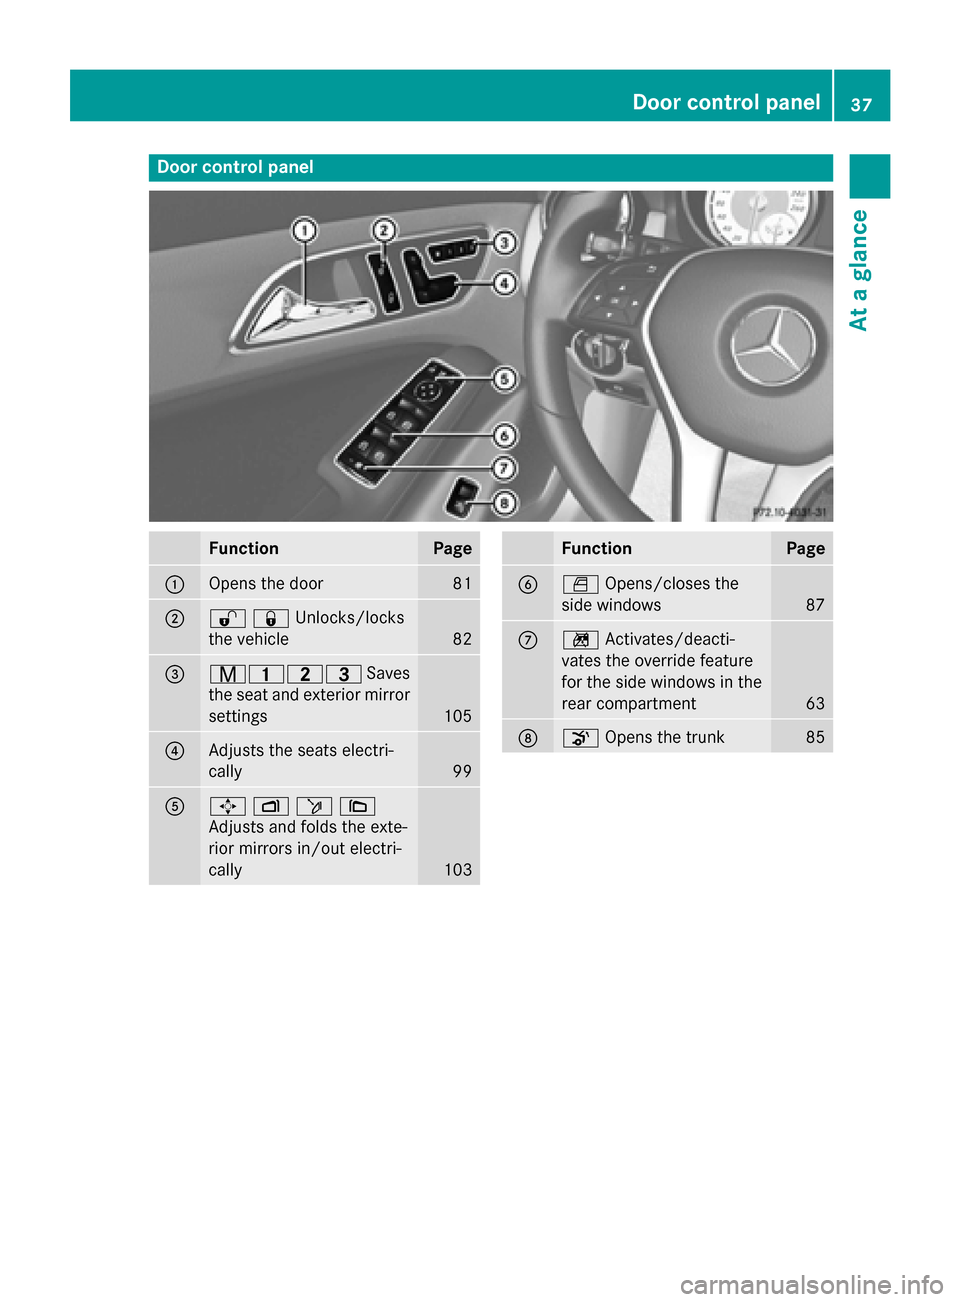
Door control panel
Function Page
0043
Opens the door 81
0044
00360037Unlocks/locks
the vehicle
82
0087
008D003700380040
Saves
the seat and exterior mirror settings 105
0085
Adjusts the seats electri-
cally
99
0083
0062
007000F50071
Adjusts and folds the exte-
rior mirrors in/out electri-
cally 103 Function Page
0084
0062
Opens/closes the
side windows 87
006B
0089
Activates/deacti-
vates the override feature
for the side windows in the
rear compartment 63
006C
008A
Opens the trunk 85Door control panel
37At a glance
Page 63 of 358

X
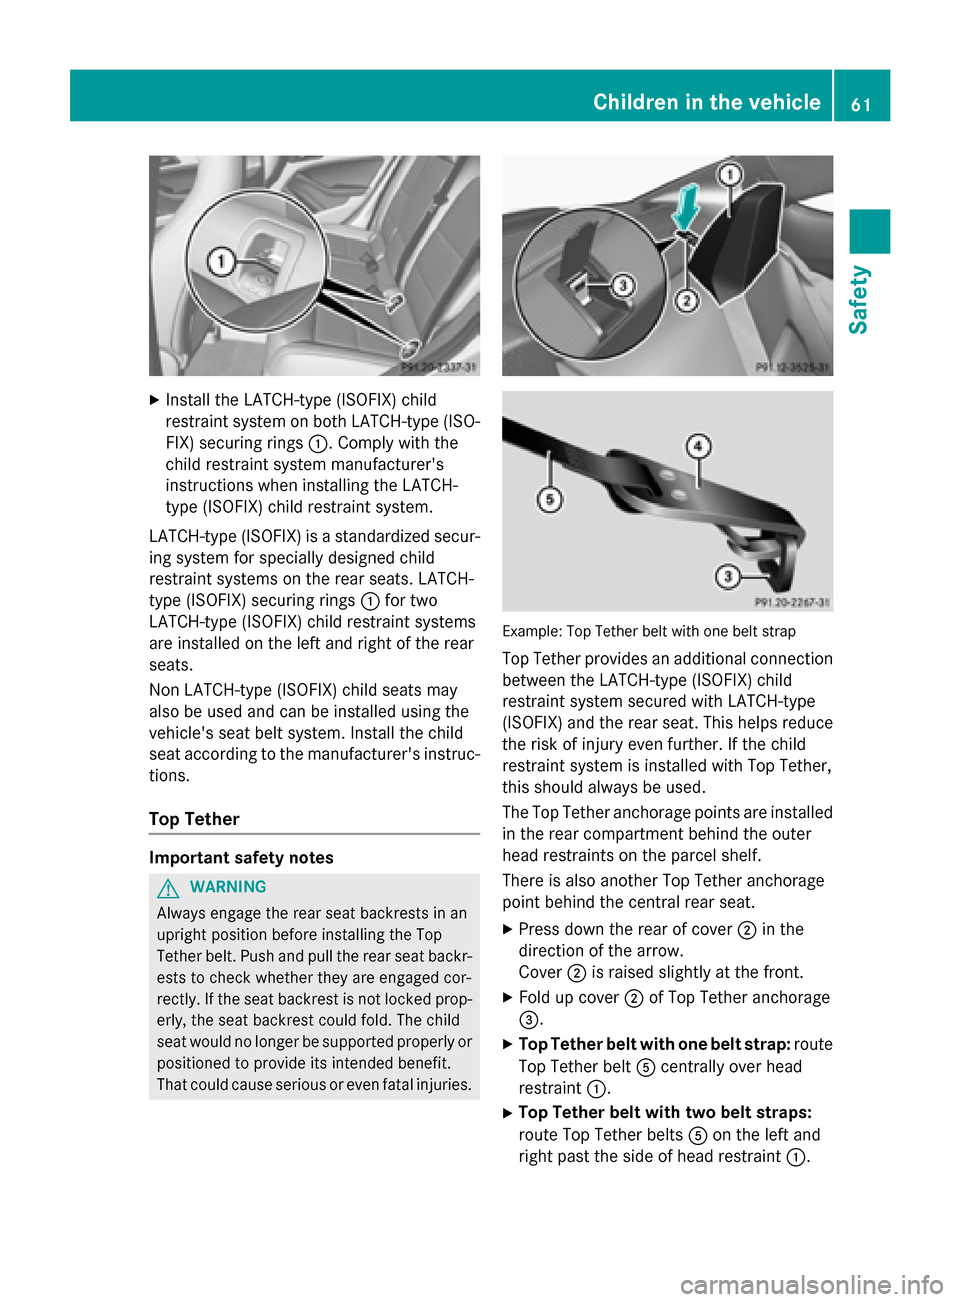
Install the LATCH-type (ISOFIX) child
restraint system on both LATCH-type (ISO-
FIX) securing rings 0043. Comply with the
child restraint system manufacturer's
instructions when installing the LATCH-
type (ISOFIX) child restraint system.
LATCH-type (ISOFIX) is a standardized secur- ing system for specially designed child
restraint systems on the rear seats. LATCH-
type (ISOFIX) securing rings 0043for two
LATCH-type (ISOFIX) child restraint systems
are installed on the left and right of the rear
seats.
Non LATCH-type (ISOFIX) child seats may
also be used and can be installed using the
vehicle's seat belt system. Install the child
seat according to the manufacturer's instruc-
tions.
Top Tether Important safety notes
G
WARNING
Always engage the rear seat backrests in an
upright position before installing the Top
Tether belt. Push and pull the rear seat backr- ests to check whether they are engaged cor-
rectly. If the seat backrest is not locked prop-
erly, the seat backrest could fold. The child
seat would no longer be supported properly or
positioned to provide its intended benefit.
That could cause serious or even fatal injuries. Example: Top Tether belt with one belt strap
Top Tether provides an additional connection
between the LATCH-type (ISOFIX) child
restraint system secured with LATCH-type
(ISOFIX) and the rear seat. This helps reduce the risk of injury even further. If the child
restraint system is installed with Top Tether,
this should always be used.
The Top Tether anchorage points are installed
in the rear compartment behind the outer
head restraints on the parcel shelf.
There is also another Top Tether anchorage
point behind the central rear seat.
X Press down the rear of cover 0044in the
direction of the arrow.
Cover 0044is raised slightly at the front.
X Fold up cover 0044of Top Tether anchorage
0087.
X Top Tether belt with one belt strap: route
Top Tether belt 0083centrally over head
restraint 0043.
X Top Tether belt with two belt straps:
route Top Tether belts 0083on the left and
right past the side of head restraint 0043. Children in the vehicle
61Safety Z
Page 100 of 358

years old and under must be seated and prop-
erly secured in an appropriately sized child
restraint system or booster seat recommen-
ded for the size and weight of the child. For
additional information, see the "Children in
the vehicle" section.
A child's risk of serious or fatal injuries is sig- nificantly increased if the child restraints are
not properly secured in the vehicle and/or the child is not properly secured in the child
restraint.
! To avoid damage to the seats and the seat
heating, observe the following information:
R keep liquids from spilling on the seats. If
liquid is spilled on the seats, dry them as soon as possible.
R if the seat covers are damp or wet, do not
switch on the seat heating. The seat
heating should also not be used to dry
the seats.
R clean the seat covers as recommended;
see the "Interior care" section.
R do not transport heavy loads on the
seats. Do not place sharp objects on the
seat cushions, e.g. knives, nails or tools.
The seats should only be occupied by
passengers, if possible.
R when the seat heating is in operation, do
not cover the seats with insulating mate- rials, e.g. blankets, coats, bags, seat cov-
ers, child seats or booster seats.
! Make sure that there are no objects in the
footwell under or behind the seats when
moving the seats back. There is a risk that
the seats and/or the objects could be dam-
aged.
i Further related subjects:
R cargo compartment enlargement (fold-
ing down the rear seats) (Y page 259) Adjusting the seats manually
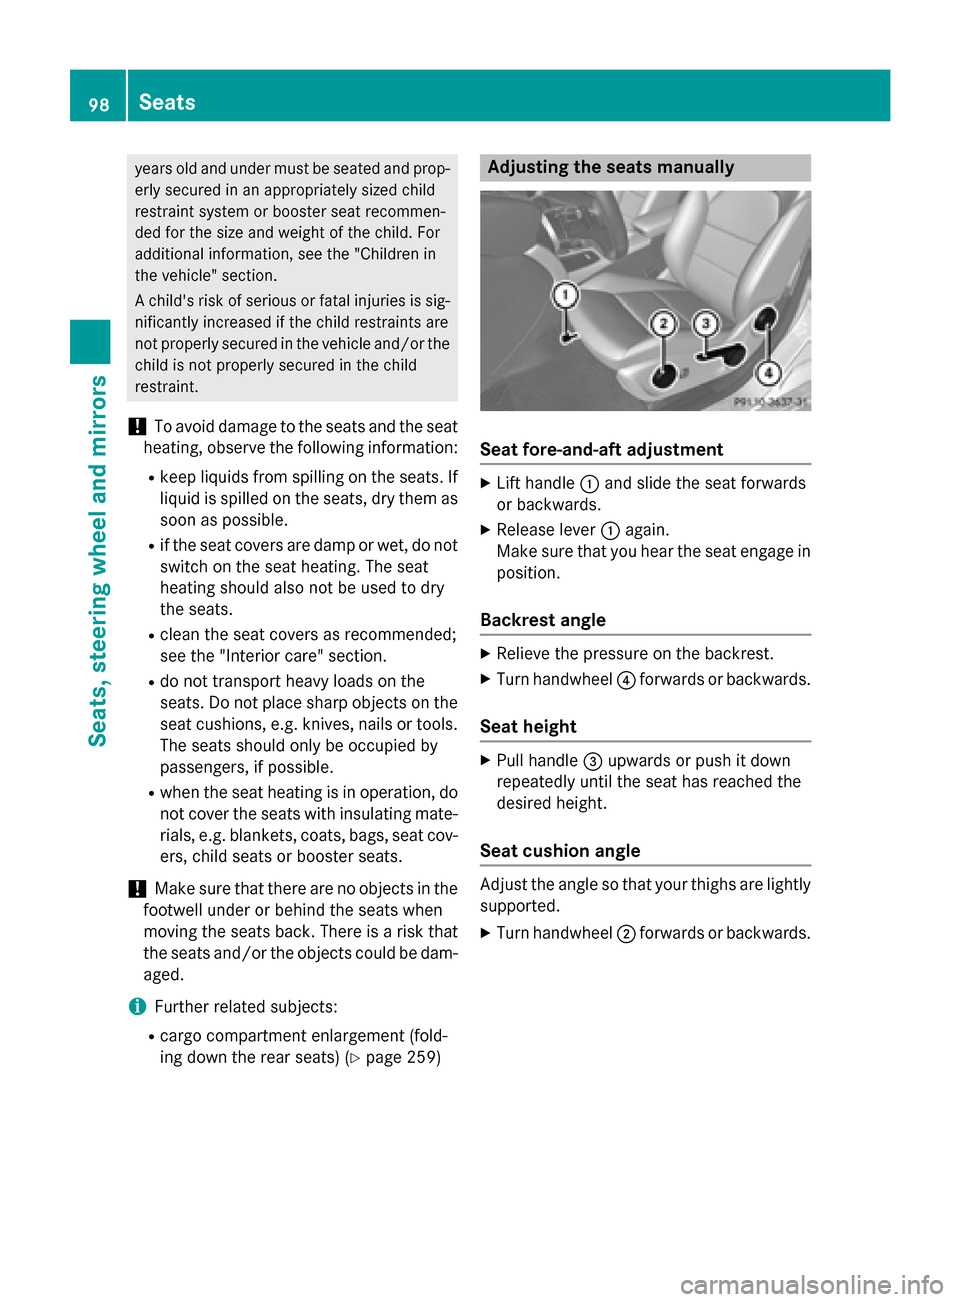
Seat fore-and-aft adjustment
X
Lift handle 0043and slide the seat forwards
or backwards.
X Release lever 0043again.
Make sure that you hear the seat engage in
position.
Backrest angle X
Relieve the pressure on the backrest.
X Turn handwheel 0085forwards or backwards.
Seat height X
Pull handle 0087upwards or push it down
repeatedly until the seat has reached the
desired height.
Seat cushion angle Adjust the angle so that your thighs are lightly
supported.
X Turn handwheel 0044forwards or backwards. 98
SeatsSeats
, steering wheel and mirrors
Page 105 of 358

Mirrors
Rear-view mirror
X
Anti-glare mode: flick anti-glare lever 0043
forwards or back. Exterior mirrors
Adjusting the exterior mirrors G
WARNING
The exterior mirror on the front-passenger
side reduces the size of the image. Visible
objects are actually closer than they appear.
This means that you could misjudge the dis-
tance from road users traveling behind, e.g.
when changing lane. There is a risk of an acci-
dent.
For this reason, always make sure of the
actual distance from the road users traveling
behind by glancing over your shoulder. X
Turn the SmartKey to position 1or 2in the
ignition lock (Y page 141).
X Press button 0043for the left-hand exterior
mirror or button 0044for the right-hand exte-
rior mirror.
The indicator lamp in the corresponding
button lights up in red.
The indicator lamp goes out again after
some time. You can adjust the selected
mirror using adjustment button 0087as long
as the indicator lamp is lit.
X Press adjustment button 0087up, down, or to
the left or right until you have adjusted the
exterior mirror to the correct position. You
should have a good overview of traffic con- ditions.
The convex exterior mirrors provide a larger
field of vision.
After the engine has been started, the exte-
rior mirrors are automatically heated at low
outside temperatures. Heating takes a maxi-
mum of ten minutes.
i You can also heat up the exterior mirrors
manually by switching on the rear window
defroster.
Folding the exterior mirrors in or out
electrically This function is only available in Canada.
X
Turn the SmartKey to position 1or 2in the
ignition lock (Y page 141).
X Briefly press button 0043.
Both exterior mirrors fold in or out. Mirrors
103Seats, steering wheel and mirrors Z
Page 106 of 358

i
Make sure that the exterior mirrors are
always folded out fully while driving. They
could otherwise vibrate.
i If you are driving faster than 30 mph
(47 km/h), you can no longer fold in the
exterior mirrors.
Setting the exterior mirrors This function is only available in Canada.
If the battery has been disconnected or com-
pletely discharged, the exterior mirrors must
be reset. The exterior mirrors will otherwise
not fold in when you select the "Fold in mir-
rors when locking" function in the on-board
computer (Y page 210).
X Turn the SmartKey to position 1in the igni-
tion lock (Y page 141).
X Briefly press button 0043.
Folding the exterior mirrors in or out
automatically This function is only available in Canada.
If the "Fold in mirrors when locking" function
is activated in the on-board computer
(Y page 210):
R the exterior mirrors fold in automatically as
soon as you lock the vehicle from the out-
side.
R the exterior mirrors fold out again automat-
ically as soon as you unlock the vehicle and
then open the driver's or front-passenger
door.
i If the exterior mirrors have been folded in
manually, they do not fold out.
Exterior mirror pushed out of position If an exterior mirror has been pushed out of
position, proceed as follows:
X Vehicles without electrically folding
exterior mirrors: move the exterior mirror
into the correct position manually.
X Vehicles with electrically folding exte-
rior mirrors: press and hold mirror-folding button (Y
page 103) until you hear a click
and then the mirrors engage in position.
The mirror housing is engaged again and
you can adjust the exterior mirrors as usual
(Y page 103). Automatic anti-glare mirrors
The "Automatic anti-glare mirrors" function is
only available if the vehicle is equipped with
the "Mirrors package".
The rear-view mirror and the exterior mirror
on the driver's side automatically go into anti- glare mode if:
R the ignition is switched on and
R incident light from headlamps strikes the
sensor in the rear-view mirror.
The mirrors do not go into anti-glare mode if
reverse gear is engaged or the interior lighting is switched on. Parking position for the exterior mir-
ror on the front-passenger side
General notes The "Parking position of the exterior mirror on
the front-passenger side" function is only
available if the vehicle is equipped with the
"Mirrors package".
Setting and storing the parking position Using reverse gear
You can position the front-passenger side
exterior mirror in such a way that you can see
the rear wheel on that side as soon as you
engage reverse gear. You can store this posi-
tion. 104
MirrorsSeats, steering wheel and mirrors