2014 MERCEDES-BENZ CLA-Class light
[x] Cancel search: lightPage 74 of 358

wheel in the direction required for vehicle
stabilization.
This steering assistance is provided in partic-
ular if:
R both right wheels or both left wheels are on
a wet or slippery road surface when you
brake.
R the vehicle starts to skid.
Important safety notes No steering support is provided from STEER
CONTROL, if:
R ESP ®
is malfunctioning.
R the lighting is faulty.
Power steering will, however, continue to
function. Theft deterrent locking system
Immobilizer
The immobilizer prevents your vehicle from
being started without the correct SmartKey. X To activate: remove the SmartKey from
the ignition lock.
X To deactivate: switch on the ignition.
When leaving the vehicle, always take the
SmartKey with you and lock the vehicle. The
engine can be started by anyone with a valid
SmartKey that is left inside the vehicle.
i The immobilizer is always deactivated
when you start the engine.
In the event that the engine cannot be star- ted when the starter battery is fully
charged, the immobilizer may be faulty.
Contact an authorized Mercedes-Benz
Center or call 1-800-FOR-MERCedes (in the USA) or 1-800-387-0100 (in Canada). ATA (anti-theft alarm system)
X
To arm: lock the vehicle with the Smart-
Key.
Indicator lamp 0043flashes. The alarm sys-
tem is armed after approximately
15 seconds.
X To disarm: unlock the vehicle with the
SmartKey.
or
X Insert the SmartKey into the ignition lock.
A visual and audible alarm is triggered if the
alarm system is armed and you open:
R the vehicle with the mechanical key
R a door
R the trunk lid
R the hood
X To stop the alarm: insert the SmartKey
into the ignition lock.
The alarm is switched off.
or
X Press the 0036or0037 button on the
SmartKey.
The alarm is switched off.
The alarm is not switched off, even if you
close the open door that triggered it, for
example. 72
Theft deterrent locking systemSafety
Page 79 of 358

X
To lock centrally: press button0043.
The SmartKey centrally locks/unlocks: R the doors
R the trunk lid
R the fuel filler flap
The turn signals flash once when unlocking
and three times when locking.
i When it is dark, the surround lighting also
comes on if it is activated in the on-board
computer (Y page 208).
i You can also set an audible signal to con-
firm that the vehicle has been locked. The
audible signal can be activated and deacti- vated using the on-board computer
(Y page 209).
X To open the trunk lid automatically:
press and hold button 0044until the trunk lid
opens (Y page 85). Changing the settings of the locking
system
You can change the settings of the locking
system. When you then unlock the vehicle
only the driver's door and the fuel filler flap
are unlocked. This is useful if you frequently
travel on your own.
X To change the setting: press and hold
down the 0036and0037 buttons simulta-
neously for approximately six seconds until
the battery check lamp (Y page 78)
flashes twice.
i If the setting of the locking system is
changed within the signal range of the vehi- cle, pressing the 0037or0036 button:
R locks or
R unlocks the vehicle
The SmartKey now functions as follows:
X To unlock the driver's door: press the
0036 button once.
X To unlock centrally: press the0036but-
ton twice. X
To lock centrally: press the0037button.
X To restore the factory settings: press
and hold down the 0036and0037 buttons
simultaneously for approximately six sec-
onds until the battery check lamp flashes
twice (Y page 78). Mechanical key
General notes If the vehicle can no longer be unlocked with
the SmartKey, use the mechanical key.
If you use the mechanical key to unlock and
open the driver's door, the anti-theft alarm
system will be triggered (Y page 72).
There are several ways to turn off the alarm:
X Press the 0036or0037 button on the
SmartKey.
or X Insert the SmartKey into the ignition lock.
If you unlock the vehicle using the mechanical key, the fuel filler flap will not be unlocked
automatically.
X To unlock the fuel filler flap: insert the
SmartKey into the ignition lock.
Removing the mechanical key X
Push release catch 0043in the direction of
the arrow and at the same time remove
mechanical key 0044from the SmartKey. SmartKey
77Opening and closing Z
Page 80 of 358

For further information about:
R unlocking the driver's door (Y page 83)
R unlocking the trunk (Y page 86)
R locking the vehicle (Y page 83)
Inserting the mechanical key X
Push mechanical key 0044completely into
the SmartKey until it engages, and release
catch 0043is back in its basic position. SmartKey battery
Important safety notes G
WARNING
Batteries contain toxic and corrosive substan- ces. If batteries are swallowed, it can result in
severe health problems. There is a risk of fatal injury.
Keep batteries out of the reach of children. If
a battery is swallowed, seek medical attention immediately.
The SmartKey batteries contain perchlorate
material, which may require special handling
and regard for the environment. National
guidelines must be observed during disposal.
In California, see www.dtsc.ca.gov/
HazardousWaste/Perchlorate/
index.cfm.
Mercedes-Benz recommends that you have
the batteries replaced at a qualified specialist workshop. Checking the battery X
Press the 0037or0036 button.
The battery is working properly if battery
check lamp 0043lights up briefly.
The battery is discharged if battery check
lamp 0043does not light up briefly.
X Change the battery (Y page 78).
i If the SmartKey battery is checked within
the signal reception range of the vehicle,
pressing the 0037or0036 button:
R locks or
R unlocks the vehicle
i You can get a battery at any qualified spe-
cialist workshop.
Replacing the battery You require a CR 2025 3 V cell battery.
X Take the mechanical key out of the Smart-
Key (Y page 77). X
Press mechanical key 0044into the opening
in the SmartKey in the direction of the 78
SmartKeyOpening and closing
Page 83 of 358

Problem
Possible causes/consequences and
0050
0050Solutions The engine cannot be
started using the
SmartKey. The on-board voltage is too low.
X Switch off non-essential consumers, e.g. seat heating or interior
lighting, and try to start the engine again.
If this does not work:
X Check the starter battery and charge it if necessary
(Y page 301).
or
X Jump-start the vehicle (Y page 305).
or
X Consult a qualified specialist workshop. The engine cannot be
started using the
SmartKey. The steering lock is mechanically blocked.
X Remove the SmartKey and reinsert it into the ignition lock. While
doing this, turn the steering wheel in both directions. Doors
Important safety notes
G
WARNING
If children are left unsupervised in the vehicle, they could:
R open the doors, thus endangering other
people or road users.
R get out and disrupt traffic.
R operate the vehicle's equipment.
Additionally, children could set the vehicle in
motion if, for example, they:
R release the parking brake.
R shifting the automatic transmission out of
park position P
R Start the engine.
There is a risk of an accident and injury.
When leaving the vehicle, always take the
SmartKey with you and lock the vehicle. Never
leave children or animals unattended in the
vehicle. Always keep the SmartKey out of
reach of children. G
WARNING
If persons, particularly children are subjected to prolonged exposure to extreme heat or
cold, there is a risk of injury, possibly even
fatal. Never leave children unattended in the
vehicle.
You should preferably place luggage or loads
in the cargo compartment. Observe the load- ing guidelines (Y page 256). Unlocking and opening doors from
the inside
i When a door is opened, the side window
on that side opens slightly. When the door
is closed, the side window closes again.
! The side windows will not open/close if
the battery is discharged or if the side win- dows have iced up. It will then not be pos-
sible to close the door. Do not attempt to
force the door closed. You could otherwise
damage the door or the side window. Doors
81Opening and closing Z
Page 88 of 358

Emergency release
If the trunk lid can no longer be opened from
outside the vehicle, use the emergency
release on the inside of the trunk lid.
! The trunk lid swings upwards when
opened. Therefore, make sure that there is
sufficient clearance above the trunk lid.
i The opening dimensions of the trunk lid
can be found in the "Vehicle data" section
(Y page 353).
You can reach the emergency release via the
trunk. Fold the rear backrests forward
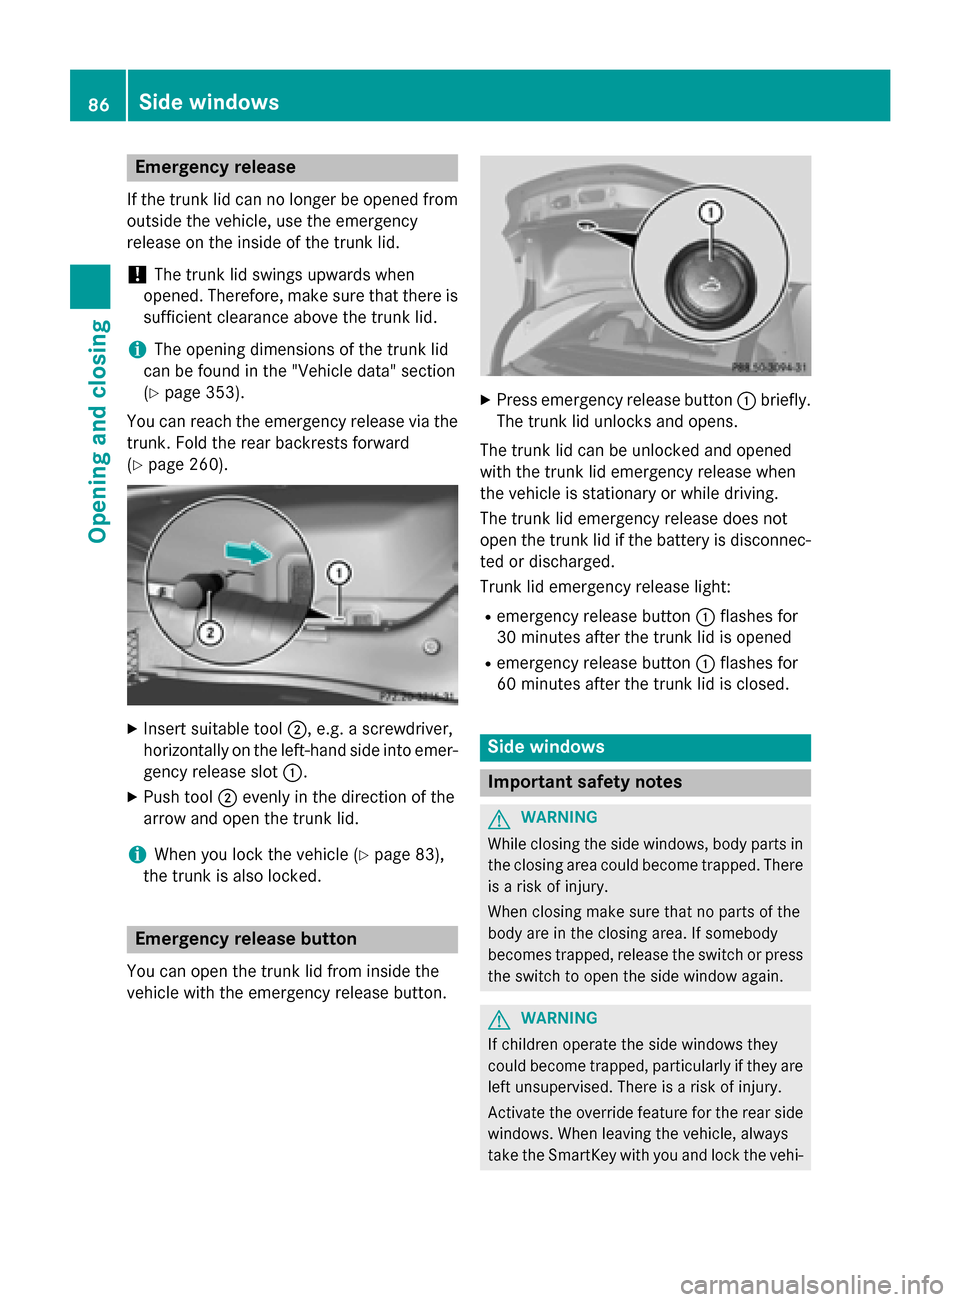
(Y page 260). X
Insert suitable tool 0044, e.g. a screwdriver,
horizontally on the left-hand side into emer- gency release slot 0043.
X Push tool 0044evenly in the direction of the
arrow and open the trunk lid.
i When you lock the vehicle (Y
page 83),
the trunk is also locked. Emergency release button
You can open the trunk lid from inside the
vehicle with the emergency release button. X
Press emergency release button 0043briefly.
The trunk lid unlocks and opens.
The trunk lid can be unlocked and opened
with the trunk lid emergency release when
the vehicle is stationary or while driving.
The trunk lid emergency release does not
open the trunk lid if the battery is disconnec- ted or discharged.
Trunk lid emergency release light:
R emergency release button 0043flashes for
30 minutes after the trunk lid is opened
R emergency release button 0043flashes for
60 minutes after the trunk lid is closed. Side windows
Important safety notes
G
WARNING
While closing the side windows, body parts in the closing area could become trapped. There is a risk of injury.
When closing make sure that no parts of the
body are in the closing area. If somebody
becomes trapped, release the switch or press
the switch to open the side window again. G
WARNING
If children operate the side windows they
could become trapped, particularly if they are left unsupervised. There is a risk of injury.
Activate the override feature for the rear side
windows. When leaving the vehicle, always
take the SmartKey with you and lock the vehi- 86
Side windowsOpening and closing
Page 89 of 358

cle. Never leave children unsupervised in the
vehicle. Side window reversing feature
The side windows are equipped with an auto- matic reversing feature. If a solid object
blocks or restricts a side window from trav-
eling upwards during the automatic closing
process, the side window opens again auto-
matically. During the manual closing process,
the side window only opens again automati-
cally after the corresponding switch is
released. The automatic reversing feature is
only an aid and is no substitute for your atten- tion when closing a side window. G
WARNING
The reversing feature does not react:
R to soft, light and thin objects, e.g. small fin-
gers
R while resetting
This means that the reversing feature cannot
prevent someone being trapped in these sit-
uations. There is a risk of injury.
Make sure that no body parts are in close
proximity during the closing procedure. If
someone becomes trapped, press the switch
to open the side window again. Opening and closing the side win-
dows
The switches for all side windows are located on the driver's door. There is also a switch on
each door for the corresponding side window.
The switches on the driver's door take prec-
edence. 0043
Front left
0044 Front right
0087 Rear right
0085 Rear left
i When the override feature for the side
windows is activated (Y page 63), the side
windows cannot be operated from the rear.
X Turn the SmartKey to position 1or 2in the
ignition lock.
X To open manually: press and hold the cor-
responding switch.
X To open fully: press the switch beyond the
point of resistance and release it.
Automatic operation is started.
X To close manually: pull the corresponding
switch and hold it.
X To close fully: pull the switch beyond the
point of resistance and release it.
Automatic operation is started.
X To interrupt automatic operation:
press/pull the corresponding switch again.
i If you press/pull the switch beyond the
point of resistance, automatic operation is
started in the corresponding direction. You
can stop automatic operation by pressing/ pulling the switch again.
i You can continue to operate the side win-
dows after you switch off the engine or
remove the SmartKey. This function is
available for up to five minutes or until the
driver's or front-passenger door is opened. Side windows
87Opening and closing Z
Page 90 of 358

Convenience opening
You can ventilate the vehicle before you start driving. To do this, the SmartKey is used to
carry out the following functions simultane-
ously:
R unlock the vehicle
R open the side windows
R open the panorama roof with power tilt/
sliding panel and the roller sunblinds
i The convenience opening feature can
only be operated using the SmartKey. The
SmartKey must be close to the driver's
door handle.
X Point the tip of the SmartKey at the driver's
door handle.
X Press and hold the 0036button until the
side windows and the panorama sunroof
are in the desired position.
If the roller sunblinds of the panorama roof
with power tilt/sliding panel are closed, the roller sunblinds are opened first.
X Press and hold the 0036button again until
the panorama roof with power tilt/sliding
panel is in the desired position.
X To interrupt convenience opening:
release the 0036button. Convenience closing feature
G
WARNING
When the convenience closing feature is oper- ating, parts of the body could become trapped
in the closing area of the side window and the
sliding sunroof. There is a risk of injury.
Observe the complete closing procedure
when the convenience closing feature is oper-
ating. Make sure that no body parts are in
close proximity during the closing procedure. When you lock the vehicle, you can simulta-
neously:
R close the side windows
R close the panorama roof with power tilt/
sliding panel
On vehicles with a panorama roof with power tilt/sliding panel, you can then close the
roller sunblinds.
i The SmartKey must be close to the driv-
er's door handle.
X Press and hold the 0037button until the
side windows and the panorama roof with
power tilt/sliding panel are fully closed.
X Make sure that all the side windows and the
panorama roof with power tilt/sliding
panel are closed.
On vehicles with a panorama roof with power
tilt/sliding panel:
X Press and hold the 0037button again until
the roller sunblinds of the panorama roof
with power tilt/sliding panel close.
X To interrupt convenience closing:
release the 0037button. Resetting the side windows
You must reset each side window if: R the side window opens again slightly after
being closed fully.
R the side window can no longer be fully
opened or closed.
X Close all the doors.
X Turn the SmartKey to position 1or 2in the
ignition lock.
X Pull the corresponding switch on the door
control panel until the side window is com-
pletely closed (Y page 87).
X Hold the switch for an additional second. 88
Side windowsOpening and closing
Page 91 of 358

If the side window opens again slightly:
X Immediately pull the corresponding switch
on the door control panel until the side win- dow is completely closed (Y page 87).
X Hold the switch for an additional second.
X If the corresponding side window remains
closed after the button has been released,
the side window has been reset correctly. If
this is not the case, repeat the steps above again. Side windows
89Opening and closing Z