2014 MERCEDES-BENZ CLA-Class window
[x] Cancel search: windowPage 91 of 358

If the side window opens again slightly:
X Immediately pull the corresponding switch
on the door control panel until the side win- dow is completely closed (Y page 87).
X Hold the switch for an additional second.
X If the corresponding side window remains
closed after the button has been released,
the side window has been reset correctly. If
this is not the case, repeat the steps above again. Side windows
89Opening and closing Z
Page 92 of 358

Problems with the side windows
G
WARNING
If you close a side window again immediately after it has been blocked or reset, the side window
closes with increased or maximum force. The reversing feature is then not active. Parts of the
body could be trapped in the closing area in the process. This poses an increased risk of injury or even fatal injury.
Make sure that no parts of the body are in the closing area. To stop the closing process, releasethe switch or push the switch again to reopen the side window. Problem
Possible causes/consequences and
0050 0050Solutions A side window cannot
be closed because it is
blocked by objects, e.g.
leaves in the window
guide. X
Remove the objects.
X Close the side window. A side window cannot
be closed and you can-
not see the cause. If a side window is obstructed during closing and reopens again
slightly:
X Immediately after the window blocks, pull the corresponding
switch again until the side window has closed.
The side window is closed with increased force.
If a side window is obstructed again during closing and reopens
again slightly: X Immediately after the window blocks, pull the corresponding
switch again until the side window has closed.
The side window is closed without the anti-entrapment feature. Panorama roof with power tilt/sliding
panel Important safety notes
In the following section, the term "sliding sun- roof" refers to the panorama roof with powertilt/sliding panel. G
WARNING
While opening and closing the sliding sunroof, body parts in close proximity could become
trapped. There is a risk of injury.
Make sure that no body parts are in close
proximity during the opening and closing pro- cedures. If somebody becomes trapped:
R release the switch immediately, or
R during automatic operation, push the
switch briefly in any direction
The opening or closing procedure will be stop-
ped. G
WARNING
If children operate the sliding sunroof they
could become trapped, particularly if they are left unsupervised. There is a risk of injury.
When leaving the vehicle, always take the
SmartKey with you and lock the vehicle. Never
leave children unsupervised in the vehicle. 90
Panorama roof with power tilt/sliding panelOpening and closing
Page 93 of 358

G
WARNING
At high speeds the raised sliding sunroof auto- matically lowers slightly at the rear. This could
trap you or other persons. There is a risk of
injury. Make sure that nobody reaches into
the sweep of the sliding sunroof whilst the
vehicle is in motion.
If somebody becomes trapped, immediately
pull back the sliding sunroof switch. The slid- ing sunroof lifts during opening.
! Only open the sliding sunroof if it is free of
snow and ice. Otherwise, malfunctions may
occur.
Do not allow anything to protrude from the
sliding sunroof. Otherwise, the seals could
be damaged.
! The weather can change abruptly. It could
start to rain or snow. Make sure that the
sliding sunroof is closed when you leave the
vehicle. The vehicle electronics can be
damaged if water enters the vehicle inte-
rior.
i Resonance noises can occur in addition to
the usual airflow noises when the sliding
sunroof is open. They are caused by minor
pressure fluctuations in the vehicle interior.
Change the position of the sliding sunroof
or open a side window slightly to reduce or
eliminate these noises. Sliding sunroof reversing feature
The sliding sunroof is equipped with an auto- matic reversing feature. If a solid object
blocks or restricts the sliding sunroof during
the closing process, the sliding sunroof opens
again automatically. The automatic reversing feature is only an aid and is no substitute for
your attention when closing the sliding roof. G
WARNING
The reversing feature does not react:
R to soft, light and thin objects, e.g. small fin-
gers
R over the last 1/6 in(4 mm) of the closing
movement
R during resetting
R when closing the sliding sunroof again man-
ually immediately after automatic reversing
This means that the reversing feature cannot
prevent someone being trapped in these sit-
uations. There is a risk of injury.
Make sure that no body parts are in close
proximity during the closing procedure.
If somebody becomes trapped:
R release the switch immediately, or
R during automatic operation, push the
switch briefly in any direction
The closing process is stopped. Operating the sliding sunroof
Overhead control panel
0043
To raise
0044 To open
0087 To close/lower
X Turn the SmartKey to position 1or 2in the
ignition lock.
X Make sure that the roller sunblinds are
open.
X Press or pull the 0057switch in the corre-
sponding direction. Panorama roof with power tilt/sliding panel
91Opening and closing Z
Page 104 of 358

Problems with the seat heating
Problem
Possible causes/consequences and
0050
0050Solutions The seat heating has
switched off prema-
turely or cannot be
switched on. The on-board voltage is too low because too many electrical con-
sumers are switched on.
X Switch off electrical consumers that you do not need, such as
the rear window defroster or interior lighting.
Once the battery is sufficiently charged, the seat heating will
switch back on automatically. Steering wheel
Important safety notes
G
WARNING
You could lose control of your vehicle if you do the following while driving:
R adjust the driver's seat, head restraint,
steering wheel or mirrors
R fasten the seat belt
There is a risk of an accident.
Adjust the driver's seat, head restraint, steer-
ing wheel and mirror and fasten your seat belt before starting the engine. G
WARNING
Children could injure themselves if they
adjust the steering wheel. There is a risk of
injury.
When leaving the vehicle, always take the
SmartKey with you and lock the vehicle. Never leave children unsupervised in the vehicle. Adjusting the steering wheel
G
WARNING
If the steering wheel is unlocked while the
vehicle is in motion, it could change position
unexpectedly. This could cause you to lose
control of the vehicle. There is a risk of an
accident. Before starting off, make sure the steering
wheel is locked. Never unlock the steering
wheel while the vehicle is in motion. 0043
Release lever
0044 To adjust the steering wheel height
0087 To adjust the steering wheel position
(fore-and-aft adjustment)
X Push release lever 0043down completely.
The steering column is unlocked.
X Adjust the steering wheel to the desired
position.
X Push release lever 0043up completely.
The steering column is locked.
X Check if the steering column is locked.
When doing so, try to push the steering
wheel up or down or try to move it in the
fore-and-aft direction. 102
Steering wheelSeats, steering wheel and mirrors
Page 105 of 358

Mirrors
Rear-view mirror
X
Anti-glare mode: flick anti-glare lever 0043
forwards or back. Exterior mirrors
Adjusting the exterior mirrors G
WARNING
The exterior mirror on the front-passenger
side reduces the size of the image. Visible
objects are actually closer than they appear.
This means that you could misjudge the dis-
tance from road users traveling behind, e.g.
when changing lane. There is a risk of an acci-
dent.
For this reason, always make sure of the
actual distance from the road users traveling
behind by glancing over your shoulder. X
Turn the SmartKey to position 1or 2in the
ignition lock (Y page 141).
X Press button 0043for the left-hand exterior
mirror or button 0044for the right-hand exte-
rior mirror.
The indicator lamp in the corresponding
button lights up in red.
The indicator lamp goes out again after
some time. You can adjust the selected
mirror using adjustment button 0087as long
as the indicator lamp is lit.
X Press adjustment button 0087up, down, or to
the left or right until you have adjusted the
exterior mirror to the correct position. You
should have a good overview of traffic con- ditions.
The convex exterior mirrors provide a larger
field of vision.
After the engine has been started, the exte-
rior mirrors are automatically heated at low
outside temperatures. Heating takes a maxi-
mum of ten minutes.
i You can also heat up the exterior mirrors
manually by switching on the rear window
defroster.
Folding the exterior mirrors in or out
electrically This function is only available in Canada.
X
Turn the SmartKey to position 1or 2in the
ignition lock (Y page 141).
X Briefly press button 0043.
Both exterior mirrors fold in or out. Mirrors
103Seats, steering wheel and mirrors Z
Page 126 of 358

Useful information
i This Operator's manual describes all
models and all standard and optional equip- ment of your vehicle available at the time of
publication of the Operator's manual.
Country-specific differences are possible.
Please note that your vehicle may not be
equipped with all features described. This
also applies to safety-related systems and
functions.
i Read the information on qualified special-
ist workshops (Y page 26). Overview of climate control systems
Important safety notes
Observe the settings recommended on the
following pages. The windows could other-
wise fog up.
To prevent the windows from fogging up:
R switch off climate control only briefly
R switch on air-recirculation mode only
briefly
R switch on the cooling with air dehumidifi-
cation function
R switch on the defrost windshield function
briefly, if required
The climate control/dual-zone automatic
control regulates the temperature and the
humidity of the vehicle interior and filters out undesirable substances from the air.
Climate control/dual-zone automatic climate control is only operational when the engine is
running. Optimum operation is only achieved
with the side windows and panorama roof
with power tilt/sliding panel closed.
The residual heat function can only be acti-
vated or deactivated with the ignition
switched off (Y page 135).
Always keep the ventilation flaps behind the
side trim panel in the cargo compartment
clear (Y page 117). Otherwise the vehicle will
not be ventilated correctly. i
Ventilate the vehicle for a brief period
during warm weather, e.g. using the con-
venience opening feature (Y page 88). This
will speed up the cooling process and the
desired interior temperature will be
reached more quickly.
i The integrated filter filters out most par-
ticles of dust and soot and completely fil-
ters out pollen. With dual-zone automatic
climate control, gaseous pollutants and
odors will also be reduced. A clogged filter
reduces the amount of air supplied to the
vehicle interior. For this reason, you should always observe the interval for replacing
the filter, which is specified in the Mainte-
nance Booklet. As it depends on environ-
mental conditions, e.g. heavy air pollution,
the interval may be shorter than stated in
the Maintenance Booklet.
i It is possible that the residual heat func-
tion may be activated automatically an hour
after the SmartKey has been removed in
order to dry the air-conditioning system.
The vehicle is then ventilated for
30 minutes. 124
Overview of climate control systemsClimate control
Page 127 of 358

Control panel for climate control
USA only
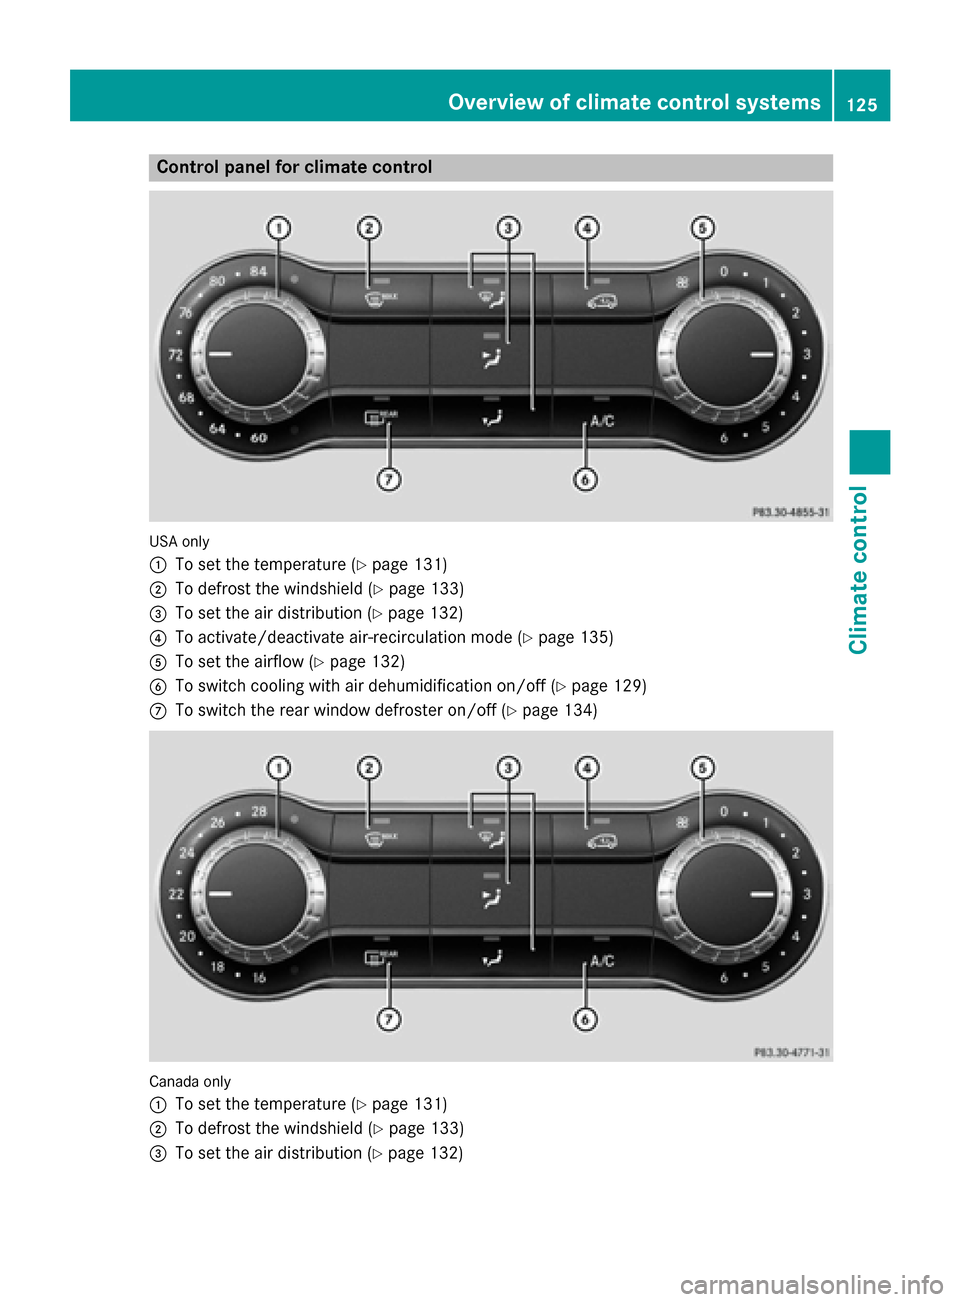
0043
To set the temperature (Y page 131)
0044 To defrost the windshield (Y page 133)
0087 To set the air distribution (Y page 132)
0085 To activate/deactivate air-recirculation mode (Y page 135)
0083 To set the airflow (Y page 132)
0084 To switch cooling with air dehumidification on/off (Y page 129)
006B To switch the rear window defroster on/off (Y page 134)Canada only
0043
To set the temperature (Y page 131)
0044 To defrost the windshield (Y page 133)
0087 To set the air distribution (Y page 132) Overview of climate control systems
125Climate control
Page 128 of 358

0085
To activate/deactivate air-recirculation mode (Y page 135)
0083 To set the airflow (Y page 132)
0084 To switch cooling with air dehumidification on/off (Y page 129)
006B To switch the rear window defroster on/off (Y page 134)Optimum use of climate control
Automatic climate control The following contains notes and recommen-
dations on optimum use of climate control.
R Switch on the air-conditioning system by
turning control knob 0083clockwise to the
desired position (except position 0).
R Set the temperature to 72 ‡ (22 †).
R Recommendation for avoiding misted
windows at low exterior temperatures
or in rain: switch on the 005Acooling with
dehumidification function (Y page 129).
Set air distribution to 0061and if possible
switch off 009Cand009B (Ypage 132).
In air-recirculation mode, switch 008Aoff
(Y page 135).
Set airflow control 0083to a setting between
3 and 6(Y page 132).
R Recommendation for rapid cooling or
heating of the vehicle interior: briefly set
airflow control 0083to a setting between 3
and 6(Y page 132).
R Recommendation for a constant vehi-
cle interior temperature: set airflow con-
trol 0083to a setting between 1and 3
(Y page 132).
R Recommendation for air distribution in
the winter: set009B and0061
(Y page 132).
Recommendation for air distribution in
the summer: set009C or009C and0061
(Y page 132).
R Only use the "Windshield defrosting" func-
tion briefly until the windshield is clear
again.
R Only use air-recirculation mode briefly, e.g.
if there are unpleasant outside odors or when in a tunnel. The windows could oth-
erwise fog up, since no fresh air is drawn
into the vehicle in air-recirculation mode.
R Vehicles with COMAND: if you change the
settings of the climate control system, the
climate status display appears for three
seconds at the bottom of the screen in the
COMAND display. See also the separate
COMAND operating instructions. You will
see the current settings of the various cli-
mate control functions.
ECO start/stop function During automatic engine switch-off, the cli-
mate control system only operates at a
reduced capacity. If you require the full cli-
mate control output, you can switch off the
ECO start/stop function by pressing the ECO
button (Y page 144). 126
Overview of climate control systemsClimate control