2014 MERCEDES-BENZ CLA-Class height
[x] Cancel search: heightPage 102 of 358

With this function you can adjust the distance
between the head restraint and the back of
the seat occupant's head.
X To adjust forwards: pull the head restraint
forwards in the direction of the arrow until
it engages.
There are several notches.
X To move backwards: press and hold
release button 0043and push the head
restraint backwards.
X When the head restraint is in the desired
position, release the button and make sure
that the head restraint is engaged in posi-
tion.
Adjusting the height of the head
restraints electrically X
To adjust the head restraint height: slide
the switch for head restraint adjustment
(Y page 99) up or down in the direction of
the arrow .
Rear seat head restraints Adjusting the rear seat head restraint
height X
To raise: pull the head restraint up to the
desired position.
X To lower: press release catch 0043and push
the head restraint down until it is in the
desired position. Adjusting the 4-way lumbar support
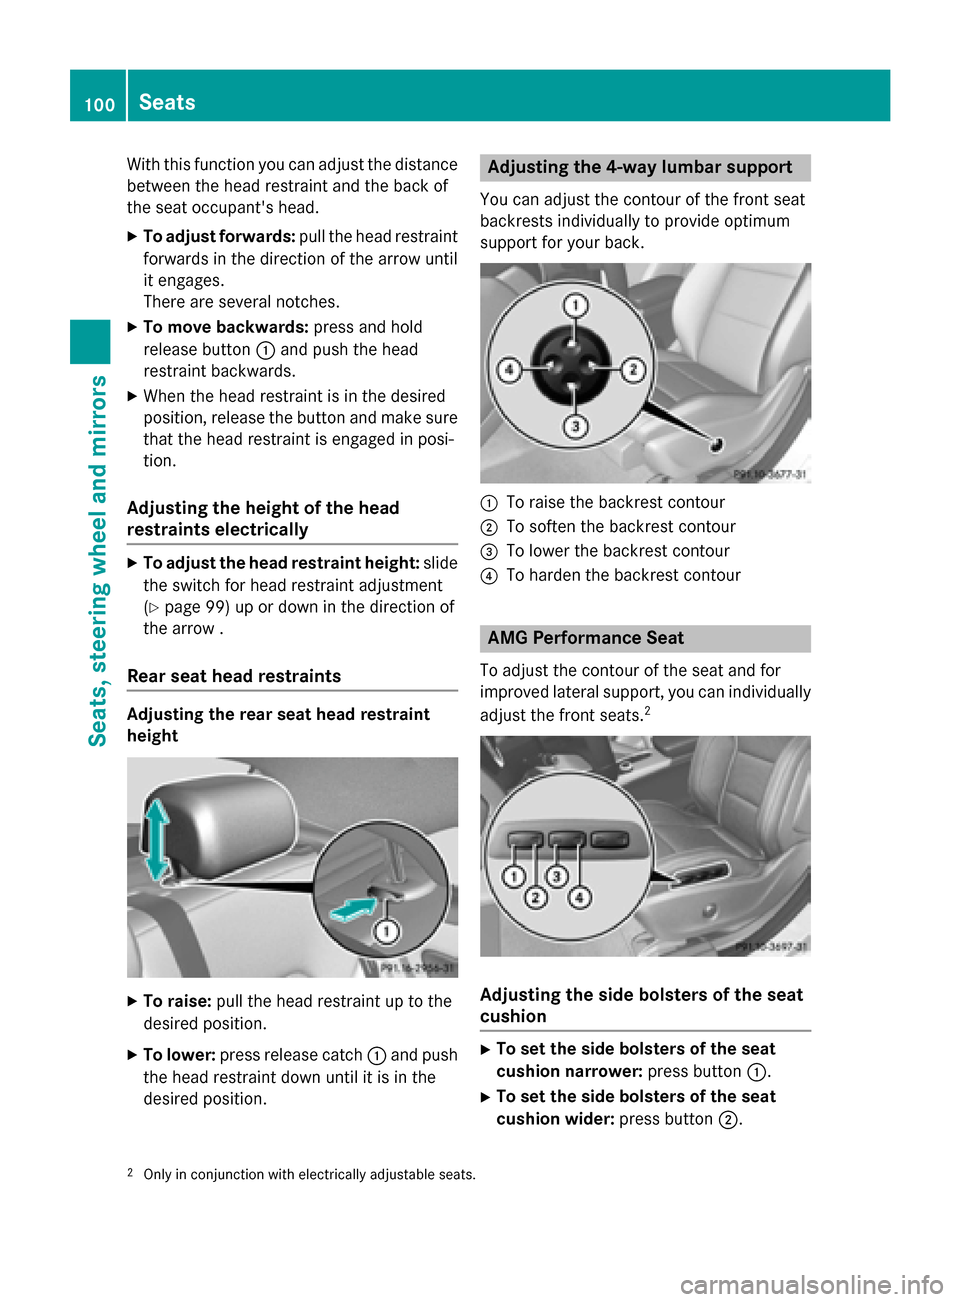
You can adjust the contour of the front seat
backrests individually to provide optimum
support for your back. 0043
To raise the backrest contour
0044 To soften the backrest contour
0087 To lower the backrest contour
0085 To harden the backrest contour AMG Performance Seat
To adjust the contour of the seat and for
improved lateral support, you can individually adjust the front seats. 2 Adjusting the side bolsters of the seat
cushion
X
To set the side bolsters of the seat
cushion narrower: press button0043.
X To set the side bolsters of the seat
cushion wider: press button0044.
2 Only in conjunction with electrically adjustable seats. 100
SeatsSeats, steering wheel and mirrors
Page 104 of 358

Problems with the seat heating
Problem
Possible causes/consequences and
0050
0050Solutions The seat heating has
switched off prema-
turely or cannot be
switched on. The on-board voltage is too low because too many electrical con-
sumers are switched on.
X Switch off electrical consumers that you do not need, such as
the rear window defroster or interior lighting.
Once the battery is sufficiently charged, the seat heating will
switch back on automatically. Steering wheel
Important safety notes
G
WARNING
You could lose control of your vehicle if you do the following while driving:
R adjust the driver's seat, head restraint,
steering wheel or mirrors
R fasten the seat belt
There is a risk of an accident.
Adjust the driver's seat, head restraint, steer-
ing wheel and mirror and fasten your seat belt before starting the engine. G
WARNING
Children could injure themselves if they
adjust the steering wheel. There is a risk of
injury.
When leaving the vehicle, always take the
SmartKey with you and lock the vehicle. Never leave children unsupervised in the vehicle. Adjusting the steering wheel
G
WARNING
If the steering wheel is unlocked while the
vehicle is in motion, it could change position
unexpectedly. This could cause you to lose
control of the vehicle. There is a risk of an
accident. Before starting off, make sure the steering
wheel is locked. Never unlock the steering
wheel while the vehicle is in motion. 0043
Release lever
0044 To adjust the steering wheel height
0087 To adjust the steering wheel position
(fore-and-aft adjustment)
X Push release lever 0043down completely.
The steering column is unlocked.
X Adjust the steering wheel to the desired
position.
X Push release lever 0043up completely.
The steering column is locked.
X Check if the steering column is locked.
When doing so, try to push the steering
wheel up or down or try to move it in the
fore-and-aft direction. 102
Steering wheelSeats, steering wheel and mirrors
Page 184 of 358

Parking tips:
R On narrow roads, drive as close to the park-
ing space as possible.
R Parking spaces that are littered or over-
grown might be identified or measured
incorrectly.
R Parking spaces that are partially occupied
by trailer drawbars might not be identified
as such or be measured incorrectly.
R Snowfall or heavy rain may lead to a parking
space being measured inaccurately.
R Pay attention to the PARKTRONIC
(Y page 180) warning messages during the
parking procedure.
R You can intervene in the steering procedure
to correct it at any time. Active Parking
Assist will then be canceled.
R When transporting a load which protrudes
from your vehicle, you should not use
Active Parking Assist.
R Never use Active Parking Assist when snow
chains are installed.
R Make sure that the tire pressures are
always correct. This has a direct influence
on the parking characteristics of the vehi-
cle.
Use Active Parking Assist for parking spaces:
R that are parallel or at right-angles to the
direction of travel
R that are on straight roads, not bends
R that are on the same level as the road, e.g.
not on the pavement
Detecting parking spaces Objects located above the height range of
Active Parking Assist will not be detected
when the parking space is measured. These
are not taken into account when the parking
procedure is calculated, e.g. overhanging
loads, tail sections or loading ramps of goods vehicles. G
WARNING
If there are objects above the detection range, Active Parking Assist may turn prematurely.
You may cause a collision as a result. There is
a risk of an accident.
If there are objects above the detection range,
stop and deactivate Active Parking Assist.
For further information on the detection
range (Y page 179).
Active Parking Assist does not support you
with parking spaces at right-angles to the
direction of travel if:
R two parking spaces are located directly
next to one another
R the parking space is directly next to a low
obstacle such as a low curb
R you park forwards
Active Parking Assist does not support you
with parking spaces that are parallel or at
right-angles to the direction of travel if:
R the parking space is on a curb
R the parking space is apparently blocked,
for example by foliage or grass paving
blocks
R the range of movement is too small
R the parking space is bordered by an obsta-
cle which is not clearly defined such as a
tree or a trailer 0043
Detected parking space on the left
0044 Parking symbol
0087 Detected parking space on the right
Active Parking Assist is automatically activa-
ted when driving forwards. The system is
operational at speeds of up to approximately
22 mph (35 km/h). While in operation, the 182
Driving systemsDriving and parking
Page 285 of 358

!
Make sure that the windshield wipers are
not folded away from the windshield. You
could otherwise damage the windshield
wipers or the hood. X
Make sure that the windshield wipers are
switched off.
X Pull release lever 0043on the hood.
The hood is released. X
Reach into the gap between the hood and
the radiator trim and press hood catch
lever 0044to the left.
X Raise the hood. X
Pull support strut 0085out of bracket 0083.
X Lift up support strut 0085and insert it into
yellow retaining clip 0087.
Closing the hood X
Raise the hood slightly and, at the same
time, remove support strut 0085from yellow
retaining clip 0087.
X Swing support strut 0085down and press it
into bracket 0083until it engages.
X Lower the hood and let it fall from a height
of approximately 8 in (20 cm).
X Check that the hood has engaged properly.
If the hood can be raised slightly, it is not
properly engaged. Do not press the hood
closed. Open the hood again and close it
with a little more force. Engine oil
General notes Depending on your driving style, the vehicle
consumes up to 0.9 US qt (0.8 liters) of oil per 600 miles (1,000 km). The oil consumption
may be higher than this when the vehicle is
new or if you frequently drive at high engine
speeds.
Depending on the engine, the oil dipstick may be in a different location.
When checking the oil level:
R park the vehicle on a level surface.
R the engine should be switched off for
approximately five minutes if the engine is
at normal operating temperature.
R if the engine is not at normal operating
temperature, e.g. if the engine was only
started briefly, wait about 30 minutes
before carrying out the measurement. Engine compartment
283Maintenance and care Z
Page 332 of 358

Tire size designation, load-bearing
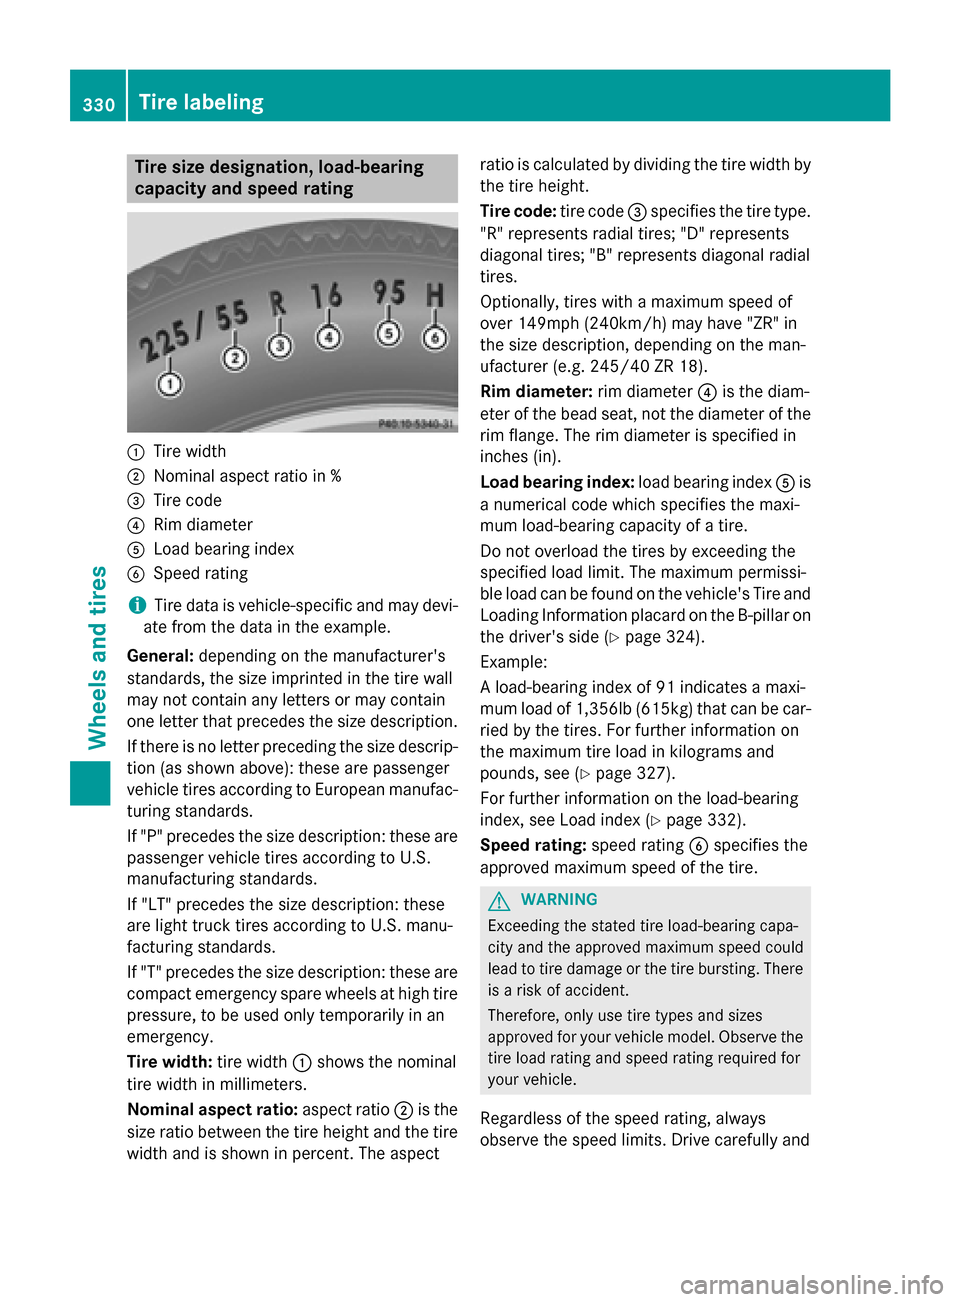
capacity and speed rating 0043
Tire width
0044 Nominal aspect ratio in %
0087 Tire code
0085 Rim diameter
0083 Load bearing index
0084 Speed rating
i Tire data is vehicle-specific and may devi-
ate from the data in the example.
General: depending on the manufacturer's
standards, the size imprinted in the tire wall
may not contain any letters or may contain
one letter that precedes the size description.
If there is no letter preceding the size descrip-
tion (as shown above): these are passenger
vehicle tires according to European manufac-
turing standards.
If "P" precedes the size description: these are passenger vehicle tires according to U.S.
manufacturing standards.
If "LT" precedes the size description: these
are light truck tires according to U.S. manu-
facturing standards.
If "T" precedes the size description: these are
compact emergency spare wheels at high tire pressure, to be used only temporarily in an
emergency.
Tire width: tire width0043shows the nominal
tire width in millimeters.
Nominal aspect ratio: aspect ratio0044is the
size ratio between the tire height and the tire width and is shown in percent. The aspect ratio is calculated by dividing the tire width by
the tire height.
Tire code: tire code0087specifies the tire type.
"R" represents radial tires; "D" represents
diagonal tires; "B" represents diagonal radial
tires.
Optionally, tires with a maximum speed of
over 149mph (24 0km/h) may have "ZR" in
the size description, depending on the man-
ufacturer (e.g. 245/40 ZR 18).
Rim diameter: rim diameter0085is the diam-
eter of the bead seat, not the diameter of the
rim flange. The rim diameter is specified in
inches (in).
Load bearing index: load bearing index0083is
a numerical code which specifies the maxi-
mum load-bearing capacity of a tire.
Do not overload the tires by exceeding the
specified load limit. The maximum permissi-
ble load can be found on the vehicle's Tire and
Loading Information placard on the B-pillar on the driver's side (Y page 324).
Example:
A load-bearing index of 91 indicates a maxi-
mum load of 1,356lb (615kg) that can be car-
ried by the tires. For further information on
the maximum tire load in kilograms and
pounds, see (Y page 327).
For further information on the load-bearing
index, see Load index (Y page 332).
Speed rating: speed rating0084specifies the
approved maximum speed of the tire. G
WARNING
Exceeding the stated tire load-bearing capa-
city and the approved maximum speed could
lead to tire damage or the tire bursting. There is a risk of accident.
Therefore, only use tire types and sizes
approved for your vehicle model. Observe the
tire load rating and speed rating required for
your vehicle.
Regardless of the speed rating, always
observe the speed limits. Drive carefully and 330
Tire labelingWheels and tires
Page 336 of 358

Speed rating
The speed rating is part of the tire identifica-
tion. It specifies the speed range for which the tire is approved. GVW (Gross Vehicle Weight)
The gross vehicle weight includes the weight
of the vehicle including fuel, tools, the spare
wheel, accessories installed, occupants, lug-
gage and the drawbar noseweight, if applica- ble. The gross vehicle weight must not exceed
the gross vehicle weight rating GVWR as
specified on the vehicle identification plate on the B-pillar on the driver's side. GVWR (Gross Vehicle Weight Rating)
The GVWR is the maximum permissible gross weight of a fully loaded vehicle (the weight of the vehicle including all accessories, occu-
pants, fuel, luggage and the drawbar nose-
weight, if applicable). The gross vehicle
weight rating is specified on the vehicle iden-
tification plate on the B-pillar on the driver's
side. Maximum loaded vehicle weight
The maximum weight is the sum of:
R the curb weight of the vehicle
R the weight of the accessories
R the load limit
R the weight of the factory installed optional
equipment Kilopascal (kPa)
Metric unit for tire pressure. 6.9 kPa corre-
sponds to 1 psi. Another unit for tire pressure
is bar. 100 kilopascal (kPa) is the equivalent
of 1 bar. Load index
In addition to the load-bearing index, the load
index may also be imprinted on the sidewall of the tire. This specifies the load-bearing capa- city more precisely. Curb weight
The weight of a vehicle with standard equip-
ment including the maximum capacity of fuel, oil and coolant. It also includes the air-condi- tioning system and optional equipment if
these are installed in the vehicle, but does not
include passengers or luggage. Maximum load rating
The maximum load rating in kilograms or
pounds is the maximum weight for which a
tire is approved. Maximum permissible tire pressure
Maximum permissible tire pressure for one
tire. Maximum load on one tire
Maximum load on one tire. This is calculated
by dividing the maximum axle load of one axle by two. PSI (pounds per square inch)
A standard unit of measure for tire pressure. Aspect ratio
Relationship between tire height and tire
width in percent. 334
Definition of terms for tires and loadingWheels and tires
Page 340 of 358

R
before raising the vehicle, secure it from
rolling away by applying the parking brake
and inserting wheel chocks. Never disen-
gage the parking brake while the vehicle is raised.
R the jack must be placed on a firm, flat and
non-slip surface. On a loose surface, a
large, flat, load-bearing underlay must be
used. On a slippery surface, a non-slip
underlay must be used, e.g. rubber mats.
R do not use wooden blocks or similar
objects as a jack underlay. Otherwise, the
jack will not be able to achieve its load-
bearing capacity due to the restricted
height.
R make sure that the distance between the
underside of the tires and the ground does
not exceed 1.2 in (3 cm).
R never place your hands and feet under the
raised vehicle.
R do not lie under the vehicle.
R do not start the engine when the vehicle is
raised.
R never open or close a door or the boot when
the vehicle is raised.
R make sure that no persons are present in
the vehicle when the vehicle is raised.
! The jack is designed exclusively for jack-
ing up the vehicle at the jacking points.
Otherwise, your vehicle could be damaged. Steel wheel with wheel trim
X
Vehicles with steel wheels: carefully
reach into two of the wheel trim openings
and remove the wheel trim. X
Using lug wrench 0043, loosen the bolts on
the wheel you wish to change by about one full turn. Do not unscrew the bolts com-
pletely. The jacking points are located just behind the
wheel housings of the front wheels and just in front of the wheel housings of the rear wheels(arrows).
AMG vehicles and vehicles with AMG
equipment: to protect the vehicle body, the
vehicle has covers installed next to the jack-
ing points on the outer sills. Covers, front (example: vehicles with AMG equip-
ment) 338
Changing a wheelWheels and tires
Page 355 of 358

Warning symbol
0043advises you about:
R possible dangers
R having service work carried out at a quali-
fied specialist workshop
Filling capacities Missing values were not available at time of
going to print. Model Refrigerant
CLA 250
CLA 250 4MATIC
22.9 ± 0.4 oz
(650 ± 10 g) AMG vehicles
23.6 ± 0.4 oz
(670 ± 10 g) Model PAG oil
CLA 250
CLA 250 4MATIC
4.2 oz
(120 g) AMG vehicles
Vehicle data
General notes
Please note that for the specified vehicle
data: R the heights specified may vary as a result
of:
- tires
- load
- condition of the suspension
- optional equipment
R optional equipment reduces the maximum
payload. Dimensions and weights
Model
0043 0043
Opening height AMG vehicles
68.0 in
(1727 mm) All other models
68.9 in
(1749 mm) Missing values were not available at time of
going to print.
Model
Vehicle width
including exterior
mirrors
80.0 in (2032 mm)
Vehicle height
56.5 in (1436 mm)
Wheelbase
106.3 in (2699 mm)
Turning radius
36.1 ft (11 m)
Maximum roof
load
Model Vehicle length
AMG vehicles
184.7 in
(4691 mm) All other models
182.3 in
(4630 mm) Vehicle data
353Technical data Z