2014 MERCEDES-BENZ C-CLASS ESTATE ECU
[x] Cancel search: ECUPage 376 of 489
Ski/snowboard bag
Important safety notes G
WARNING
The skibag in conjunction with the lashing
straps cannot restrain any objects other than skis.
Vehicle occupants could be struck in the
event of sudden braking or an accident, for
instance, if you:
R transport other heavy or sharp-edged
objects in the skibag
R do not secure the skibag with the lashing
straps
There is a risk of accident and injury.
Store only skis in the skibag. Always secure
the skibag with the lashing straps so that it
cannot move around.
A maximum of four pairs of skis or two snow- boards can be transported in the ski/snow-
board bag.
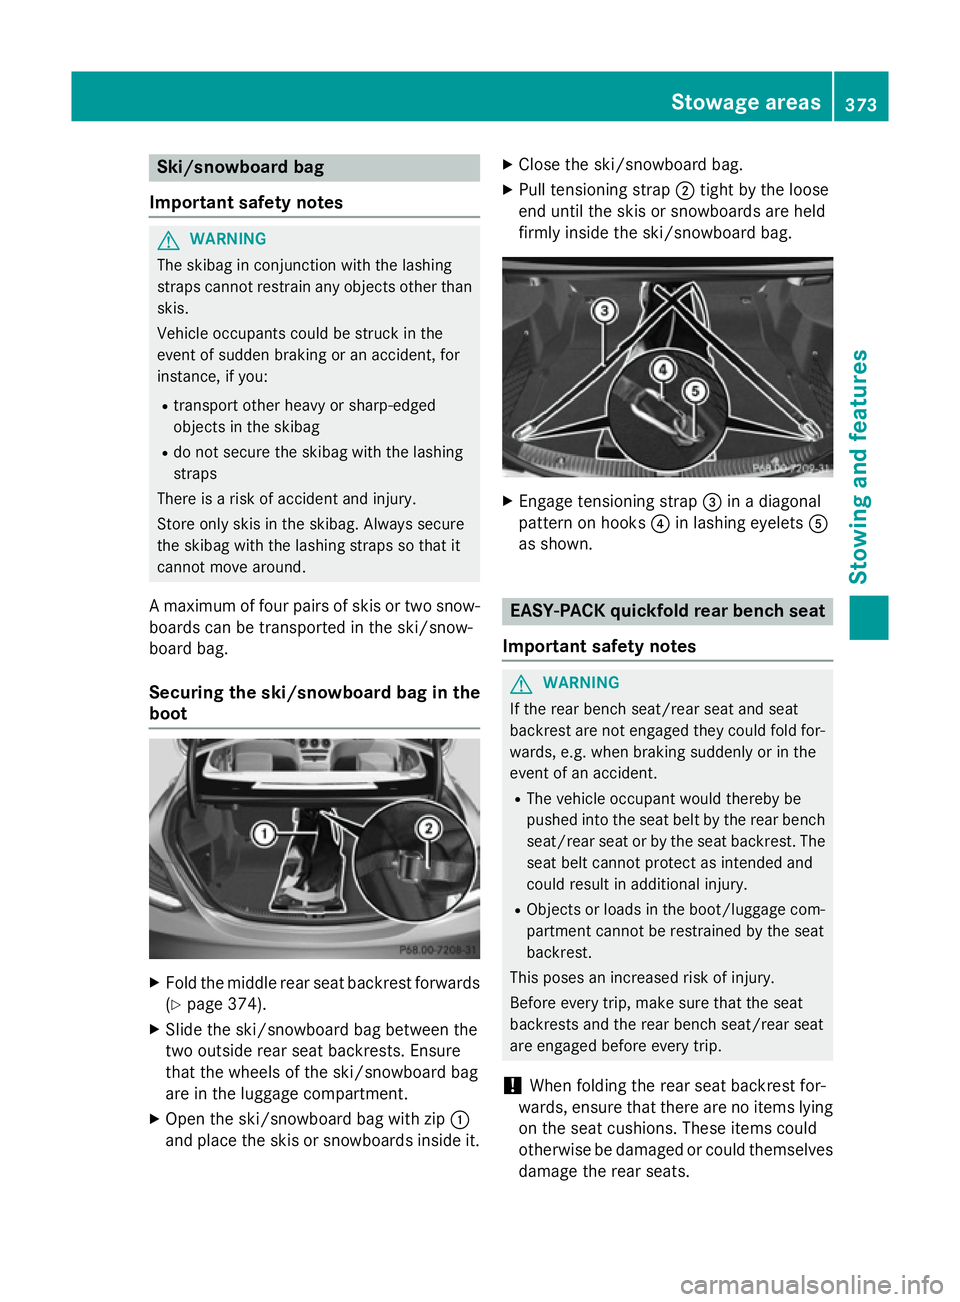
Securing the ski/snowboard bag in the
boot X
Fold the middle rear seat backrest forwards
(Y page 374).
X Slide the ski/snowboard bag between the
two outside rear seat backrests. Ensure
that the wheels of the ski/snowboard bag
are in the luggage compartment.
X Open the ski/snowboard bag with zip :
and place the skis or snowboards inside it. X
Close the ski/snowboard bag.
X Pull tensioning strap ;tight by the loose
end until the skis or snowboards are held
firmly inside the ski/snowboard bag. X
Engage tensioning strap =in a diagonal
pattern on hooks ?in lashing eyelets A
as shown. EASY-PACK quickfold rear bench seat
Important safety notes G
WARNING
If the rear bench seat/rear seat and seat
backrest are not engaged they could fold for- wards, e.g. when braking suddenly or in the
event of an accident.
R The vehicle occupant would thereby be
pushed into the seat belt by the rear bench
seat/rear seat or by the seat backrest. The
seat belt cannot protect as intended and
could result in additional injury.
R Objects or loads in the boot/luggage com-
partment cannot be restrained by the seat
backrest.
This poses an increased risk of injury.
Before every trip, make sure that the seat
backrests and the rear bench seat/rear seat
are engaged before every trip.
! When folding the rear seat backrest for-
wards, ensure that there are no items lying
on the seat cushions. These items could
otherwise be damaged or could themselves damage the rear seats. Stowage areas
373Stowing and features Z
Page 379 of 489
X
To lock: fold the left and centre seat backr-
ests forward. Make sure that the centre and
left seat backrests are engaged and joined together.
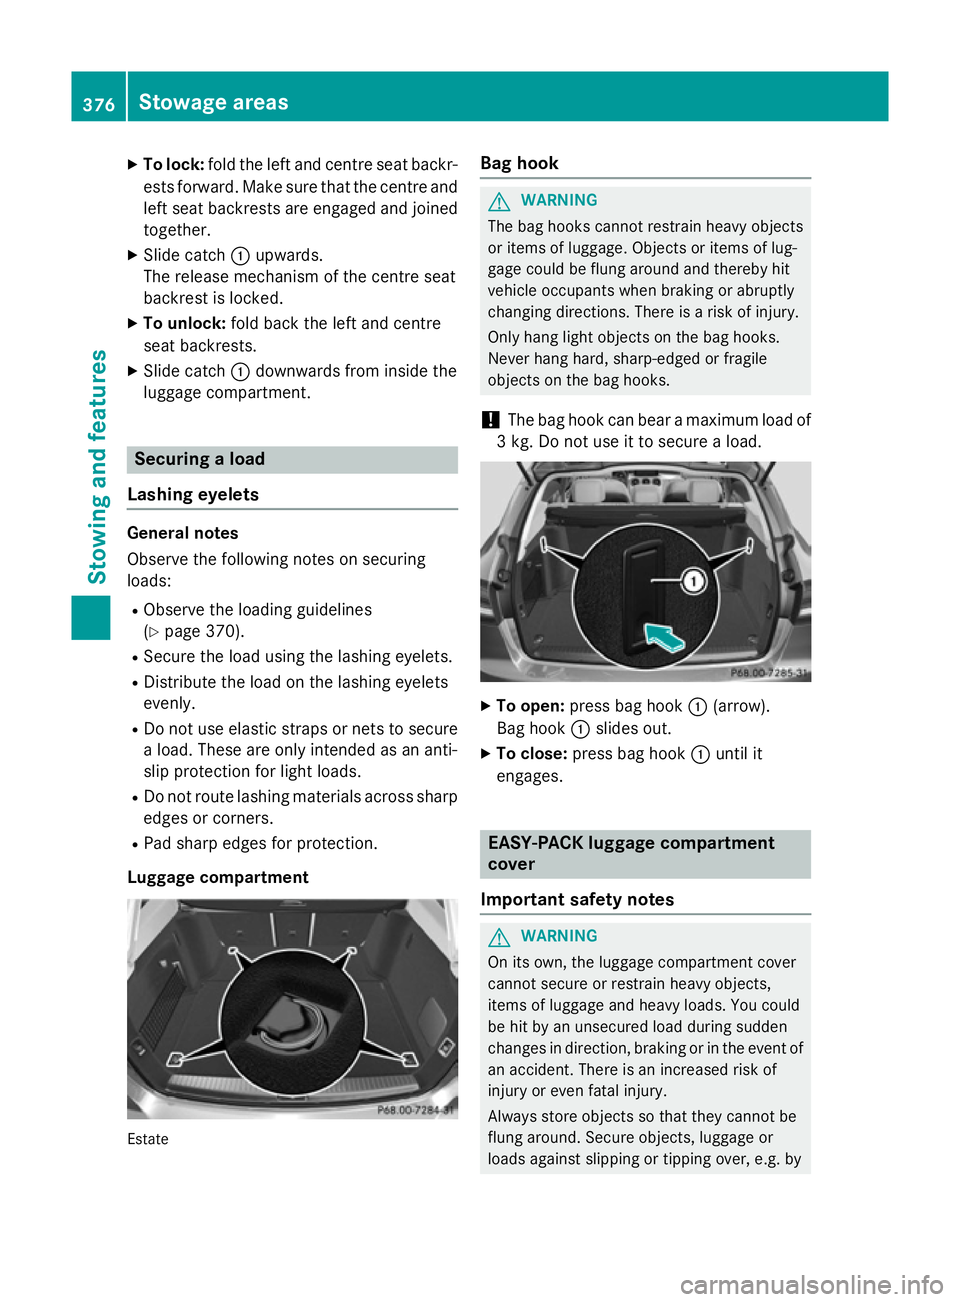
X Slide catch :upwards.
The release mechanism of the centre seat
backrest is locked.
X To unlock: fold back the left and centre
seat backrests.
X Slide catch :downwards from inside the
luggage compartment. Securing a load
Lashing eyelets General notes
Observe the following notes on securing
loads:
R Observe the loading guidelines
(Y page 370).
R Secure the load using the lashing eyelets.
R Distribute the load on the lashing eyelets
evenly.
R Do not use elastic straps or nets to secure
a load. These are only intended as an anti-
slip protection for light loads.
R Do not route lashing materials across sharp
edges or corners.
R Pad sharp edges for protection.
Luggage compartment Estate Bag hook G
WARNING
The bag hooks cannot restrain heavy objects
or items of luggage. Objects or items of lug-
gage could be flung around and thereby hit
vehicle occupants when braking or abruptly
changing directions. There is a risk of injury.
Only hang light objects on the bag hooks.
Never hang hard, sharp-edged or fragile
objects on the bag hooks.
! The bag hook can bear a maximum load of
3 kg. Do not use it to secure a load. X
To open: press bag hook :(arrow).
Bag hook :slides out.
X To close: press bag hook :until it
engages. EASY-PACK luggage compartment
cover
Important safety notes G
WARNING
On its own, the luggage compartment cover
cannot secure or restrain heavy objects,
items of luggage and heavy loads. You could
be hit by an unsecured load during sudden
changes in direction, braking or in the event of an accident. There is an increased risk of
injury or even fatal injury.
Always store objects so that they cannot be
flung around. Secure objects, luggage or
loads against slipping or tipping over, e.g. by 376
Stowage areasSto
wing an d features
Page 381 of 489
X
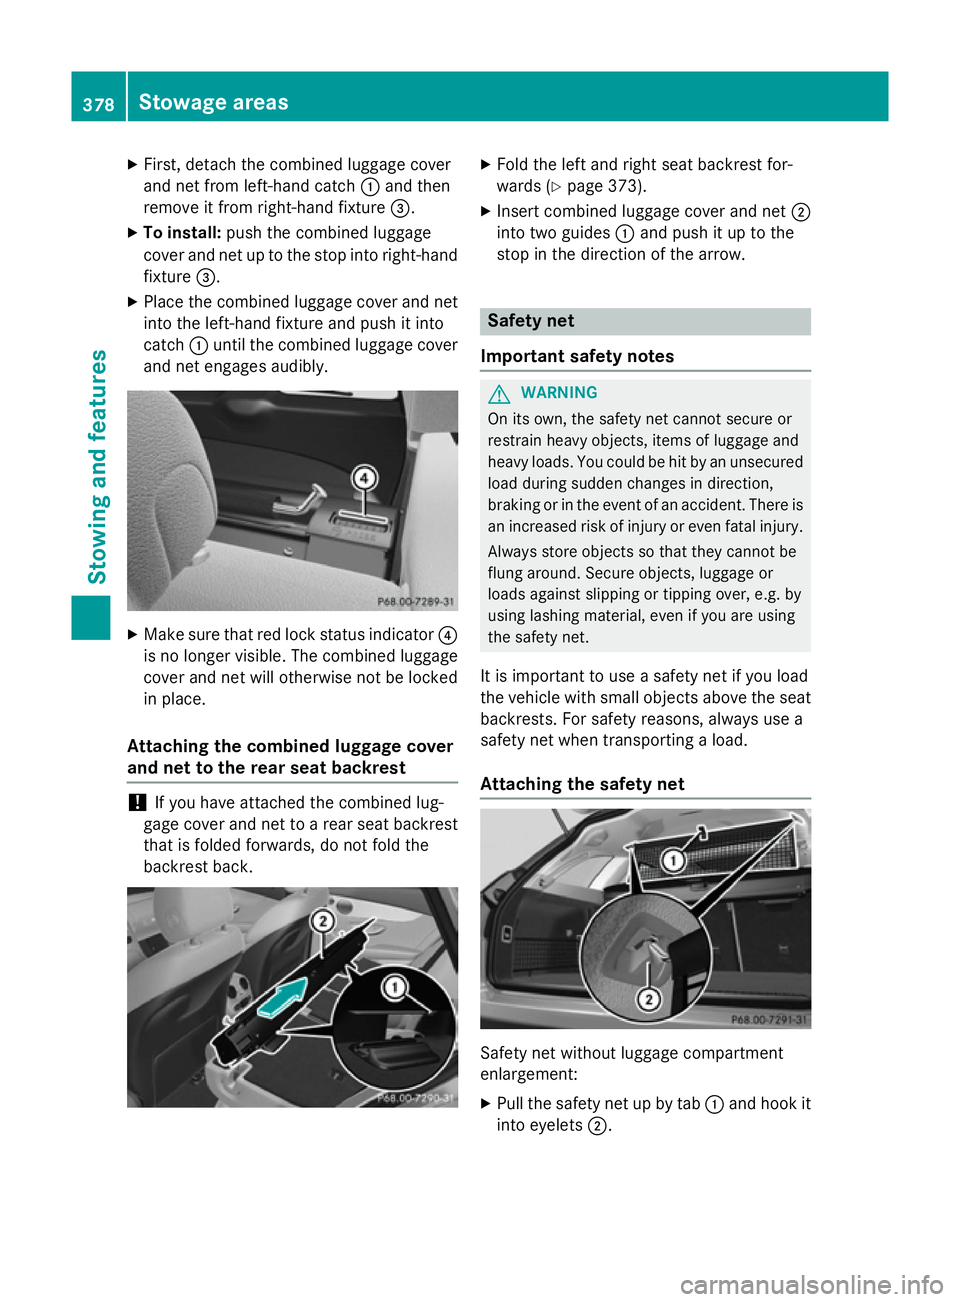
First, detach the combined luggage cover
and net from left-hand catch :and then
remove it from right-hand fixture =.
X To install: push the combined luggage
cover and net up to the stop into right-hand fixture =.
X Place the combined luggage cover and net
into the left-hand fixture and push it into
catch :until the combined luggage cover
and net engages audibly. X
Make sure that red lock status indicator ?
is no longer visible. The combined luggage
cover and net will otherwise not be locked
in place.
Attaching the combined luggage cover
and net to the rear seat backrest !
If you have attached the combined lug-
gage cover and net to a rear seat backrest that is folded forwards, do not fold the
backrest back. X
Fold the left and right seat backrest for-
wards (Y page 373).
X Insert combined luggage cover and net ;
into two guides :and push it up to the
stop in the direction of the arrow. Safety net
Important safety notes G
WARNING
On its own, the safety net cannot secure or
restrain heavy objects, items of luggage and
heavy loads. You could be hit by an unsecured load during sudden changes in direction,
braking or in the event of an accident. There isan increased risk of injury or even fatal injury.
Always store objects so that they cannot be
flung around. Secure objects, luggage or
loads against slipping or tipping over, e.g. by
using lashing material, even if you are using
the safety net.
It is important to use a safety net if you load
the vehicle with small objects above the seat backrests. For safety reasons, always use a
safety net when transporting a load.
Attaching the safety net Safety net without luggage compartment
enlargement:
X Pull the safety net up by tab :and hook it
into eyelets ;.378
Stowage areasStowing and features
Page 382 of 489
Safety net with luggage compartment
enlargement:
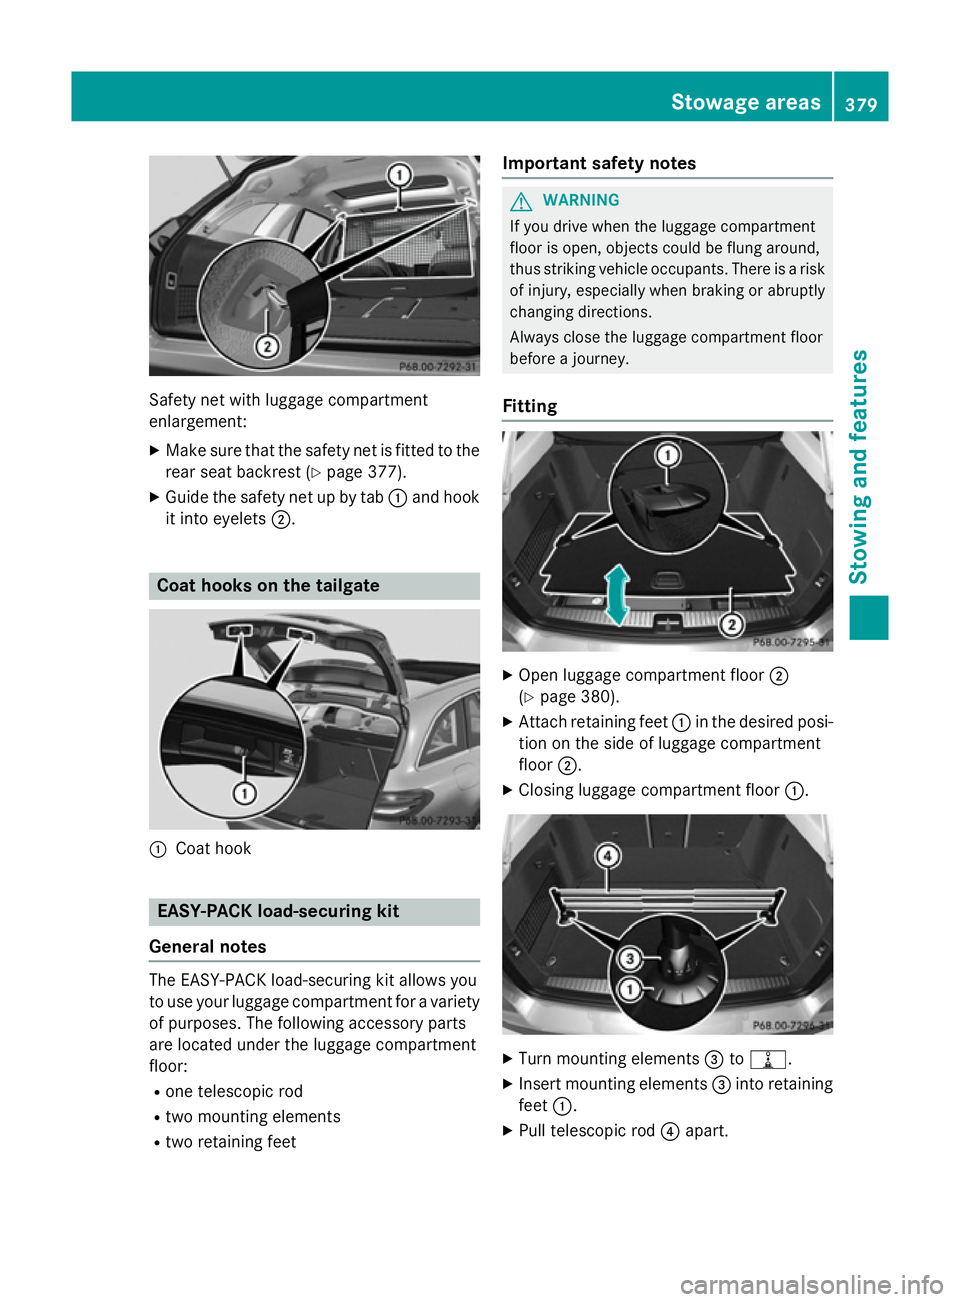
X Make sure that the safety net is fitted to the
rear seat backrest (Y page 377).
X Guide the safety net up by tab :and hook
it into eyelets ;. Coat hooks on the tailgate
:
Coat hook EASY-PACK load-securing kit
General notes The EASY-PACK load-securing kit allows you
to use your luggage compartment for a variety of purposes. The following accessory parts
are located under the luggage compartment
floor:
R one telescopic rod
R two mounting elements
R two retaining feet Important safety notes G
WARNING
If you drive when the luggage compartment
floor is open, objects could be flung around,
thus striking vehicle occupants. There is a risk of injury, especially when braking or abruptly
changing directions.
Always close the luggage compartment floor
before a journey.
Fitting X
Open luggage compartment floor ;
(Y page 380).
X Attach retaining feet :in the desired posi-
tion on the side of luggage compartment
floor ;.
X Closing luggage compartment floor :. X
Turn mounting elements =to=.
X Insert mounting elements =into retaining
feet :.
X Pull telescopic rod ?apart. Stowage areas
379Stowing and features Z
Page 383 of 489
X
Insert telescopic rod ?into mounting ele-
ments =.
X Turn both mounting elements =to&
until you feel them engage. Stowage well underneath the luggage
compartment floor G
WARNING
If you drive when the luggage compartment
floor is open, objects could be flung around,
thus striking vehicle occupants. There is a risk of injury, especially when braking or abruptly
changing directions.
Always close the luggage compartment floor
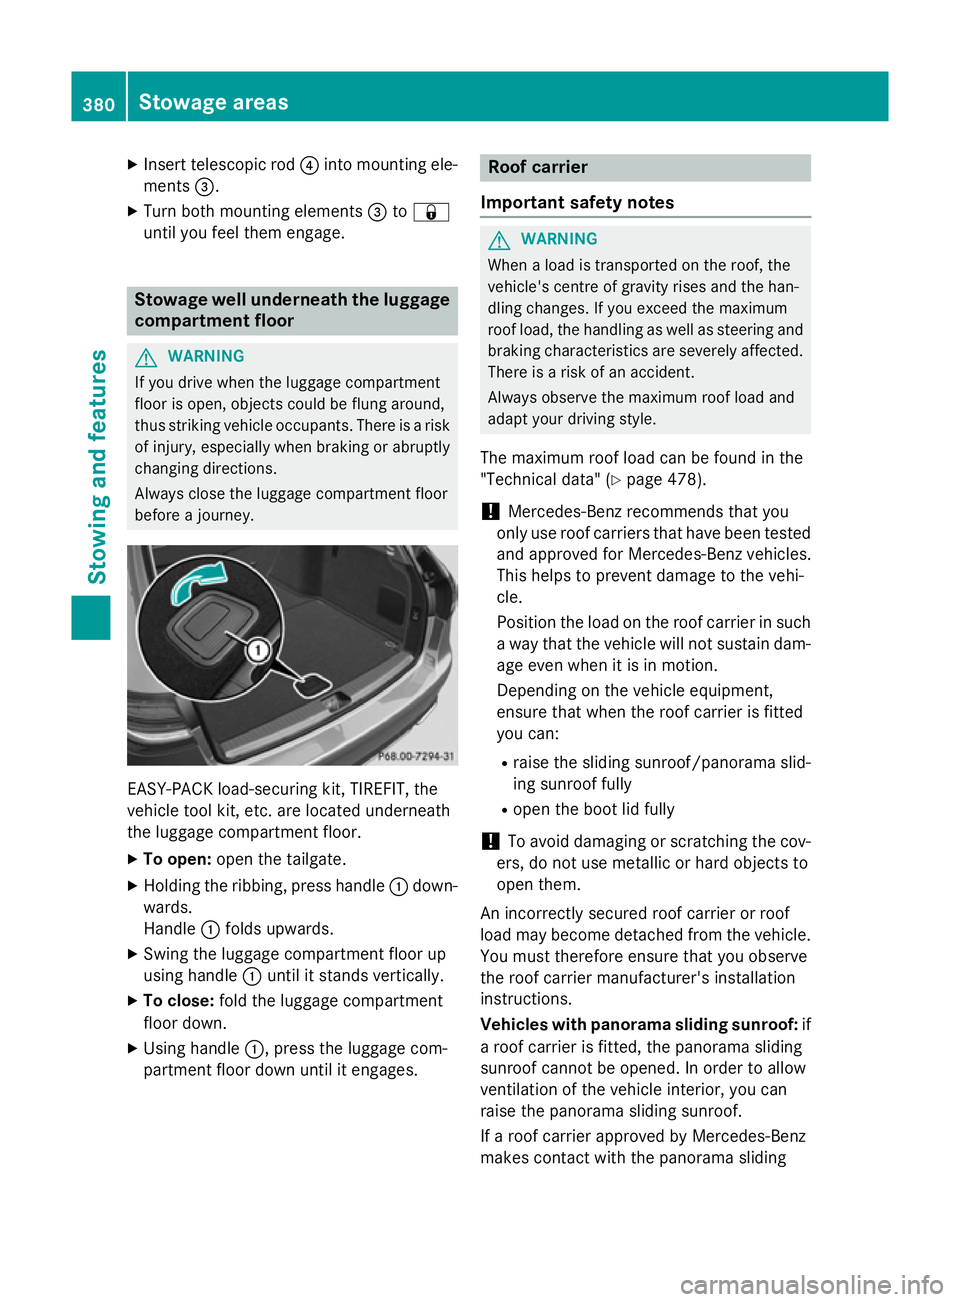
before a journey. EASY-PACK load-securing kit, TIREFIT, the
vehicle tool kit, etc. are located underneath
the luggage compartment floor.
X To open: open the tailgate.
X Holding the ribbing, press handle :down-
wards.
Handle :folds upwards.
X Swing the luggage compartment floor up
using handle :until it stands vertically.
X To close: fold the luggage compartment
floor down.
X Using handle :, press the luggage com-
partment floor down until it engages. Roof carrier
Important safety notes G
WARNING
When a load is transported on the roof, the
vehicle's centre of gravity rises and the han-
dling changes. If you exceed the maximum
roof load, the handling as well as steering and braking characteristics are severely affected.
There is a risk of an accident.
Always observe the maximum roof load and
adapt your driving style.
The maximum roof load can be found in the
"Technical data" (Y page 478).
! Mercedes-Benz recommends that you
only use roof carriers that have been tested
and approved for Mercedes-Benz vehicles.
This helps to prevent damage to the vehi-
cle.
Position the load on the roof carrier in such
a way that the vehicle will not sustain dam-
age even when it is in motion.
Depending on the vehicle equipment,
ensure that when the roof carrier is fitted
you can:
R raise the sliding sunroof/panorama slid-
ing sunroof fully
R open the boot lid fully
! To avoid damaging or scratching the cov-
ers, do not use metallic or hard objects to
open them.
An incorrectly secured roof carrier or roof
load may become detached from the vehicle.
You must therefore ensure that you observe
the roof carrier manufacturer's installation
instructions.
Vehicles with panorama sliding sunroof: if
a roof carrier is fitted, the panorama sliding
sunroof cannot be opened. In order to allow
ventilation of the vehicle interior, you can
raise the panorama sliding sunroof.
If a roof carrier approved by Mercedes-Benz
makes contact with the panorama sliding 380
Stowage areasStowing and features
Page 384 of 489
sunroof, the sunroof will lower slightly but
remain raised in the rear.
Attaching the roof carrier X
Secure the roof carrier to the roof rails.
X Observe the manufacturer's installation
instructions. Features
Cup holders
Important safety notes Vehicles with manual transmission:
G
WARNING
The cup holder cannot secure a drinks con-
tainer in place during a journey. If you use a
cup holder during a journey, the drinks con-
tainer could be flung around and liquid could
be spilt. Vehicle occupants could come into
contact with the liquid and, in particular, be
scalded by hot liquid. You could be distracted
from the traffic situation and lose control of
the vehicle. There is a risk of an accident and
injury.
Only use the cup holder when the vehicle is
stationary. Only place containers of a suitable size in the cup holder. Seal the container, in
particular when it contains hot liquid.
! Only use the cup holders for containers of
the right size and which have lids. The
drinks could otherwise spill. G
WARNING
If you do not correctly store objects in the
vehicle interior, they can slip or be flung
around, thus striking vehicle occupants.
There is a risk of injury, especially when brak- ing or abruptly changing directions. R
Always store objects so that they cannot be
flung around in these or in similar situa-
tions.
R Always make sure that objects do not pro-
trude from stowage compartments, lug-
gage nets or stowage nets.
R Close lockable stowage compartments
while driving.
R Stow and secure objects that are heavy,
hard, pointy, sharp-edged, fragile or too
large in the luggage compartment.
Observe the loading guidelines (Y page 370).
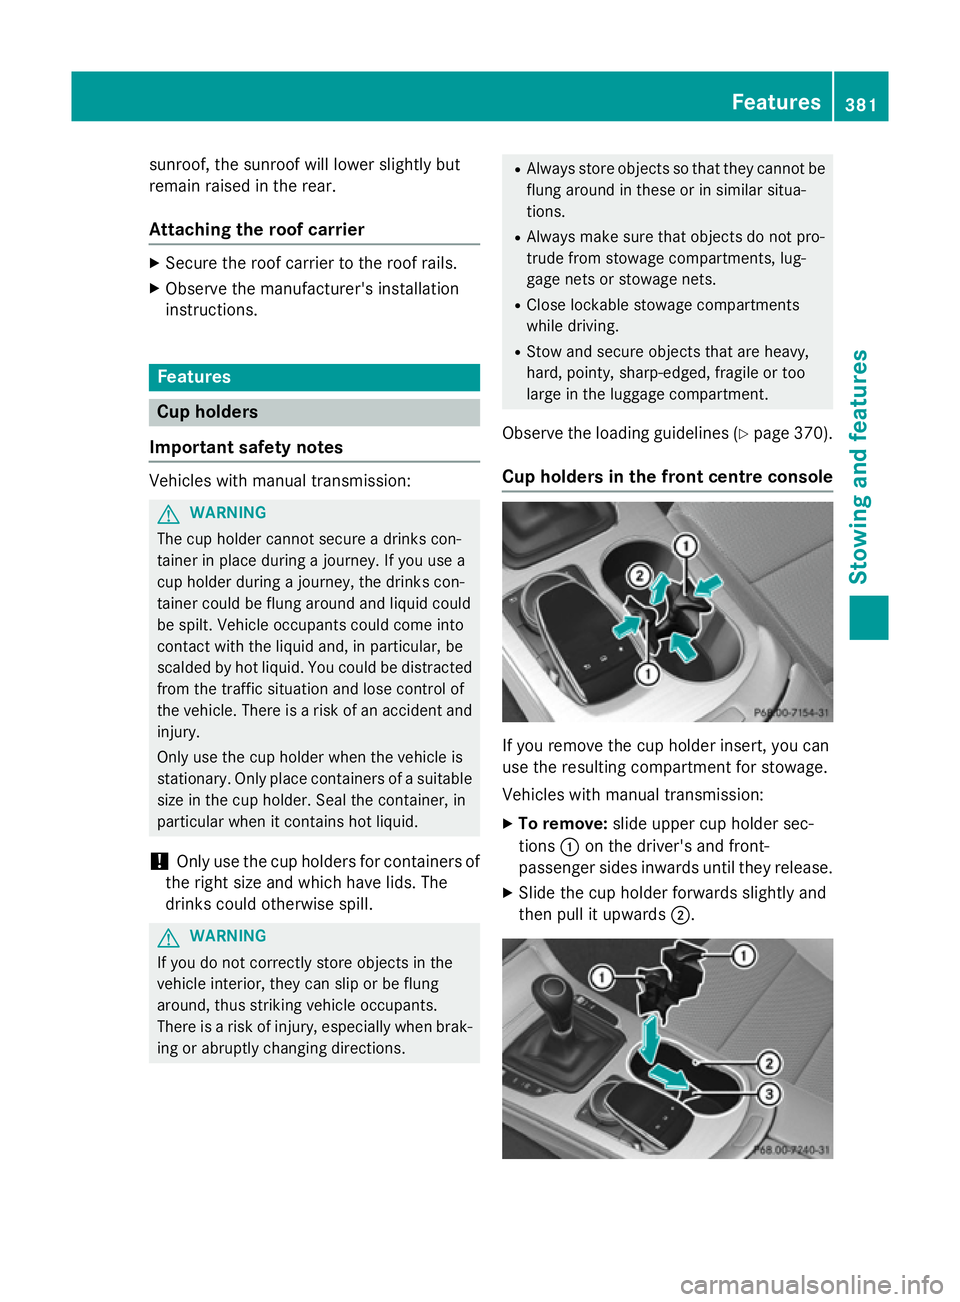
Cup holders in the front centre console If you remove the cup holder insert, you can
use the resulting compartment for stowage.
Vehicles with manual transmission:
X
To remove: slide upper cup holder sec-
tions :on the driver's and front-
passenger sides inwards until they release.
X Slide the cup holder forwards slightly and
then pull it upwards ;. Features
381Stowing and features Z
Page 394 of 489
Operating the mobile phone
You can operate the telephone using the
6
and~ buttons on the multifunction
steering wheel. You can operate other mobile
phone functions via the on-board computer
(Y page 306).
When you remove the key from the ignition
lock, the mobile phone is disconnected from
the vehicle. You can then no longer make calls using the hands-free system.
If a call is active and you remove the key from
the ignition lock, the conversation is trans-
ferred over to the mobile telephone. It is then possible to continue the conversation on the
mobile phone. Floormats
G
WARNING
Objects in the driver's footwell may restrict
the clearance around the pedals or block a
depressed pedal. This jeopardises the oper-
ating and road safety of the vehicle. There is a risk of an accident.
Stow all objects securely in the vehicle so that
they do not get into the driver's footwell.
Always fit the floormats securely and as pre-
scribed in order to ensure that there is always sufficient room for the pedals. Do not use
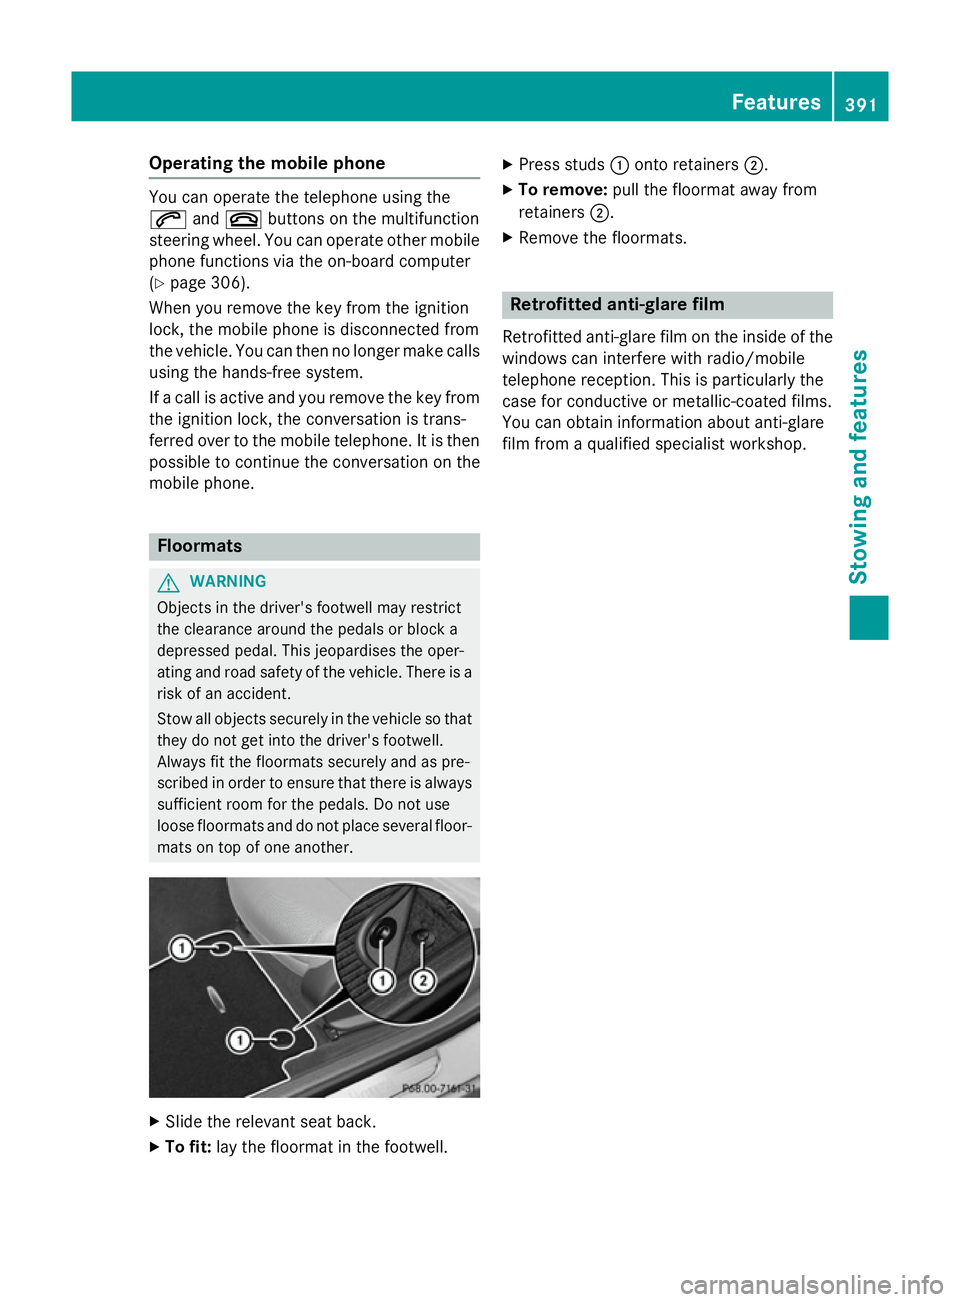
loose floormats and do not place several floor- mats on top of one another. X
Slide the relevant seat back.
X To fit: lay the floormat in the footwell. X
Press studs :onto retainers ;.
X To remove: pull the floormat away from
retainers ;.
X Remove the floormats. Retrofitted anti-glare film
Retrofitted anti-glare film on the inside of the
windows can interfere with radio/mobile
telephone reception. This is particularly the
case for conductive or metallic-coated films.
You can obtain information about anti-glare
film from a qualified specialist workshop. Features
391Stowing and features Z
Page 400 of 489
G
WARNING
If engine oil comes into contact with hot com- ponents in the engine compartment, it may
ignite. There is a risk of fire and injury.
Make sure that engine oil does not spill out
over the filler neck. Allow the engine to cool
down and thoroughly clean the components
that have come into contact with engine oil
before you start the engine. H
Environmental note
When topping up the oil, take care not to spill
any. If oil enters the soil or waterways, it is
harmful to the environment.
! Only use engine oils and oil filters that
have been approved for vehicles with a ser-
vice system. You can obtain a list of the
engine oils and oil filters tested and
approved in accordance with the
Mercedes-Benz Specifications for Service
Products at any Mercedes-Benz Service
Centre.
Damage to the engine or exhaust system is caused by the following:
R using engine oils and oil filters that have
not been specifically approved for the
service system
R changing the engine oil and oil filter after
missing the change interval required by
the service system
R using engine oil additives
! Do not add too much oil. Topping up with
too much engine oil can result in damage to
the engine or to the catalytic converter.
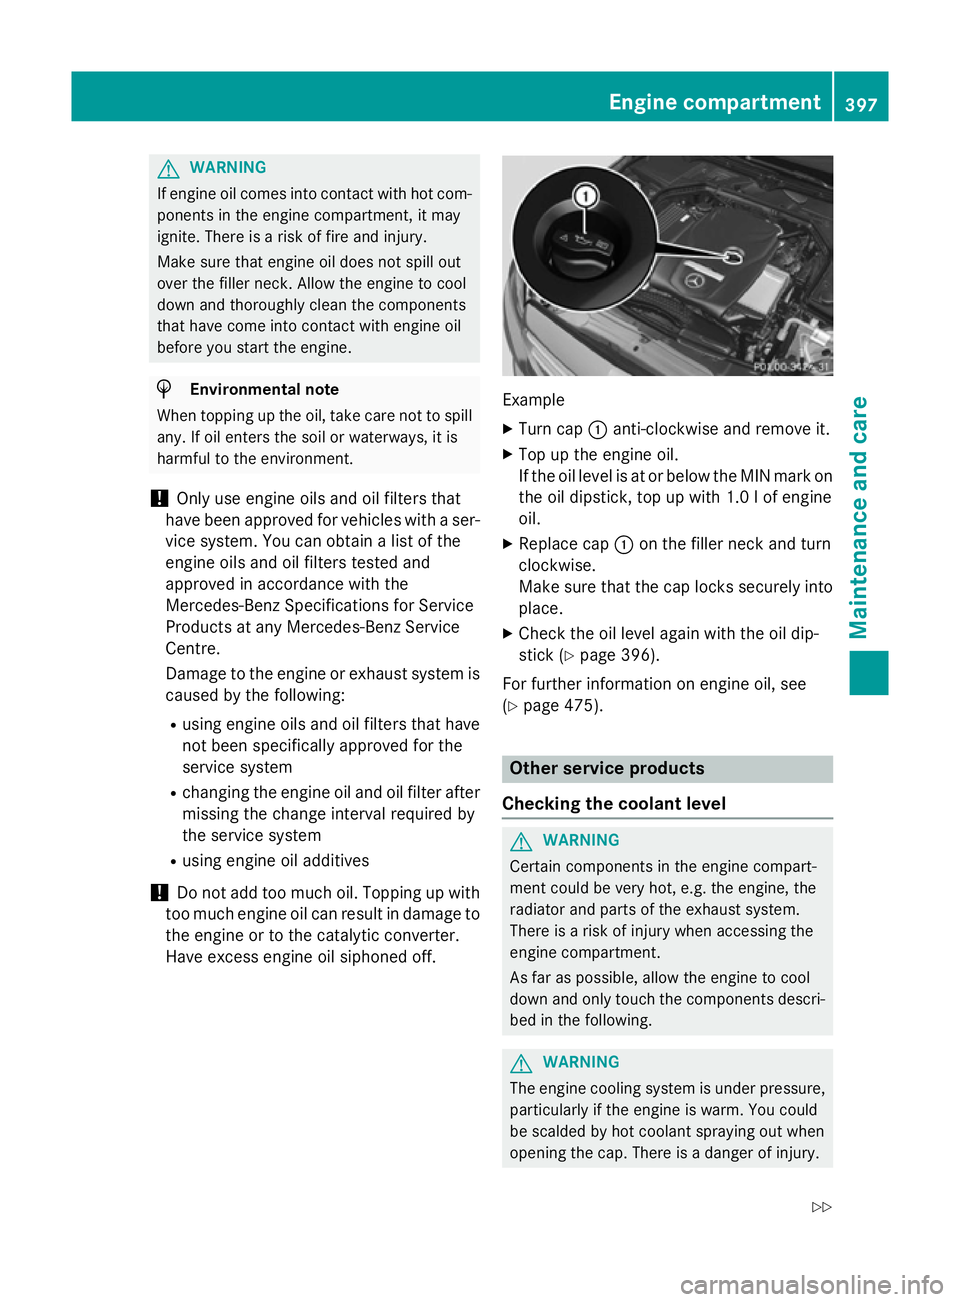
Have excess engine oil siphoned off. Example
X Turn cap :anti-clockwise and remove it.
X Top up the engine oil.
If the oil level is at or below the MIN mark on
the oil dipstick, top up with 1.0 lof engine
oil.
X Replace cap :on the filler neck and turn
clockwise.
Make sure that the cap locks securely into place.
X Check the oil level again with the oil dip-
stick (Y page 396).
For further information on engine oil, see
(Y page 475). Other service products
Checking the coolant level G
WARNING
Certain components in the engine compart-
ment could be very hot, e.g. the engine, the
radiator and parts of the exhaust system.
There is a risk of injury when accessing the
engine compartment.
As far as possible, allow the engine to cool
down and only touch the components descri- bed in the following. G
WARNING
The engine cooling system is under pressure, particularly if the engine is warm. You could
be scalded by hot coolant spraying out when
opening the cap. There is a danger of injury. Engine compartment
397Maintenance and care
Z