2014 MERCEDES-BENZ C-CLASS ESTATE engine
[x] Cancel search: enginePage 100 of 489
The doors can then be opened from the inside
after the vehicle has been locked from the
outside. The anti-theft alarm system is trig-
gered if the door is opened from the inside.
Switch off the alarm (Y page 87).
All countries: G
WARNING
If children are left unsupervised in the vehicle, they could:
R open doors, thereby endangering other per-
sons or road users
R get out and be struck by oncoming traffic
R operate vehicle equipment and become
trapped, for example
In addition, the children could also set the
vehicle in motion, for example, if they:
R release the parking brake
R shift the automatic transmission out of park
position P or shift manual transmission into
neutral
R start the engine
There is a risk of an accident and injury.
When leaving the vehicle, always take the key with you and lock the vehicle. Never leave
children and animals unattended in the vehi-
cle. Keep the keys out of the reach of children.
Stow luggage or loads preferably in the lug-
gage compartment. Observe the loading
guidelines (Y page 370). Unlocking and opening the doors
from the inside
Only for the United Kingdom: if the vehicle
has been locked with the key or with KEY-
LESS-GO, the double lock function is activa-
ted as standard. It is then not possible to open the doors from inside the vehicle. You can
deactivate the double lock function by deac-
tivating the interior motion sensor . The doors
can then be opened from the inside after the vehicle has been locked from the outside. You can only open the rear doors from inside the vehicle if they are not secured by the child-
proof locks (Y
page 75). The anti-theft alarm
system is triggered if the door is opened from
the inside. Switch off the alarm (Y page 87).
For all countries except the United King-
dom:
You can open a door from inside the vehicle
even if it has been locked. You can only open
the rear doors from inside the vehicle if they
are not secured by the child-proof locks
(Y page 75). If the vehicle has previously been
locked with the key or with KEYLESS-GO,
opening a door from the inside will trigger the
anti-theft alarm system. Switch off the alarm
(Y page 87). X
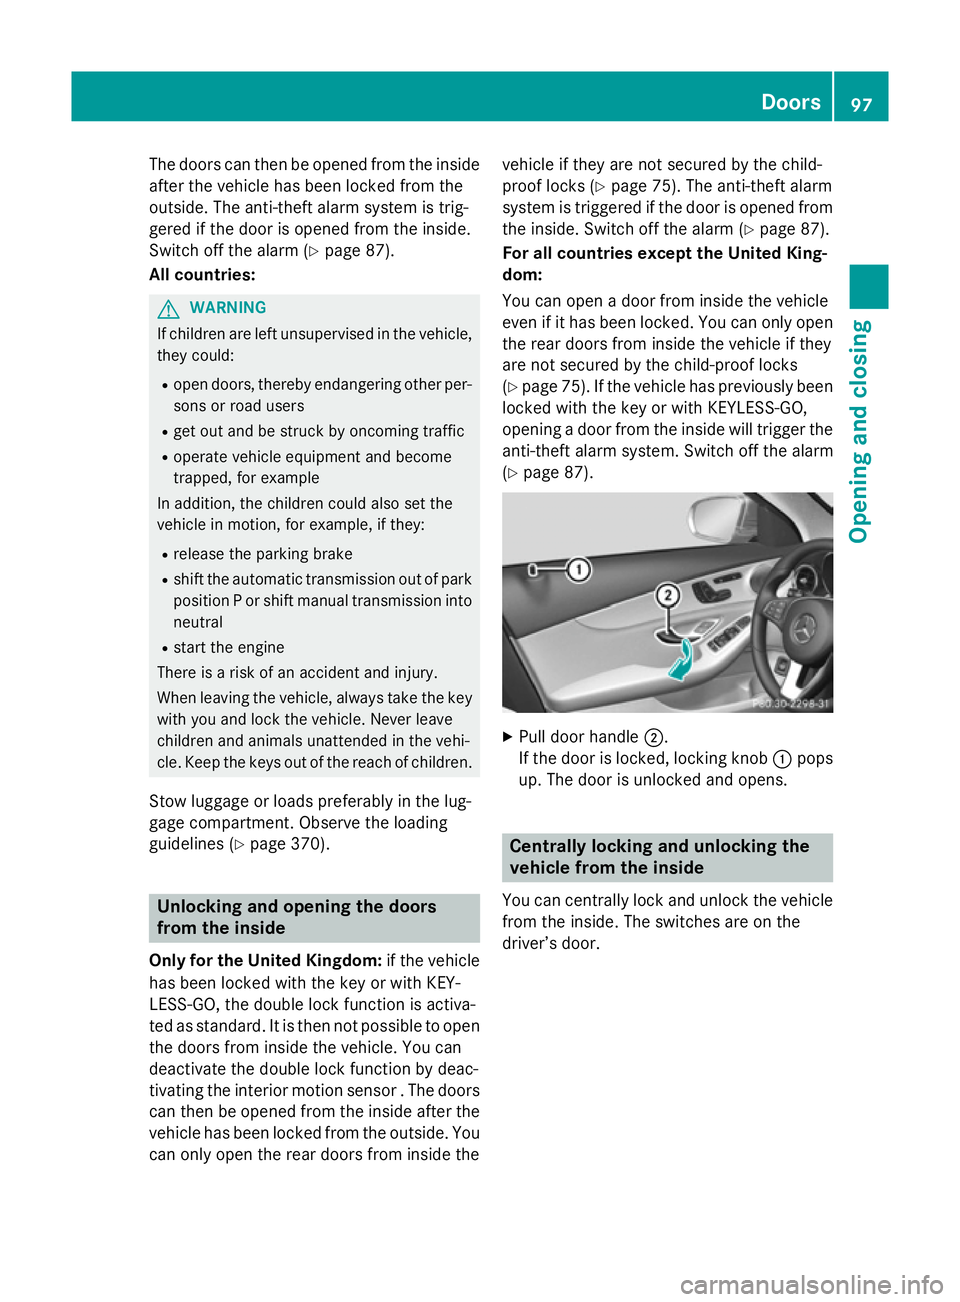
Pull door handle ;.
If the door is locked, locking knob :pops
up. The door is unlocked and opens. Centrally locking and unlocking the
vehicle from the inside
You can centrally lock and unlock the vehicle from the inside. The switches are on the
driver’s door. Doors
97Opening and closing Z
Page 104 of 489
X
Insert the emergency key element into the
lock of the driver's door as far as it will go.
X Turn the emergency key element clockwise
as far as it will go to position 1.
The locking knob drops down and the driv- er's door is locked.
On right-hand-drive vehicles, turn the emer-
gency key element anti-clockwise.
X Turn the emergency key element back and
remove it.
X Insert the emergency key element into the
key (Y page 93).
X Make sure that the doors and the tailgate
are locked.
X Carefully press the protective cap onto the
lock cylinder until it engages and is seated firmly. Do not pull the door handle when
doing so.
All vehicles:
If you lock the vehicle as described above, the
fuel filler flap is not locked. The anti-theft
alarm system is not primed. Luggage compartment
Important safety notes
G
WARNING
Combustion engines emit poisonous exhaust
gases such as carbon monoxide. If the tailgate is open when the engine is running, particu-
larly if the vehicle is moving, exhaust fumes
could enter the passenger compartment.
There is a risk of poisoning.
Turn off the engine before opening the tail-
gate. Never drive with the tailgate open. G
WARNING
If objects, luggage or loads are not secured or not secured sufficiently, they could slip, tip
over or be flung around and thereby hit vehicle
occupants. There is a risk of injury, especially when braking or abruptly changing directions.
Always store objects so that they cannot be
flung around. Secure objects, luggage or loads against slipping or tipping before the
journey.
! The tailgate swings upwards and to the
rear when opened. Therefore, make sure
that there is sufficient clearance above and behind the tailgate.
The opening dimensions on the tailgate can
be found in the "Vehicle data" section
(Y page 478).
i You can limit the opening angle of the
tailgate (Y page 105).
Do not leave the key in the luggage compart- ment. You could otherwise lock yourself out.
Stow luggage or loads preferably in the lug-
gage compartment. Observe the loading
guidelines (Y page 370). Tailgate obstruction detection with
reversing function
Vehicles with remote tailgate closing fea-
ture: the tailgate is equipped with automatic
obstacle recognition with a reversing feature. If a solid object blocks or restricts the tailgate when automatically opening, this procedure
is stopped. If a solid object blocks or restrictsthe tailgate when automatically closing, the
boot lid automatically opens again slightly.
The automatic obstacle recognition with
reversing function is only an aid. It is not a
substitute for your attentiveness when open-
ing and closing the tailgate. G
WARNING
The reversing function does not react:
R to soft, light and thin objects, e.g. small fin-
gers
R over the last 8 mm of the closing path
This means that the reversing feature cannot
prevent someone being trapped in these sit-
uations. There is a risk of injury.
When closing make sure that no parts of the
body are in the closing area. Luggage compartment
101Opening and closing
Z
Page 107 of 489
R
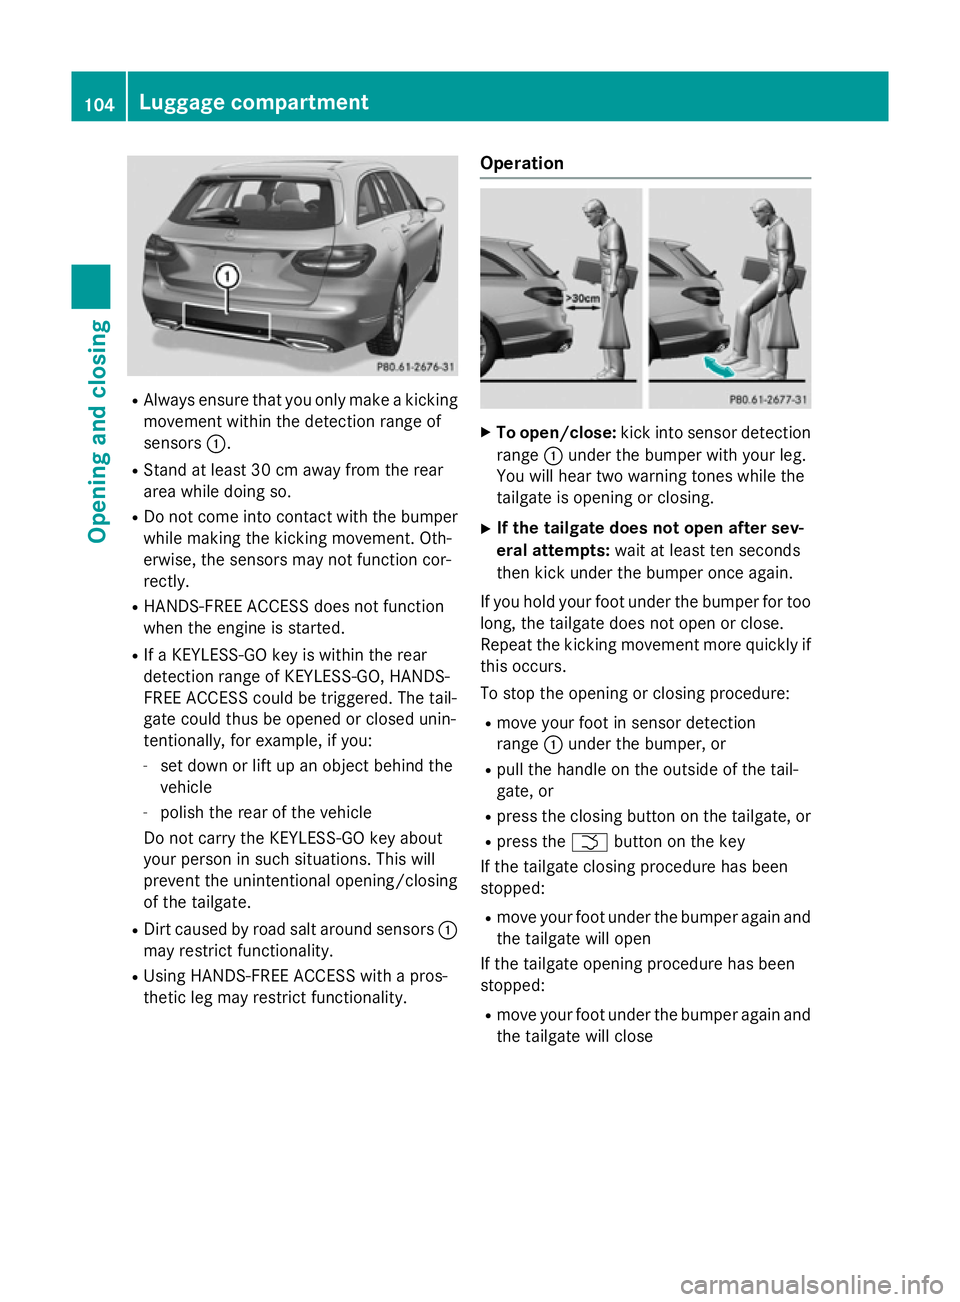
Always ensure that you only make a kicking
movement within the detection range of
sensors :.
R Stand at least 30 cm away from the rear
area while doing so.
R Do not come into contact with the bumper
while making the kicking movement. Oth-
erwise, the sensors may not function cor-
rectly.
R HANDS-FREE ACCESS does not function
when the engine is started.
R If a KEYLESS-GO key is within the rear
detection range of KEYLESS-GO, HANDS-
FREE ACCESS could be triggered. The tail-
gate could thus be opened or closed unin-
tentionally, for example, if you:
- set down or lift up an object behind the
vehicle
- polish the rear of the vehicle
Do not carry the KEYLESS-GO key about
your person in such situations. This will
prevent the unintentional opening/closing
of the tailgate.
R Dirt caused by road salt around sensors :
may restrict functionality.
R Using HANDS-FREE ACCESS with a pros-
thetic leg may restrict functionality. Operation X
To open/close: kick into sensor detection
range :under the bumper with your leg.
You will hear two warning tones while the
tailgate is opening or closing.
X If the tailgate does not open after sev-
eral attempts: wait at least ten seconds
then kick under the bumper once again.
If you hold your foot under the bumper for too
long, the tailgate does not open or close.
Repeat the kicking movement more quickly if
this occurs.
To stop the opening or closing procedure:
R move your foot in sensor detection
range :under the bumper, or
R pull the handle on the outside of the tail-
gate, or
R press the closing button on the tailgate, or
R press the Fbutton on the key
If the tailgate closing procedure has been
stopped:
R move your foot under the bumper again and
the tailgate will open
If the tailgate opening procedure has been
stopped:
R move your foot under the bumper again and
the tailgate will close 104
Luggage compartmentOpening and closing
Page 110 of 489
When closing make sure that no parts of the
body are in the closing area. If somebody
becomes trapped, release the switch or press the switch to open the side window again. G
WARNING
If children operate the side windows they
could become trapped, particularly if they are left unsupervised. There is a risk of injury.
Activate the override feature for the rear side
windows. When leaving the vehicle, always
take the key with you and lock the vehicle.
Never leave children unattended in the vehi-
cle. Side window reversing feature
The side windows are equipped with an auto-
matic reversing feature. If a solid object
blocks or restricts a side window from trav-
elling upwards during the automatic closing
process, the side window opens again auto-
matically. During the manual closing process, the side window only opens again automati-
cally after the corresponding switch is
released. The automatic reversing feature is
only an aid and is no substitute for your atten-
tion when closing a side window. G
WARNING
The reversing function does not react:
R to soft, light and thin objects, e.g. small fin-
gers
R while resetting
This means that the reversing feature cannot
prevent someone being trapped in these sit-
uations. There is a risk of injury.
When closing, make sure that no parts of the
body are in the closing area. If someone
becomes trapped, press the switch to open
the side window again. Opening and closing the side win-
dows
The switches for all side windows are located
on the driver's door. There is also a switch on
each door for the corresponding side window.
The switches on the driver's door take prec-
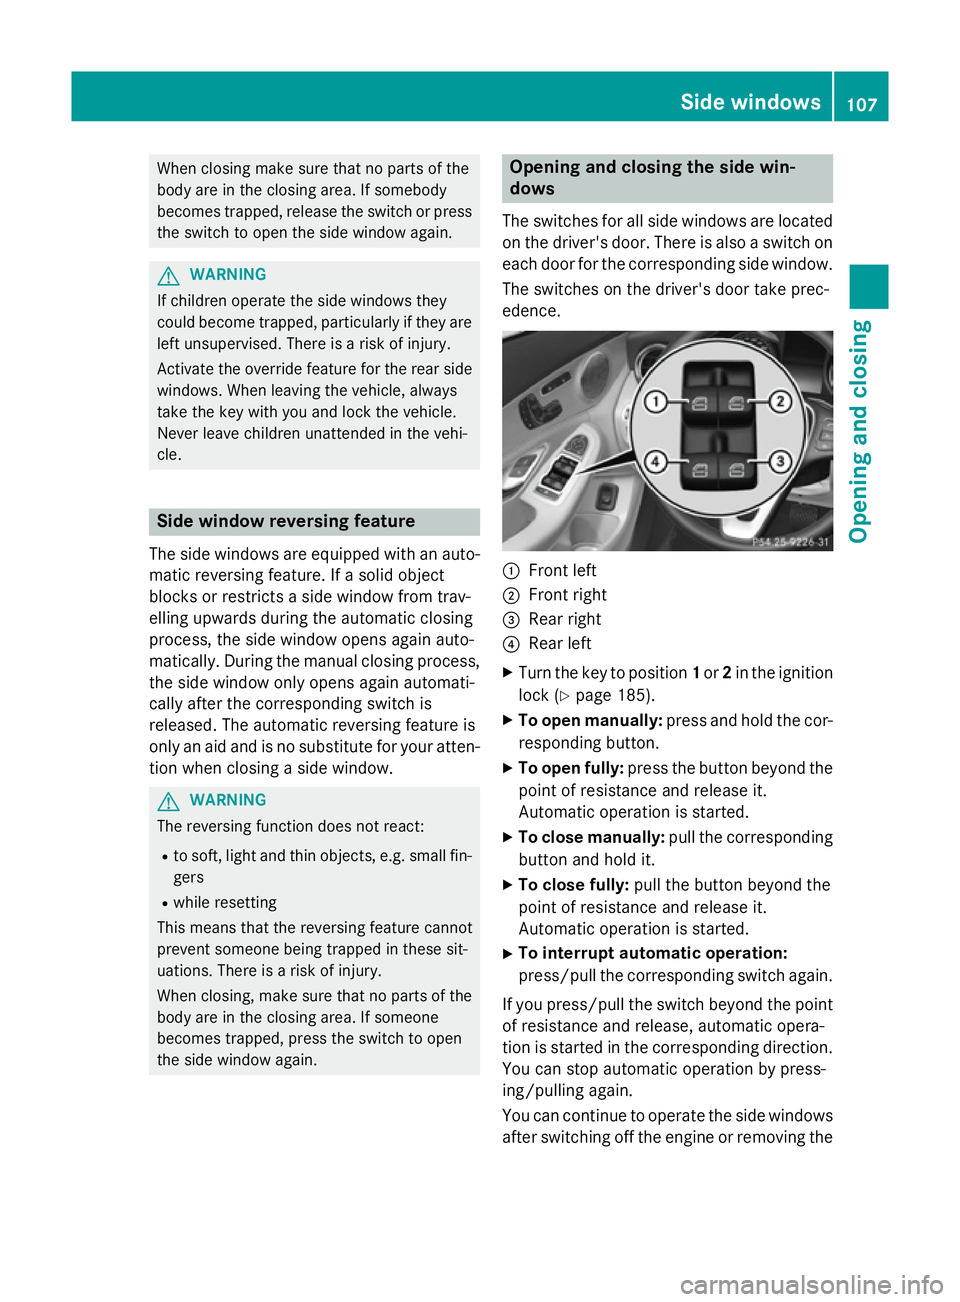
edence. :
Front left
; Front right
= Rear right
? Rear left
X Turn the key to position 1or 2in the ignition
lock (Y page 185).
X To open manually: press and hold the cor-
responding button.
X To open fully: press the button beyond the
point of resistance and release it.
Automatic operation is started.
X To close manually: pull the corresponding
button and hold it.
X To close fully: pull the button beyond the
point of resistance and release it.
Automatic operation is started.
X To interrupt automatic operation:
press/pull the corresponding switch again.
If you press/pull the switch beyond the point
of resistance and release, automatic opera-
tion is started in the corresponding direction. You can stop automatic operation by press-
ing/pulling again.
You can continue to operate the side windowsafter switching off the engine or removing the Side windows
107Opening and closing Z
Page 115 of 489
or close the sun protection cover manually
when the sliding sunroof is raised or closed.
You can continue to operate the sliding sun-
roof after switching off the engine or remov-
ing the key. This function remains active for
five minutes or until the driver's or front-
passenger door is opened.
Rain-closing feature When the key is in position
0in the ignition
lock or is removed, the sliding sunroof closes
automatically:
R if it starts to rain.
R at extreme outside temperatures.
R after six hours.
R if there is a malfunction in the power sup-
ply.
The rear of the sliding sunroof is then raised in order to ventilate the vehicle interior.
If the sliding sunroof is obstructed when
being closed by the rain-closing feature, it
opens again slightly. The rain-closing feature
is then deactivated.
The sliding sunroof does not close if:
R it is raised at the rear.
R it is blocked.
R no rain is falling on the area of the wind-
screen being monitored by the rain sensor,
e.g. because the vehicle is under a bridge.
Resetting !
If the sliding sunroof still cannot be
opened or closed fully after resetting, con- tact a qualified specialist workshop.
Reset the sliding sunroof if it does not operate
smoothly.
X Turn the key to position 1or 2in the ignition
lock.
X Raise the sliding sunroof fully at the rear
(Y page 111).
X Keep the 3switch pressed for another
second. X
Make sure that the sliding sunroof can be
fully opened and closed again
(Y page 111).
X If this is not the case, repeat the steps
above again. Operating the panorama sliding sun-
roof
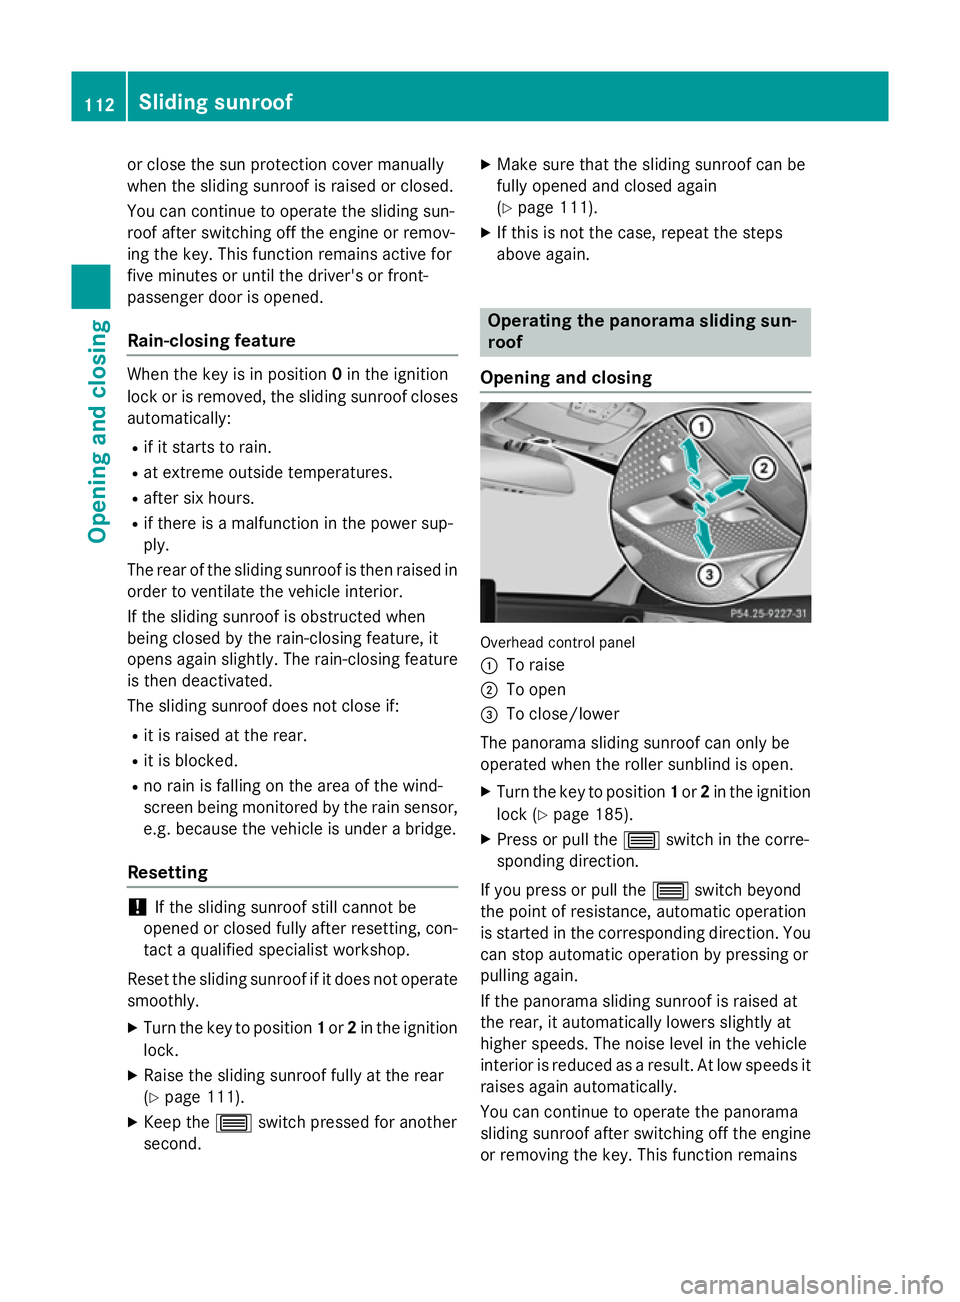
Opening and closing Overhead control panel
:
To raise
; To open
= To close/lower
The panorama sliding sunroof can only be
operated when the roller sunblind is open.
X Turn the key to position 1or 2in the ignition
lock (Y page 185).
X Press or pull the 3switch in the corre-
sponding direction.
If you press or pull the 3switch beyond
the point of resistance, automatic operation
is started in the corresponding direction. You can stop automatic operation by pressing or
pulling again.
If the panorama sliding sunroof is raised at
the rear, it automatically lowers slightly at
higher speeds. The noise level in the vehicle
interior is reduced as a result. At low speeds it
raises again automatically.
You can continue to operate the panorama
sliding sunroof after switching off the engine
or removing the key. This function remains 112
Sliding sunroofOpening and closing
Page 116 of 489
active for five minutes or until you open a
front door.
The panorama sliding sunroof cannot be
opened if a roof carrier is fitted. In order to
allow ventilation of the vehicle interior, you
can raise the panorama sliding sunroof. If a
roof carrier approved by Mercedes-Benz
makes contact with the panorama sliding
sunroof, the sunroof will lower slightly but
remain raised at the rear.
Rain-closing feature when the engine is
switched off If the key is in position
0in the ignition lock or
if it is removed, the panorama sliding sunroof
closes automatically:
R if it starts to rain.
R at extreme outside temperatures.
R after six hours.
R if there is a malfunction in the power sup-
ply.
The panorama sliding sunroof remains raised
at the rear in order to allow ventilation of the vehicle interior.
If the panorama sliding sunroof is obstructed
when being closed by the rain-closing feature,
it opens again slightly. The rain-closing fea-
ture is then deactivated.
The panorama sliding sunroof does not close if:
R it is raised at the rear.
R it is blocked.
R no rain is falling on the area of the wind-
screen being monitored by the rain sensor. If the vehicle, for example, is under a bridge
or in a carport, the field of the sensor may
be covered.
Rain-closing feature when driving The raised sliding sunroof automatically low-
ers at the rear when driving if it starts to rain.
The sliding sunroof is lowered depending on:
R the road speed and
R the intensity of the rain You can manually cancel the automatic clos-
ing procedure. Press or pull the
3switch
in any direction.
To raise the sliding sunroof again, press the
3 switch in direction :.
The "Rain-closing feature when driving" func-
tion is deactivated, until you:
R press or pull the 3switch in any direc-
tion or
R turn the key to another position in the igni-
tion lock (Y page 185). Operating the panorama sliding sun-
roof roller sunblinds
Important safety notes G
WARNING
When opening or closing the roller sunblind
parts of the body could be trapped between
the roller sunblind and the frame or sliding
sunroof. There is a risk of injury.
When opening or closing make sure that no
parts of the body are in the sweep of the roller sunblind.
If someone is trapped:
R release the switch immediately or
R during automatic operation, press the
switch briefly in any direction
The opening/closing process is stopped.
The roller sunblinds shield the vehicle interior from sunlight. The front roller sunblind can
only be opened and closed when the sliding
sunroof is closed.
Roller sunblinds reversing feature The roller sunblinds are equipped with an
automatic reversing feature. If a solid object
blocks or restricts the roller blind during the
closing process, the roller blind opens again
automatically. However, the automatic
reversing feature is only an aid, not a substi-
tute for your attention when closing the roller
sunblind. Sliding sunroof
113Opening and closing Z
Page 121 of 489
Useful information
i This Owner's Manual describes all mod-
els, series and optional equipment for your
vehicle that were available at the time of
going to press. National variations are pos- sible. Note that your vehicle may not be
equipped with all of the functions descri-
bed. This is also the case for systems and
functions relevant to safety.
i Read the information on qualified special-
ist workshops: (Y page 27). Correct driver's seat position
G
WARNING
You could lose control of the vehicle while
driving if you:
R adjust the driver's seat, steering wheel or
mirrors
R fasten the seat belt
There is a risk of an accident.
Adjust the driver's seat, head restraint, steer-
ing wheel and mirrors and fasten your seat
belt before starting the engine. X
Observe the safety guidelines on seat
adjustment (Y page 119).
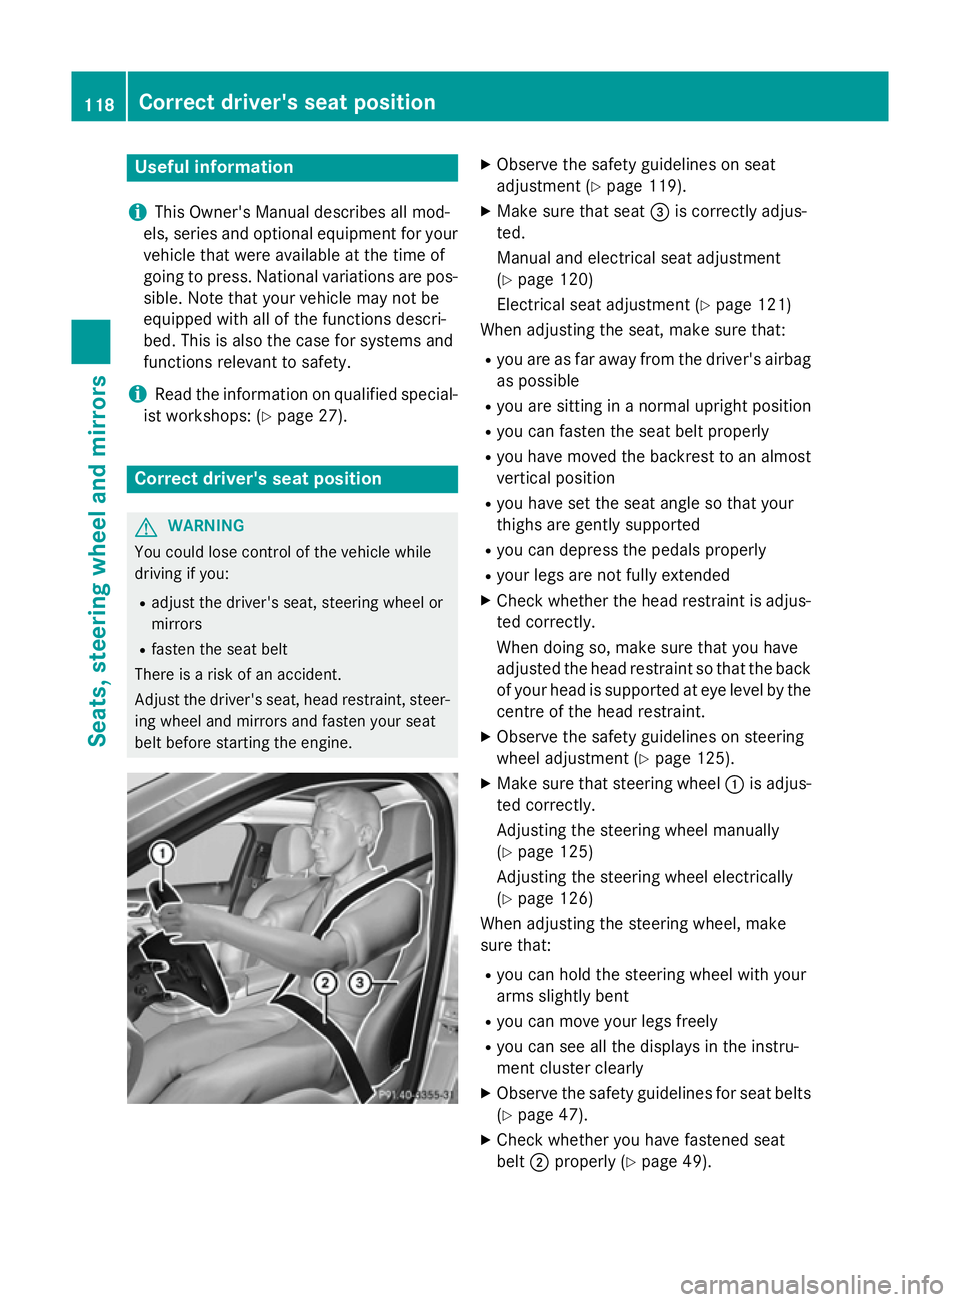
X Make sure that seat =is correctly adjus-
ted.
Manual and electrical seat adjustment
(Y page 120)
Electrical seat adjustment (Y page 121)
When adjusting the seat, make sure that:
R you are as far away from the driver's airbag
as possible
R you are sitting in a normal upright position
R you can fasten the seat belt properly
R you have moved the backrest to an almost
vertical position
R you have set the seat angle so that your
thighs are gently supported
R you can depress the pedals properly
R your legs are not fully extended
X Check whether the head restraint is adjus-
ted correctly.
When doing so, make sure that you have
adjusted the head restraint so that the back of your head is supported at eye level by the centre of the head restraint.
X Observe the safety guidelines on steering
wheel adjustment (Y page 125).
X Make sure that steering wheel :is adjus-
ted correctly.
Adjusting the steering wheel manually
(Y page 125)
Adjusting the steering wheel electrically
(Y page 126)
When adjusting the steering wheel, make
sure that:
R you can hold the steering wheel with your
arms slightly bent
R you can move your legs freely
R you can see all the displays in the instru-
ment cluster clearly
X Observe the safety guidelines for seat belts
(Y page 47).
X Check whether you have fastened seat
belt ;properly (Y page 49).118
Correct driver's seat positionSeats, steering wheel and mirrors
Page 122 of 489
The seat belt should:
R fit snugly across your body
R be routed across the middle of your shoul-
der
R be routed across your hips in the pelvic
area
X Before starting off, adjust the rear-view mir-
ror and the exterior mirrors so that you
have a good view of the road and traffic
conditions (Y page 128).
X Vehicles with memory function: you can
store the seat, steering wheel, exterior mir-
ror and head-up display settings with the
memory function (Y page 131). Seats
Important safety notes
G
WARNING
If children adjust the seats, they could
become trapped, especially if they are unat-
tended. There is a risk of injury.
When leaving the vehicle, always take the key with you and lock the vehicle. Never leave
children unattended in the vehicle.
The seats can still be adjusted when there is
no key in the ignition lock. G
WARNING
When adjusting a seat, you or another vehicle occupant could become trapped by the guiderail of the seat, for instance. There is a risk of
injury.
Make sure that no one has any part of their
body within the sweep of the seat when
adjusting it.
Observe the safety notes on "Airbags"
(Y page 51) and "Children in the Vehicle"
(Y page 63). G
WARNING
If the driver's seat is not engaged, it can move unexpectedly while the vehicle is in motion. This could cause you to lose control of the
vehicle. There is a risk of an accident.
Always make sure that the driver's seat is
engaged before starting the engine.
G
WARNING
You could lose control of the vehicle while
driving if you:
R adjust the driver's seat, steering wheel or
mirrors
R fasten the seat belt
There is a risk of an accident.
Adjust the driver's seat, head restraint, steer-
ing wheel and mirrors and fasten your seat
belt before starting the engine. G
WARNING
If you adjust the seat height carelessly, you or other vehicle occupants could be trapped andthereby injured. Children in particular could
accidentally press the electrical seat adjust-
ment buttons and become trapped. There is a
risk of injury.
While moving the seats, make sure that your
hands or other body parts do not get under the
lever assembly of the seat adjustment sys-
tem. G
WARNING
The head restraints cannot provide the inten-
ded protection unless they are fitted and
adjusted correctly. There is an increased risk of injury to the head and neck in the event of
an accident or sudden braking, for example.
Always drive with the head restraints fitted.
Ensure that the centre of the head restraints
support the back of each vehicle occupant's
head at eye level before driving off. G
WARNING
The seat belt does not offer the intended level of protection if you have not moved the back-
rest to an almost vertical position. When brak-
ing or in the event of an accident, you could
slide underneath the seat belt and sustain Seats
119Seats, steering wheel and mirrors
Z