2014 MERCEDES-BENZ C-CLASS ESTATE weight
[x] Cancel search: weightPage 373 of 489
Useful information
i This Owner's Manual describes all mod-
els, series and optional equipment for your
vehicle that were available at the time of
going to press. National variations are pos- sible. Note that your vehicle may not be
equipped with all of the functions descri-
bed. This is also the case for systems and
functions relevant to safety.
i Read the information on qualified special-
ist workshops: (Y page 27). Stowage areas
Loading guidelines
G
WARNING
Combustion engines emit poisonous exhaust
gases such as carbon monoxide. If the tailgate is open when the engine is running, particu-
larly if the vehicle is moving, exhaust fumes
could enter the passenger compartment.
There is a risk of poisoning.
Turn off the engine before opening the tail-
gate. Never drive with the tailgate open. G
WARNING
If objects, luggage or loads are not secured or not secured sufficiently, they could slip, tip
over or be flung around and thereby hit vehicle
occupants. There is a risk of injury, especially when braking or abruptly changing directions.
Always store objects so that they cannot be
flung around. Secure objects, luggage or
loads against slipping or tipping before the
journey. G
WARNING
The exhaust tail pipe and tail pipe trim can
become very hot. If you come into contact
with these parts of the vehicle, you could burn
yourself. There is a risk of injury.
Always be particularly careful around the
exhaust tail pipe and the tail pipe trim. Allow these components to cool down before touch-
ing them.
The handling characteristics of a laden vehi-
cle are dependent on the distribution of the
load within the vehicle. For this reason, you
should observe the following notes when
transporting a load:
R never exceed the maximum permissible
gross vehicle weight or the permissible axle
loads for the vehicle (including occupants).
R the luggage compartment is the preferred
place to carry objects.
R position heavy loads as far forwards as pos-
sible and as low down in the luggage com-
partment as possible.
R the load must not protrude above the upper
edge of the seat backrests.
R always place the load behind unoccupied
seats if possible.
R secure the load with sufficiently strong and
wear-resistant lashing material. Pad sharp
edges for protection.
i Load restraints are available at any quali-
fied specialist workshop, e.g. a Mercedes-
Benz Service Centre. Stowage compartments
Important safety notes G
WARNING
If you do not correctly store objects in the
vehicle interior, they can slip or be flung
around, thus striking vehicle occupants.
There is a risk of injury, especially when brak- ing or abruptly changing directions.
R Always store objects so that they cannot be
flung around in these or in similar situa-
tions.
R Always make sure that objects do not pro-
trude from stowage compartments, lug-
gage nets or stowage nets. 370
Stowage areasStowing and features
Page 385 of 489
X
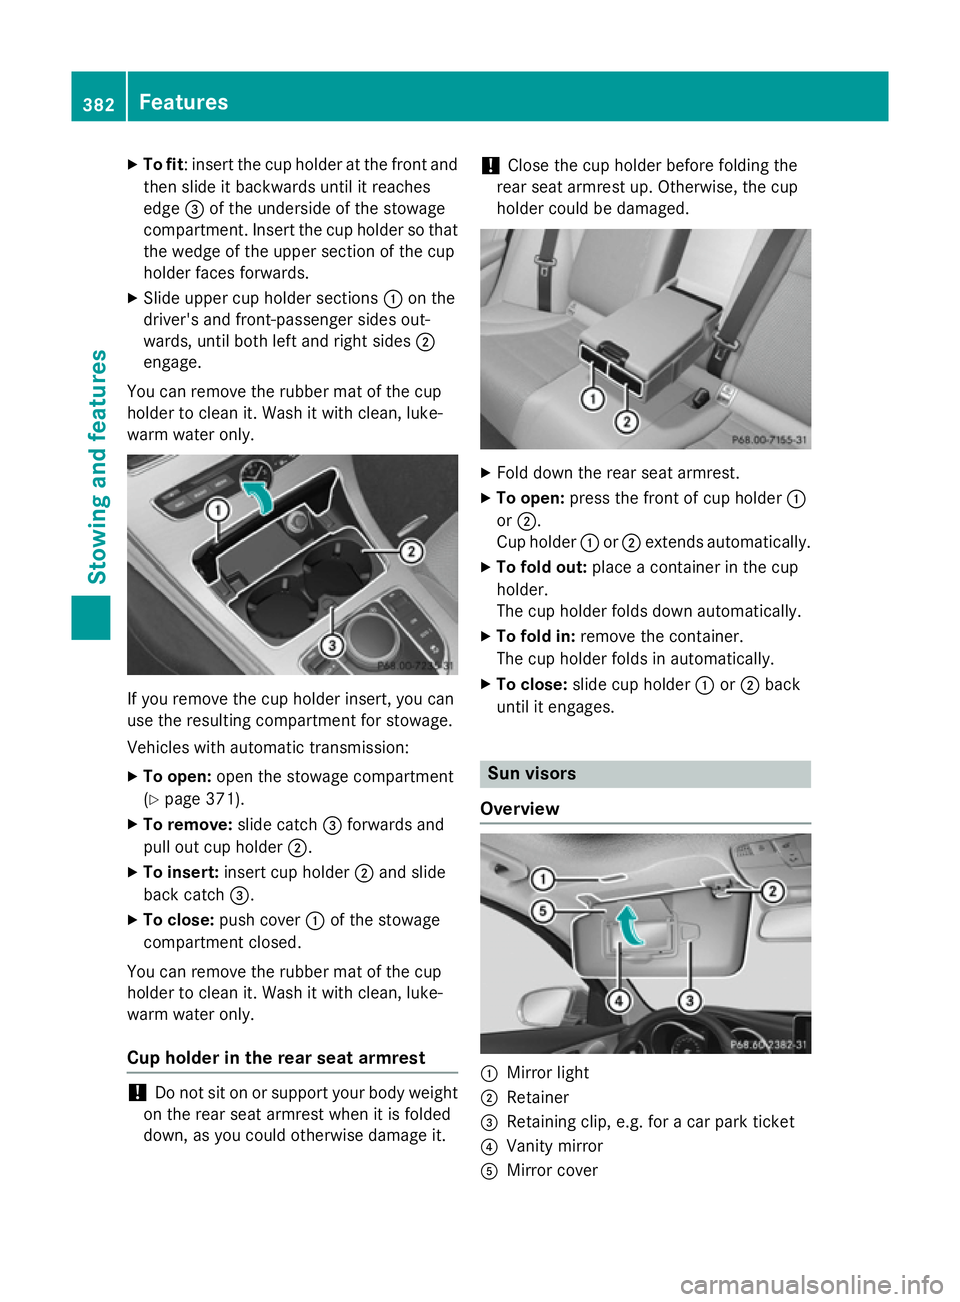
To fit : insert the cup holder at the front and
then slide it backwards until it reaches
edge =of the underside of the stowage
compartment. Insert the cup holder so that
the wedge of the upper section of the cup
holder faces forwards.
X Slide upper cup holder sections :on the
driver's and front-passenger sides out-
wards, until both left and right sides ;
engage.
You can remove the rubber mat of the cup
holder to clean it. Wash it with clean, luke-
warm water only. If you remove the cup holder insert, you can
use the resulting compartment for stowage.
Vehicles with automatic transmission:
X To open: open the stowage compartment
(Y page 371).
X To remove: slide catch=forwards and
pull out cup holder ;.
X To insert: insert cup holder ;and slide
back catch =.
X To close: push cover :of the stowage
compartment closed.
You can remove the rubber mat of the cup
holder to clean it. Wash it with clean, luke-
warm water only.
Cup holder in the rear seat armrest !
Do not sit on or support your body weight
on the rear seat armrest when it is folded
down, as you could otherwise damage it. !
Close the cup holder before folding the
rear seat armrest up. Otherwise, the cup
holder could be damaged. X
Fold down the rear seat armrest.
X To open: press the front of cup holder :
or ;.
Cup holder :or; extends automatically.
X To fold out: place a container in the cup
holder.
The cup holder folds down automatically.
X To fold in: remove the container.
The cup holder folds in automatically.
X To close: slide cup holder :or; back
until it engages. Sun visors
Overview :
Mirror light
; Retainer
= Retaining clip, e.g. for a car park ticket
? Vanity mirror
A Mirror cover 382
FeaturesSto
wing an d features
Page 427 of 489
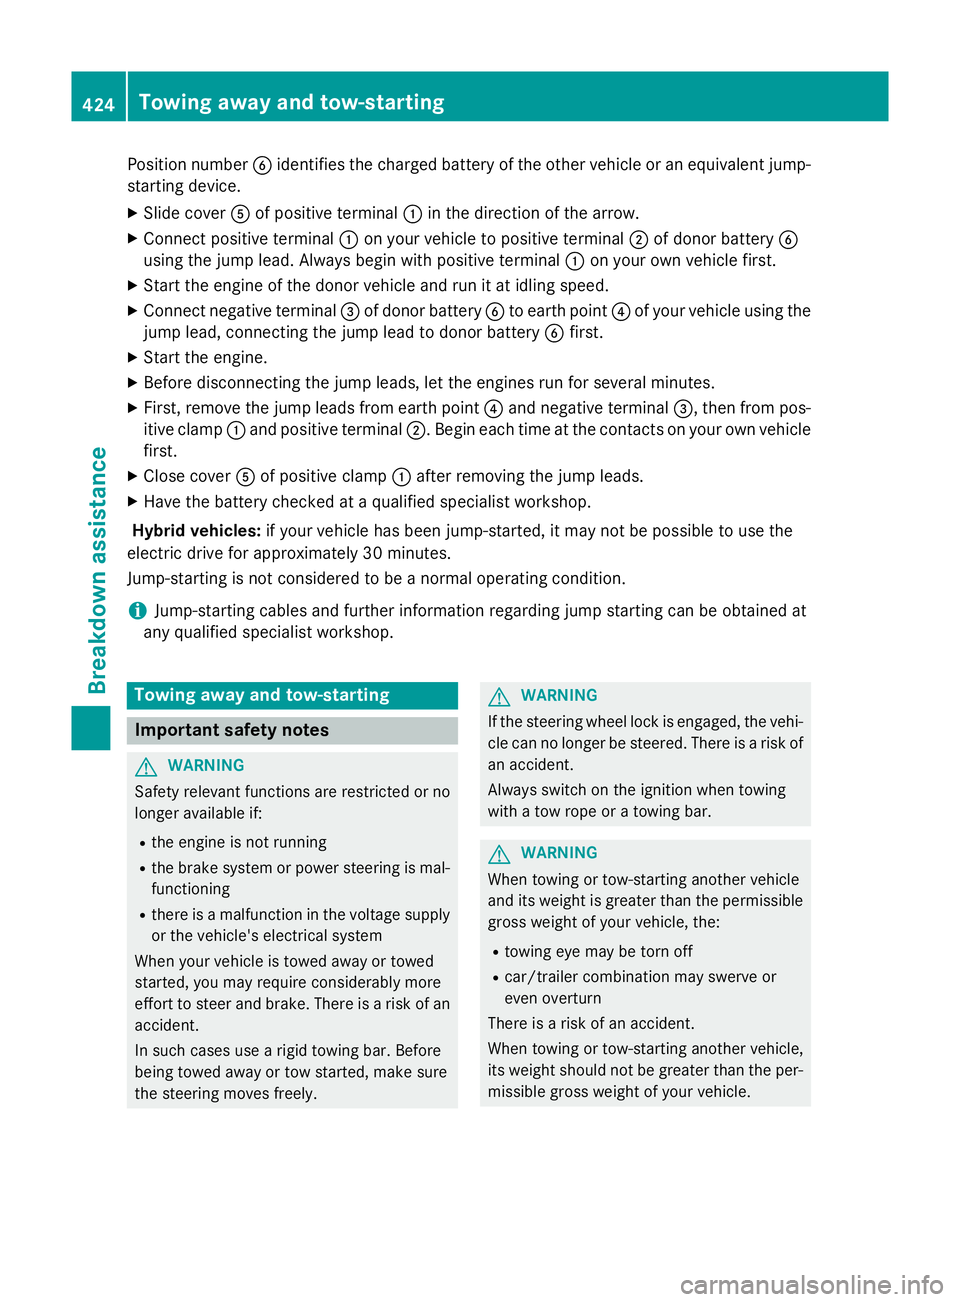
Position number
Bidentifies the charged battery of the other vehicle or an equivalent jump-
starting device.
X Slide cover Aof positive terminal :in the direction of the arrow.
X Connect positive terminal :on your vehicle to positive terminal ;of donor battery B
using the jump lead. Always begin with positive terminal :on your own vehicle first.
X Start the engine of the donor vehicle and run it at idling speed.
X Connect negative terminal =of donor battery Bto earth point ?of your vehicle using the
jump lead, connecting the jump lead to donor battery Bfirst.
X Start the engine.
X Before disconnecting the jump leads, let the engines run for several minutes.
X First, remove the jump leads from earth point ?and negative terminal =, then from pos-
itive clamp :and positive terminal ;. Begin each time at the contacts on your own vehicle
first.
X Close cover Aof positive clamp :after removing the jump leads.
X Have the battery checked at a qualified specialist workshop.
Hybrid vehicles: if your vehicle has been jump-started, it may not be possible to use the
electric drive for approximately 30 minutes.
Jump-starting is not considered to be a normal operating condition.
i Jump-starting cables and further information regarding jump starting can be obtained at
any qualified specialist workshop. Towing away and tow-starting
Important safety notes
G
WARNING
Safety relevant functions are restricted or no
longer available if:
R the engine is not running
R the brake system or power steering is mal-
functioning
R there is a malfunction in the voltage supply
or the vehicle's electrical system
When your vehicle is towed away or towed
started, you may require considerably more
effort to steer and brake. There is a risk of an
accident.
In such cases use a rigid towing bar. Before
being towed away or tow started, make sure
the steering moves freely. G
WARNING
If the steering wheel lock is engaged, the vehi- cle can no longer be steered. There is a risk of
an accident.
Always switch on the ignition when towing
with a tow rope or a towing bar. G
WARNING
When towing or tow-starting another vehicle
and its weight is greater than the permissible gross weight of your vehicle, the:
R towing eye may be torn off
R car/trailer combination may swerve or
even overturn
There is a risk of an accident.
When towing or tow-starting another vehicle,
its weight should not be greater than the per- missible gross weight of your vehicle. 424
Towing away and tow-startingBreakdown assistance
Page 428 of 489
!
When COLLISION PREVENTION ASSIST
PLUS, DISTRONIC PLUS or the HOLD func- tion is activated, the vehicle brakes auto-
matically in certain situations. To avoid
damage to the vehicle, deactivate these
systems in the following or similar situa-
tions:
R when towing away
R in a car wash
! Make sure that the electric parking brake
is released. If the electric parking brake is
faulty, visit a qualified specialist workshop.
! Only secure the tow cable or tow bar to
the towing eyes or, if available, to the trailer
tow hitch. You could otherwise damage the
vehicle.
! Observe the following points when towing
with a tow rope:
R secure the tow rope on the same side on
both vehicles.
R make sure that the tow rope is not longer
than legally permitted. Mark the tow rope
in the middle, e.g. with a white cloth
(30 x 30 cm). This makes other road
users aware that a vehicle is being
towed.
R only secure the tow rope to the towing
eye.
R observe the brake lamps of the towing
vehicle while driving. Always maintain a
distance so that the tow rope does not
sag.
R do not use steel cables or chains to tow
your vehicle. You could otherwise dam-
age the vehicle.
! Do not use the towing eyes for recovery
purposes as this could damage the vehicle.
If in doubt, recover the vehicle with a crane.
! Pull away smoothly when towing away or
tow-starting a vehicle. If the tractive power
is too high, the vehicles could be damaged.
! Shift the automatic transmission to
Nand
do not open the driver's or front passeng- er's door during towing. The automatic
transmission may otherwise shift to posi-
tion
P, which could damage the transmis-
sion.
! You may tow the vehicle for a maximum of
50km. A towing speed of 50 km/h must not
be exceeded.
For towing distances over 50 km, the entire vehicle must be lifted up and transported.
! If you tow or tow-start another vehicle, its
weight must not exceed the maximum per- missible gross vehicle weight of your vehi-
cle.
Details on the permissible gross vehicle
weight of your vehicle can be found on the
vehicle identification plate (Y page 470).
Observe the legal requirements for the rele-
vant countries when towing.
It is better to have the vehicle transported
than to have it towed.
If the vehicle has suffered transmission dam-
age, have it transported on a transporter or
trailer.
Vehicles with automatic transmission:
when towing a vehicle, the automatic trans-
mission must be in position N. If the auto-
matic transmission cannot be shifted to posi- tion N, have the vehicle transported on a
transporter or trailer.
The battery must be connected and charged.
Otherwise, you:
R cannot turn the key in the ignition lock to
position 2
R cannot release the electric parking brake
R cannot shift the transmission to position N
on vehicles with automatic transmission
Deactivate the automatic locking feature
before the vehicle is towed (Y page 98). You
could otherwise be locked out when pushing
or towing the vehicle.
Deactivate tow-away protection (Y page 88)
before the vehicle is towed.
Hybrid vehicles: Towing away and tow-starting
425Breakdown assistance Z
Page 473 of 489
Identification plates
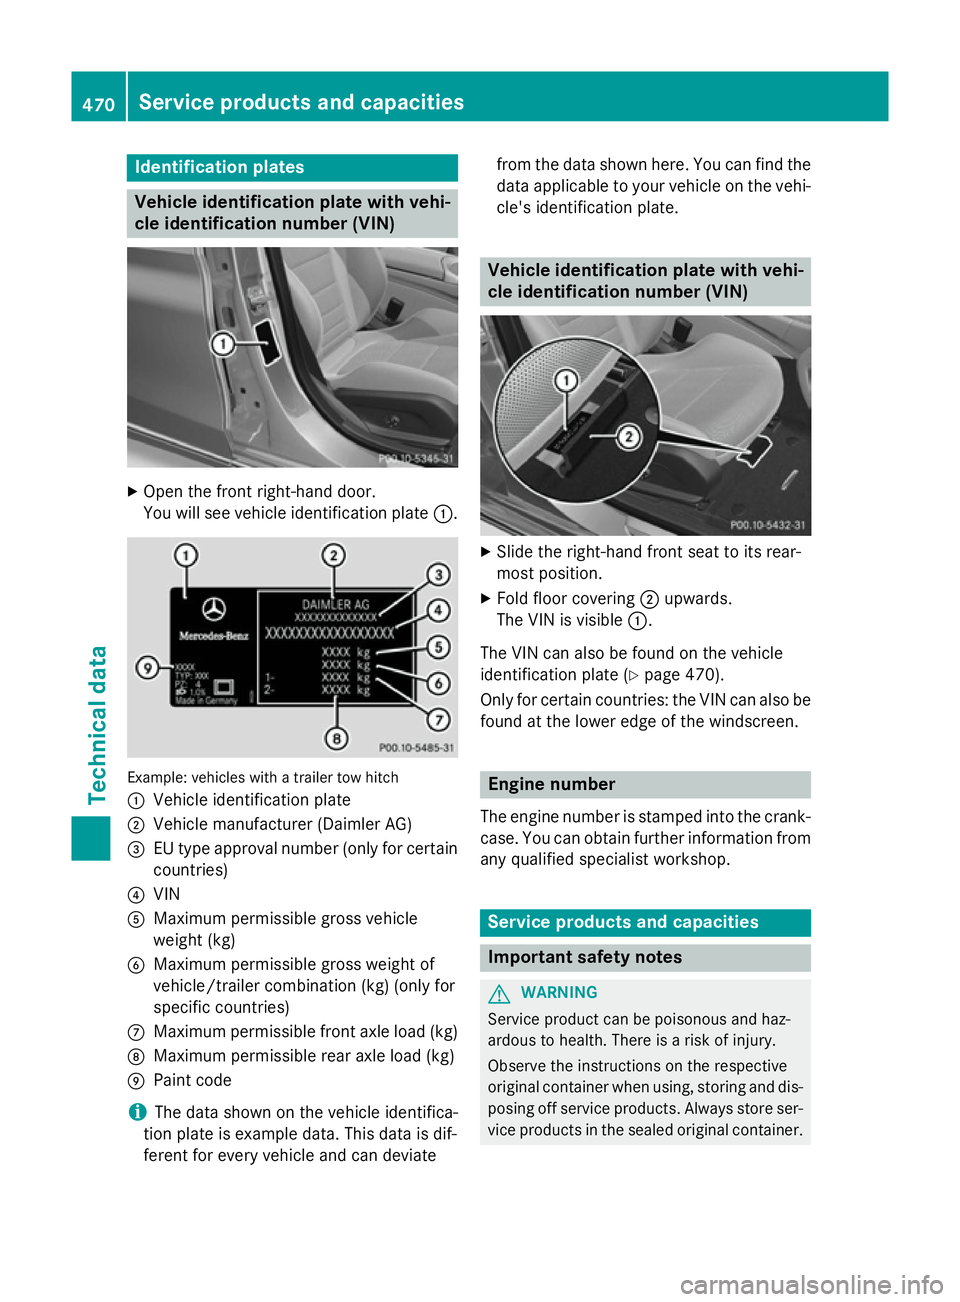
Vehicle identification plate with vehi-
cle identification number (VIN) X
Open the front right-hand door.
You will see vehicle identification plate :.Example: vehicles with a trailer tow hitch
: Vehicle identification plate
; Vehicle manufacturer (Daimler AG)
= EU type approval number (only for certain
countries)
? VIN
A Maximum permissible gross vehicle
weight (kg)
B Maximum permissible gross weight of
vehicle/trailer combination (kg) (only for
specific countries)
C Maximum permissible front axle load (kg)
D Maximum permissible rear axle load (kg)
E Paint code
i The data shown on the vehicle identifica-
tion plate is example data. This data is dif-
ferent for every vehicle and can deviate from the data shown here. You can find the
data applicable to your vehicle on the vehi- cle's identification plate. Vehicle identification plate with vehi-
cle identification number (VIN)
X
Slide the right-hand front seat to its rear-
most position.
X Fold floor covering ;upwards.
The VIN is visible :.
The VIN can also be found on the vehicle
identification plate (Y page 470).
Only for certain countries: the VIN can also be
found at the lower edge of the windscreen. Engine number
The engine number is stamped into the crank-
case. You can obtain further information from any qualified specialist workshop. Service products and capacities
Important safety notes
G
WARNING
Service product can be poisonous and haz-
ardous to health. There is a risk of injury.
Observe the instructions on the respective
original container when using, storing and dis- posing off service products. Always store ser-
vice products in the sealed original container. 470
Service products and capacitiesTechnical data
Page 481 of 489
i
Add washer fluid concentrate, e.g. MB
SummerFit or MB WinterFit, to the washer
fluid all year round. Vehicle data
General notes
Please note that for the specified vehicle
data: R the heights specified may vary as a result
of:
- tyres
- load
- condition of the suspension
- optional equipment
R optional equipment reduces the maximum
payload
R vehicle-specific weight information can be
found on the vehicle identification plate
(Y page 470)
R only for certain countries: you can find vehi-
cle-specific vehicle data in the COC docu-
ments (CERTIFICATE OF CONFORMITY).
These documents are delivered with your
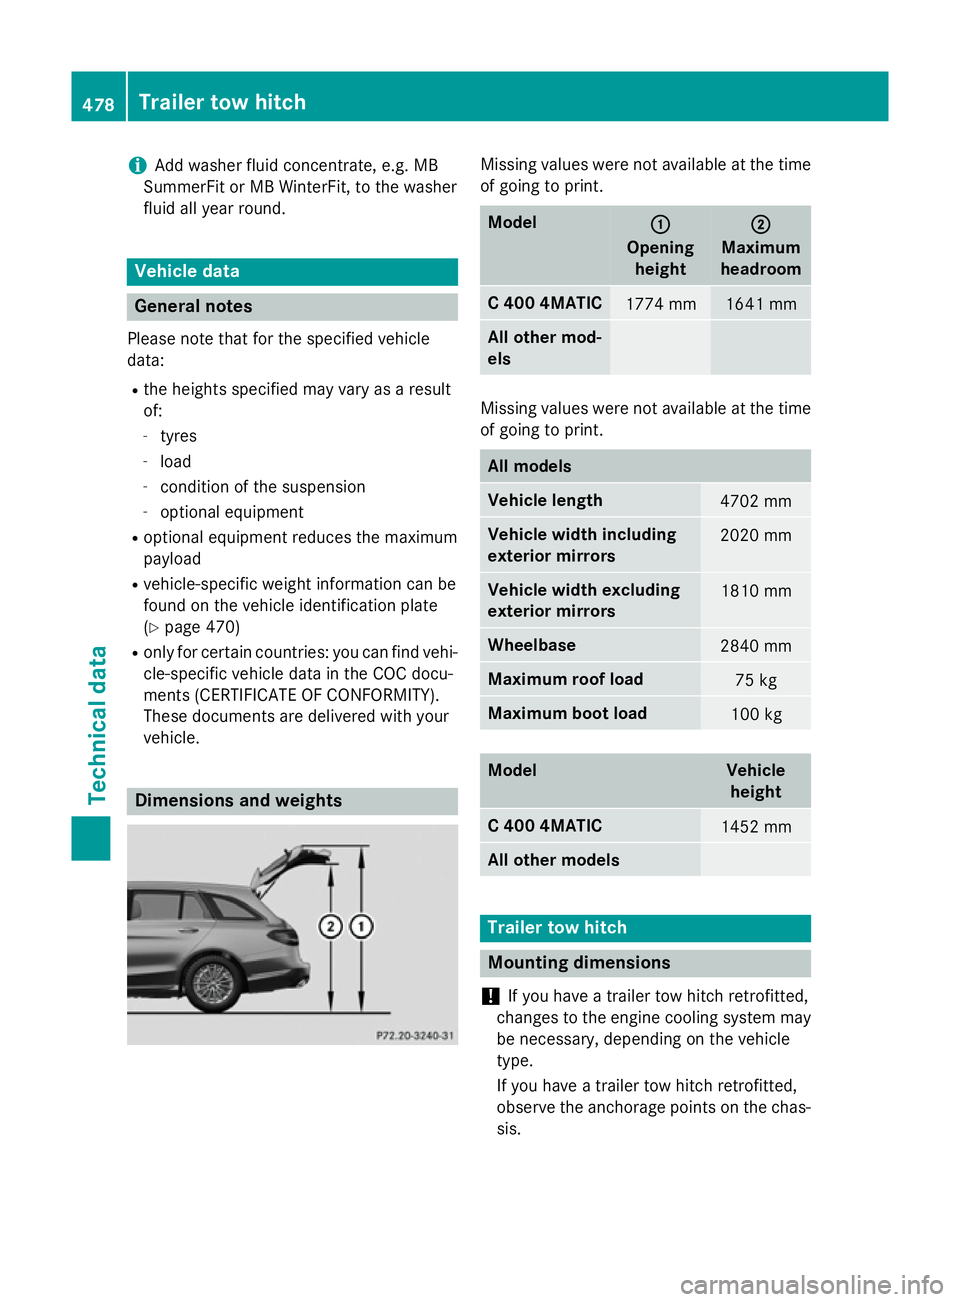
vehicle. Dimensions and weights Missing values were not available at the time
of going to print. Model
: :
Opening height ;
;
Maximum
headroom C 400 4MATIC
1774 mm 1641 mm
All other mod-
els
Missing values were not available at the time
of going to print. All models
Vehicle length
4702 mm
Vehicle width including
exterior mirrors
2020 mm
Vehicle width excluding
exterior mirrors
1810 mm
Wheelbase
2840 mm
Maximum roof load
75 kg
Maximum boot load
100 kg
Model Vehicle
height C 400 4MATIC
1452 mm
All other models
Trailer tow hitch
Mounting dimensions
! If you have a trailer tow hitch retrofitted,
changes to the engine cooling system may
be necessary, depending on the vehicle
type.
If you have a trailer tow hitch retrofitted,
observe the anchorage points on the chas- sis. 478
Trailer tow hitchTechnical data
Page 482 of 489
The retrofitting of a trailer tow hitch is only
permissible if a towing weight is specified in
your vehicle documents. If this is not the case,
then the vehicle is not approved for the tow-
ing of a trailer.
For more information, please contact a quali-
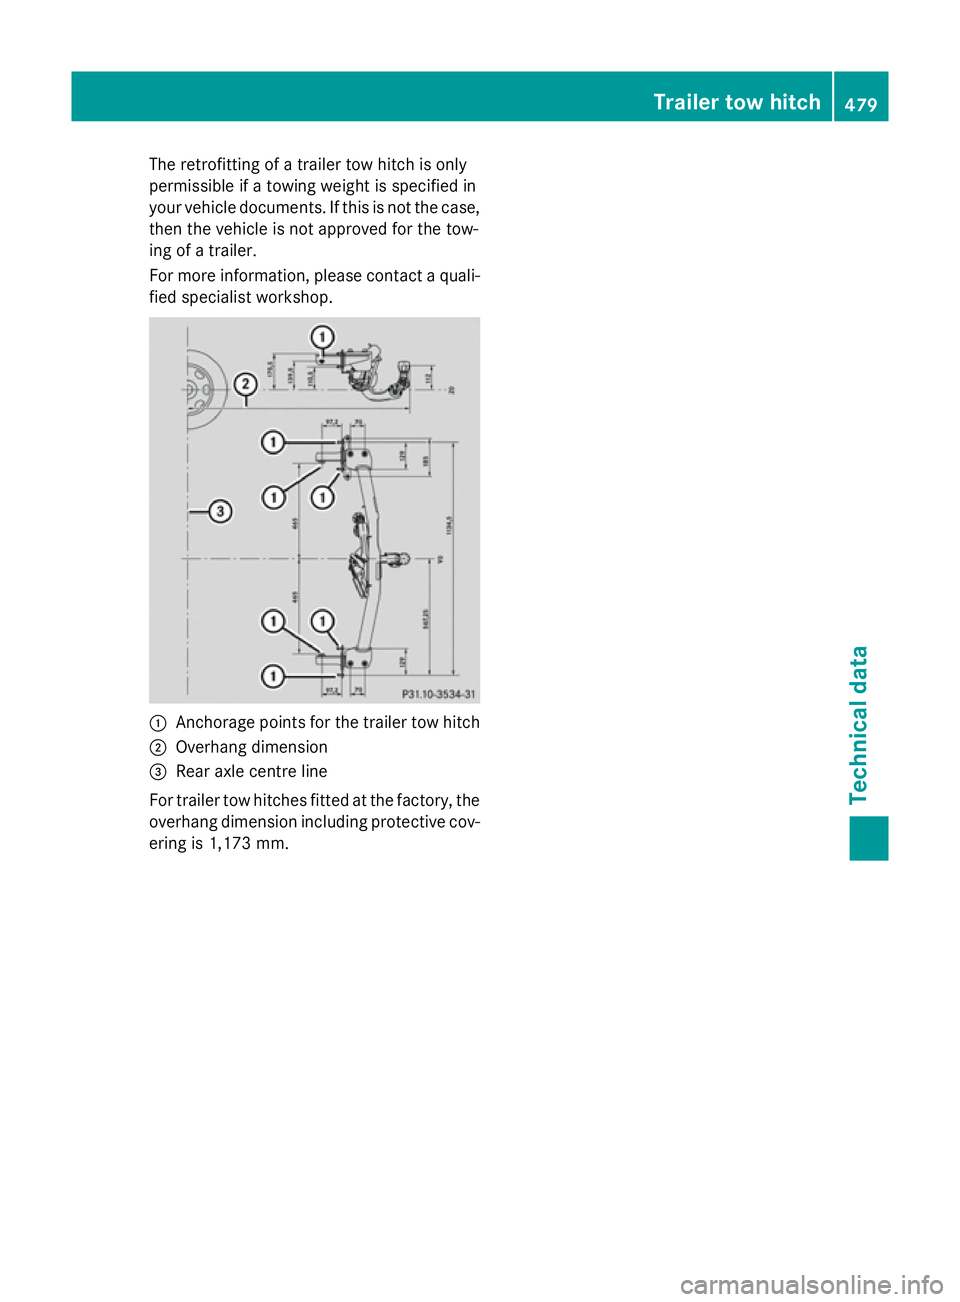
fied specialist workshop. :
Anchorage points for the trailer tow hitch
; Overhang dimension
= Rear axle centre line
For trailer tow hitches fitted at the factory, the
overhang dimension including protective cov- ering is 1,173 mm. Trailer tow hitch
479Technical data Z
Page 484 of 489
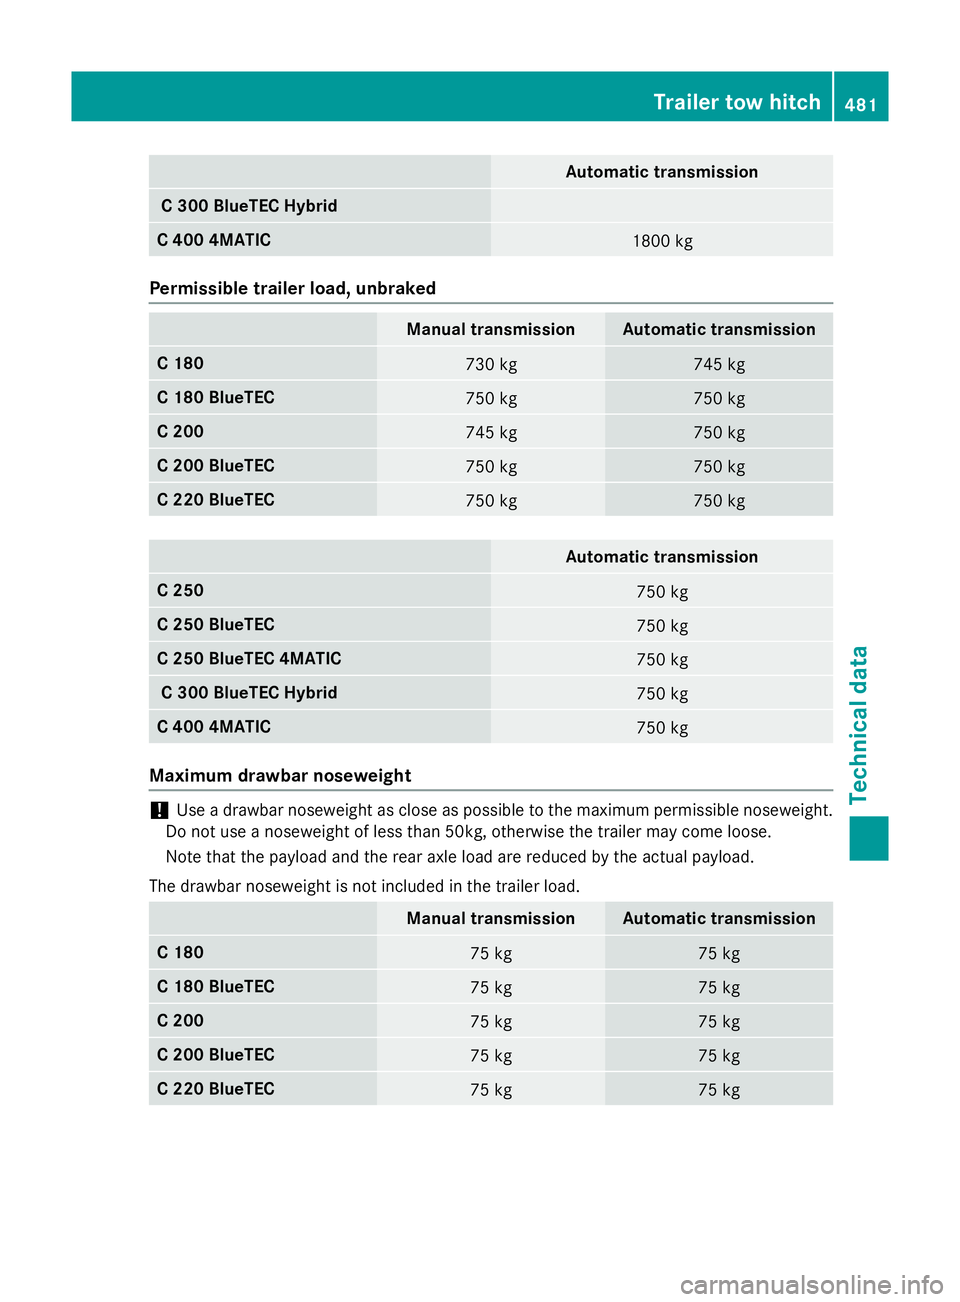
Automatic transmission
C 300 BlueTEC Hybrid
C 400 4MATIC
1800 kg
Permissible trailer load, unbraked
Manual transmission Automatic transmission
C 180
730 kg 745 kg
C 180 BlueTEC
750 kg 750 kg
C 200
745 kg 750 kg
C 200 BlueTEC
750 kg 750 kg
C 220 BlueTEC
750 kg 750 kg
Automatic transmission
C 250
750 kg
C 250 BlueTEC
750 kg
C 250 BlueTEC 4MATIC
750 kg
C 300 BlueTEC Hybrid
750 kg
C 400 4MATIC
750 kg
Maximum drawbar noseweight
!
Use a drawbar noseweight as close as possible to the maximum permissible noseweight.
Do not use a noseweight of less than 50kg, otherwise the trailer may come loose.
Note that the payload and the rear axle load are reduced by the actual payload.
The drawbar noseweight is not included in the trailer load. Manual transmission Automatic transmission
C 180
75 kg 75 kg
C 180 BlueTEC
75 kg 75 kg
C 200
75 kg 75 kg
C 200 BlueTEC
75 kg 75 kg
C 220 BlueTEC
75 kg 75 kgTrailer tow hitch
481Technical data Z