2014 MERCEDES-BENZ C-CLASS ESTATE fog light
[x] Cancel search: fog lightPage 143 of 489
Adaptive Highbeam Assist Plus cannot take
into account road, weather or traffic condi-
tions. Adaptive Highbeam Assist Plus is only
an aid. You are responsible for adjusting the
vehicle's lighting to the prevailing light, visi-
bility and traffic conditions.
In particular, the detection of obstacles can
be restricted if there is:
R poor visibility, e.g. due to fog, heavy rain or
snow
R dirt on the sensors or if the sensors are
obscured
Switching Adaptive Highbeam Assist
PLUS on/off X
To switch on: turn the light switch to Ã.
X Press the combination switch beyond the
pressure point in the direction of arrow :.
The _ indicator lamp in the multifunc-
tion display lights up when it is dark and the light sensor activates the dipped-beam
headlamps.
If you are driving at speeds above 25 km/h:
The headlamp range is set automatically
depending on the distance between the
vehicle and other road users.
If you are driving at speeds above approx-
imately 30 km/h and no other road users
are recognised:
The main-beam headlamps are switched on
automatically. The Kindicator lamp in
the instrument cluster also lights up.
If you are driving at speeds above 45 km/h and other road users are recognised:
Partial main-beam is selected automati-
cally. The Kindicator lamp in the instru-
ment cluster also lights up.
If you are driving at speeds below approx-
imately 40 km/h:
The partial main-beam headlamps are
switched off automatically. If no other road users are recognised, the main-beam head-
lamps are switched on. If you are driving at speeds below approx-
imately 25 km/h or the roads are ade-
quately illuminated:
The main-beam headlamps are switched off
automatically. The Kindicator lamp in
the instrument cluster goes out. The _
indicator lamp in the multifunction display
remains lit.
X To switch off: move the combination
switch back to its normal position or move the light switch to another position.
The _ indicator lamp in the multifunc-
tion display goes out. Headlamps misted up on the inside
Certain climatic and physical conditions may
cause moisture to form in the headlamp. This
moisture does not affect the functionality of
the headlamp. Interior lighting
Overview of interior lighting
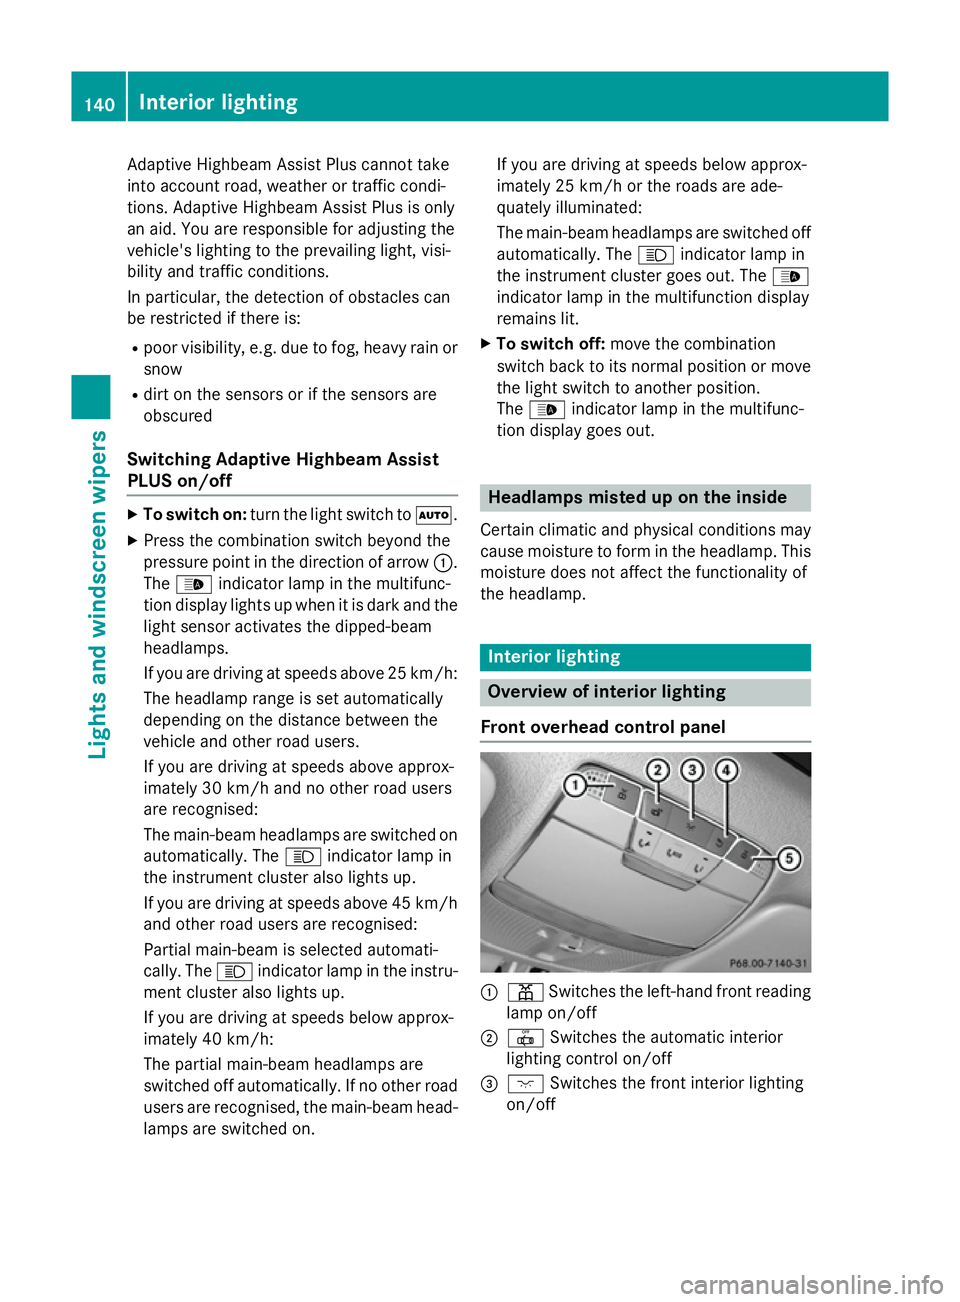
Front overhead control panel :
p Switches the left-hand front reading
lamp on/off
; | Switches the automatic interior
lighting control on/off
= c Switches the front interior lighting
on/off 140
Interior lightingLights and
windscreen wipers
Page 238 of 489
At speeds of more than 60 km/h Steering
Assist focuses on clear lane markings (left
and right).
In a speed range from 0 - 60 km/h, Stop&Go
Pilot focuses on the vehicle in front, taking
into account lane markings, e.g. when follow- ing vehicles in a traffic jam.
If these conditions are not present, Steering
Assist and Stop&Go Pilot cannot provide
assistance.
DISTRONIC PLUS must be active in order for
the function to be available.
Important safety notes
If you fail to adapt your driving style,
DISTRONIC PLUS with Steering Assist and
Stop&Go Pilot can neither reduce the risk of
an accident nor override the laws of physics.
It cannot take into account road, weather or
traffic conditions. DISTRONIC PLUS with
Steering Assist and Stop&Go Pilot is only an
aid. You are responsible for the distance to
the vehicle in front, for vehicle speed, for
braking in good time, and for staying in lane.
DISTRONIC PLUS with Steering Assist and
Stop&Go Pilot does not detect road and traf-
fic conditions and does not detect all road
users. If you are following a vehicle which is
driving towards the edge of the carriageway,
your vehicle could come into contact with the
kerb or other road boundaries. Be particularly aware of other road users, e.g. cyclists, that
are directly next to your vehicle.
Obstacles such as traffic pylons on the lane or
projecting out into the lane are not detected.
An inappropriate steering intervention, e.g.
after intentionally driving over a lane marking,
can be corrected at any time if you steer
slightly in the opposite direction.
DISTRONIC PLUS with Steering Assist and
Stop&Go Pilot cannot continuously keep your
vehicle in lane. In some cases, the steering
intervention is not sufficient to bring the vehi- cle back to the lane. In such cases, you must
steer the vehicle yourself to ensure that it
does not leave the lane. The system may be impaired or may not func-
tion if:
R there is poor visibility, e.g. due to insuffi-
cient illumination of the road, or due to
snow, rain, fog or spray
R there is glare, e.g. from oncoming traffic,
the sun or reflection from other vehicles
(e.g. if the road surface is wet)
R the windscreen is dirty, misted up, dam-
aged or covered, for instance by a sticker,
in the vicinity of the camera
R no or several, unclear lane markings are
present for one lane, e.g. in a construction
area
R the lane markings are worn away, dark or
covered up, e.g. by dirt or snow
R the distance to the vehicle in front is too
small and the lane markings thus cannot be
detected
R the lane markings change quickly, e.g.
lanes branch off, cross one another or
merge
R the road is narrow and winding
R there are highly variable shade conditions
on the road
The system is switched to passive and no lon- ger assists you by performing steering inter-
ventions if:
R you actively change lane
R you switch on the turn signal
R you take your hands off the steering wheel
or do not steer for a prolonged period of
time
i After you have finished changing lanes,
Steering Assist and Stop&Go Pilot are auto- matically active again.
Steering Assist and Stop&Go Pilot cannot
provide assistance: R on very sharp corners
R when towing a trailer
R a loss of tyre pressure or a defective tyre
has been detected and displayed Driving systems
235Driving and parking Z
Page 251 of 489
appears in the multifunction display. You will
then have to steer and merge into traffic on
your own. PARKTRONIC is still available. You
can take over the steering before the vehicle has exited the parking space completely. This is useful, for example when you recognise
that it is already possible to pull out of the
parking space.
Cancelling Active Parking Assist X
Stop the movement of the multifunction
steering wheel or steer yourself.
Active Parking Assist will be cancelled at
once. The Park Assist cancelled
Park Assist cancelled mes-
sage appears in the multifunction display.
or
X Press the PARKTRONIC button
(Y page 242).
PARKTRONIC is switched off and Active
Parking Assist is immediately cancelled.
The Park Assist cancelled Park Assist cancelled message
appears in the multifunction display.
Active Parking Assist is cancelled automati-
cally if:
R the electric parking brake is applied
R transmission position Pis selected in vehi-
cles with automatic transmission
R parking using Active Parking Assist is no
longer possible
R you are driving faster than 10 km/h
R a wheel spins and ESP ®
intervenes or fails.
The ÷ warning lamp lights up in the
instrument cluster.
A warning tone sounds. The parking symbol
disappears and the multifunction display
shows the Park Assist cancelled
Park Assist cancelled mes-
sage.
When Active Parking Assist is cancelled, you
must steer and brake again yourself.
If a system malfunction occurs, the vehicle is braked to a standstill. To drive on, depress the
accelerator pedal again. Reversing camera
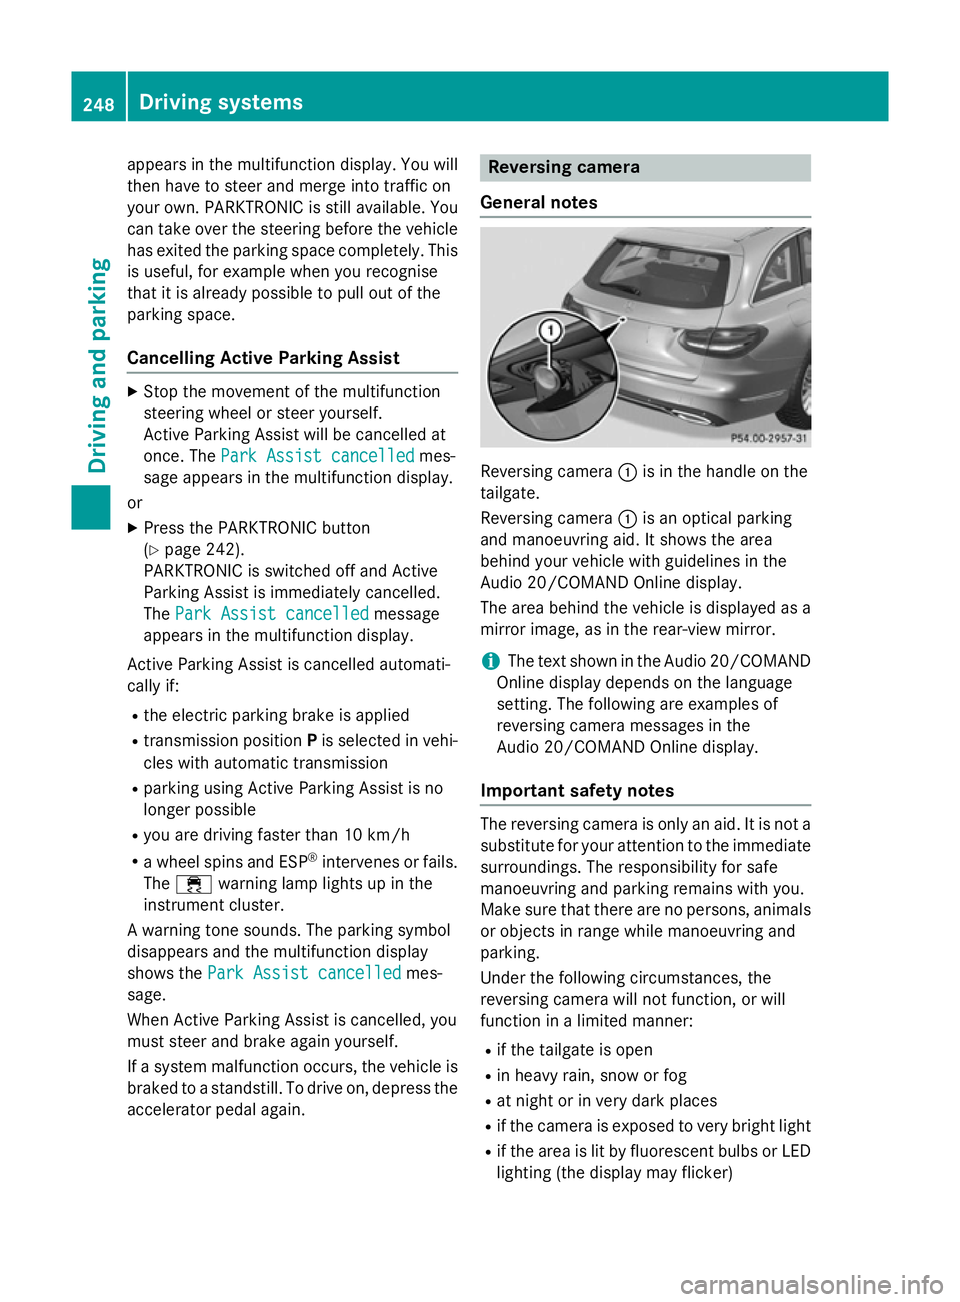
General notes Reversing camera
:is in the handle on the
tailgate.
Reversing camera :is an optical parking
and manoeuvring aid. It shows the area
behind your vehicle with guidelines in the
Audio 20/COMAND Online display.
The area behind the vehicle is displayed as a
mirror image, as in the rear-view mirror.
i The text shown in the Audio 20/COMAND
Online display depends on the language
setting. The following are examples of
reversing camera messages in the
Audio 20/COMAND Online display.
Important safety notes The reversing camera is only an aid. It is not a
substitute for your attention to the immediate surroundings. The responsibility for safe
manoeuvring and parking remains with you.
Make sure that there are no persons, animals
or objects in range while manoeuvring and
parking.
Under the following circumstances, the
reversing camera will not function, or will
function in a limited manner:
R if the tailgate is open
R in heavy rain, snow or fog
R at night or in very dark places
R if the camera is exposed to very bright light
R if the area is lit by fluorescent bulbs or LED
lighting (the display may flicker) 248
Driving systemsDriving and parking
Page 257 of 489
R
top view and enlarged front view
R top view and trailer view (vehicles with
trailer tow hitch)
R top view and images from the rear-facing
side cameras (rear wheel view)
R top view and images from the forward-
facing side cameras (front wheel view)
When the function is active and you shift the
transmission from Dor Rto N, the guide lines
in the COMAND/Audio 20 display are hidden.
When you change between transmission
positions Dand R, you see the previously
selected front or rear view.
Important safety notes The 360° camera is only an aid and may show
a distorted view of obstacles, show them
incorrectly or not at all. The 360° camera is
not a substitute for attentive driving.
The responsibility for safe manoeuvring and
parking remains with you. Make sure that
there are no persons, animals or objects in
range while manoeuvring and parking.
You are always responsible for safety and
must always pay attention to your surround-
ings when parking and manoeuvring. This
applies to the areas behind, in front of and
beside the vehicle. You could otherwise
endanger yourself and others.
The 360° camera will not function or will
function only in a limited manner:
R if the doors are open
R if the exterior mirrors are folded in
R if the boot lid is open
R in heavy rain, snow or fog
R at night or in very dark places
R if the cameras are exposed to very bright
light
R if the area is lit by fluorescent bulbs or LED
lighting (the display may flicker)
R if the camera lenses mist up, e.g. when
driving into a heated garage in winter, caus- ing a rapid change in temperature R
if the camera lenses are dirty or covered
R if the vehicle components in which the
cameras are fitted are damaged. In this
event, have the camera position and setting
checked at a qualified specialist workshop.
Do not use the 360° camera in this case. You could otherwise injure others or damage
objects when parking the vehicle.
Guide lines are always shown at road level.
In trailer mode, the guide lines are shown at
the level of the trailer tow hitch.
The camera in the rear area is protected by
means of a flap. This flap opens when the
360° camera is activated. Observe the notes on cleaning (Y page 405). For technical rea-
sons, the flap may remain open briefly after
the 360° camera has been deactivated.
Activation conditions The 360° camera image can be displayed if:
R COMAND Online/Audio 20 is switched on,
see the Digital Owner's Manual
R the 360° camera 360° camera function is switched on
i If the 360° camera is activated at speeds
above 30 km/h, a warning message
appears.
The warning message disappears if:
R the vehicle's speed falls below 30 km/h.
The 360° camera is then activated.
R the message is confirmed with the %
button. 254
Driving systemsDriving an
d parking
Page 268 of 489
ing the trailer lighting. Blind Spot Assist is
then deactivated. The Blind Spot Assist
Blind Spot Assist
not
not available
available when
whentowing
towing a
atrailer
trailer
See Owner's Manual
See Owner's Manual message appears in
the multifunction display.
Lane Keeping Assist General notes
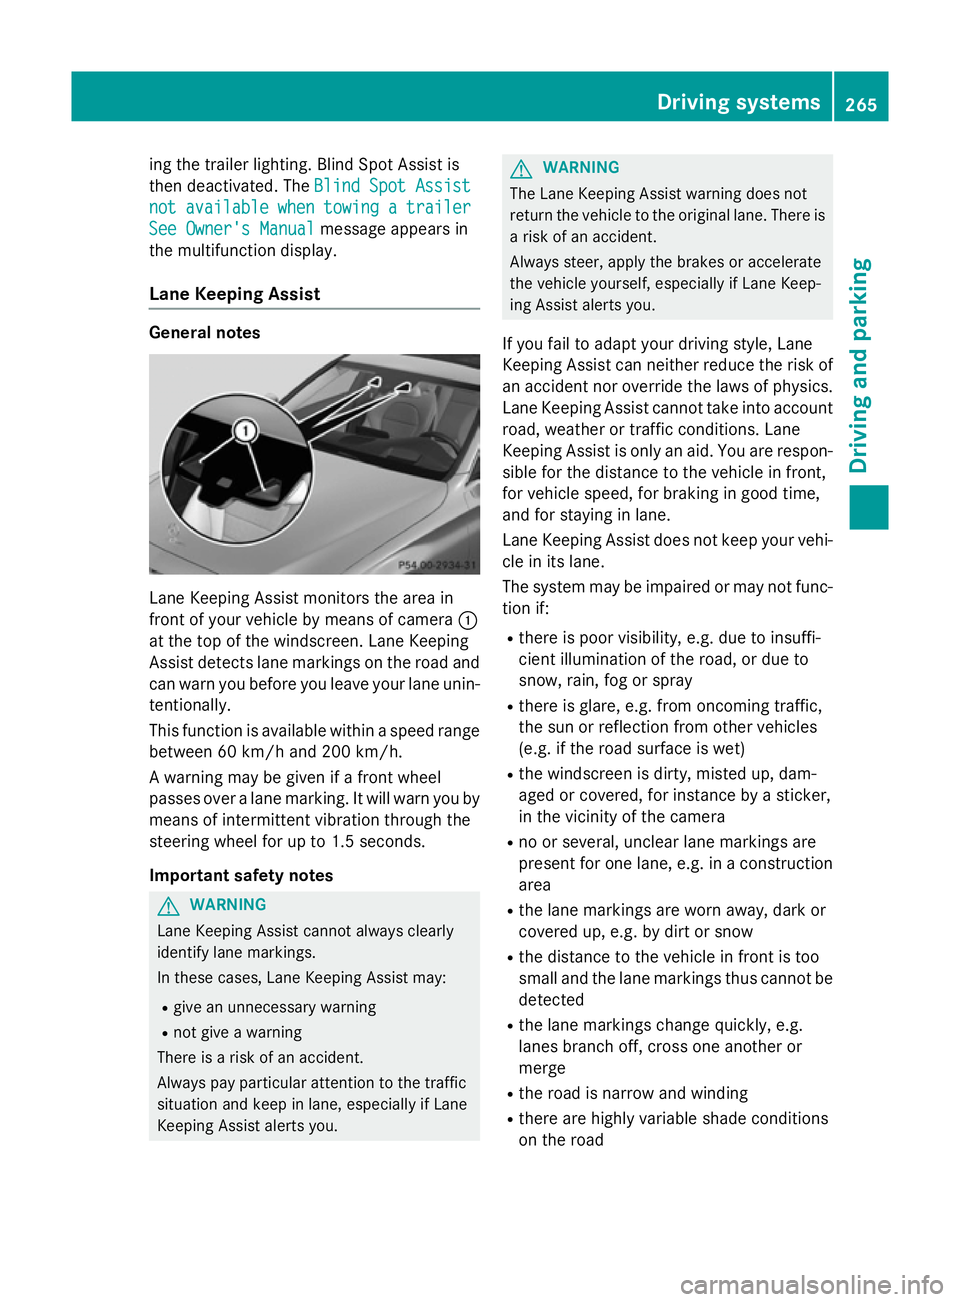
Lane Keeping Assist monitors the area in
front of your vehicle by means of camera :
at the top of the windscreen. Lane Keeping
Assist detects lane markings on the road and
can warn you before you leave your lane unin-
tentionally.
This function is available within a speed range between 60 km/h and 200 km/h.
A warning may be given if a front wheel
passes over a lane marking. It will warn you by
means of intermittent vibration through the
steering wheel for up to 1.5 seconds.
Important safety notes G
WARNING
Lane Keeping Assist cannot always clearly
identify lane markings.
In these cases, Lane Keeping Assist may:
R give an unnecessary warning
R not give a warning
There is a risk of an accident.
Always pay particular attention to the traffic
situation and keep in lane, especially if Lane
Keeping Assist alerts you. G
WARNING
The Lane Keeping Assist warning does not
return the vehicle to the original lane. There is a risk of an accident.
Always steer, apply the brakes or accelerate
the vehicle yourself, especially if Lane Keep-
ing Assist alerts you.
If you fail to adapt your driving style, Lane
Keeping Assist can neither reduce the risk of
an accident nor override the laws of physics. Lane Keeping Assist cannot take into account
road, weather or traffic conditions. Lane
Keeping Assist is only an aid. You are respon- sible for the distance to the vehicle in front,
for vehicle speed, for braking in good time,
and for staying in lane.
Lane Keeping Assist does not keep your vehi-
cle in its lane.
The system may be impaired or may not func-
tion if:
R there is poor visibility, e.g. due to insuffi-
cient illumination of the road, or due to
snow, rain, fog or spray
R there is glare, e.g. from oncoming traffic,
the sun or reflection from other vehicles
(e.g. if the road surface is wet)
R the windscreen is dirty, misted up, dam-
aged or covered, for instance by a sticker,
in the vicinity of the camera
R no or several, unclear lane markings are
present for one lane, e.g. in a construction
area
R the lane markings are worn away, dark or
covered up, e.g. by dirt or snow
R the distance to the vehicle in front is too
small and the lane markings thus cannot be
detected
R the lane markings change quickly, e.g.
lanes branch off, cross one another or
merge
R the road is narrow and winding
R there are highly variable shade conditions
on the road Driving systems
265Driving and parking Z
Page 316 of 489
X
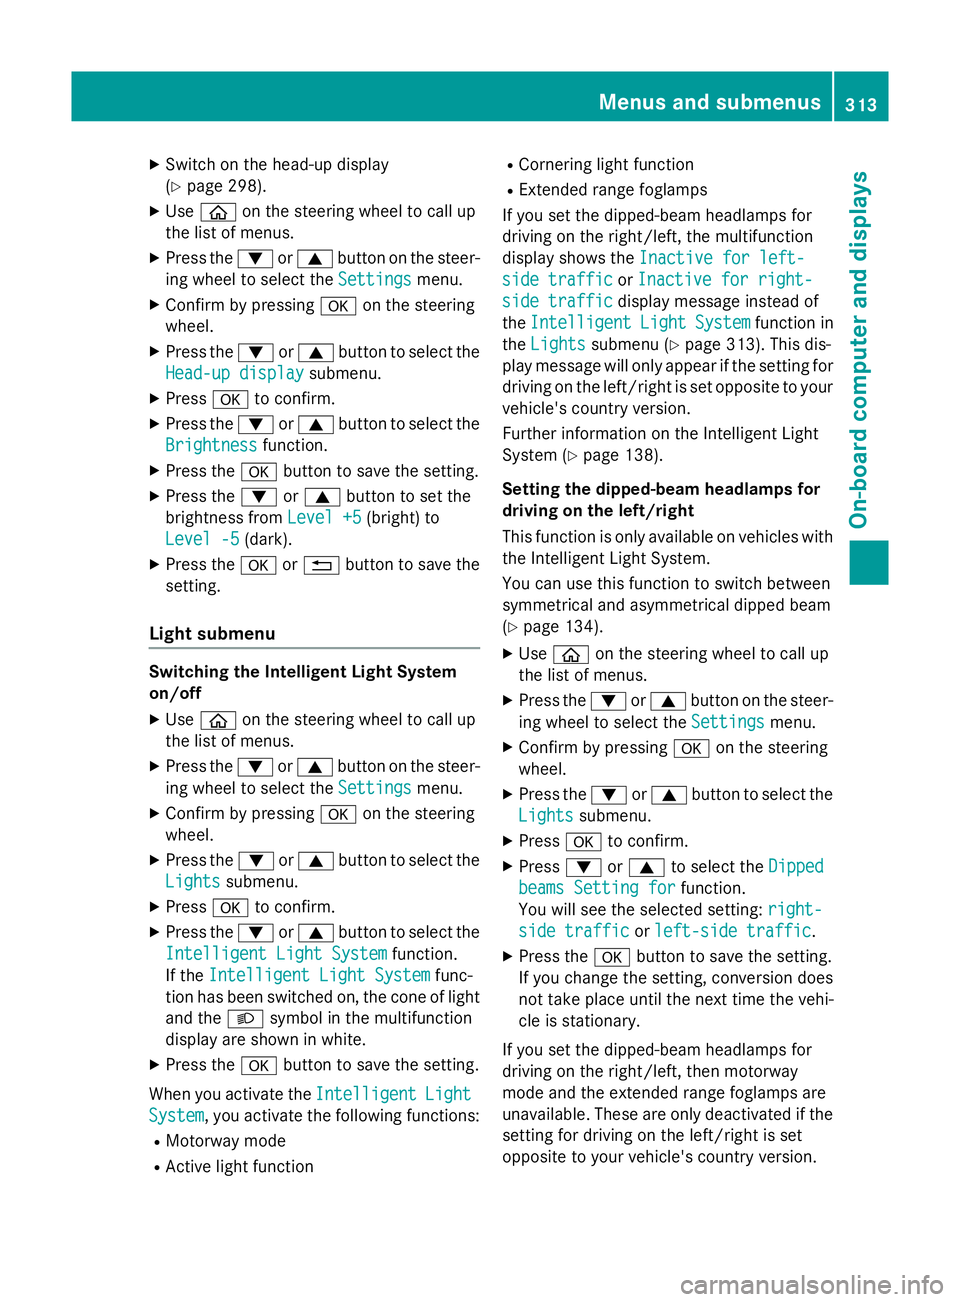
Switch on the head-up display
(Y page 298).
X Use ò on the steering wheel to call up
the list of menus.
X Press the :or9 button on the steer-
ing wheel to select the Settings
Settings menu.
X Confirm by pressing aon the steering
wheel.
X Press the :or9 button to select the
Head-up display
Head-up display submenu.
X Press ato confirm.
X Press the :or9 button to select the
Brightness
Brightness function.
X Press the abutton to save the setting.
X Press the :or9 button to set the
brightness from Level +5
Level +5(bright) to
Level -5
Level -5 (dark).
X Press the aor% button to save the
setting.
Light submenu Switching the Intelligent Light System
on/off
X Use ò on the steering wheel to call up
the list of menus.
X Press the :or9 button on the steer-
ing wheel to select the Settings
Settings menu.
X Confirm by pressing aon the steering
wheel.
X Press the :or9 button to select the
Lights
Lights submenu.
X Press ato confirm.
X Press the :or9 button to select the
Intelligent Light System
Intelligent Light System function.
If the Intelligent Light System
Intelligent Light System func-
tion has been switched on, the cone of light
and the Lsymbol in the multifunction
display are shown in white.
X Press the abutton to save the setting.
When you activate the Intelligent
IntelligentLight
Light
System
System , you activate the following functions:
R Motorway mode
R Active light function R
Cornering light function
R Extended range foglamps
If you set the dipped-beam headlamps for
driving on the right/left, the multifunction
display shows the Inactive for left-
Inactive for left-
side traffic side traffic orInactive for right-
Inactive for right-
side traffic
side traffic display message instead of
the Intelligent
Intelligent Light
LightSystem
System function in
the Lights
Lights submenu (Y page 313). This dis-
play message will only appear if the setting for
driving on the left/right is set opposite to your
vehicle's country version.
Further information on the Intelligent Light
System (Y page 138).
Setting the dipped-beam headlamps for
driving on the left/right
This function is only available on vehicles with
the Intelligent Light System.
You can use this function to switch between
symmetrical and asymmetrical dipped beam
(Y page 134).
X Use ò on the steering wheel to call up
the list of menus.
X Press the :or9 button on the steer-
ing wheel to select the Settings Settingsmenu.
X Confirm by pressing aon the steering
wheel.
X Press the :or9 button to select the
Lights
Lights submenu.
X Press ato confirm.
X Press :or9 to select the Dipped
Dipped
beams Setting for
beams Setting for function.
You will see the selected setting: right-
right-
side traffic
side traffic orleft-side traffic
left-side traffic.
X Press the abutton to save the setting.
If you change the setting, conversion does
not take place until the next time the vehi-
cle is stationary.
If you set the dipped-beam headlamps for
driving on the right/left, then motorway
mode and the extended range foglamps are
unavailable. These are only deactivated if the setting for driving on the left/right is set
opposite to your vehicle's country version. Menus and submenus
313On-board computer and displays Z
Page 336 of 489
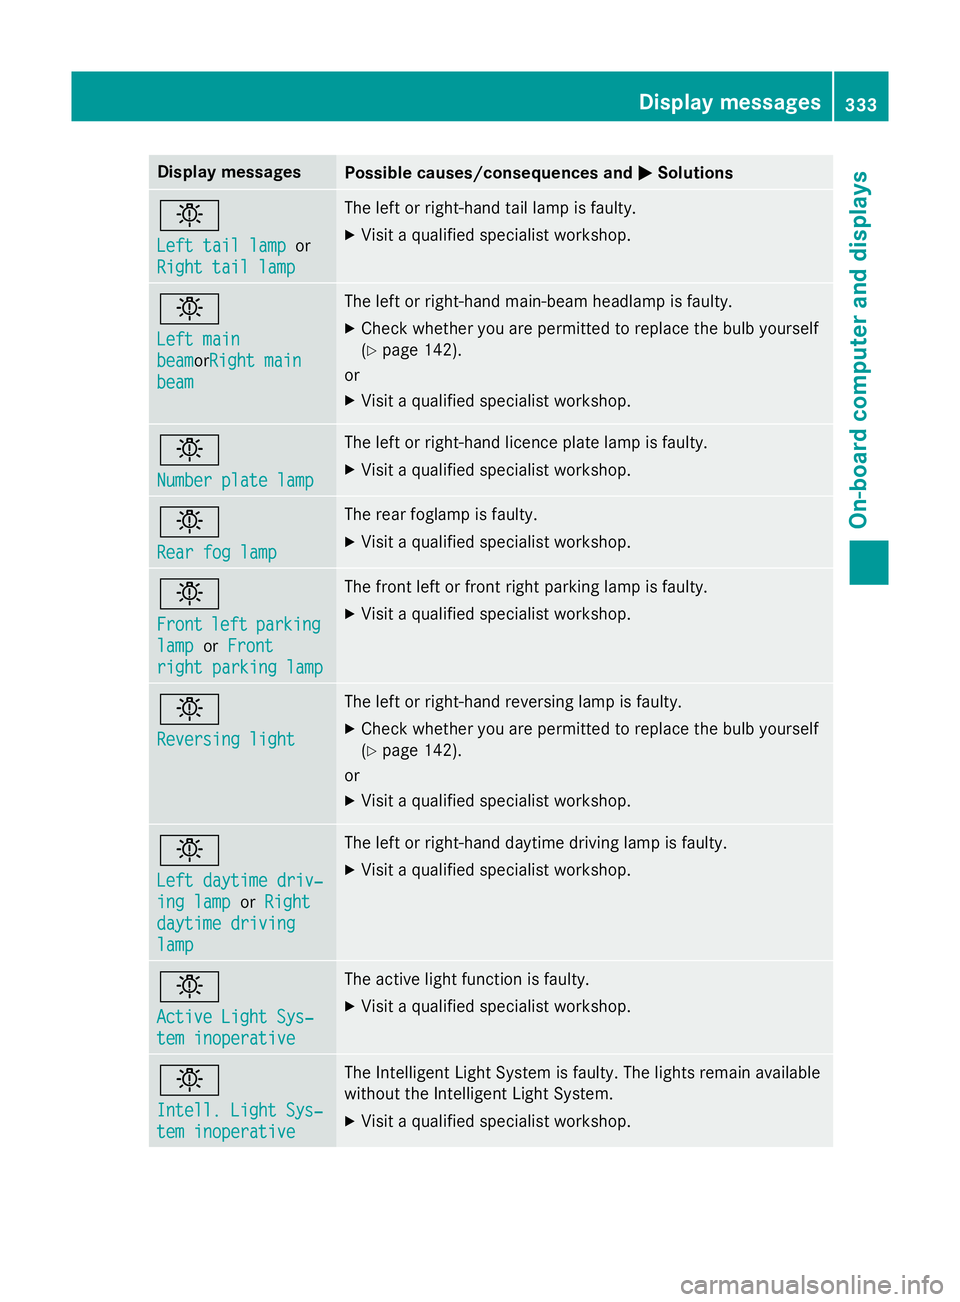
Display messages
Possible causes/consequences and
M
MSolutions b
Left tail lamp Left tail lamp
or
Right tail lamp
Right tail lamp The left or right-hand tail lamp is faulty.
X Visit a qualified specialist workshop. b
Left main Left main
beam beamor
Right main
Right main
beam
beam The left or right-hand main-beam headlamp is faulty.
X Check whether you are permitted to replace the bulb yourself
(Y page 142).
or
X Visit a qualified specialist workshop. b
Number plate lamp Number plate lamp The left or right-hand licence plate lamp is faulty.
X Visit a qualified specialist workshop. b
Rear fog lamp Rear fog lamp The rear foglamp is faulty.
X Visit a qualified specialist workshop. b
Front Front
left
leftparking
parking
lamp
lamp orFront
Front
right parking lamp
right parking lamp The front left or front right parking lamp is faulty.
X Visit a qualified specialist workshop. b
Reversing light Reversing light The left or right-hand reversing lamp is faulty.
X Check whether you are permitted to replace the bulb yourself
(Y page 142).
or
X Visit a qualified specialist workshop. b
Left daytime driv‐ Left daytime driv‐
ing lamp ing lamp
orRight
Right
daytime driving
daytime driving
lamp lamp The left or right-hand daytime driving lamp is faulty.
X Visit a qualified specialist workshop. b
Active Light Sys‐ Active Light Sys‐
tem inoperative tem inoperative The active light function is faulty.
X Visit a qualified specialist workshop. b
Intell. Light Sys‐ Intell. Light Sys‐
tem inoperative tem inoperative The Intelligent Light System is faulty. The lights remain available
without the Intelligent Light System.
X Visit a qualified specialist workshop. Display
messages
333On-board computer and displays Z
Page 337 of 489
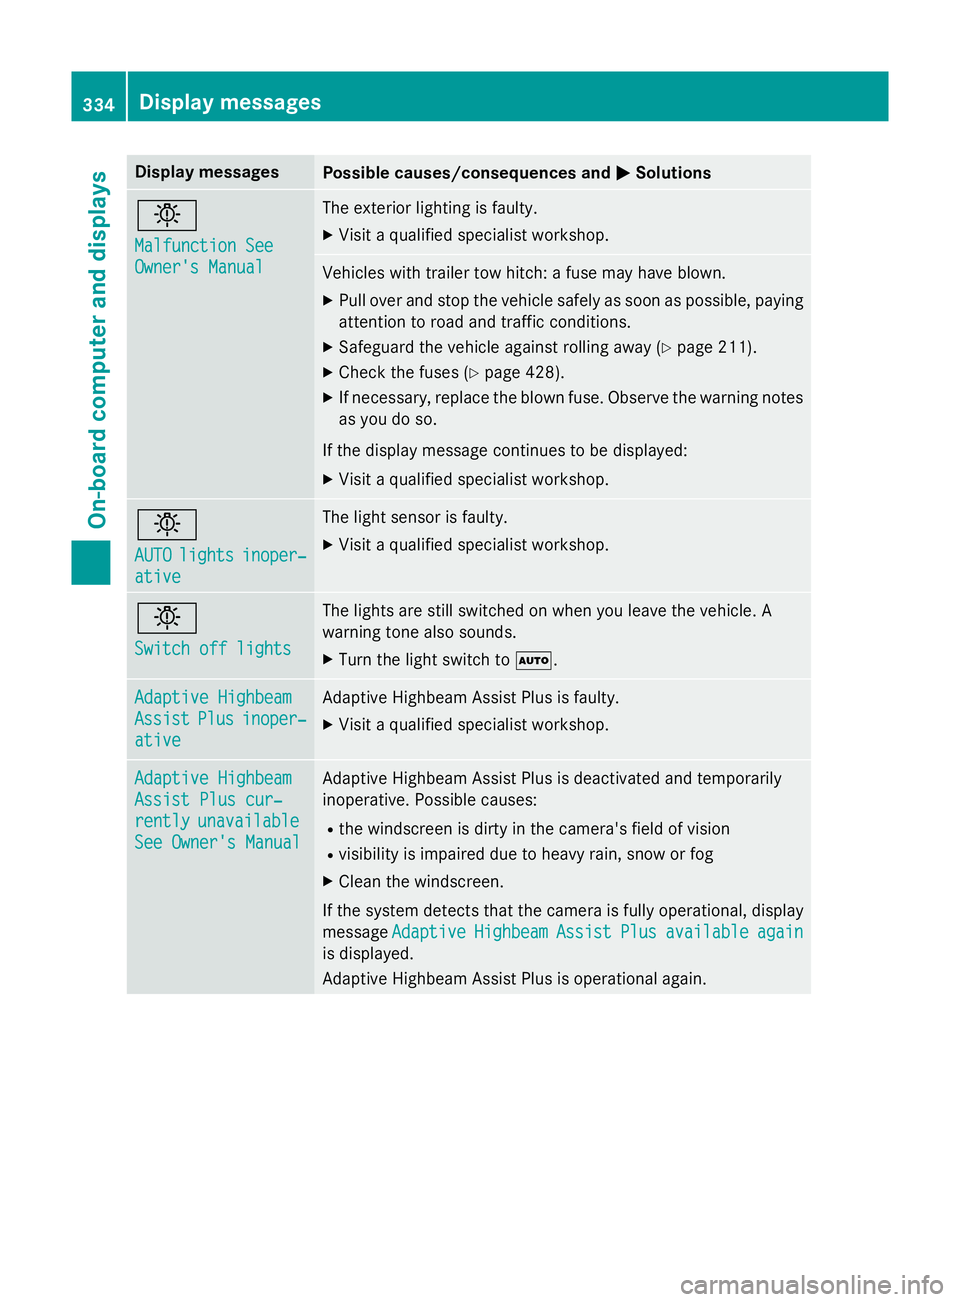
Display messages
Possible causes/consequences and
M
MSolutions b
Malfunction See Malfunction See
Owner's Manual Owner's Manual The exterior lighting is faulty.
X Visit a qualified specialist workshop. Vehicles with trailer tow hitch: a fuse may have blown.
X Pull over and stop the vehicle safely as soon as possible, paying
attention to road and traffic conditions.
X Safeguard the vehicle against rolling away (Y page 211).
X Check the fuses (Y page 428).
X If necessary, replace the blown fuse. Observe the warning notes
as you do so.
If the display message continues to be displayed: X Visit a qualified specialist workshop. b
AUTO AUTO
lights
lights inoper‐
inoper‐
ative
ative The light sensor is faulty.
X Visit a qualified specialist workshop. b
Switch off lights Switch off lights The lights are still switched on when you leave the vehicle. A
warning tone also sounds.
X Turn the light switch to Ã.Adaptive Highbeam Adaptive Highbeam
Assist Assist
Plus
Plusinoper‐
inoper‐
ative
ative Adaptive Highbeam Assist Plus is faulty.
X Visit a qualified specialist workshop. Adaptive Highbeam
Adaptive Highbeam
Assist Plus cur‐ Assist Plus cur‐
rently rently
unavailable
unavailable
See Owner's Manual
See Owner's Manual Adaptive Highbeam Assist Plus is deactivated and temporarily
inoperative. Possible causes:
R the windscreen is dirty in the camera's field of vision
R visibility is impaired due to heavy rain, snow or fog
X Clean the windscreen.
If the system detects that the camera is fully operational, display
message Adaptive
Adaptive Highbeam
HighbeamAssist
Assist Plus
Plusavailable
available again
again
is displayed.
Adaptive Highbeam Assist Plus is operational again. 334
Display
messagesOn-board computer and displays