2014 MERCEDES-BENZ C-CLASS ESTATE check engine light
[x] Cancel search: check engine lightPage 11 of 489
Information about using
THERMATIC automatic climate
control (2
‑zone) .............................1 56
Information on using
THERMOTRONIC automatic cli-
mate control .................................. 160
Ionisation ....................................... 172
Overview of systems ..................... .152
Perfume atomizer .......................... 170
Pre-entry climate control via key ... 172
Problem with the rear window
heating .......................................... 168
Problems with cooling with air
dehumidification ............................ 162
Rear control panel ......................... 158
Remote activation of heating/
ventilation systems ........................ 174
Setting the air distribution ............. 164
Setting the air vents ..................... .181
Setting the airflow ......................... 165
Setting the climate mode .............. .163
Setting the temperature ................ 163
Switching air-recirculation mode
on/off ............................................ 168
Switching on/off ........................... 160
Switching residual heat on/off ...... 169
Switching the rear window heat-
ing on/off ...................................... 167
Switching the synchronisation
function on and off ........................ 165
THERMATIC automatic climate
control (1-zone) ............................ .153
THERMATIC automatic climate
control (2-zone) ............................ .155
THERMOTRONIC (3-zone) auto-
matic climate control ..................... 158
Coat hooks ......................................... 379
Cockpit
Overview .......................................... 32
Collapsible emergency spare
wheel
see Emergency spare wheel
COLLISION PREVENTION ASSIST
PLUS
Activating/deactivating ................. 310
Display message ............................ 324
Operation/notes .............................. 78 COMAND display
Cleaning ......................................... 406
Combination switch .......................... 137
Combined luggage cover and net .... 377
Consumption statistics (on-board
computer) .......................................... 301
Convenience closing feature ............ 108
Convenience opening feature .......... 108
Convenience opening/closing (air-
recirculation mode) ........................... 168
Coolant (engine)
Checking the level ......................... 397
Display message ............................ 335
Important safety notes .................. 476
Temperature display in the instru-
ment cluster .................................. 295
Temperature display in the on-
board computer ............................ .309
Warning lamp ................................. 362
Cooling
see Climate control
Copyright ............................................. 29
Cornering light function
Display message ............................ 331
Function/notes ............................ .138
Crash-responsive emergency light-
ing ....................................................... 141
Crosswind Assist ................................. 83
Cruise control
Cruise control lever ....................... 220
Deactivating ................................... 222
Display message ............................ 344
Driving system ............................... 220
Important safety notes .................. 220
LIM indicator lamp ......................... 220
Selecting ........................................ 221
Setting a speed .............................. 222
Storing and maintaining current
speed ............................................. 221
Cup holder
Centre console .............................. 381
Important safety notes .................. 381
Rear compartment ......................... 382 D
Data see Technical data 8
Index
Page 14 of 489
Removing ........................................
.93
Emergency release
Driver's door .................................... 99
Emergency spare wheel
General notes ................................ 463
Important safety notes .................. 463
Inflating the collapsible spare
wheel ............................................ .464
Technical data ............................... 465
Emergency unlocking
Tailgate .......................................... 106
Vehicle ............................................. 99
Energy flow display ........................... 276
Engine
Display message ............................ 335
ECO start/stop function ................ 190
Engine number ............................... 470
Jump-starting ................................. 422
Running irregularl y......................... 193
Starting problems .......................... 193
Starting the engine with the key .... 188
Starting with the Start/Stop but-
ton ................................................. 188
Stopping ........................................ 212
Tow-starting (vehicle) ..................... 428
Warning lamp (engine diagnos-
tics) ............................................... 362
Engine electronics
Notes ............................................. 468
Problem (fault) ............................... 193
Engine oil
Additives ........................................ 476
Checking the oil level ..................... 396
Checking the oil level using the
dipstick .......................................... 396
Display message ............................ 337
Filling capacity ............................... 475
Notes about oil grade s................... 475
Notes on oil level/consumption .... 396
Topping up ..................................... 396
Viscosity ........................................ 476
Environmental protection
Returning an end-of-life vehicle ....... 24
ESP® (Electronic Stability Pro-
gram)
Activating/deactivating ................... 82
Characteristics ................................. 82
Deactivating/activating ................. 309 Display message ............................ 317
ETS/4ETS ........................................ 81
Function/note
s................................ 81
General notes .................................. 81
Important safety guidelines ............. 82
Trailer stabilisation .......................... 83
Warning lamp ................................. 359
ETS/4ETS (Electronic Traction Sys-
tem) ...................................................... 81
Exhaust
see Exhaust pipe
Exhaust pipe
Cleaning ......................................... 406
Exhaustive discharging (high-volt-
age battery) ....................................... 419
Extended overrun mode ................... 283
Exterior lighting
Cleaning ......................................... 404
see Lights
Exterior mirrors
Adjusting ....................................... 128
Anti-dazzle mode (automatic) ........ 129
Folding in/out (automatically )....... 128
Folding in/out (electrically) ........... 128
Out of position (troubleshooting) ... 129
Parking position ............................. 129
Resetting ....................................... 128
Storing settings (memory func-
tion) ............................................... 131 F
Fault message see Display messages
Features ............................................. 381
Filler cap
see Fuel filler flap
Fire extinguisher ............................... 411
First-aid kit ......................................... 410
Fitting a wheel
Fitting a wheel ............................... 446
Lowering the vehicle ...................... 447
Preparing the vehicle ..................... 442
Raising the vehicle ......................... 443
Removing a whee l.......................... 446
Securing the vehicle against roll-
ing away ........................................ 443 Index
11
Page 17 of 489
Display message ............................ 333
Overview ........................................ 138
Setting the dipped-beam head-
lamps for driving on the right/left .. 313
Interior lighting
Control ........................................... 141
Emergency lighting ........................ 141
Overview ........................................ 140
Reading lamp ................................. 140
Interior motion sensor
Deactivating .................................... .88
Function ........................................... 88
Priming ............................................ 88
Switching off .................................... 88
Internal combustion engine
Malfunction .................................... 285
ISOFIX child seat securing system .... 65J
Jack Storage location ............................ 411
Using ............................................. 443
Jump starting (engine) ...................... 422K
Key Changing the battery ....................... 94
Checking the battery ....................... 94
Convenience closing feature .......... 108
Convenience opening feature ........ 108
Display messag e............................ 352
Door central locking/unlocking ....... 91
Emergency key element ................... 93
Important safety notes .................... 90
KEYLESS-GO start function .............. 92
Loss ................................................. 95
Modifying the programming ............. 92
Overview .......................................... 90
Positions (ignition lock) ................. 185
Problem (malfunction) ..................... 95
Starting the engine ........................ 188
Key positions
Key ................................................ 185
Start/Stop button .......................... 185
KEYLESS-GO
Convenience closing ...................... 109
Deactivation ..................................... 91 Locking ............................................ 91
Removing the Start/Stop button ... 186
Unlocking ......................................... 91
Kickdown
Driving tips .................................... 200
Kneebag ............................................... 53 L
Lamps see Warning and indicator lamps
Lane Keeping Assist
Activating/deactivating (on-
board computer) ............................ 311
Display message ............................ 340
Function/information .................... 265
see Active Lane Keeping Assist
Lane package ..................................... 263
Lashing eyelets ................................. 376
Licence plate lamp (display mes-
sage) ................................................... 333
Light sensor (display message) ....... 334
Lighting
see Lights
Lights
Activating/deactivating the Intel-
ligent Light System ........................ 313
Active light function ....................... 138
Adaptive Highbeam Assist PLUS .... 139
Automatic headlamp mode ............ 135
Cornering light function ................. 138
Dipped-beam headlamp s............... 135
Driving abroad ............................... 134
Foglamps (extended range) ........... 139
Hazard warning lamps ................... 137
Headlamp flashe r........................... 137
Headlamp range ............................ 136
Intelligent Light System (func-
tion) ............................................... 138
Light switch ................................... 134
Main-beam headlamp s................... 137
Misted up headlamp s.................... 140
Motorway mode ............................. 138
Parking lamps ................................ 136
Rear foglamp ................................. 135
Setting exterior lighting ................. 134
Side lamps ..................................... 136
Turn signals ................................... 137 14
Index
Page 48 of 489
The restraint system includes:
R seat belt system
R airbags
R child restraint system
R child seat securing systems
The components of the restraint system are
complementary. They can offer maximum
protection only when all vehicle occupants:
R secure their seat belts correctly
(Y page 48)
R adjust the seat and head restraints prop-
erly (Y page 119)
As the driver, you must also make sure that
the steering wheel is adjusted correctly.
Observe the information on the correct driv-
er's seat position (Y page 118).
Additionally, you must make sure that the air- bag can inflate without restriction if deployed
(Y page 51).
An airbag is supplementary to a correctly fas-
tened seatbelt. An airbag, as an additional
safety device, provides greater protection for vehicle occupants in an accident situation. If
the seat belts offer sufficient protection in the
event of an accident, for example, the airbags
will not be deployed. Also, only the airbags
which are deemed to offer protection in the
corresponding accident situation are
deployed. However, seat belts and airbags
generally do not protect against objects pen-
etrating the vehicle from the outside.
Information on how the restraint system
operates can be found in "Deployment of the seat belt tensioner and airbags"
(Y page 60).
See "Children in the vehicle" (Y page 63) for
further information on infants and children
travelling in the vehicle as well as on child
restraint systems. Important safety notes
G
WARNING
If the restraint system is modified, it may no
longer work as intended. The restraint system
may then not perform its intended protective function by failing in an accident or triggering
unexpectedly, for example. There is an
increased risk of injury, possibly even fatal.
Never modify parts of the restraint system. Do not attempt to modify the wiring as well as
electronic components or their software.
If it is necessary to modify an airbag system
for a person with physical disabilities, contact a Mercedes-Benz Service Centre for details. Restraint system warning lamp
The functions of the restraint system are
checked after the ignition is switched on and at regular intervals while the engine is run-
ning. Therefore, malfunctions can be detec-
ted in good time.
The 6 restraint system warning lamp in
the instrument cluster lights up when the igni- tion is switched on. It goes out no later than afew seconds after the vehicle is started. The
components of the restraint system are in
operational readiness.
A malfunction has occurred if the 6
restraint system warning lamp:
R does not light up after the ignition is
switched on
R does not go out after a few seconds with
the engine running
R lights up again while the engine is running
All vehicles, except hybrid vehicles: G
WARNING
If the restraint system is malfunctioning,
restraint system components may be trig-
gered unintentionally or might not be trig-
gered at all in the event of an accident with a high rate of vehicle deceleration. This can
effect belt tensioners or airbags, for example. Occupant safety
45Safety
Z
Page 79 of 489
Important safety notes
If you fail to adapt your driving style or if you
are inattentive, the driving safety systems can
neither reduce the risk of an accident nor
override the laws of physics. Driving safety
systems are merely aids designed to assist
driving. You are responsible for the distance
to the vehicle in front, for vehicle speed and
for braking in good time. Always adapt your
driving style to suit the prevailing road,
weather and traffic conditions and maintain a
safe distance from the vehicle in front. Drive
carefully.
The driving safety systems described only
work as effectively as possible when there is
adequate contact between the tyres and the
road surface. Please pay special attention to
the notes on tyres, recommended minimum
tyre tread depths etc. (Y page 432).
In wintry driving conditions, always use winter
tyres (M+S tyres) and, if necessary, snow
chains. Only in this way will the driving safety
systems described in this section work as
effectively as possible. ABS (Anti-lock Braking System)
General notes ABS regulates brake pressure in such a way
that the wheels do not lock when you brake.
This allows you to continue steering the vehi- cle when braking.
The ! ABS warning lamp in the instrument
cluster lights up when the ignition is switched on. It goes out when the engine is running.
Important safety notes i
Observe the "Important safety notes" sec-
tion (Y page 76). G
WARNING
If ABS is faulty, the wheels could lock when
braking. The steerability and braking charac-
teristics may be severely impaired. Addition-
ally, further driving safety systems are deac- tivated. There is an increased danger of skid-
ding and accidents.
Drive on carefully. Have ABS checked imme-
diately at a qualified specialist workshop.
If ABS is malfunctioning, other systems,
including driving safety systems, will also
become inoperative. Observe the information on the ABS warning lamp (Y page 357) and
display messages which may be shown in the
instrument cluster (Y page 317).
ABS works from a speed of about
8 km/hupwards, regardless of road-surface
conditions. ABS works on slippery surfaces,
even when you only brake gently.
Braking X
If ABS intervenes: continue to depress the
brake pedal with force until the braking sit-
uation is over.
X To make a full brake application:
depress the brake pedal with full force.
If ABS intervenes when braking, you will feel a pulsing in the brake pedal.
The pulsating brake pedal can be an indica-
tion of hazardous road conditions, and func-
tions as a reminder to take extra care while
driving. BAS (Brake Assist)
General notes BAS operates in emergency braking situa-
tions. If you depress the brake pedal quickly,
BAS automatically boosts the braking force,
thus shortening the stopping distance.
Important safety notes i
Observe the "Important safety notes" sec-
tion (Y page 76). 76
Driving safety systemsSafety
Page 85 of 489
Traction control brakes the drive wheels indi-
vidually if they spin. This enables you to pull
away and accelerate on slippery surfaces, for
example if the road surface is slippery on one side. In addition, more drive torque is trans-
ferred to the wheel or wheels with traction.
Traction control remains active if you deacti-
vate ESP ®
.
Important safety notes i
Observe the "Important safety notes" sec-
tion (Y page 76). G
WARNING
If ESP ®
is malfunctioning, ESP ®
is unable to
stabilise the vehicle. In addition, other driving
safety systems are switched off. This increa-
ses the risk of skidding and an accident.
Drive on carefully. Have ESP ®
checked at a
qualified specialist workshop.
! If you test the parking brake using a brake
dynamometer, switch the ignition off.
Application of the brakes by ESP ®
may oth-
erwise destroy the brake system.
When towing your vehicle with the rear axle
raised, observe the notes on ESP ®
(Y page 426).
ESP ®
is deactivated if the åwarning lamp
in the instrument cluster lights up and:
R the vehicle is moving
R the ECO start/stop function is activated
If the ÷ warning lamp lights up continu-
ously, ESP ®
is not available due to a malfunc-
tion.
Observe the information on warning lamps
(Y page 359) and display messages which
may be shown in the instrument cluster
(Y page 317).
Only use wheels with the recommended tyre
sizes. Only then will ESP ®
function properly. Characteristics of ESP
® General notes
If the
÷ ESP warning lamp goes out before
beginning the journey, ESP ®
is automatically
active.
If ESP ®
intervenes, the ÷ESP®
warning
lamp flashes in the instrument cluster.
If ESP ®
intervenes:
X Do not deactivate ESP ®
under any circum-
stances.
X When pulling away, only depress the accel-
erator pedal as far as is necessary.
X Adapt your driving style to suit the prevail-
ing road and weather conditions.
ECO start/stop function
The ECO start/stop function switches the
engine off automatically if the vehicle stops
moving. When pulling away again, the engine
starts automatically. ESP ®
remains in its pre-
viously selected status. Example:if ESP®
was deactivated before the engine was
switched off, ESP ®
remains deactivated when
the engine is switched on again.
Deactivating/activating ESP ® Important safety notes
i Observe the "Important safety notes" sec-
tion (Y page 76).
You can select between the following states
of ESP ®
:
R ESP ®
is activated
R ESP ®
is deactivated G
WARNING
If you deactivate ESP ®
, ESP ®
no longer sta-
bilises the vehicle. There is an increased risk
of skidding and an accident.
Only deactivate ESP ®
in the situations descri-
bed in the following. 82
Driving safety systemsSafety
Page 94 of 489
A check which periodically establishes a radio
connection between the vehicle and the key
determines whether a valid key is in the vehi- cle. This occurs, for example:
R when starting the engine
R whilst driving
R when the external door handles are
touched
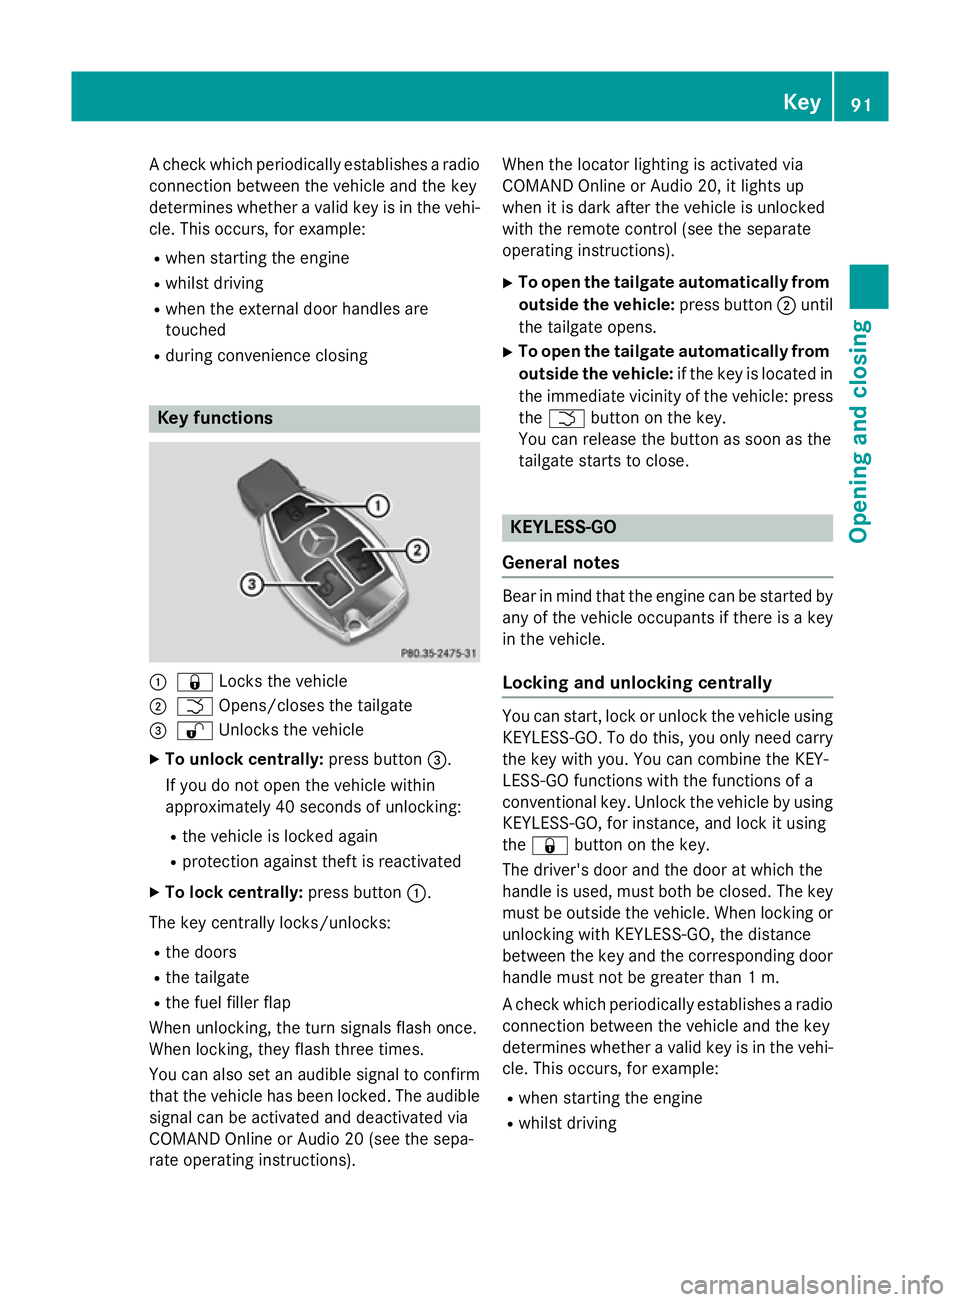
R during convenience closing Key functions
:
& Locks the vehicle
; F Opens/closes the tailgate
= % Unlocks the vehicle
X To unlock centrally: press button=.
If you do not open the vehicle within
approximately 40 second s of unlocking:
R the vehicle is locked again
R protection against theft is reactivated
X To lock centrally: press button:.
The key centrally locks/unlocks:
R the doors
R the tailgate
R the fuel filler flap
When unlocking, the turn signals flash once.
When locking, they flash three times.
You can also set an audible signal to confirm that the vehicle has been locked. The audible
signal can be activated and deactivated via
COMAND Online or Audio 20 (see the sepa-
rate operating instructions). When the locator lighting is activated via
COMAND Online or Audio 20, it lights up
when it is dark after the vehicle is unlocked
with the remote control (see the separate
operating instructions).
X To open the tailgate automatically from
outside the vehicle: press button;until
the tailgate opens.
X To open the tailgate automatically from
outside the vehicle: if the key is located in
the immediate vicinity of the vehicle: press the F button on the key.
You can release the button as soon as the
tailgate starts to close. KEYLESS-GO
General notes Bear in mind that the engine can be started by
any of the vehicle occupants if there is a key
in the vehicle.
Locking and unlocking centrally You can start, lock or unlock the vehicle using
KEYLESS-GO. To do this, you only need carry
the key with you. You can combine the KEY-
LESS-GO functions with the functions of a
conventional key. Unlock the vehicle by using KEYLESS-GO, for instance, and lock it using
the & button on the key.
The driver's door and the door at which the
handle is used, must both be closed. The key
must be outside the vehicle. When locking or unlocking with KEYLESS-GO, the distance
between the key and the corresponding door
handle must not be greater than 1 m.
A check which periodically establishes a radio
connection between the vehicle and the key
determines whether a valid key is in the vehi- cle. This occurs, for example:
R when starting the engine
R whilst driving Key
91Opening and closing Z
Page 95 of 489
R
when the external door handles are
touched
R during convenience closing X
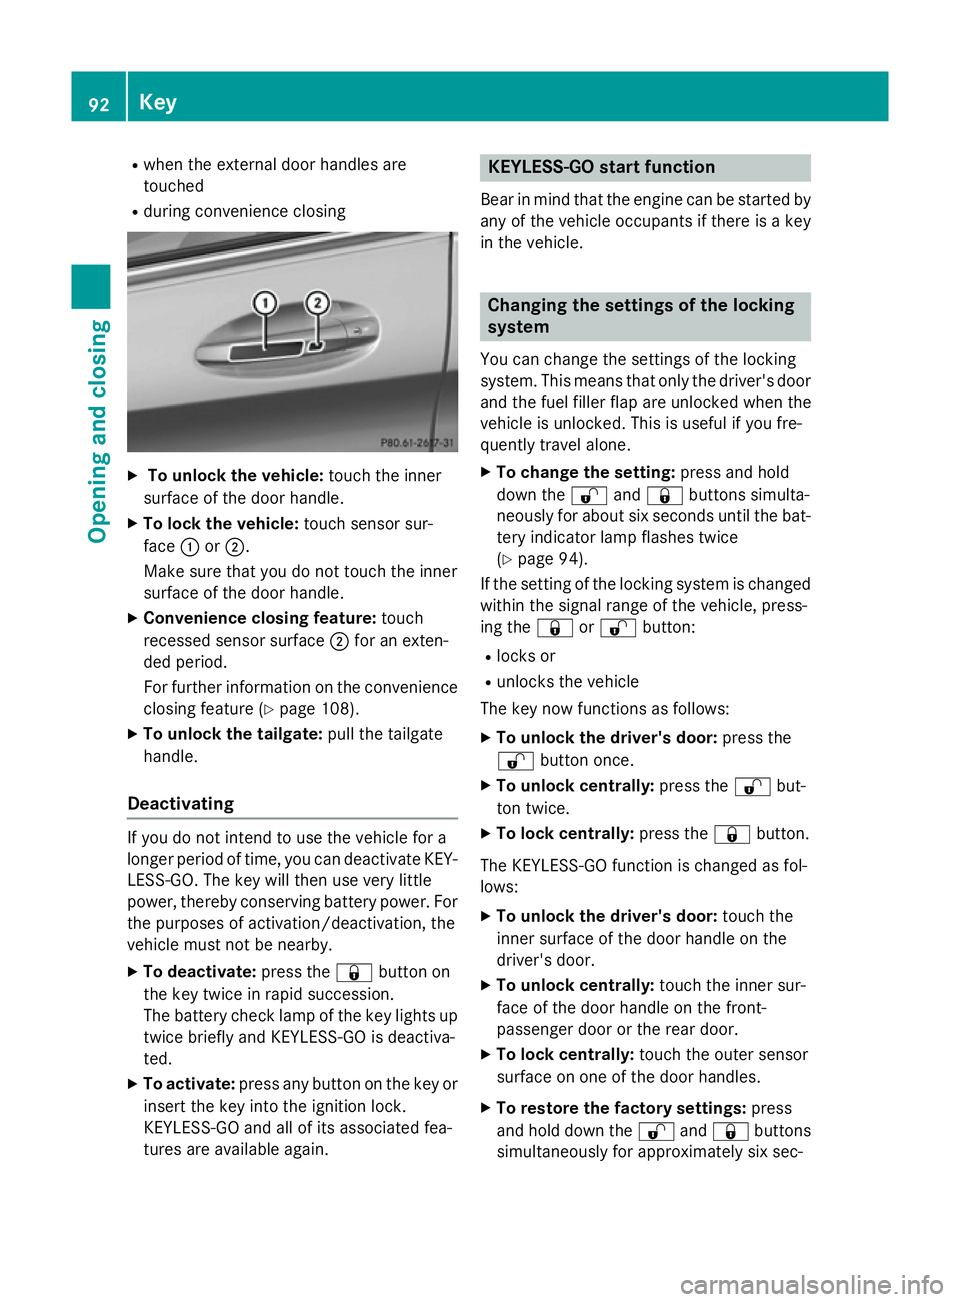
To unlock the vehicle: touch the inner
surface of the door handle.
X To lock the vehicle: touch sensor sur-
face :or;.
Make sure that you do not touch the inner
surface of the door handle.
X Convenience closing feature: touch
recessed sensor surface ;for an exten-
ded period.
For further information on the convenience closing feature (Y page 108).
X To unlock the tailgate: pull the tailgate
handle.
Deactivating If you do not intend to use the vehicle for a
longer period of time, you can deactivate KEY- LESS-GO. The key will then use very little
power, thereby conserving battery power. For
the purposes of activation/deactivation, the
vehicle must not be nearby.
X To deactivate: press the&button on
the key twice in rapid succession.
The battery check lamp of the key lights up
twice briefly and KEYLESS-GO is deactiva-
ted.
X To activate: press any button on the key or
insert the key into the ignition lock.
KEYLESS-GO and all of its associated fea-
tures are available again. KEYLESS-GO start function
Bear in mind that the engine can be started by any of the vehicle occupants if there is a key
in the vehicle. Changing the settings of the locking
system
You can change the settings of the locking
system. This means that only the driver's door and the fuel filler flap are unlocked when the
vehicle is unlocked. This is useful if you fre-
quently travel alone.
X To change the setting: press and hold
down the %and& buttons simulta-
neously for about six seconds until the bat- tery indicator lamp flashes twice
(Y page 94).
If the setting of the locking system is changed
within the signal range of the vehicle, press-
ing the &or% button:
R locks or
R unlocks the vehicle
The key now functions as follows:
X To unlock the driver's door: press the
% button once.
X To unlock centrally: press the%but-
ton twice.
X To lock centrally: press the&button.
The KEYLESS-GO function is changed as fol-
lows:
X To unlock the driver's door: touch the
inner surface of the door handle on the
driver's door.
X To unlock centrally: touch the inner sur-
face of the door handle on the front-
passenger door or the rear door.
X To lock centrally: touch the outer sensor
surface on one of the door handles.
X To restore the factory settings: press
and hold down the %and& buttons
simultaneously for approximately six sec- 92
KeyOpening and closing