2014 MERCEDES-BENZ B-CLASS SPORTS warning light
[x] Cancel search: warning lightPage 120 of 360
the
0002 position, causing the windshield
wipers to wipe mor efrequently.
If the wipe rblades are worn ,the windshield
will no longer be wiped properly. This could
prevent you fro mobservin gthe traffic
conditions. Replace the wiper blades twic ea
year, ideally in sprin gand fall. Switching th
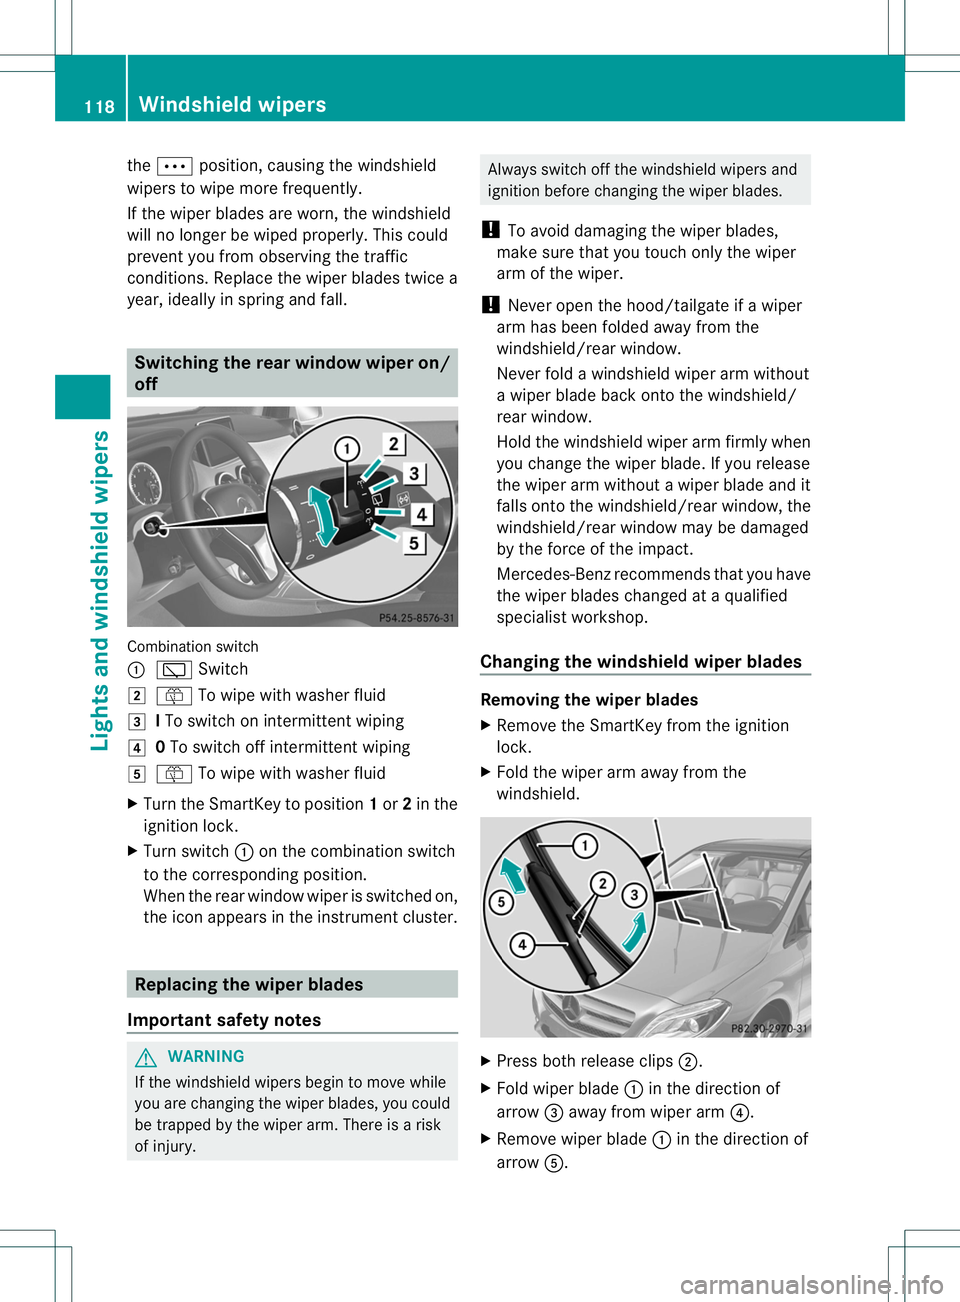
erearw indow wiper on/
off Combination switch
001A
001B Switch
0001 0018 To wipe with washer fluid
0002 ITo switc honintermitten twiping
001F 0To switc hoff intermitten twiping
0011 0018 To wipe with washer fluid
X Turn the SmartKey to position 1or 2in the
ignition lock.
X Turn switch 001Aon the combination switch
to the correspondin gposition.
When the rear window wiper is switched on,
the icon appears in the instrumen tcluster. Replacing th
ewiper blades
Important safety notes G
WARNING
If the windshield wipers begin to mov ewhile
you are changing the wiper blades, you could
be trapped by the wiper arm. There is arisk
of injury. Always switc
hoff the windshield wipers and
ignition befor echanging the wiper blades.
! To avoid damagin gthe wiper blades,
mak esure that you touc honly the wiper
ar moft he wiper.
! Never open the hood/tailgate if awiper
arm has been folded away from the
windshield/rear window.
Never fold awindshield wiper arm without
aw iper blade back onto the windshield/
rear window.
Hold the windshield wiper arm firmly when
you change the wiper blade. If you release
the wiper arm without awiper blade and it
falls onto the windshield/rear window, the
windshield/rear window may be damaged
by the force of the impact.
Mercedes-Ben zrecommends that you have
the wiper blades changed at aqualified
specialist workshop.
Changing th ewindshield wiper blades Removing th
ewiper blades
X Remove th eSmartKey from th eignition
lock.
X Fold th ewiper arm away from the
windshield. X
Press bot hrelease clips 0010.
X Fold wiper blade 001Ain th edirection of
arrow 0023away from wiper arm 0021.
X Remove wiper blade 001Ain th edirection of
arrow 001E. 118
Windshiel
dwipersLight sand windshield wipers
Page 135 of 360
Activating/deactivating
X
Turn th eSmartKey to position 0in the
ignition loc korremove it (Y page 137).
X To activate: press the0016button.
The indicator lamp in the 0016buttonlights
up.
X To deactivate: press the0016button.
The indicator lamp in the 0016button goes
out.
i Residual heat is deactivated
automatically:
R after approximately 30 minutes
R when the ignition is switched on
R if the battery voltage drops Setting th
eair vents Important safety notes
G
WARNING
Very hot or very cold air can flow fro mthe air
vents. This could result in burns or frostbite in
the immediate vicinity of the air vents. There
is ar isk of injury.
Make sure that all vehicle occupants always
maintain asufficient distance to the air
outlets. If necessary, redirect the airflow to
another area of the vehicle interior.
In order to ensure the direct flow of fresh air
through the air ventsi nto the vehicle interior,
please observe the following notes:
R keep the air inlet between the windshield
and the hood free of blockages, such as ice,
snow or leaves.
R never cover the air ventsora ir intake grilles
in the vehicle interior.
i You can move the adjusters for the air
ventsv ertically or horizontally to set the
direction of the airflow.
i For optimal climate control in the vehicle,
open the air ventsc ompletely and set the
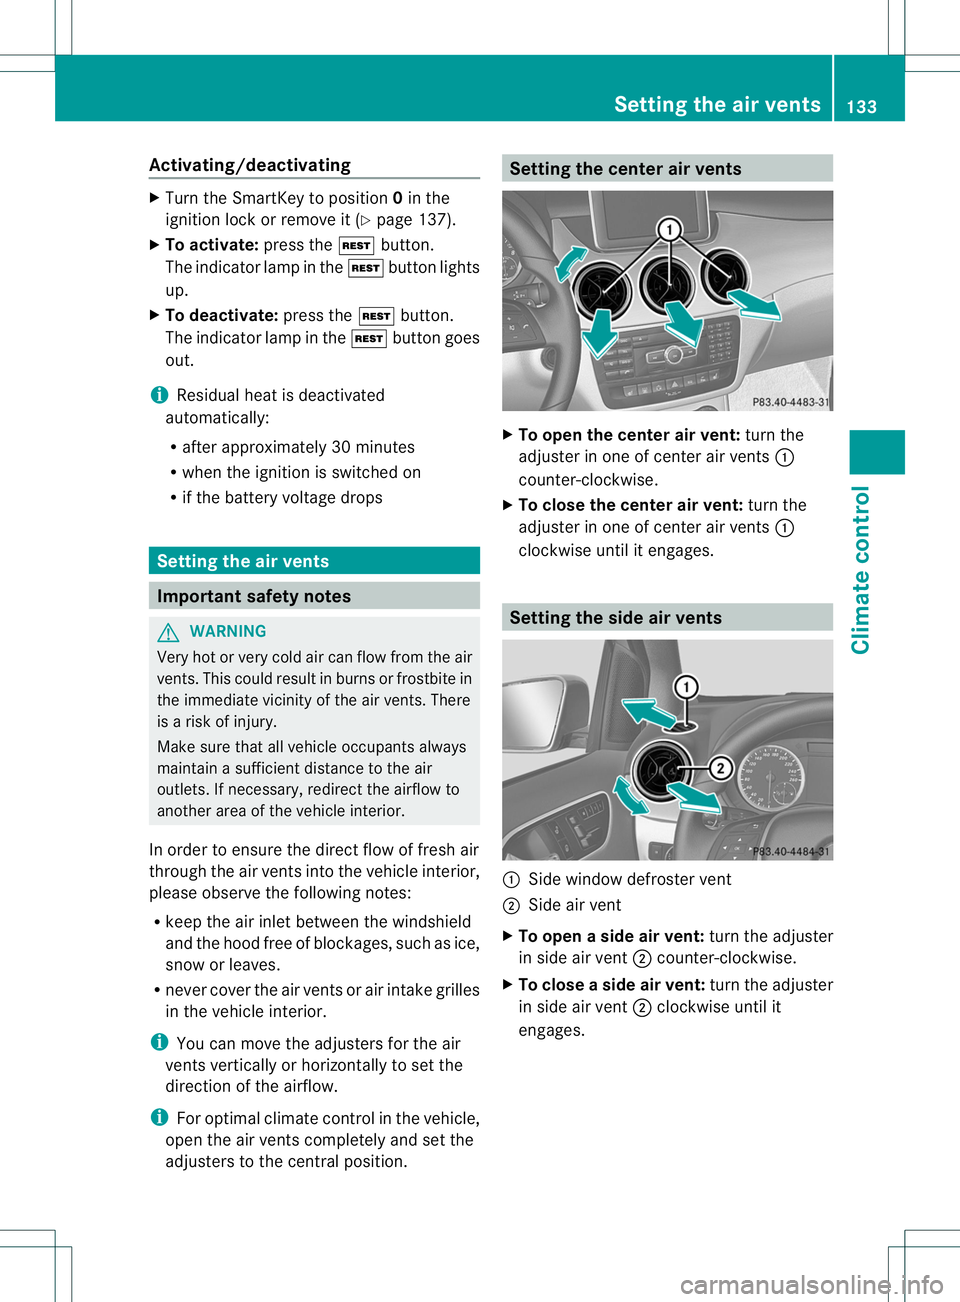
adjusters to the central position. Setting the center air vents
X
To open the center air vent: turn the
adjuster in one of center air vents 001A
counter-clockwise.
X To close the center air vent: turn the
adjuster in one of center air vents 001A
clockwise until it engages. Setting the side air vents
001A
Side window defroster vent
0010 Side air vent
X To open aside air vent: turn the adjuster
in side air vent 0010counter-clockwise.
X To close aside air vent: turn the adjuster
in side air vent 0010clockwise until it
engages. Setting thea
ir vents
133Climatecontrol Z
Page 145 of 360
Problem Possible causes/consequences and
000B Solutions
The engine is not
running smoothly and
is misfiring. There is
amalfunction in the engine electronics or in amechanical
componentoft he engine management system.
X Only depress the accelerator pedal slightly.
X Have the cause rectified immediately at aqualified specialist
workshop.
Otherwise, non-combusted fuel may get into the catalytic
converter and damage it. The coolant
temperature display is
showing more than
248
‡(120 †). The
coolant warning lamp
may also be lit and a
warning tone may
sound. The coolant level is too low. The coolant is too hot and the engine
is no longer being cooled sufficiently.
X
Stop as soon as possible and allow the engine and the coolant
to cool down.
X Check the coolant level (Y page 283). Observe the warning
notes as you do so and add coolant if necessary. Automatic transmission
Important safety notes
G
WARNING
If the engine speed is above the idling speed
and you engage transmission position Dor
R,t he vehicle could pull away suddenly. There
is ar isk of an accident.
When engaging transmission position Dor R,
always firmly depress the brake pedal and do
not simultaneously accelerate. G
WARNING
The automatic transmission switches to
neutral position Nwhen you switch off the
engine. The vehicle may roll away.T here is a
risk of an accident.
After switching off the engine, always switch
to parking position P.Prevent the parked
vehicle from rolling away by applying the
parking brake. DIRECTS
ELECT lever
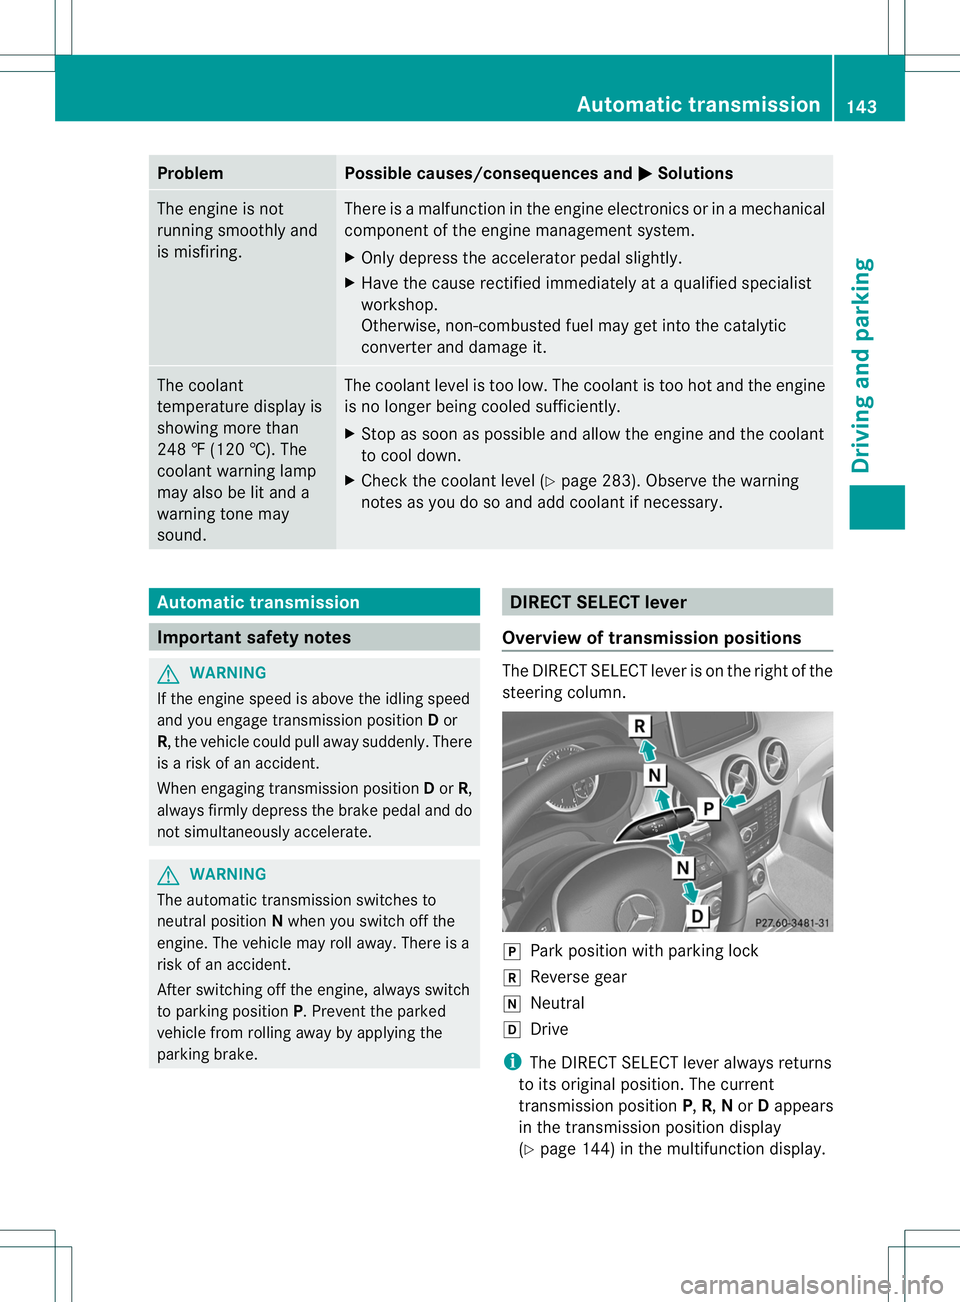
Overview of transmission positions The DIRECT SELECT leve
risonthe right of the
steering column. 0006
Park position with parking lock
0019 Reverse gear
0018 Neutral
000A Drive
i The DIRECT SELECT lever always returns
to its original position. The current
transmission position P,R, Nor Dappears
in the transmission position display
(Y page 144) in the multifunction display. Automatic transmission
143Driving and parking Z
Page 153 of 360
!
Overfilling the fuel tank could damage the
fuel system.
! Take care not to spill any fuel on painted
surfaces. You could otherwise damage the
paintwork.
! Use afilter when refueling from afuel can.
Otherwise, the fuel lines and/or injection
system could be blocked by particles from
the fuel can.
Do not get into the vehicle againd uringthe
refuelin gprocess. Otherwise, electrostatic
charge could build up again.
If you overfill th efuel tank, fuel could spray
out when th efuel pump nozzle is removed.
Fo rfurther information on fuel and fuel quality
(Y page 348). Refueling
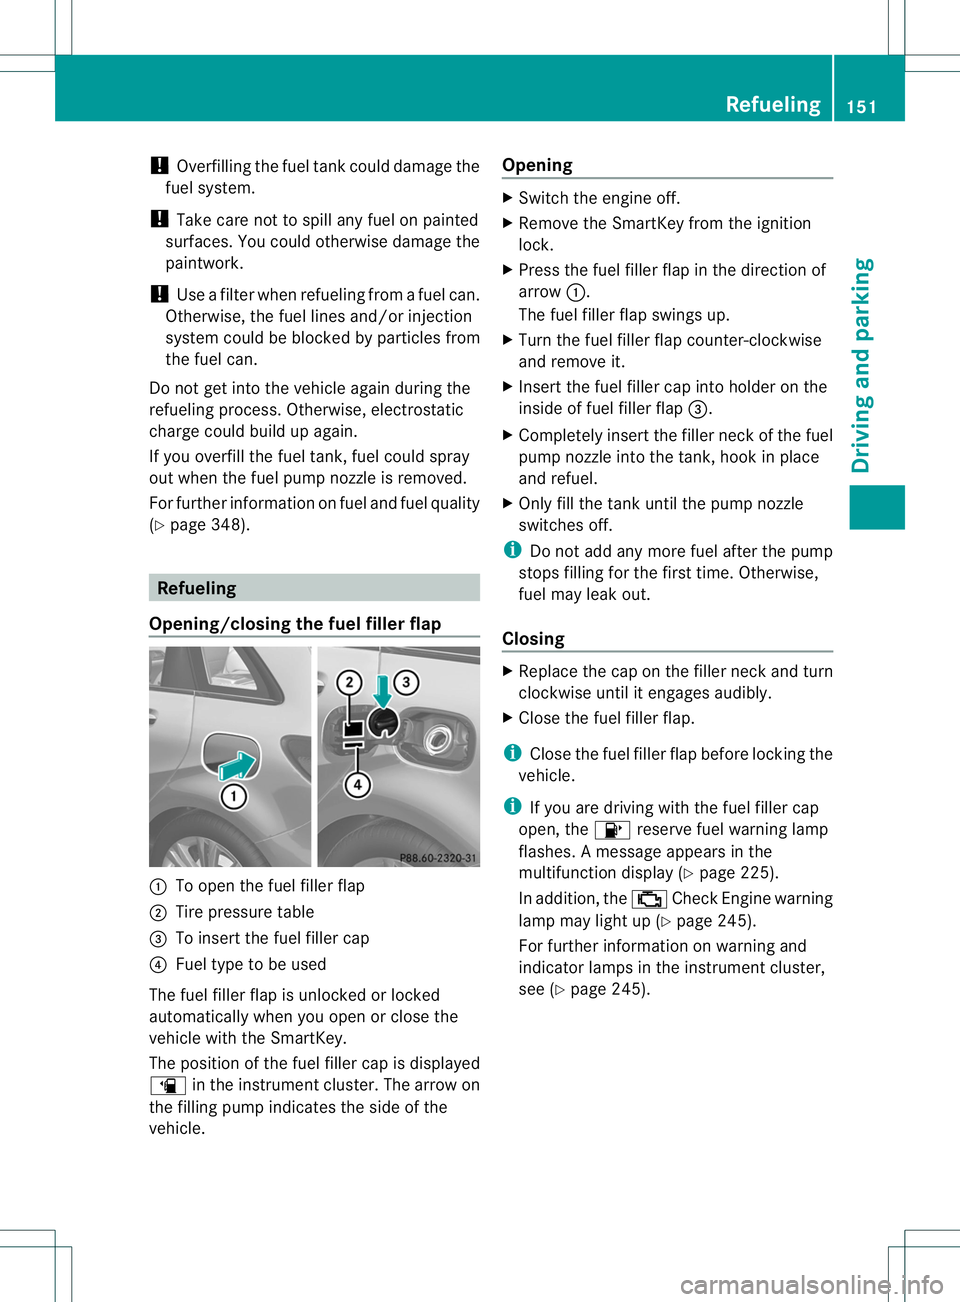
Opening/closing th efuelfiller flap 001A
To open th efuel filler flap
0010 Tirep ressur etable
0023 To insert th efuel filler cap
0021 Fuel typ etobeu sed
The fuel filler flap is unlocked or locked
automatically when you open or close the
vehicl ewitht he SmartKey.
The position of th efuel filler cap is displayed
0007 in theinstrumen tcluster .The arrow on
the filling pump indicates the side of the
vehicle. Opening X
Switch the engine off.
X Remove the SmartKey from the ignition
lock.
X Press the fuel filler flap in the direction of
arrow 001A.
The fuel filler flap swings up.
X Turn the fuel filler flap counter-clockwise
and remove it.
X Insert the fuel filler cap into holder on the
inside of fuel filler flap 0023.
X Completely insert the filler neck of the fuel
pump nozzle into the tank,h ook in place
and refuel.
X Only fill the tank until the pump nozzle
switches off.
i Do not add any more fuel after the pump
stops filling for the first time. Otherwise,
fuel may leak out.
Closing X
Replace the cap on the filler neck and turn
clockwise until it engages audibly.
X Close the fuel filler flap.
i Close the fuel filler flap before locking the
vehicle.
i If you are driving with the fuel filler cap
open, the 0007reserve fuel warning lamp
flashes. Amessage appears in the
multifunction display (Y page 225).
In addition, the 000ACheck Engine warning
lamp may light up (Y page 245).
For further information on warning and
indicator lamps in the instrument cluster,
see (Y page 245). Refueling
151Driving and parking Z
Page 159 of 360
i
On long journeys at aconstant speed, e.g.
on the highway, only the bar for Constantwill change.
i The ECO displays ummaries the driving
characteristics from the start of the journey
to its completion. For this reason, the bars
change dynamically at the beginning of the
journey. On longer journeys, there are
fewer changes. For more dynamic changes,
carry out amanual reset.
Further information on the ECO display
(Y page 194). Braking
Important safety notes G
WARNING
If you shift down on aslippery road surface in
an attempt to increase the engine's braking
effect, the drive wheels could lose their grip.
There is an increased danger of skidding and
accidents.
Do not shift down for additional engine
braking on aslippery road surface.
Downhill gradients !
On long and steep gradients, you must
reduce the load on the brakes by shifting to
al ower gear in good time. This allows you
to take advantage of the engine's braking
effect. For this, you need to have selected
manual drive program M.This helps you to
avoid overheating the brakes and wearing
them out excessively.
When you take advantage of the engine's
braking effect,ad rive wheel may not turn
for some time, e.g. on aslippery road
surface. This could cause damage to the
drive train. This type of damage is not
covered by the Mercedes-Ben zwarranty.
i Briefl ydepressing th eaccelerato rpedal
on downhill gradient swhile the manual
drive program Mis temporarily activated:
the automatic transmission may switch to the last activ
eautomatic drive program E
or S.T he automatic transmission may shift
to ah igher gear. This can reduce the
engine's braking effect.
Heavy and light loads G
WARNING
If you rest your foot on the brake pedal while
driving, the braking system can overheat. This
increases the stopping distance and can even
cause the braking system to fail. There is a
risk of an accident.
Never use the brake pedal as afootrest .Never
depress the brake pedal and the accelerator
pedal at the same time.
! Depressing the brake pedal constantly
results in excessive and premature wear to
the brake pads.
If the brakes have been subjected to aheavy
load, do not stop the vehicle immediately.
Driv eonf oras hort while. This allows the
airflow to cool the brakes more quickly.
Wet roads If you have driven for
along time in heavy rain
without braking ,there may be adelayed
reaction from the brakes when braking for the
first time. This may also occur after the
vehicle has been washed or driven through
deep water.
You have to depress the brake pedal more
firmly. Maintain agreater distanc efrom the
vehicle in front.
After driving on awet road or having the
vehicle washed, brake firmly while paying
attention to the traffic conditions .This will
warm up the brake discs, thereby drying them
more quickly and protecting them against
corrosion.
Limited braking performance on salt-
treated roads If you drive on salted roads,
alayer of salt
residue may form on the brake discs and Driving tips
157Driving and parking Z
Page 160 of 360
brake pads. This can result in
asignificantly
longer brakin gdistance.
R Brak eoccasionally to remov eany possible
salt residue. Make sure that you do not
endanger other road users when doing so.
R Carefully depress the brake pedal and the
beginning and end of ajourney.
R Maintain agreater distance to the vehicle
ahead.
Servicing the brakes !
If the red brake warning lamp lights up in
the instrument cluster and you hear a
warning ton ewhile the engin eisrunning,
the brake fluid level may be too low.
Observ eadditional warning messages in
the multifunction display.
The brake fluid level may be too low due to
brake pad wear or leaking brake lines.
Have the brake system checked
immediately. This work should be carried
out at aqualified specialist workshop.
! Afunction or performanc etest should
only be carried out on a2-axle
dynamometer. If yo uareplanning to have
the vehicl eteste dons uchad ynamometer,
contact an authorize dMercedes-Benz
Center to obtai nfurthe rinformatio nfirst.
Otherwise, yo ucould damage the drive
trai nort he brake system.
! As the ESP ®
system operates
automatically, the engine and the ignition
must be switched off (the SmartKe ymust
be in position 0or 1in the ignition lock) if:
R the electri cparking brak eistested on a
brake dynamometer (for amaximum of
ten seconds)
R the vehicle is towed with the front axle
raised.
Braking triggered automaticallybyE SP®
may seriouslyd amage the brake system.
All checks and maintenance work on the
brake system must be carried out at a qualified specialist workshop. Consult a
qualified specialist workshop to arrange this.
Have brake pads installed and brake fluid
replaced at
aqualified specialist workshop.
If the brake system has only been subject to
moderate loads, you should test the
functionality of your brakes at regular
intervals.
You can find adescription of Brake Assist
(BAS) on (Y page 64).
Mercedes-Benz recommends that you only
have brake pads/linings installed on your
vehicle which have been approved for
Mercedes-Benz vehicles or which correspond
to an equivalent quality standard. Brake
pads/linings which have not been approved
for Mercedes-Benz vehicles or which are not
of an equivalent quality could affect your
vehicle's operating safety.
Mercedes-Benz recommends that you only
use brake fluid that has been specially
approved for your vehicle by Mercedes-Benz,
or which corresponds to an equivalent quality
standard. Brake fluid which has not been
approved for Mercedes-Benz vehicles or
which is not of an equivalent quality could
affect your vehicle's operating safety.
Checking brake liningt hickness You can measure the break pad/lining
thickness using
atest gauge.C olor-coding
(green or red) on the test gauge allows you to
determin ewhether the brake pad/lining
thickness is still sufficient .The test gauge is
in the vehicle document wallet in the glove
box. 158
Driving tipsDriving and parking
Page 165 of 360
An intermittent warning tone will then sound
and the distance warning lamp will light up in
the instrument cluster .Brake immediatel yin
order to increase the distance to the vehicle
in front or take evasive action provided it is
safe to do so.
For DISTRONI CPLUStoa ssist you, the radar
sensor system must be operational.
DISTRONIC PLUS is automatically
deactivated if:
R you are driving slower than 15 mph
(25 km/h) and there is no longer avehicle
in front or
R the vehicle in front is no longer detected
If there is no vehicle in front,D ISTRONIC
PLUS operates in the same way as cruise
control in the speed range between 20 mph
(30 km/h) and 120 mph (200 km/h) .Ifa
vehicle is driving in front of you, it operates in
the speed range between 0mph (0 km/h) and
120 mph (200 km/h).
Do not use DISTRONIC PLUS while driving on
roads with steep gradients.
As DISTRONIC PLUS transmits radar waves,
it can resemble the radar detector softhe
responsible authorities. You can refer to the
relevant chapter in the Operator's Manual if
question sare asked about this.
i This device complies with RSS-210 of
Industry Canada. Operation is subjec tto
the following two conditions:
1. This device ma ynot cause harmful
interference, and
2. thi sdevic emusta ccep tany interference
received, including interference tha tmay
caus eundesired operatio nofthe device.
Removal, tampering, or altering of the
device will void any warranties, and is not
permitted. Do not tamper with, alter, or use
in any non-approved way.
Any unauthorized modification to this
device could void the user's authority to
operate the equipment. Important safety notes G
WARNING
DISTRONIC PLUS does not react to:
R people or animals
R stationary obstacles on the road, e.g.
stopped or parked vehicles
R oncominga nd crossing traffic
As aresult, DISTRONIC PLUS may neither give
warnings nor interveneins uch situations.
There is arisk of an accident.
Always pay careful attention to the traffic
situation and be ready to brake. G
WARNING
DISTRONIC PLUS cannot always clearly
identify other road users and complex traffic
situations.
In such cases, DISTRONIC PLUS may:
R give an unnecessary warning and then
brake the vehicle
R neither give awarning nor intervene
R accelerate unexpectedly
There is arisk of an accident.
Continue to drive carefully and be ready to
brake, in particular when warned to do so by
DISTRONIC PLUS. G
WARNING
DISTRONIC PLUS brakes your vehicle with up
to 40% of the maximum braking force. If this
braking force is insufficient, DISTRONIC PLUS
warns you visuallya nd audibly. There is arisk
of an accident.
In such cases, apply the brakes yourself and
try to take evasive action. Driving systems
163Driving and parking Z
Page 170 of 360
There are several ways to deactivate
DISTRONIC PLUS:
X
Briefly press the cruise control lever
forwards 001A.
or
X Brake, unless the vehicle is stationary.
When you deactivate DISTRONIC PLUS, you
will see the DISTRONIC PLUS Off message
in the multifunction display for approximately
five seconds.
i The last speed stored remains stored until
you switch off the engine. DISTRONIC PLUS
is not deactivated if you depress the
accelerator pedal.
DISTRONIC PLUS is automatically
deactivated if:
R you engage the electric parking brake or if
the vehicle is automatically secured with
the electric parking brake
R you are driving slower than 7mph
(10 km/h) and ther eisnovehicle in front,
or if the vehicle in fron tisnolonger
detected
R ESP ®
intervenes or you deactivate ESP ®
R the transmission is in the P,Ror Nposition
R you pull the cruise contro llever towards
you in order to pull away and the front-
passenger door or one of the rear doors is
open
R the vehicle is skidding
R you activat eActive Parkin gAssist
If DISTRONIC PLUS is deactivated, you will
hear awarning tone. You will see the
DISTRONIC PLUS Off message in the
multifunction display for approximately five
seconds. DISTRONIC PLUS displays in the
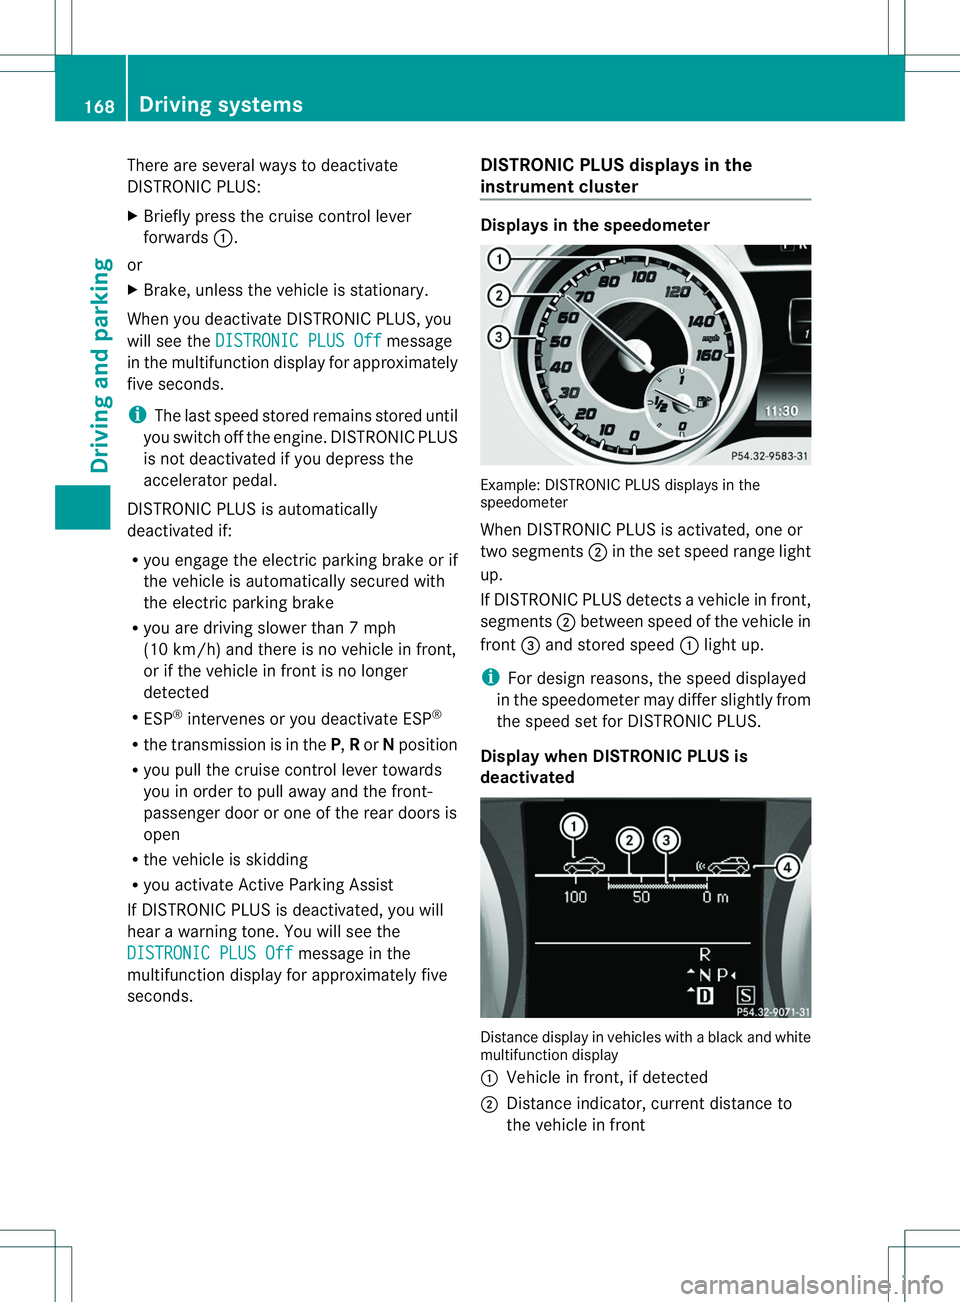
instrument cluster Displays in the speedometer
Example: DISTRONIC PLUS displays in the
speedometer
When DISTRONIC PLUS is activated, one or
two segments
0010in the set speed range light
up.
If DISTRONIC PLUS detects avehicle in front,
segments 0010between speed of the vehicle in
front 0023and stored speed 001Alight up.
i For design reasons, the speed displayed
in the speedometer may differ slightly from
the speed set for DISTRONIC PLUS.
Display when DISTRONIC PLUS is
deactivated Distance display in vehicles with
ablack and white
multifunction display
001A Vehicle in front, if detected
0010 Distance indicator, curren tdistanc eto
the vehicle in front 168
Driving systemsDriving and parking