2014 MERCEDES-BENZ B-CLASS SPORTS ESP
[x] Cancel search: ESPPage 109 of 360
The blue
0011indicator lamp in the
instrument cluster lights up when the high-
beam headlamps are switched on.
X To switch off the high-beam
headlamps: move the combination switch
back to its normal position.
The blue 0011indicator lamp in the
instrument cluster goes out.
i Vehicles with Adaptive Highbeam Assist:
when Adaptive Highbeam Assist is active,
it controls activation of the high-beam
headlamps (Y page 108).
High-beam flasher X
To switch on: turn the SmartKey in the
ignition lock to position 1or 2or start the
engine.
X Pull the combination switch in the direction
of arrow 0023. Hazard warning lamps
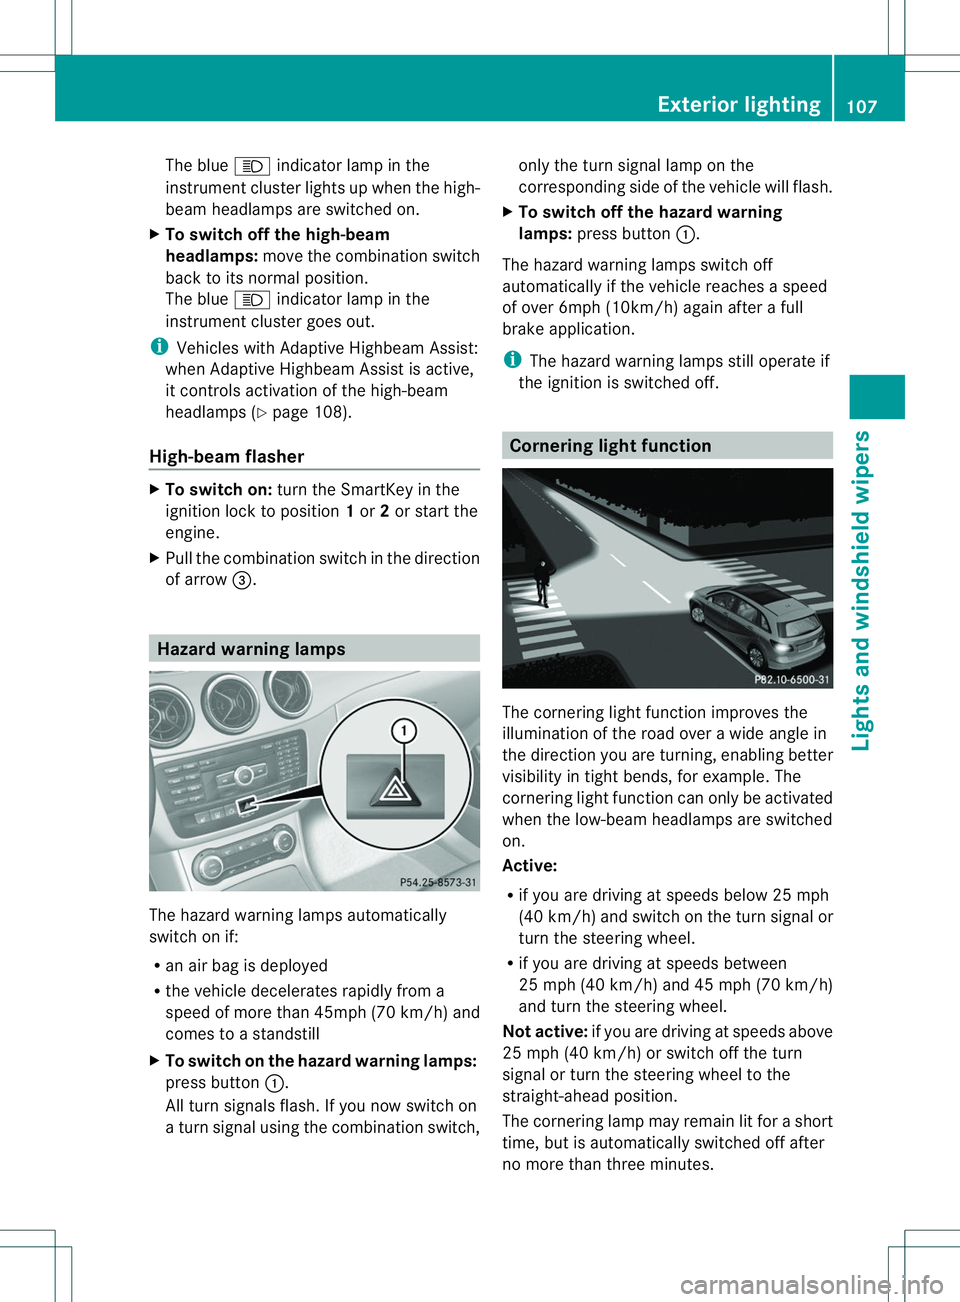
The hazard warning lamps automatically
switch on if:
R
an air bag is deployed
R the vehicle decelerates rapidly from a
speed of more than 45mph (70k m/h) and
comes to astandstill
X To switch on the hazard warning lamps:
press button 001A.
All turn signals flash. If you now switch on
at urn signa lusing the combination switch, only the turn signa
llam pont he
corresponding sid eofthe vehicle will flash.
X To switch off the hazard warning
lamps: press button 001A.
The hazard warning lamps switch off
automatically if the vehicle reaches aspeed
of over 6mph (10km/h) again after afull
brake application.
i The hazard warning lamps still operate if
the ignition is switched off. Cornerin
glight function The cornering light function improves the
illumination of the road over
awidea nglein
the direction you are turning, enabling better
visibility in tight bends ,for example. The
cornering light function can only be activated
whe nthe low-beam headlamps are switched
on.
Active:
R if you are driving at speeds below 25 mph
(40 km/h )and switch on the turn signal or
turn the steering wheel.
R if you are driving at speeds between
25 mph (40k m/h )and 45 mph (70k m/h)
and turn the steering wheel.
Not active: if you are driving at speeds above
25 mph (40 km/h) or switch off the turn
signa lorturn the steering wheel to the
straight-ahead position.
The cornering lamp may remain lit for ashort
time, but is automatically switched off after
no more than three minutes. Exterior lighting
107Lights and windshield wipers Z
Page 110 of 360
Extende
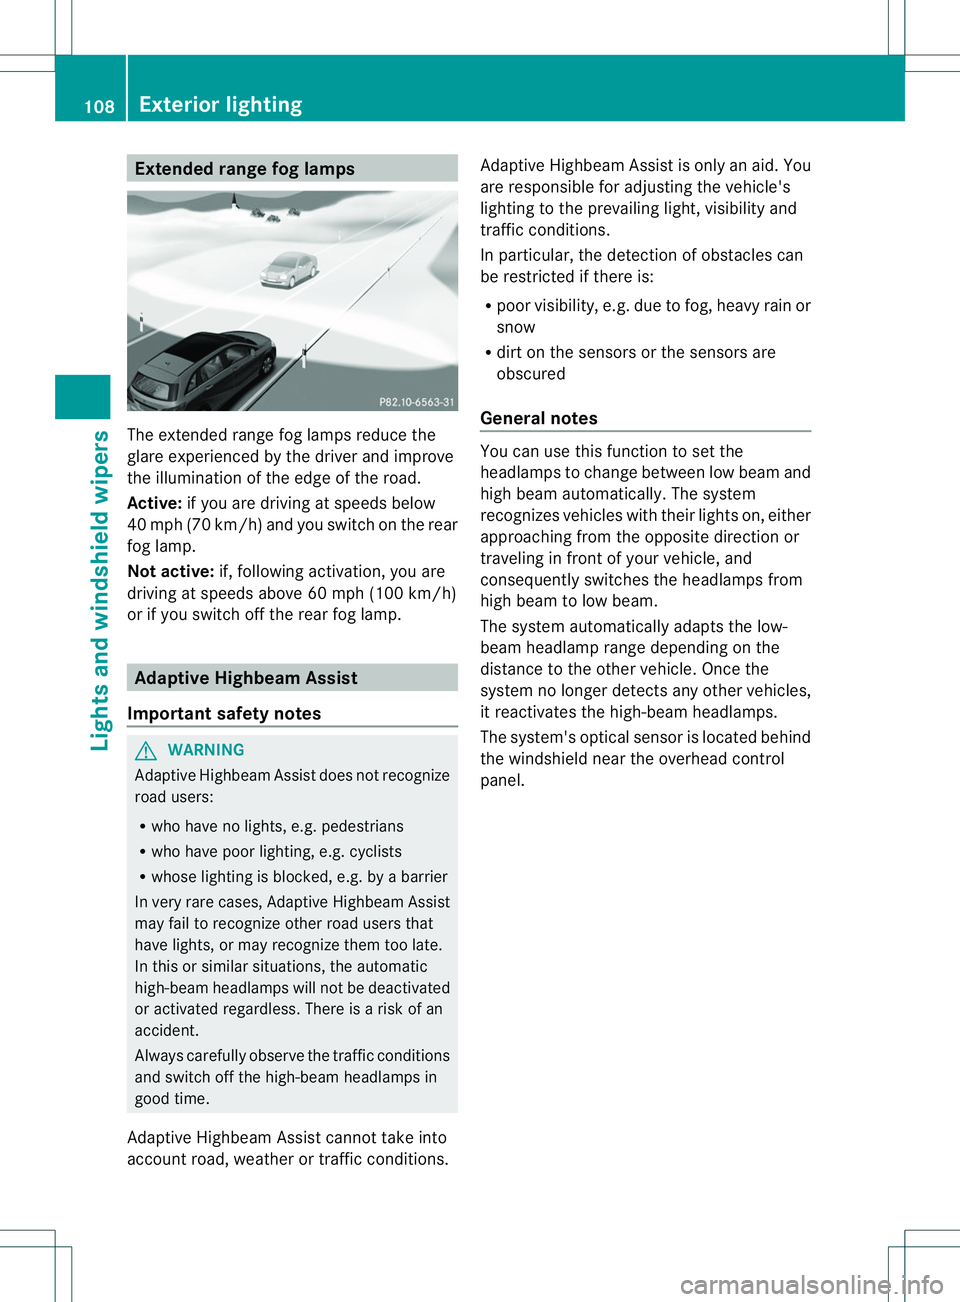
drange fog lamps The extended range fog lamps reduc
ethe
glare experienced by th edriver and improve
th ei lluminatio nofthe edge of the road.
Active: if you are driving at speeds below
40 mph (70 km/h) and you switch on the rear
fog lamp.
Not active: if, following activation, you are
driving at speeds above 60 mph (100 km/h)
or if you switch off the rear fog lamp. Adaptive Highbeam Assist
Important safety notes G
WARNING
Adaptive Highbeam Assist does not recognize
road users:
R who have no lights, e.g. pedestrians
R who have poor lighting, e.g. cyclists
R whose lighting is blocked, e.g. by abarrier
In very rare cases, Adaptive Highbeam Assist
may fail to recognize other road users that
have lights, or may recognizet hem too late.
In this or similar situations, the automatic
high-beam headlamps will not be deactivated
or activated regardless. There is arisk of an
accident.
Always carefully observe the traffic conditions
and switch off the high-beam headlamps in
good time.
Adaptive Highbeam Assist cannot take into
account road, weather or traffic conditions. Adaptive Highbeam Assist is only an aid. You
are responsible for adjusting the vehicle's
lighting to the prevailing light, visibility and
traffic conditions.
In particular, the detection of obstacles can
be restricted if there is:
R
poor visibility, e.g. due to fog, heavy rain or
snow
R dirt on the sensors or the sensors are
obscured
General notes You can use this function to set the
headlamps to change between low beam and
high beam automatically
.The system
recognizes vehicles with their lights on, either
approaching from the opposite direction or
traveling in front of your vehicle, and
consequently switches the headlamps from
high beam to low beam.
The system automatically adapts the low-
beam headlamp range depending on the
distance to the other vehicle. Once the
system no longer detectsa ny other vehicles,
it reactivates the high-beam headlamps.
The system's optical sensor is located behind
the windshield near the overhead control
panel. 108
Exterior lightingLights and windshield wipers
Page 112 of 360
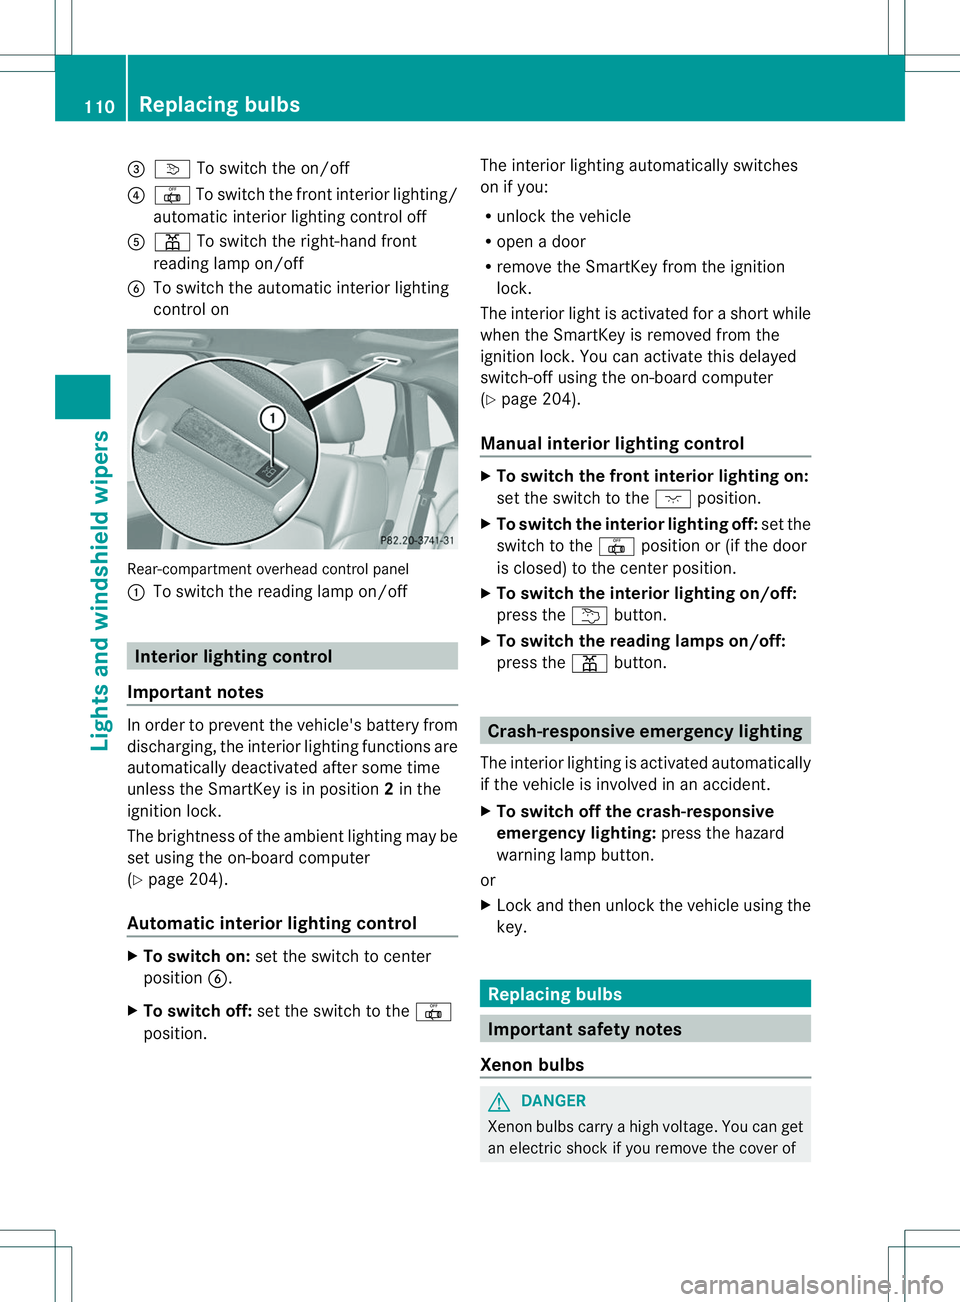
0023
0010 To switch the on/off
0021 0017 To switch the fronti nterior lighting/
automatic interio rlighting control off
001E 001D To switc hthe right-han dfront
reading lamp on/off
0024 To switch the automatic interior lighting
control on Rear-compartment overhea
dcontrol panel
001A To switch the reading lamp on/off Interior lighting control
Important notes In order to prevent the vehicle's battery from
discharging, the interior lighting functions are
automatically deactivated after some time
unless the SmartKey is in position 2in the
ignitio nlock.
The brightness of the ambient lighting may be
set using the on-board computer
(Y page 204).
Automatic interior lighting control X
To switch on: set the switch to center
position 0024.
X To switch off: set the switch to the 0017
position. The interior lighting automatically switches
on if you:
R unlock the vehicle
R open adoor
R remove the SmartKey from the ignition
lock.
The interior light is activated for ashort while
when the SmartKey is removed from the
ignition lock. You can activate this delayed
switch-off using the on-board computer
(Y page 204).
Manuali nterior lighting control X
To switch the front interior lighting on:
set the switch to the 0001position.
X To switch the interior lighting off: set the
switch to the 0017position or (if the door
is closed) to the center position.
X To switch the interior lighting on/off:
press the 001Abutton.
X To switch the reading lampso n/off:
press the 001Dbutton. Crash-responsive emergency lighting
The interior lighting is activated automatically
if the vehicle is involved in an accident.
X To switch off the crash-responsive
emergency lighting: press the hazard
warning lamp button.
or
X Lock and then unlock the vehicle using the
key. Replacing bulbs
Important safety notes
Xenon bulbs G
DANGER
Xenon bulbs carry ahigh voltage. You can get
an electric shock if you remove the cover of 110
Replacing bulbsLights and windshield wipers
Page 117 of 360
Tail lamp
Turn signal lamp/tail lamp and brake
lamp
X
Switch off the lights.
X Open the cargo compartment.
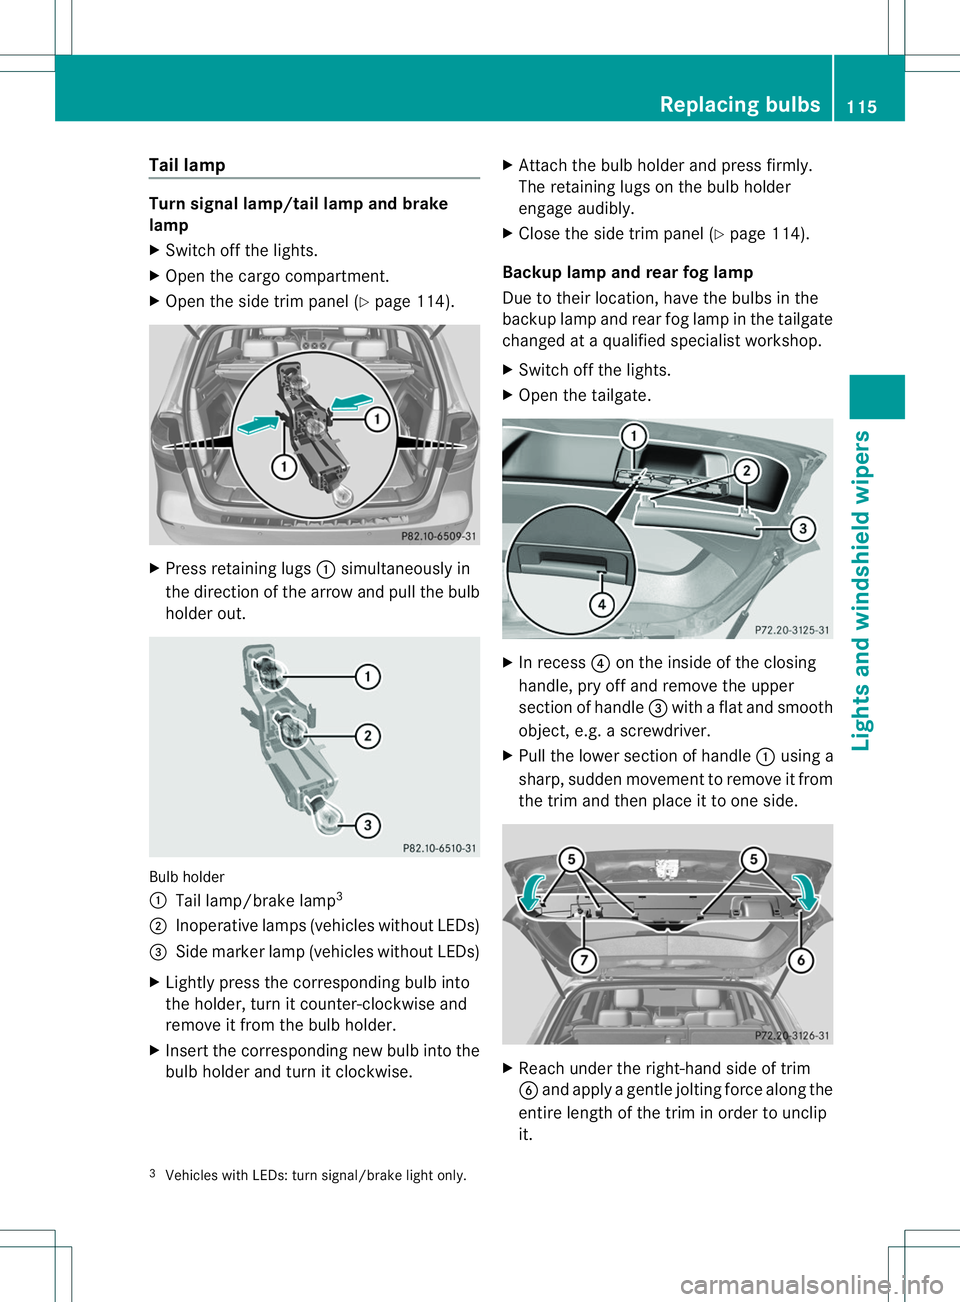
X Open the side trim panel (Y page 114).X
Press retaining lugs 001Asimultaneously in
the direction of the arrow and pull the bulb
holde rout. Bulb holder
001A
Tail lamp/brak elamp 3
0010 Inoperative lamps (vehicles without LEDs)
0023 Sidem arke rlamp (vehicle swithout LEDs)
X Lightly press the correspondin gbulb into
the holder ,tur nitc ounter-clockwise and
remove it from the bulb holder.
X Insert the corresponding new bulb into the
bulb holder and turn it clockwise. X
Attach the bulb holder and press firmly.
The retaining lugs on the bulb holder
engage audibly.
X Close the side trim panel (Y page 114).
Backup lamp and rear fog lamp
Due to their location, have the bulbs in the
backup lamp and rear fog lamp in the tailgate
changed at aqualified specialist workshop.
X Switch off the lights.
X Open the tailgate. X
In recess 0021on the inside of the closing
handle, pry off and remove the upper
section of handle 0023with aflat and smooth
object ,e.g. ascrewdriver.
X Pull the lower section of handle 001Ausing a
sharp, sudden movemen ttoremove it from
the trim and then place it to one side. X
Reach under the right-hand side of trim
0024 and apply agentle jolting forc ealong the
entire lengt hofthe trim in order to unclip
it.
3 Vehicles with LEDs: turn signal/brake light only. Replacing bulbs
115Lights and windshield wipers Z
Page 118 of 360
X
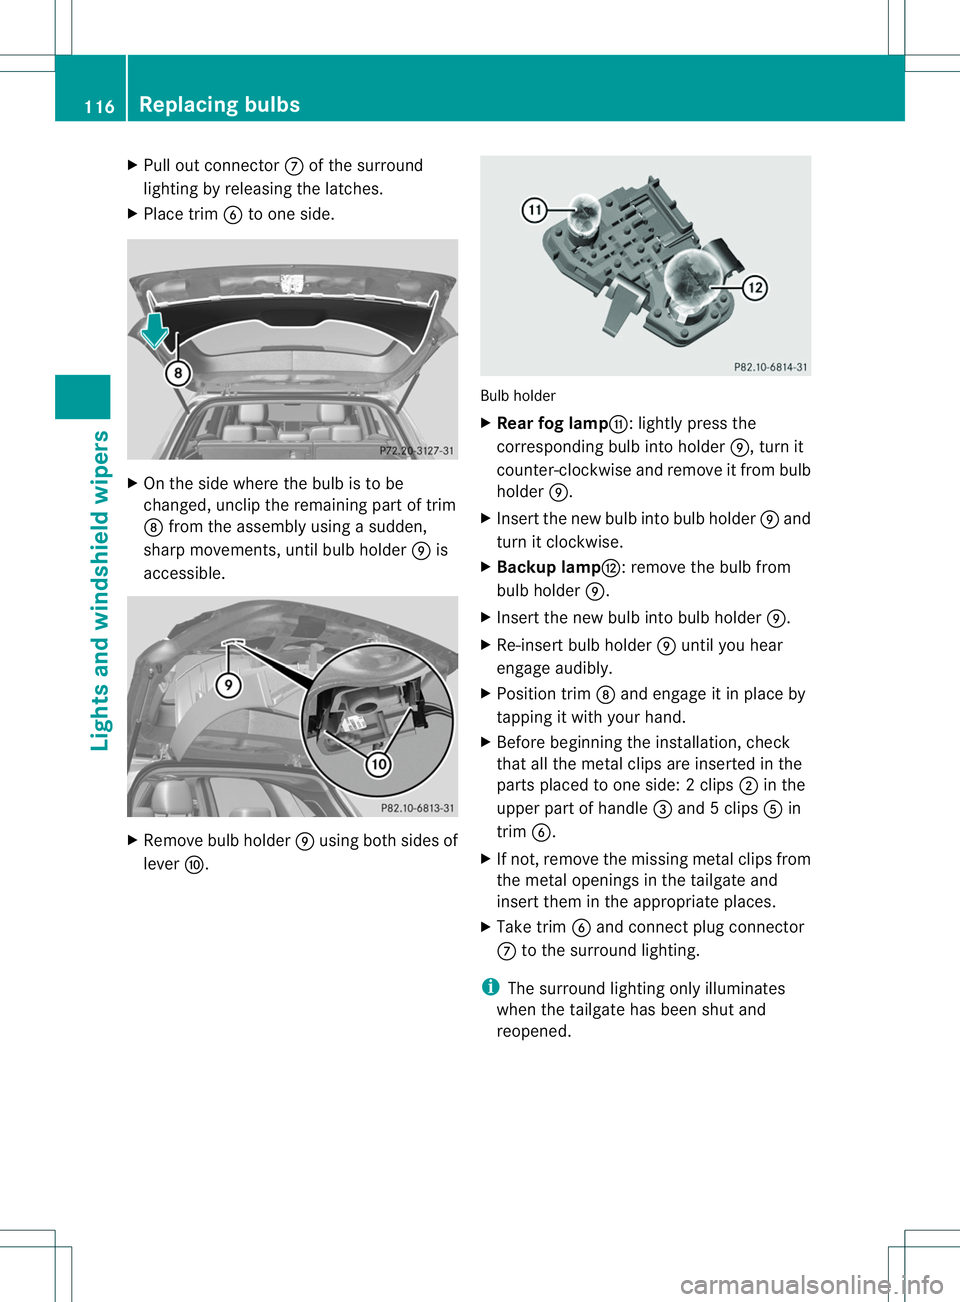
Pull out connector 0007of the surround
lighting by releasing the latches.
X Place trim 0024to one side. X
On the side where the bulb is to be
changed, unclip the remaining part of trim
0008 from the assembly using asudden,
sharp movements, until bulb holder 0009is
accessible. X
Remove bulb holder 0009using both sides of
lever 0016. Bulb holder
X
Rear fog lamp001D:l ightly press the
correspondin gbulb int oholder 0009,turnit
counter-clockwise and remove it fro mbulb
holder 0009.
X Inser tthe new bulb into bulb holder 0009and
turn it clockwise.
X Backup lamp0004:r emove the bulb from
bulb holder 0009.
X Insert the new bulb into bulb holder 0009.
X Re-insert bulb holder 0009until you hear
engage audibly.
X Position trim 0008and engage it in place by
tapping it with your hand.
X Before beginning the installation, check
that all the metal clips are inserted in the
parts placed to one side: 2clips 0010in the
upper part of handle 0023and 5clips 001Ein
trim 0024.
X If not ,remove the missin gmetal clips from
the metal openings in the tailgat eand
insert the minthe appropriate places.
X Take trim 0024and connect plug connector
0007 to the surround lighting.
i The surround lighting only illuminates
when the tailgate has been shut and
reopened. 116
Replacing bulbsLights and windshield wipers
Page 119 of 360
X
Position trim 0024and engage it in place by
tapping it with your hand, starting from the
outside.
X Clip in the lower section of handle 001Aagain.
X Inser tand engag ethe uppe rsection of
handle 0023intol ower section 001A.
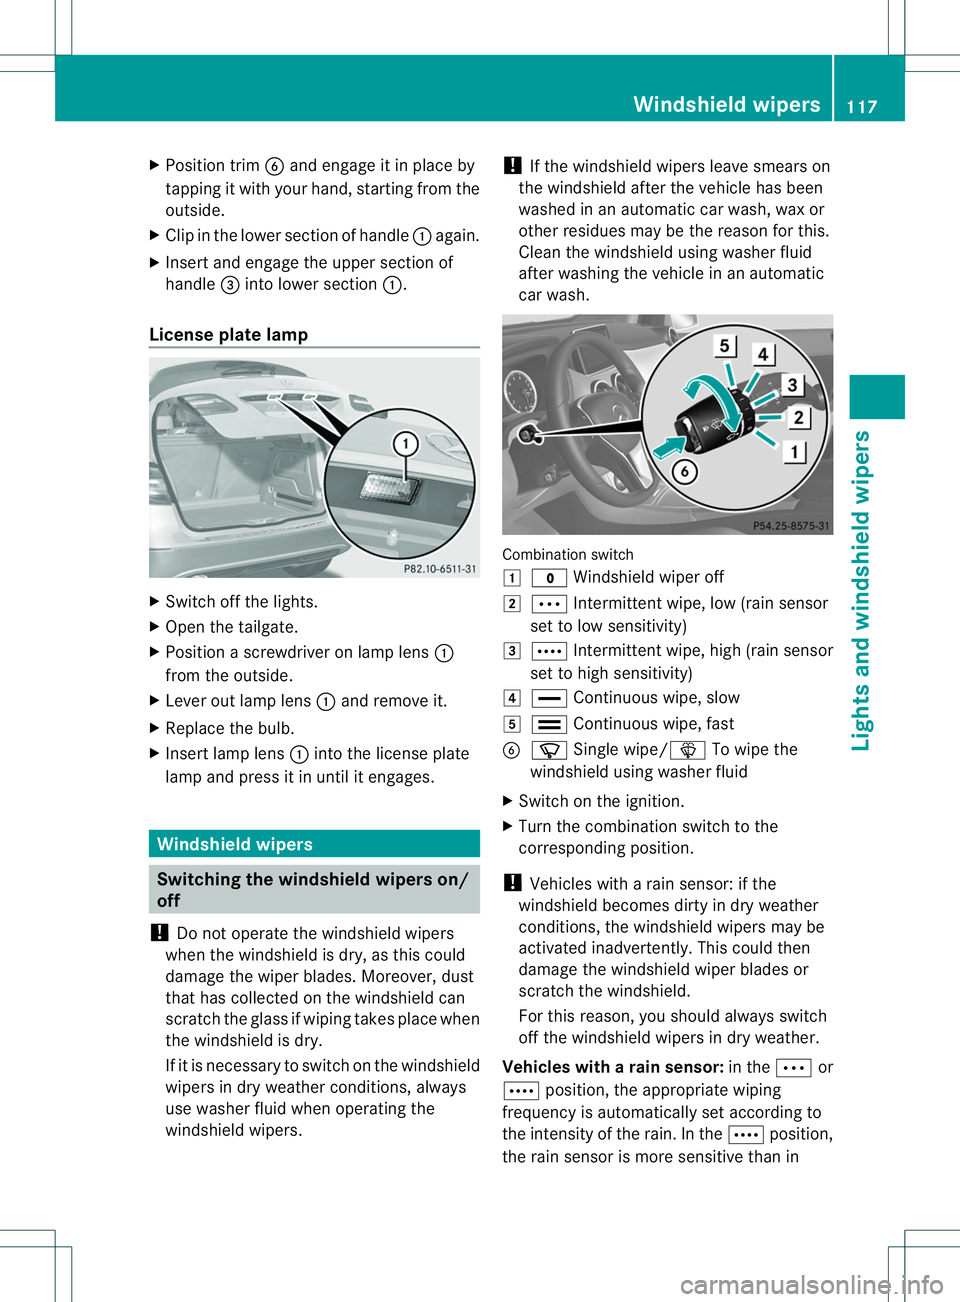
License plat elamp X
Switc hoff the lights.
X Open the tailgate.
X Position ascrewdriver on lamp lens 001A
from the outside.
X Lever out lamp lens 001Aand remove it.
X Replace the bulb.
X Inser tlamp lens 001Aintot he licens eplate
lamp and pres sitinuntil it engages. Windshield wipers
Switching th
ewindshield wiper son/
off
! Do no toperate the windshield wipers
when the windshield is dry, as this could
damage the wiper blades. Moreover ,dust
that has collected on the windshield can
scratch the glass if wiping takes place when
the windshield is dry.
If it is necessary to switc honthe windshield
wipers in dry weather conditions, always
use washer fluid when operatin gthe
windshield wipers. !
If the windshield wipers leave smears on
the windshield after the vehicle has been
washed in an automatic car wash, wax or
other residues may be the reason for this.
Cleant he windshield using washer fluid
after washing the vehicle in an automatic
car wash. Combination switch
000C
0003 Windshield wiper off
0001 0002 Intermittent wipe, low (rain sensor
set to low sensitivity)
0002 0001 Intermittent wipe, high (rain sensor
set to high sensitivity)
001F 000B Continuous wipe, slow
0011 0008 Continuous wipe, fast
0024 0002 Single wipe/0003 To wipe the
windshield using washer fluid
X Switch on the ignition.
X Turn the combination switch to the
corresponding position.
! Vehicles with arain sensor: if the
windshield becomes dirty in dry weather
conditions, the windshield wipers may be
activated inadvertently. This could then
damage the windshield wiper blades or
scratcht he windshield.
For this reason, you should always switch
off the windshield wipers in dry weather.
Vehicles with arain sensor: in the0002or
0001 position, the appropriate wiping
frequency is automatically set according to
the intensity of the rain. In the 0001position,
the rai nsensor is more sensitive than in Windshield wipers
117Lights and windshield wipers Z
Page 120 of 360
the
0002 position, causing the windshield
wipers to wipe mor efrequently.
If the wipe rblades are worn ,the windshield
will no longer be wiped properly. This could
prevent you fro mobservin gthe traffic
conditions. Replace the wiper blades twic ea
year, ideally in sprin gand fall. Switching th
erearw indow wiper on/
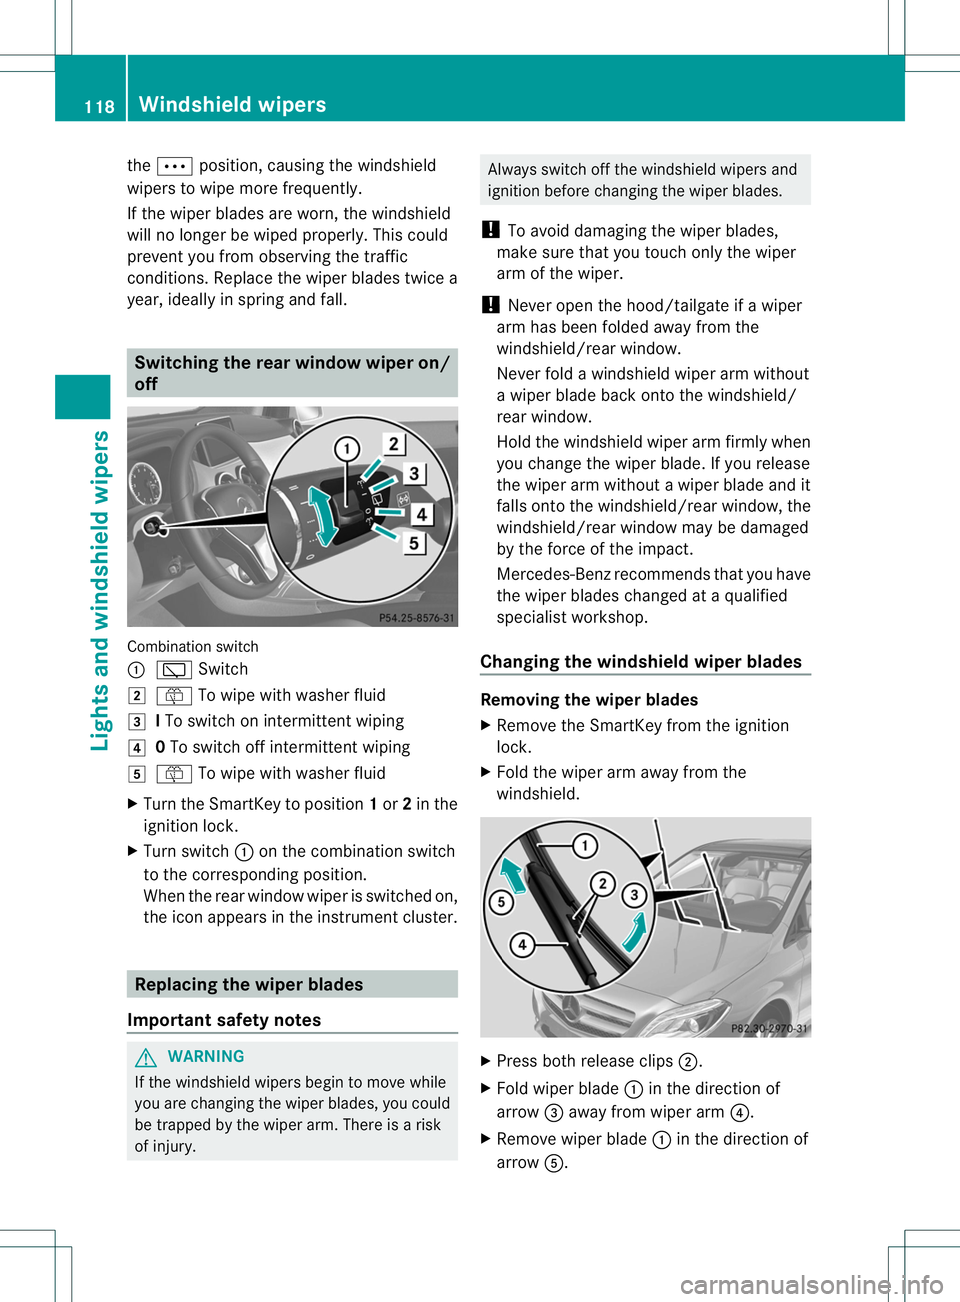
off Combination switch
001A
001B Switch
0001 0018 To wipe with washer fluid
0002 ITo switc honintermitten twiping
001F 0To switc hoff intermitten twiping
0011 0018 To wipe with washer fluid
X Turn the SmartKey to position 1or 2in the
ignition lock.
X Turn switch 001Aon the combination switch
to the correspondin gposition.
When the rear window wiper is switched on,
the icon appears in the instrumen tcluster. Replacing th
ewiper blades
Important safety notes G
WARNING
If the windshield wipers begin to mov ewhile
you are changing the wiper blades, you could
be trapped by the wiper arm. There is arisk
of injury. Always switc
hoff the windshield wipers and
ignition befor echanging the wiper blades.
! To avoid damagin gthe wiper blades,
mak esure that you touc honly the wiper
ar moft he wiper.
! Never open the hood/tailgate if awiper
arm has been folded away from the
windshield/rear window.
Never fold awindshield wiper arm without
aw iper blade back onto the windshield/
rear window.
Hold the windshield wiper arm firmly when
you change the wiper blade. If you release
the wiper arm without awiper blade and it
falls onto the windshield/rear window, the
windshield/rear window may be damaged
by the force of the impact.
Mercedes-Ben zrecommends that you have
the wiper blades changed at aqualified
specialist workshop.
Changing th ewindshield wiper blades Removing th
ewiper blades
X Remove th eSmartKey from th eignition
lock.
X Fold th ewiper arm away from the
windshield. X
Press bot hrelease clips 0010.
X Fold wiper blade 001Ain th edirection of
arrow 0023away from wiper arm 0021.
X Remove wiper blade 001Ain th edirection of
arrow 001E. 118
Windshiel
dwipersLight sand windshield wipers
Page 131 of 360
Setting the air distribution
Automatic climate control Air distribution settings
0002
Directsa ir through the defroster vents
0018 Directsa ir through the center and side
air vents
000B Directsa ir through the footwell air
vents
i You can also activate several air
distribution settings simultaneously. To do
this, press multiple air distribution buttons.
The air is then directed through various
vents.
Setting the air distribution
X Turn the SmartKey to position 2in the
ignition lock (Y page 137).
X Press one or more of the 0018,000B,
0002 buttons.
The corresponding indicator lamp lights up
briefly.
Dual-zone automatic climate control Air distribution settings
0002
Directsa ir through the defroster vents
0018 Directsair through the center and side
air vents
000B Directsair through the footwell air
vents
0013 Directsair through the defroster,
center and side air vents
0009 Directsair through the defroster and
footwell vents
i Regardless of the air distribution setting,
airflow is always directed through the side
air vents. The side air ventsc an only be
closed if the adjusters are turned clockwise
until they engage. Setting the air distribution
X
Turn the SmartKey to position 2in the
ignition lock (Y page 137).
X Press the 000For0017 button repeatedly
until the desired symbol appears in the
display. Setting the airflow
Automatic climate control X
Turn the SmartKey to position 2in the
ignition lock (Y page 137).
X To increase/reduce: turn control001E
clockwise or counter-clockwise
(Y page 123).
Dual-zone automatic climate control X
Turn the SmartKey to position 2in the
ignition lock (Y page 137).
X To increase/reduce: press the0004or
000E button. Switching the ZONE function on/off
This function is only available with dual-zone
automatic climate control.
X To activate: press the000Dbutton.
The indicator lamp in the 000Dbutton lights
up.
The temperature setting for the driver's
side is not adopted for the front-passenger
side.
X To deactivate: press the000Dbutton.
The indicator lamp in the 000Dbutton goes
out.
The temperature setting for the driver's
side is adopted for the front-passenger
side. Operating the climate control systems
129Climate control