2014 MAZDA MODEL CX-5 AUX
[x] Cancel search: AUXPage 5 of 42

4
www.MazdaUSA.com
Emergency Engine Start
If the engine cannot be started
due to a dead key battery:
1 Push the brake pedal (A / T)
or the clutch pedal (M/ T).
2 While the indicator light
flashes GREEN , touch
the START/STOP button
using the back side of the
transmitter (as shown).
3
After the GREEN indicator
light illuminates constantly,
push the START/STOP
button with your finger
to start the engine.
Transmitter
Emergency Engine Stop:
Pushing and holding the
START/STOP button or repeatedly
pushing the button while the engine
is running will turn the engine OFF.
Use only in case of an emergency.
Emergency Vehicle Entry:
If the key cannot be used due to
a malfunction or dead key battery,
use the auxiliary key (below) to
lock or unlock the doors.
Auxiliary Key Release
Auxiliary KeyKey (Rear)
START/STOP b utton
Indicator Light
Key
Page 28 of 42
27
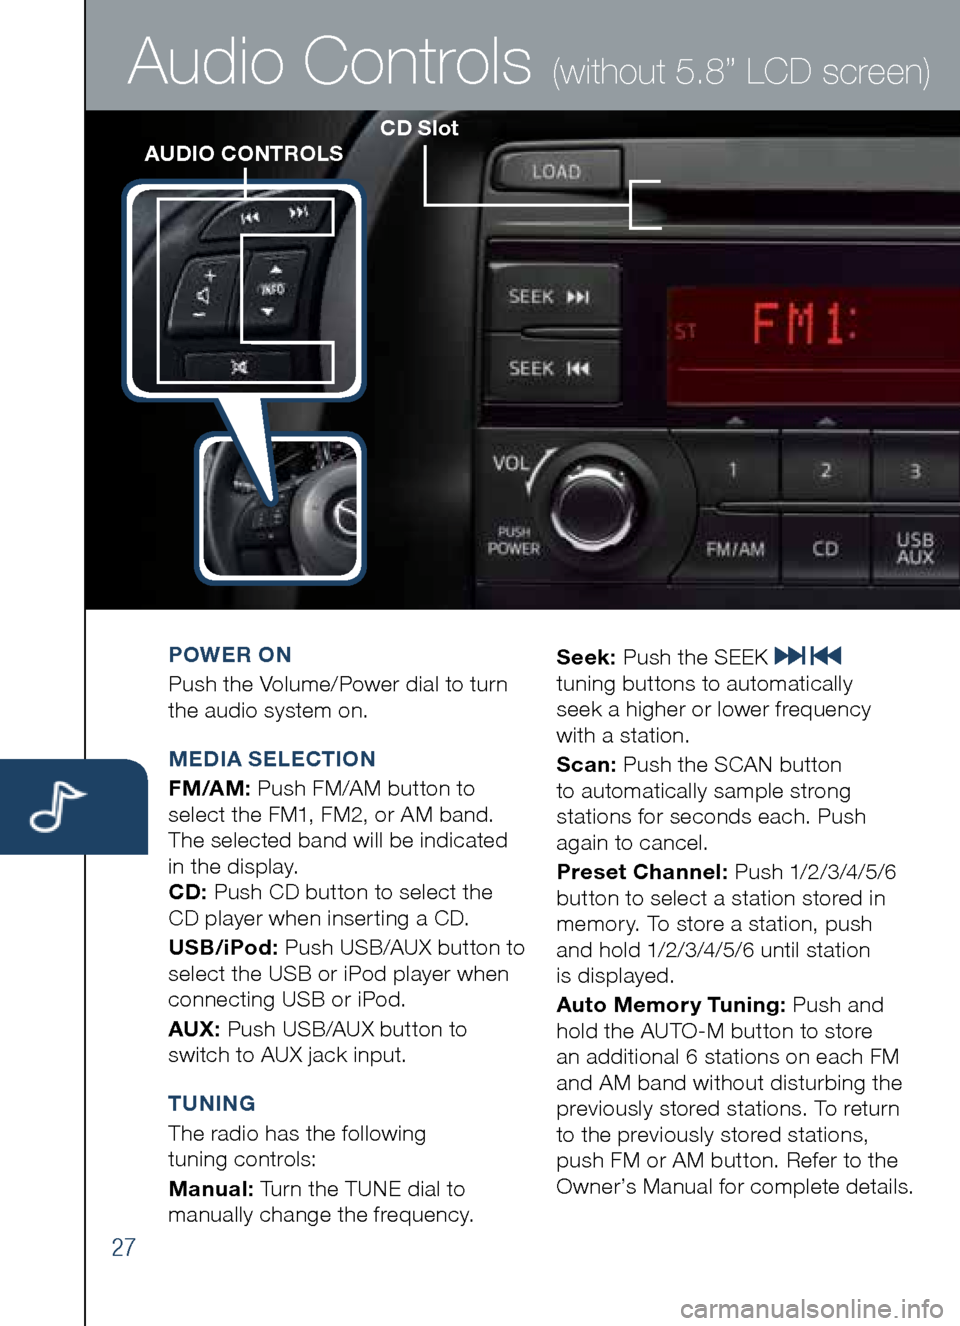
CD SlotAUDIO CONTROLS
Audio Controls (without 5.8” LCD screen)
POWER ON
Push the Volume/Power dial to turn
the audio system on.
M EDIA SELECTION
FM/AM: Push FM/AM button to
select the FM1, FM2, or AM band.
The selected band will be indicated
in the display.
CD: Push CD button to select the
CD player when inserting a CD.
US b/iPod: Push USB/AUX button to
select the USB or iPod player when
connecting USB or iPod.
AUX: Push USB/AUX button to
switch to AUX jack input.
T UNING
The radio has the following
tuning controls:
M anual: Turn the TUNE dial to
manually change the frequency. S
eek: Push the SEEK
tuning buttons to automatically
seek a higher or lower frequency
with a station.
S can: Push the SCAN button
to automatically sample strong
stations for seconds each. Push
again to cancel.
Preset Channel: Push 1/2/3/4/5/6
button to select a station stored in
memory. To store a station, push
and hold 1/2/3/4/5/6 until station
is displayed.
Auto Memory Tuning: Push and
hold the AUTO-M button to store
an additional 6 stations on each FM
and AM band without disturbing the
previously stored stations. To return
to the previously stored stations,
push FM or AM button. Refer to the
Owner’s Manual for complete details.
Page 30 of 42
29
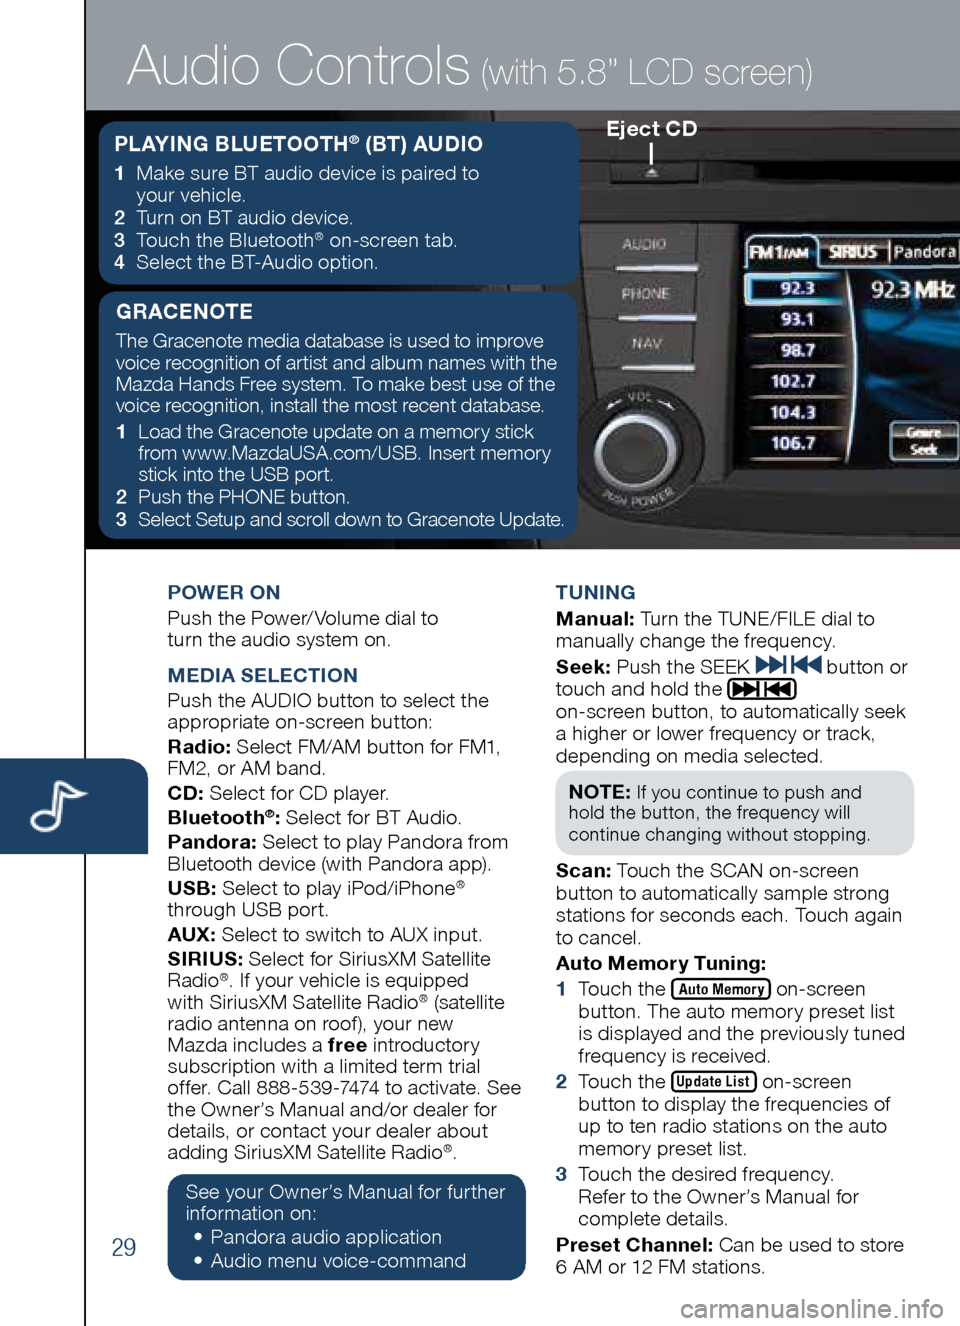
POWER ON
Push the Power/ Volume dial to
turn the audio system on.
M EDIA SELECTION
Push the AUDIO button to select the
appropriate on-screen button:
Radio: Select FM/AM button for FM1,
FM2, or AM band.
CD: Select for CD player.
b luetooth
®: Select for BT Audio.
Pandora: Select to play Pandora from
Bluetooth device (with Pandora app).
US b: Select to play iPod/iPhone
®
through USB port.
AUX: Select to switch to AUX input.
SIRIUS: Select for SiriusXM Satellite
Radio
®. If your vehicle is equipped
with SiriusXM Satellite Radio® (satellite
radio antenna on roof ), your new
Mazda includes a free introductory
subscription with a limited term trial
offer. Call 888-539-7474 to activate. See
the Owner’s Manual and/or dealer for
details, or contact your dealer about
adding SiriusXM Satellite Radio
®.
See your Owner’s Manual for further
information on:
• Pandora audio application
•
Audio me nu voice-command T
UNING
M anual: Turn the TUNE/FILE dial to
manually change the frequency.
S eek: Push the SEEK
button or
touch and hold the
on-screen button, to automatically seek
a higher or lower frequency or track,
depending on media selected.
NOTE:
If you continue to push and
hold the button, the frequency will
continue changing without stopping.
S can: Touch the SCAN on-screen
button to automatically sample strong
stations for seconds each. Touch again
to cancel.
Auto Memory Tuning:
1 Touch the
Auto Memory on-screen
button. The auto memory preset list
is displayed and the previously tuned
frequency is received.
2 Touch the
Update List on-screen
button to display the frequencies of
up to ten radio stations on the auto
memory preset list.
3 Touch the desired frequency.
Refer to the Owner’s Manual for
complete details.
Preset Channel: Can be used to store
6 AM or 12 FM stations.
Eject CD
Audio Controls (with 5.8” LCD screen)
PLAYING b LUETOOTH® (bT) AUDIO
1 Make sure BT audio device is paired to
your vehicle.
2
Turn on BT audio device.
3
Touch the Bluetooth
® on-screen tab.
4
Select the BT-Audio option.
GRACENOTE
The Gracenote media database is used to improve
voice recognition of artist and album names with the
Mazda Hands Free system. To make best use of the
voice recognition, install the most recent database.
1 Load the Gracenote update on a memory stick
from www.MazdaUSA.com/USB. Insert memory
stick into the USB port.
2 Push the PHONE button.
3
Select Setup and scroll down to Gracenote Update.
Page 32 of 42
31
Audio
NOTE: You will need an audio cable with an 1/8 inch (3.5 mm) mini stereo plug
(available as a Genuine Mazda accessory) to connect your portable audio player
into the AUX jack.
Refer to the Owner’s Manual for additional information.
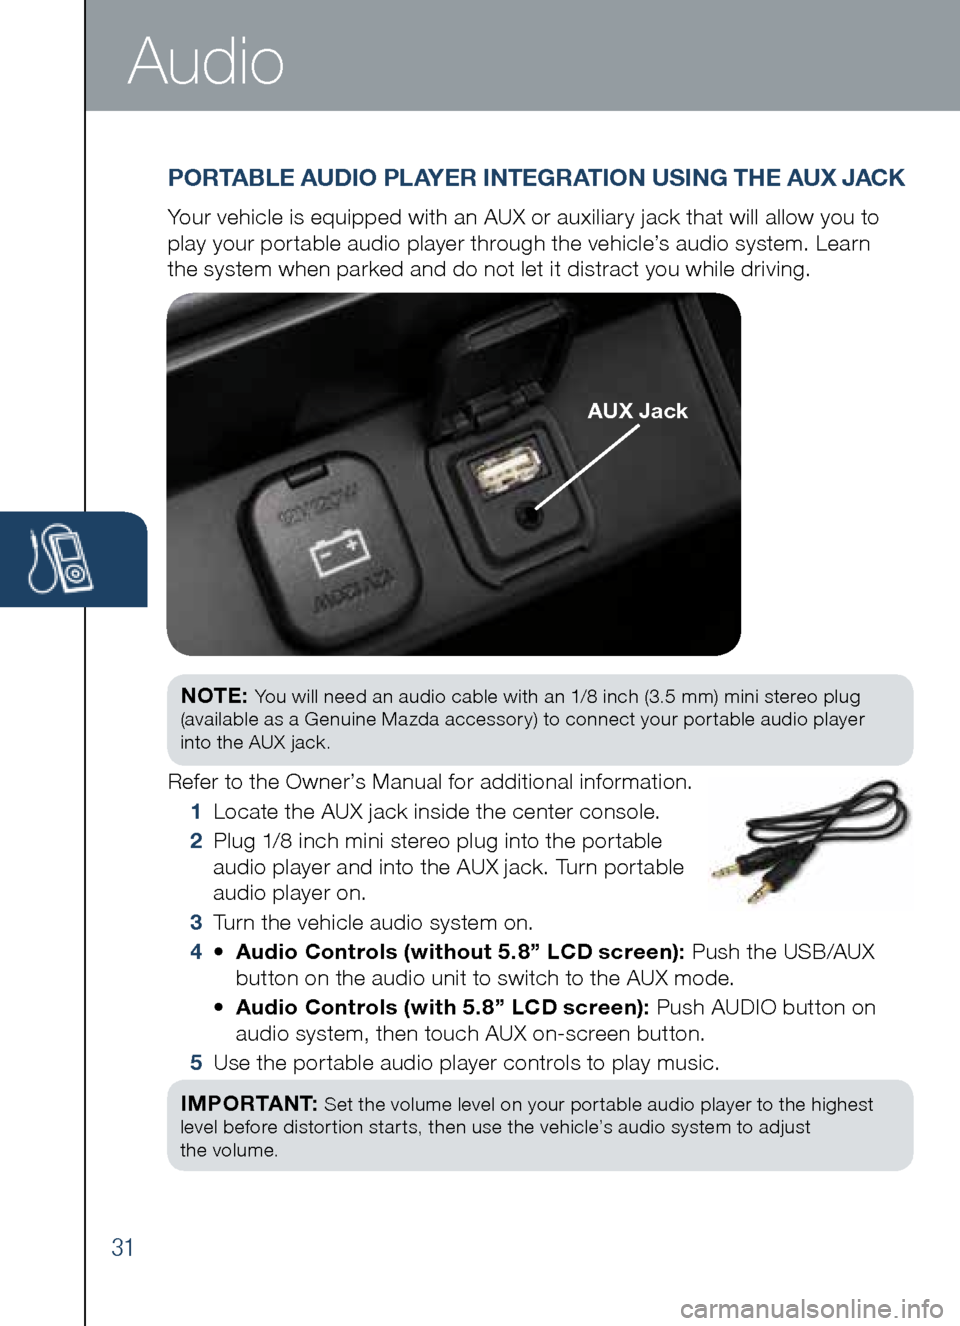
1 Locate the AUX jack inside the center console.
2
Plug 1/8 inch mini stereo plug into the portable
audio player and into the AUX jack. Turn portable
audio player on.
3 Turn the vehicle audio system on.
4 •
Audio Controls (without 5.8” LCD screen): Push the USB/AUX
button on the audio unit to switch to the AUX mode.
•
Audio Controls (with 5.8” LCD screen): Push AUDIO button on
audio system, then touch AUX on-screen button.
5 Use the portable audio player controls to play music.
I M P O R TA N T:
Set the volume level on your portable audio player to the highest
level before distortion starts, then use the vehicle’s audio system to adjust
the volume.
PORTA bLE AUDIO PLAYER INTEGRATION USING THE AUX JACK
Your vehicle is equipped with an AUX or auxiliary jack that will allow you to
play your portable audio player through the vehicle’s audio system. Learn
the system when parked and do not let it distract you while driving.
AUX Jack
Page 33 of 42
32
www.MazdaUSA.com
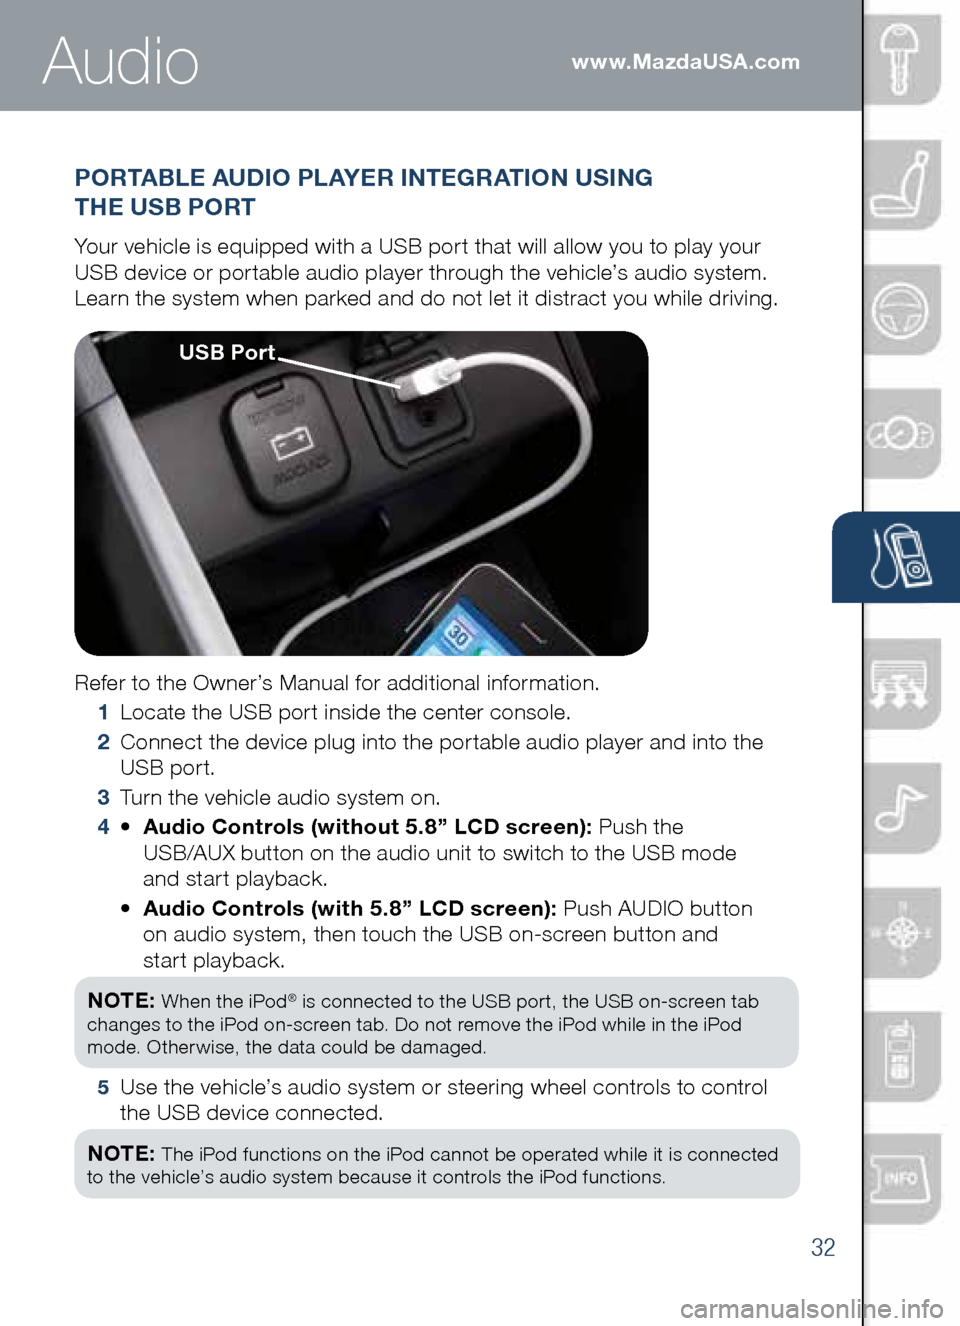
PORTAbLE AUDIO PLAYER INTEGRATION USING
THE US b PORT
Your vehicle is equipped with a USB port that will allow you to play your
USB device or portable audio player through the vehicle’s audio system.
Learn the system when parked and do not let it distract you while driving.
Refer to the Owner’s Manual for additional information.
1 Locate the USB port inside the center console.
2
Connect the device plug into the portable audio player and into the
USB port.
3 Turn the vehicle audio system on.
4 •
Audio Controls (without 5.8” LCD screen): Push the
USB/AUX button on the audio unit to switch to the USB mode
and start playback.
•
Audio Controls (with 5.8” LCD screen): Push AUDIO button
on audio system, then touch the USB on-screen button and
start playback.
NOTE:
When the iPod® is connected to the USB port, the USB on-screen tab
changes to the iPod on-screen tab. Do not remove the iPod while in the iPod
mode. Otherwise, the data could be damaged.
5
Use the vehicle’s audio system or steering wheel controls to control
the USB device connected.
NOTE:
The iPod functions on the iPod cannot be operated while it is connected
to the vehicle’s audio system because it controls the iPod functions.
Audio
US b Port
Page 40 of 42
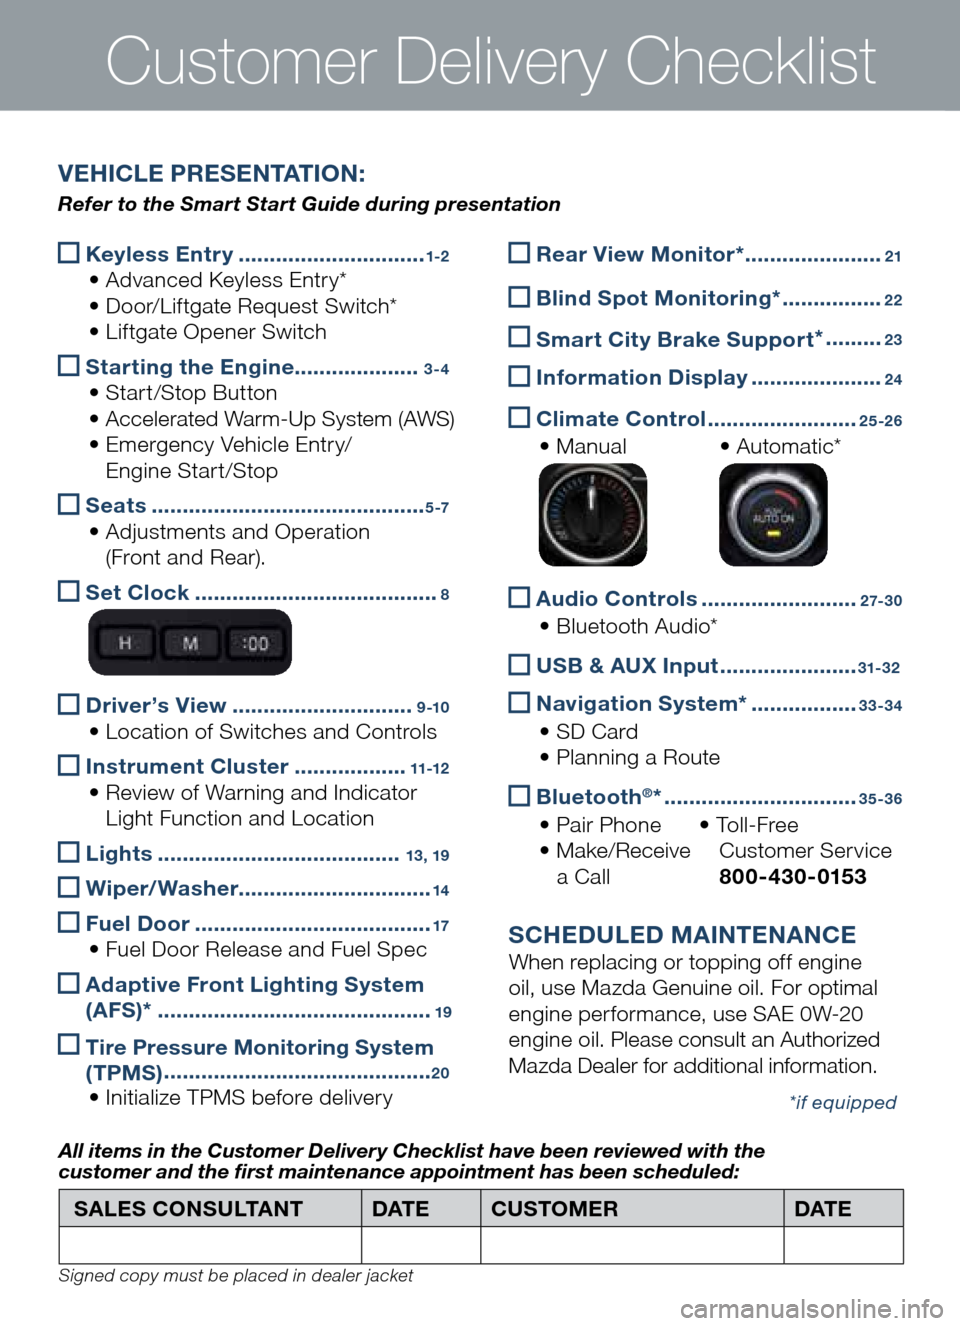
Keyless Entry
..............................1-2
• Advanced Keyless Entry*
• Door/Liftgate Request Switch*
• Liftgate Opener Switch
Starting the Engine
....................3-4
• Start/Stop Button
• Accelerated Warm-Up System (AWS)
• Emergency Vehicle Entry/
Engine Start/Stop
Seats
............................................5 -7
• Adjustments and Operation
(Front and Rear).
Set Clock
.......................................8
Driver’s View
.............................9 -10
• Location of Switches and Controls
Instrument Cluster
..................11-12
• Review of Warning and Indicator
Light Function and Location
Lights
.......................................13, 19
Wiper/Washer
...............................14
Fuel Door
......................................17
• Fuel Door Release and Fuel Spec
Adaptive Front Lighting System
(AFS)*
............................................19
Tire Pressure Monitoring System
(TPMS) ...........................................20
• Initialize TPMS before delivery
Customer Delivery Checklist
Rear View Monitor* ......................21
b
lind Spot Monitoring* ................22
Smart City b rake Support *
.........23
Information Display
.....................24
Climate Control
........................25-26
• Manual • Automatic*
Audio Controls
.........................2 7- 3 0
• Bluetooth Audio*
US
b & AUX Input ......................31-32
Navigation System*
.................33-34
• SD Card
• Planning a Route
b
luetooth®* ...............................35-36
• Pair Phone • To l l - F r e e
• Make/Receive Customer Service
a Call 800-430-0153
SCHEDULED MAINTENANCE
When replacing or topping off engine
oil, use Mazda Genuine oil. For optimal
engine performance, use SAE 0W-20
engine oil. Please consult an Authorized
Mazda Dealer for additional information.
*if equipped
SALES CONSULTANT DAT ECUSTOMER DAT E
All items in the Customer Deliver y Checklist have been reviewed with the
customer and the first maintenance appointment has been scheduled:
Signed copy must be placed in dealer jacket
V EHICLE PRESENTATION :
Refer to the Smart Start Guide during presentation