2014 MAZDA MODEL CX-5 clock
[x] Cancel search: clockPage 304 of 528

Black plate (304,1)
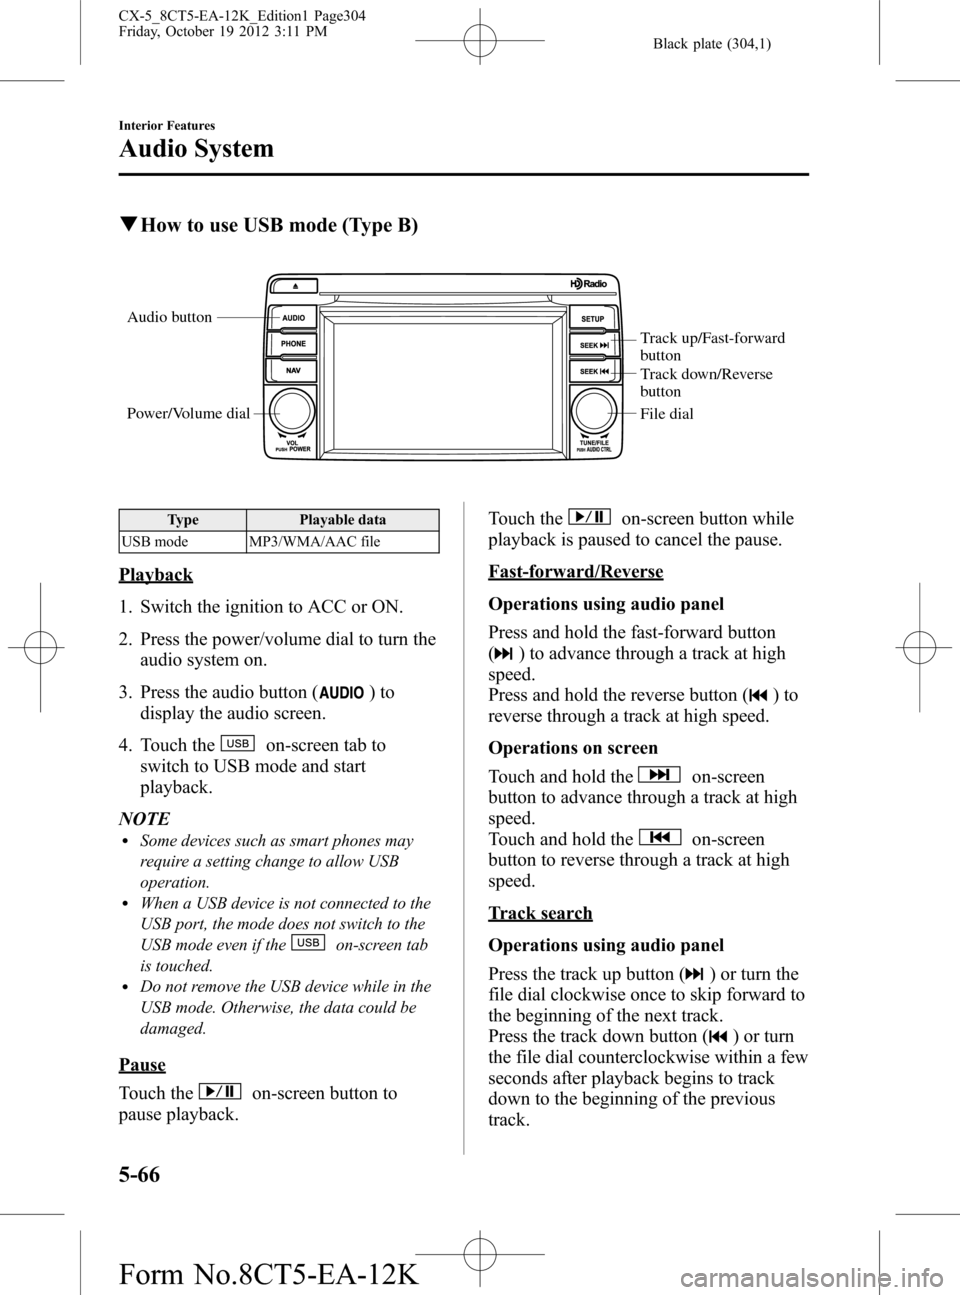
qHow to use USB mode (Type B)
Audio button
Power/Volume dial
Track up/Fast-forward
button
Track down/Reverse
button
File dial
Type Playable data
USB mode MP3/WMA/AAC file
Playback
1. Switch the ignition to ACC or ON.
2. Press the power/volume dial to turn the
audio system on.
3. Press the audio button (
)to
display the audio screen.
4. Touch the
on-screen tab to
switch to USB mode and start
playback.
NOTE
lSome devices such as smart phones may
require a setting change to allow USB
operation.
lWhen a USB device is not connected to the
USB port, the mode does not switch to the
USB mode even if the
on-screen tab
is touched.
lDo not remove the USB device while in the
USB mode. Otherwise, the data could be
damaged.
Pause
Touch the
on-screen button to
pause playback.Touch the
on-screen button while
playback is paused to cancel the pause.
Fast-forward/Reverse
Operations using audio panel
Press and hold the fast-forward button
(
) to advance through a track at high
speed.
Press and hold the reverse button (
)to
reverse through a track at high speed.
Operations on screen
Touch and hold the
on-screen
button to advance through a track at high
speed.
Touch and hold the
on-screen
button to reverse through a track at high
speed.
Track search
Operations using audio panel
Press the track up button (
) or turn the
file dial clockwise once to skip forward to
the beginning of the next track.
Press the track down button (
) or turn
the file dial counterclockwise within a few
seconds after playback begins to track
down to the beginning of the previous
track.
5-66
Interior Features
Audio System
CX-5_8CT5-EA-12K_Edition1 Page304
Friday, October 19 2012 3:11 PM
Form No.8CT5-EA-12K
Page 305 of 528

Black plate (305,1)
Press the track down button () or turn
the file dial counterclockwise after a few
seconds have elapsed to start playback
from the beginning of the current track.
Operations on screen
Touch the
on-screen button once to
skip forward to the beginning of the next
track.
Touch the
on-screen button within
a few seconds after playback begins to
track down to the beginning of the
previous track.
Touch the
on-screen button after a
few seconds have elapsed to start
playback from the beginning of the
current track.
Displaying song list
The song list in the USB device can be
viewed.
NOTE
The song list may not display depending on the
conditions.
(Displaying optional list)
1. Touch the
on-screen button during
playback.
2. Touch the category which you want to
select. The record list or song list is
displayed.
(Displaying a list being played)
Touch the
on-screen button.
NOTE
Press theon-screen button to display the
upper list.
Selecting from list
Select the desired song to play.
1. Press the
on-screen button to select
the song list.2. Touch the song you want to listen to.
NOTE
The selected song list becomes the play list.
Repeat playback
Touch the
on-screen button during
playback.“
”is displayed during
playback.
Touch the
on-screen button two
times while“
”is displayed to cancel.
Shuffle playback
(Shuffling songs in list being played)
Touch the
on-screen button during
playback.“
”is displayed during
playback.
Touch the
on-screen button two
times while“
”is displayed to cancel.
(Shuffling album in list being played)
Touch the
on-screen button two
times during playback.“
”is displayed
during playback.
Touch the
on-screen button while
“
”is displayed to cancel.
Text scroll
If a whole title cannot be displayed at one
time, touch the
on-screen button on
the right side of each title. When the last
character is displayed, touch the
on-
screen button to display the first character
of the title.
Interior Features
Audio System
5-67
CX-5_8CT5-EA-12K_Edition1 Page305
Friday, October 19 2012 3:11 PM
Form No.8CT5-EA-12K
Page 308 of 528

Black plate (308,1)
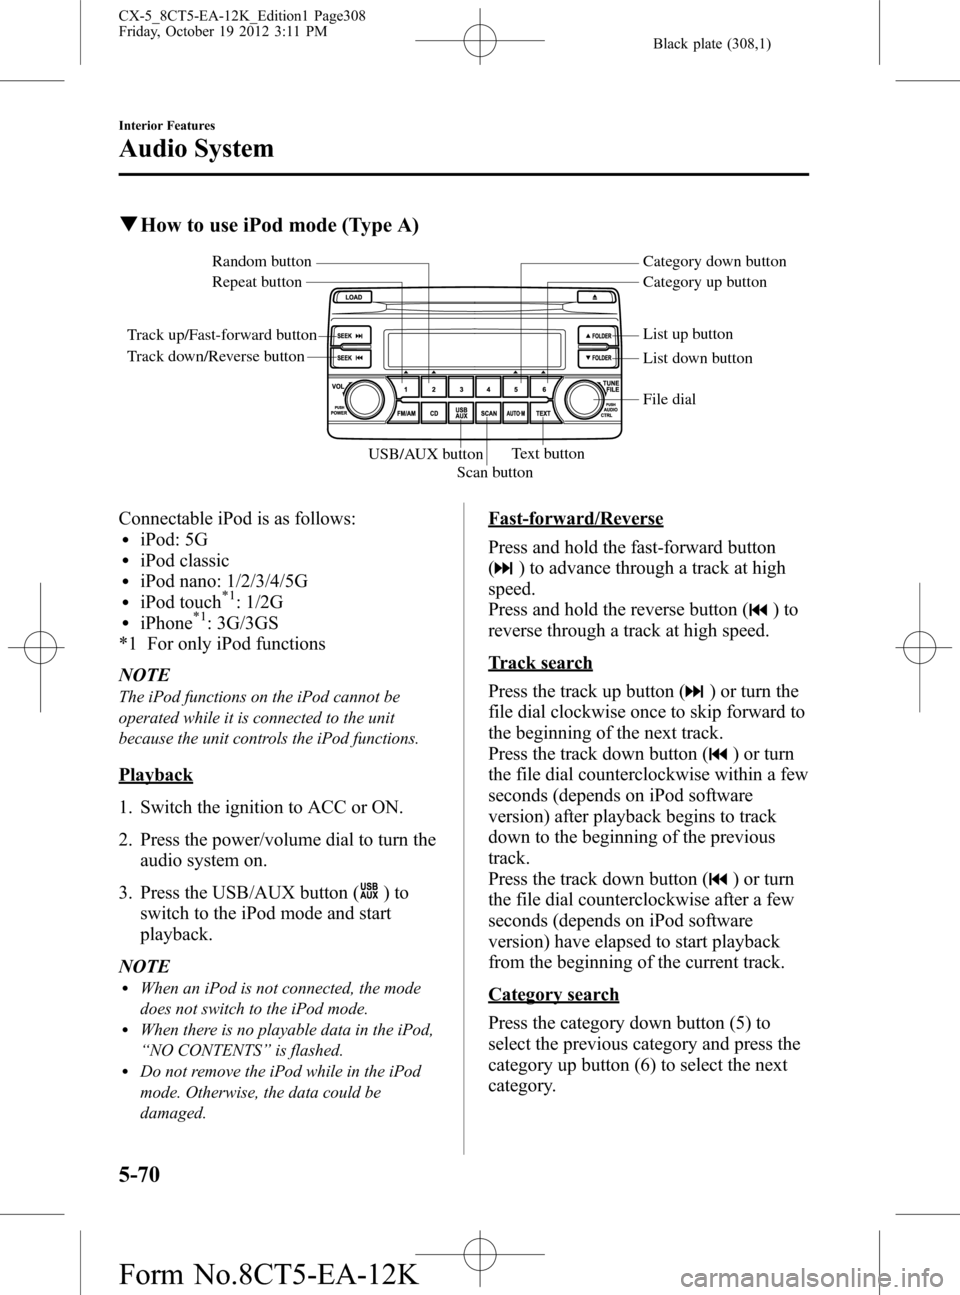
qHow to use iPod mode (Type A)
Track up/Fast-forward button
Track down/Reverse buttonRepeat button Random button Category down button
Category up button
List down button List up button
Text button
Scan button USB/AUX button
File dial
Connectable iPod is as follows:liPod: 5GliPod classicliPod nano: 1/2/3/4/5GliPod touch*1: 1/2GliPhone*1: 3G/3GS
*1 For only iPod functions
NOTE
The iPod functions on the iPod cannot be
operated while it is connected to the unit
because the unit controls the iPod functions.
Playback
1. Switch the ignition to ACC or ON.
2. Press the power/volume dial to turn the
audio system on.
3. Press the USB/AUX button (
)to
switch to the iPod mode and start
playback.
NOTE
lWhen an iPod is not connected, the mode
does not switch to the iPod mode.
lWhen there is no playable data in the iPod,
“NO CONTENTS”is flashed.
lDo not remove the iPod while in the iPod
mode. Otherwise, the data could be
damaged.
Fast-forward/Reverse
Press and hold the fast-forward button
(
) to advance through a track at high
speed.
Press and hold the reverse button (
)to
reverse through a track at high speed.
Track search
Press the track up button (
) or turn the
file dial clockwise once to skip forward to
the beginning of the next track.
Press the track down button (
) or turn
the file dial counterclockwise within a few
seconds (depends on iPod software
version) after playback begins to track
down to the beginning of the previous
track.
Press the track down button (
) or turn
the file dial counterclockwise after a few
seconds (depends on iPod software
version) have elapsed to start playback
from the beginning of the current track.
Category search
Press the category down button (5) to
select the previous category and press the
category up button (6) to select the next
category.
5-70
Interior Features
Audio System
CX-5_8CT5-EA-12K_Edition1 Page308
Friday, October 19 2012 3:11 PM
Form No.8CT5-EA-12K
Page 313 of 528

Black plate (313,1)
Track search
Operations using audio panel
Press the track up button (
) or turn the
file dial clockwise once to skip forward to
the beginning of the next track.
Press the track down button (
) or turn
the file dial counterclockwise within a few
seconds (depends on iPod software
version) after playback begins to track
down to the beginning of the previous
track.
Press the track down button (
) or turn
the file dial counterclockwise after a few
seconds (depends on iPod software
version) have elapsed to start playback
from the beginning of the current track.
Operations on screen
Touch the
on-screen button once to
skip forward to the beginning of the next
track.
Touch the
on-screen button within
a few seconds (depends on iPod software
version) after playback begins to track
down to the beginning of the previous
track.
Touch the
on-screen button after a
few seconds (depends on iPod software
version) have elapsed to start playback
from the beginning of the current track.
Displaying song list
The song list in the iPod can be viewed.
NOTE
The song list may not display depending on the
conditions.
(Displaying optional list)
1. Touch the
on-screen button during
playback.2. Touch the category which you want to
select. The record list or song list is
displayed.
(Displaying a list being played)
Touch the
on-screen button.
NOTE
Press theon-screen button to display the
upper list.
Selecting from list
Select the desired song to play.
1. Press the
on-screen button to select
the song list.
2. Touch the song you want to listen to.
NOTE
The selected song list becomes the play list.
Repeat playback
Touch the
on-screen button during
playback.“
”is displayed during
playback.
Touch the
on-screen button two
times while“
”is displayed to cancel.
Shuffle playback
(Shuffling songs in list being played)
Touch the
on-screen button during
playback.“
”is displayed during
playback.
Touch the
on-screen button two
times while“
”is displayed to cancel.
(Shuffling album in list being played)
Touch the
on-screen button two
times during playback.“
”is displayed
during playback.
Touch the
on-screen button while
“
”is displayed to cancel.
Interior Features
Audio System
5-75
CX-5_8CT5-EA-12K_Edition1 Page313
Friday, October 19 2012 3:11 PM
Form No.8CT5-EA-12K
Page 351 of 528

Black plate (351,1)
Clock
The time is displayed when the ignition is
switched to ACC or ON.
With Fully Automatic Type Climate
Control System
Clock
With Manual Type Climate Control
System
Clock
Time setting
1. Switch the ignition ACC or ON.
2. Adjust the time using the time setting
buttons (
,).
The hours advance while the time
setting button (
) is pressed.
The minutes advance while the time
setting button (
) is pressed.
Time resetting
1. Switch the ignition to ACC or ON.
2. Press the :00 button.
3. When the button is pressed, the time
will be reset as follows:
(Example)
12:01―12:29→12:00
12:30―12:59→1:00
NOTE
When the :00 button is pressed, the seconds
will start at“00”.
Interior Features
Interior Equipment
5-113
CX-5_8CT5-EA-12K_Edition1 Page351
Friday, October 19 2012 3:12 PM
Form No.8CT5-EA-12K
Page 401 of 528

Black plate (401,1)
Low-beam bulbs
High-beam bulbs/Daytime running
lights
6. Install the new bulb in the reverse order
of the removal procedure.
Front turn signal lights/Parking lights
(Front side-marker lights)
1. Make sure the ignition is switched off,
and the headlight switch is off.
2. If you are changing the right bulb, start
the engine, turn the steering wheel all
the way to the right, and turn off
engine. If you are changing the left
bulb, turn the steering wheel to the left.3. Pull the center of each plastic retainer
and remove the retainers.
InstallationRemoval
4. Turn the screw counterclockwise and
remove it, and then partially peel back
the mudguard.
5. Turn the socket and bulb assembly
counterclockwise and remove it.
Maintenance and Care
Owner Maintenance
6-43
CX-5_8CT5-EA-12K_Edition1 Page401
Friday, October 19 2012 3:12 PM
Form No.8CT5-EA-12K
Page 402 of 528

Black plate (402,1)
6. Disconnect the bulb from the socket.
7. Install the new bulb in the reverse order
of the removal procedure.
Fog lightsí
1. Make sure the ignition is switched off,
and the headlight switch is off.
2. If you are changing the right bulb, start
the engine, turn the steering wheel all
the way to the right, and turn off
engine. If you are changing the left
bulb, turn the steering wheel to the left.
3. Pull the center of each plastic retainer
and remove the retainers.
InstallationRemoval
4. Turn the screw counterclockwise and
remove it, and then partially peel back
the mudguard.
5. Disconnect the connector from the unit
by pressing the tab on the connector
with your finger and pulling the
connector downward.
6-44
Maintenance and Care
íSome models.
Owner Maintenance
CX-5_8CT5-EA-12K_Edition1 Page402
Friday, October 19 2012 3:12 PM
Form No.8CT5-EA-12K
Page 403 of 528

Black plate (403,1)
6. Turn the socket and bulb assembly to
remove it. Carefully remove the bulb
from its socket in the reflector by
gently pulling it straight back out of the
socket.
7. Install the new bulb in the reverse order
of the removal procedure.
Side-turn signal lights
Due to the complexity and difficulty of
the procedure, the LED bulbs must be
replaced by an Authorized Mazda Dealer.
NOTE
LED bulb replacement is not possible because
it is built into the unit. Replace the unit.
Brake lights/Taillights, Rear turn signal
lights, Rear side-marker lights,
Taillights (Liftgate side), Reverse lights
1. Make sure the ignition is switched off,
and the headlight switch is off.
2. Remove the cover with a cloth-
wrapped flathead screwdriver to the
cover.Brake lights/Taillights, Rear turn signal
lights, Rear side-marker lights
Taillights (Liftgate side), Reverse lights
3. Turn the socket and bulb assembly
counterclockwise and remove it.
4. Disconnect the bulb from the socket.
Maintenance and Care
Owner Maintenance
6-45
CX-5_8CT5-EA-12K_Edition1 Page403
Friday, October 19 2012 3:12 PM
Form No.8CT5-EA-12K