2014 MAZDA MODEL 3 HATCHBACK change time
[x] Cancel search: change timePage 22 of 46

21
Blind Spot Monitoring System
BLIND SPOT MONITORING (BSM) (if equipped)
The BSM system is designed to assist the driver by monitoring blind spots
on both sides of the vehicle to the rear in certain situations such as when
changing lanes on roads and freeways.
Turning BSM System Off
Turning the BSM system off will turn off both the light
and sound indicators. To manually turn the BSM
system off, push the BSM OFF switch on the dash.
The BSM OFF indicator in the instrument cluster will
turn on to indicate when the BSM system is off. The
BSM system will automatically turn on the next time the vehicle is started.
• If your vehicle speed is 7 mph (11 km/h) or more, the BSM will warn
you of vehicles in the detection area by illuminating the BSM warning
lights located on the left and right door mirrors.
• If you operate a turn signal in the direction of an illuminated BSM warning
light, the system will also warn you with a beep and warning light flash.
• BSM sensors are located under the left and right rear bumper areas.
The BSM system may not operate properly if the rear bumper gets dirty,
so keep the rear bumper area clean and free of bumper stickers.
Your Vehicle
Detection Areas
Refer to your
Owner’s Manual
for complete
details.
NOTE: • The BSM can assist the driver in confirming the safety of the surroundings,
but is not a complete substitute.
• The driver is responsible for ensuring safe lane changes and other maneuvers.
• Always pay attention to the direction in which the vehicle is traveling and the
vehicle’s surroundings.
• The BSM does not operate when the vehicle speed is lower than about
7 mph (11 km/h).
WARNING: BSM is only a supplementary system to help aid in monitoring blind
spots , however BSM has limitations. The system may not detect all vehicles,
especially a motorcycle. Do not rely solely on the BSM . Relying solely on the BSM
may cause an unexpected accident resulting in death or serious injury. Make sure to
look over your shoulder before changing lanes.
1669736_15_Mazda3_SSG_041514.indd 214/15/14 2:17 PM
Page 24 of 46

23
NOTE: The DRL (Daytime Running Lights) automatically turn on when the ignition
is switched ON. To disable/enable this feature see your Authorized Mazda Dealer.
NOTE: • You can adjust the timing of the Auto Headlights OFF and the sensitivity of the
Auto Light Control.
HEADLIGHT LEVELING ( without AFS)
Adjust headlight angle with headlight leveling
switch depending on vehicle passengers
and load (example: Driver only = 0,
Driver + Passengers = 1 or 2, etc.). Refer to
your Owner’s Manual for complete details.
Lights
LIGHTING CONTROL/TURN SIGNAL LEVER
: Turns tail,
parking, and
dashboard
lights on.
Pull
to Flash
High Beams
Push for
High Beams
AUTO: The light
sensor automatically
determines when to turn
the headlights on or off.: Turns fog lights
on only when
headlights are on.
Three-Flash Turn Signal: To signal
a lane change, push the turn signal lever
up or down halfway and release. The turn
signal indicator will flash three times.
: Turns tail, parking,
dashboard, and headlights on.
1669736_15_Mazda3_SSG_041514.indd 234/15/14 2:17 PM
Page 30 of 46

29
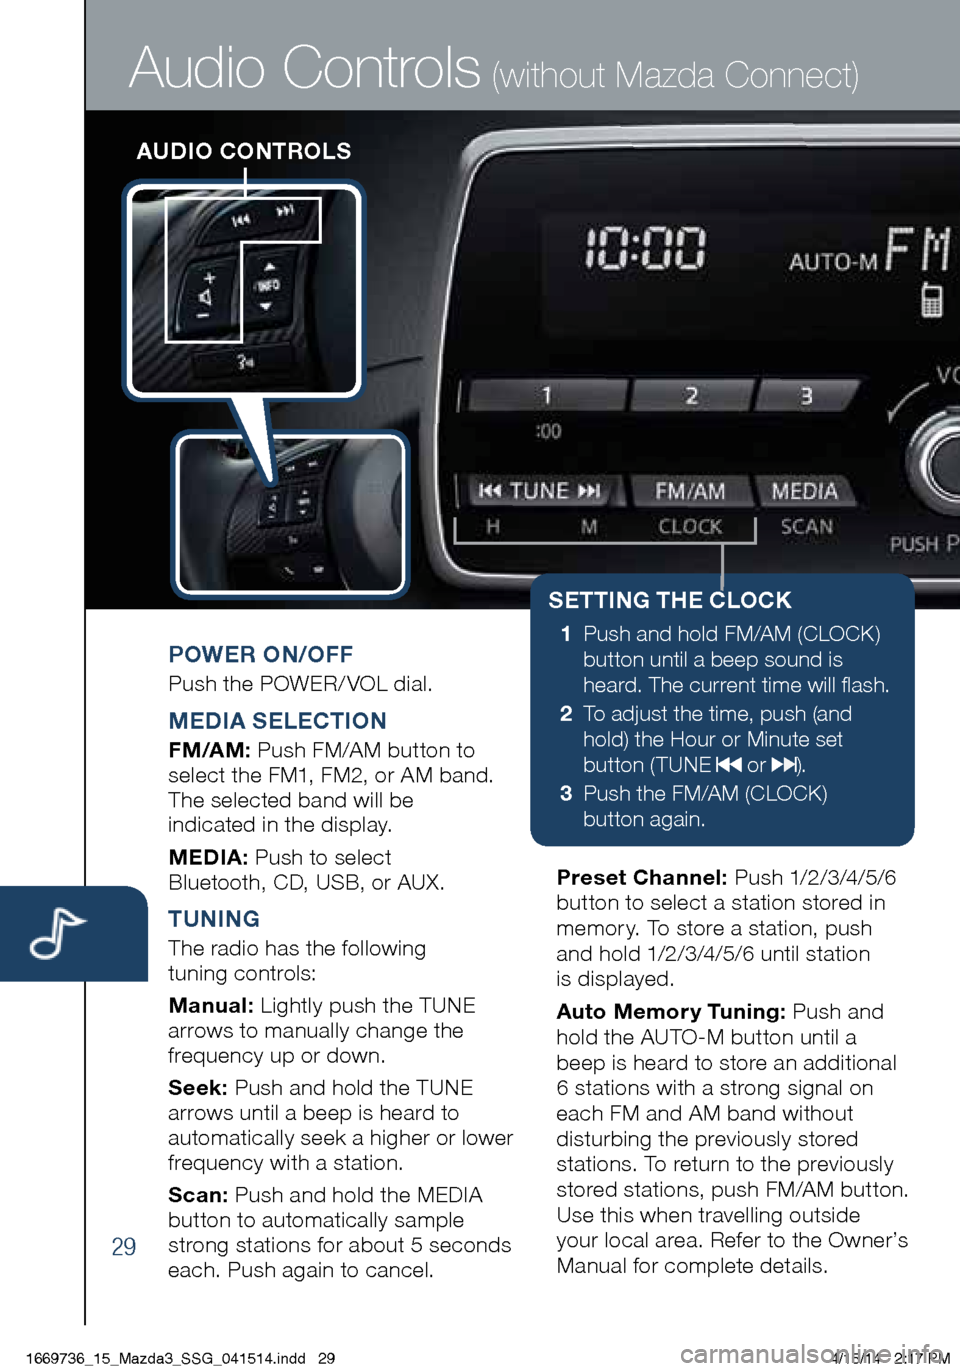
AUDIO CONTROLS
Audio Controls (without Mazda Connect)
POWER ON/OFF
Push the POWER/ VOL dial.
MEDIA SELECTION
FM/AM: Push FM/AM button to
select the FM1, FM2, or AM band.
The selected band will be
indicated in the display.
MEDIA: Push to select
Bluetooth, CD, USB, or AUX.
TUNING
The radio has the following
tuning controls:
Manual: Lightly push the TUNE
arrows to manually change the
frequency up or down.
Seek: Push and hold the TUNE
arrows until a beep is heard to
automatically seek a higher or lower
frequency with a station.
Scan: Push and hold the MEDIA
button to automatically sample
strong stations for about 5 seconds
each. Push again to cancel. Preset Channel:
P u s h 1/2 /3 /4 /5 /6
button to select a station stored in
memory. To store a station, push
and hold 1/2/3/4/5/6 until station
is displayed.
Auto Memory Tuning: Push and
hold the AUTO-M button until a
beep is heard to store an additional
6 stations with a strong signal on
each FM and AM band without
disturbing the previously stored
stations. To return to the previously
stored stations, push FM/AM button.
Use this when travelling outside
your local area. Refer to the Owner’s
Manual for complete details.
SETTING THE CLOCK
1 Push and hold FM/AM (CLOCK)
button until a beep sound is
heard. The current time will flash.
2 To adjust the time, push (and
hold) the Hour or Minute set
button ( TUNE
or ).
3 Push the FM/AM (CLOCK)
button again.
1669736_15_Mazda3_SSG_041514.indd 294/15/14 2:17 PM
Page 31 of 46

30
Audio Controls (without Mazda Connect)
FOLDER SEARCH
(during MP3/WMA/AAC
CD or USB playback)
• To change to the previous
folder, push the folder down
button
, or push the folder
up button to advance to the
next folder.
LOADING A CD
• CD player is located just in
front of the transmission gear
selector (if equipped).
• Insert the CD into the slot,
label-side up. The auto
loading mechanism will load
the CD and begin to play it.
MENU: Push the MENU button to
adjust the audio sound, turn audio
operation beep on and off, perform
Bluetooth setup, or change the
clock between 12 and 24 hr times.
NOTE: To use BT audio, make sure
the musical note icon is displayed in the
audio display. Some Bluetooth
® audio
devices need a certain amount of time
before the icon is displayed.
www.MazdaUSA.com
1669736_15_Mazda3_SSG_041514.indd 304/15/14 2:17 PM
Page 33 of 46

32
AUDIO OPERATION
USING VOICE
Audio operation and media selection
can be done using voice. Push the
“TALK” button on the steering wheel, wait for a beep, then say a command in
a clear, natural voice (not too fast or too slow). Some common commands are listed below.
Play (and any of the following):
AM, FM, XM, CD, Bluetooth, Aha, Pandora, Stitcher, USB, AUX
Play or Resume / Pause or
Stop / Next or Previous
Play (and any of the following):
Song, Playlist
Artist
Tune to Station
Tune to Channel Number (XM)
HD RADIO
HD radio has a special
receiver which allows it to
receive digital broadcasts (where available) in addition to the analog broadcasts it already receives. Digital broadcasts have better
sound quality than analog broadcasts as digital
broadcasts provide free,
crystal clear audio.
When the HD radio button is ON (red), there could be a
noticeable difference in sound
quality and volume when a change from digital to analog signals occurs. If the sound
quality and volume becomes noticeably diminished or cuts
off, select the HD button to turn OFF HD radio (not red).
Audio Controls (with Mazda Connect)
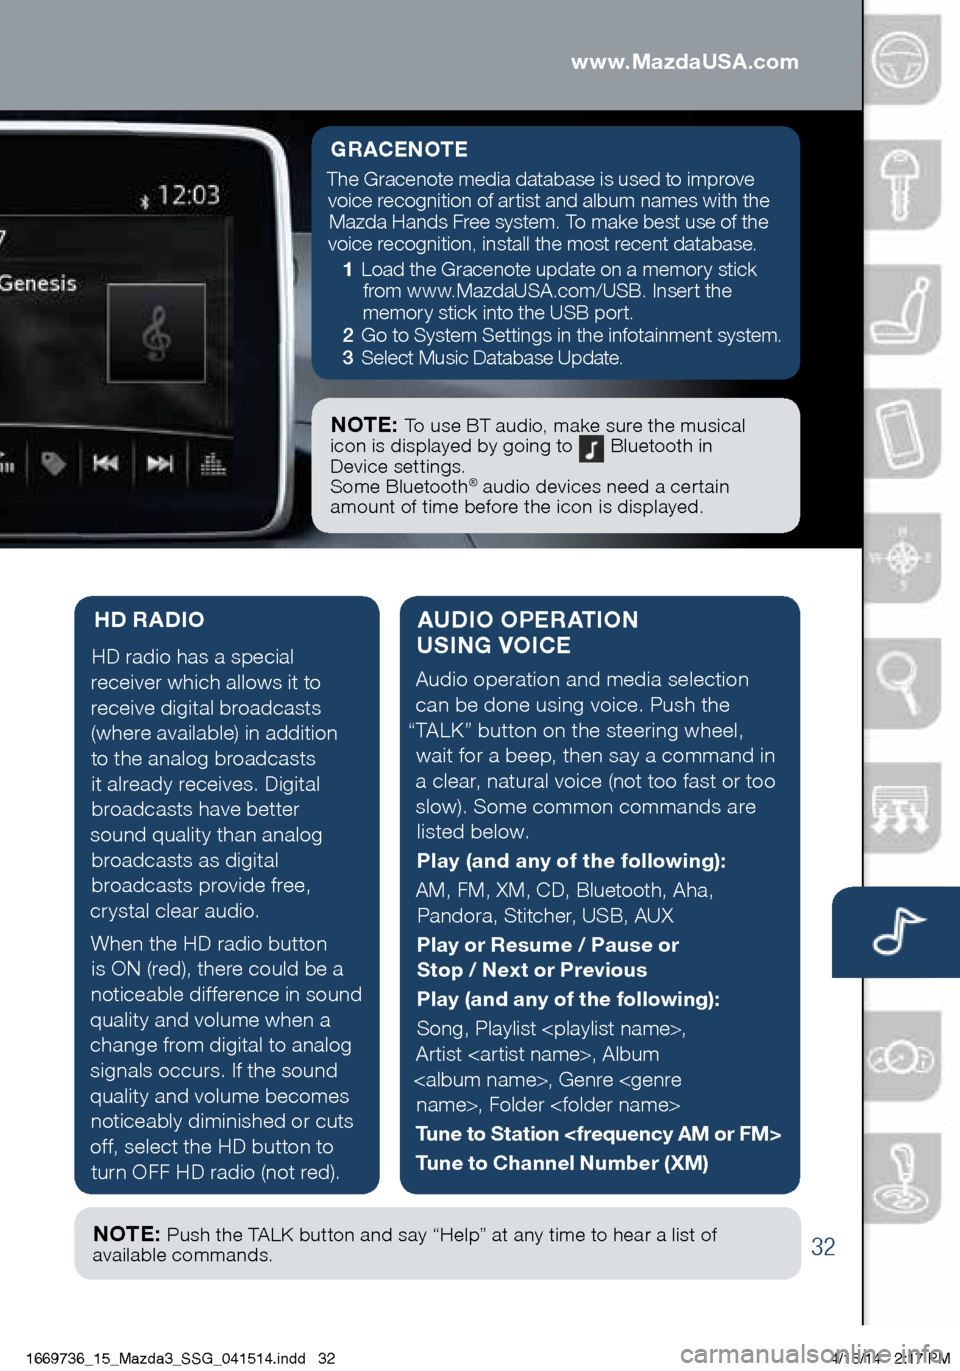
GRACENOTE
The Gracenote media database is used to improve voice recognition of artist and album names with the Mazda Hands Free system. To make best use of the
voice recognition, install the most recent database.
1 Load the Gracenote update on a memory stick
from www.MazdaUSA.com/USB. Insert the
memory stick into the USB port.
2 Go to System Settings in the infotainment system.
3 Select Music Database Update.
NOTE: To use BT audio, make sure the musical
icon is displayed by going to Bluetooth in
Device settings.
Some Bluetooth
® audio devices need a certain
amount of time before the icon is displayed.
NOTE: Push the TALK button and say “Help” at any time to hear a list of
available commands.
www.MazdaUSA.com
1669736_15_Mazda3_SSG_041514.indd 324/15/14 2:17 PM