Page 195 of 506
AVehicle without AdvanceTrac®
with RSC® skidding off its intended
route.
BVehicle with AdvanceTrac® with
RSC® maintaining control on a
slippery surface.
USING ADVANCETRAC® WITH RSC®
The system automatically activates when you start your engine. The
AdvanceTrac® with RSC® system cannot be completely turned off, but
the electronic stability control and roll stability control portions of the
system are disabled when the transmission is in positionR.You can turn
off the traction control portion of the system independently. See the
Traction Controlchapter.
194Stability Control
2014 Navigator(nav)
Owners Guide gf, 1st Printing, June 2013
USA(fus)
Page 197 of 506

Using the Front and Rear Sensing System
Rear Sensing System
The rear sensors are only active when the transmission is in R (Reverse).
As the vehicle moves closer to the obstacle, the rate of the audible
warning increases. When the obstacle is fewer than 10 inches
(25 centimeters) away, the warning sounds continuously. If a stationary
or receding object is detected farther than 10 inches (25 centimeters)
from the side of the vehicle, the tone sounds for only three seconds.
Once the system detects an object approaching, the warning sounds
again.
A. Coverage area of up to 6 feet
(2 meters) from the rear bumper
(with a decreased coverage area at
the outer corners of the bumper).
The system detects certain objects while the transmission is in R
(Reverse):
•and moving toward a stationary object at a speed of 3 mph (5 km/h)
or less.
•but not moving, and a moving object is approaching the rear of the
vehicle at a speed of 3 mph (5 km/h) or less.
•and moving at a speed of less than 3 mph (5 km/h) and a moving
object is approaching the rear of the vehicle at a speed of less than
3 mph (5 km/h).
A
196Parking Aids
2014 Navigator(nav)
Owners Guide gf, 1st Printing, June 2013
USA(fus)
Page 200 of 506

Using the Rear View Camera System
The rear view camera system displays what is behind your vehicle when
you place the transmission in R (Reverse). The system uses two types of
guides to help you see what is behind your vehicle:
1. Fixed guidelines: Show the actual path the vehicle is moving in while
reversing in a straight line, which can be helpful when backing into a
parking space or aligning the vehicle with another object behind the
vehicle.
2. Centerline: Helps align the center of the vehicle with an object (i.e. a
trailer).
Note:If the image comes on while the transmission is not in R
(Reverse), have the system inspected by your authorized dealer.
Note:When towing, the camera only sees what is being towed behind
the vehicle. This might not provide adequate coverage as it usually
provides in normal operation and some objects might not be seen.
In some vehicles, the guidelines may disappear once the trailer tow
connector is engaged.
Note:The default setting for the camera delay is off. Press the Settings
button found on the navigation screen (if equipped) to set the camera
delay feature to on or off.
Note:The camera may not operate correctly under the following
conditions:
•Nighttime or dark areas if one or both reverse lamps are not
operating.
•The camera’s view is obstructed by mud, water or debris. Clean the
lens with a soft, lint-free cloth and non-abrasive cleaner.
•The rear of the vehicle is hit or damaged, causing the camera to
become misaligned.
Parking Aids199
2014 Navigator(nav)
Owners Guide gf, 1st Printing, June 2013
USA(fus)
Page 201 of 506

Guidelines and the Centerline
Note:Fixed guidelines are only available when the transmission is in R
(Reverse).
Note:The centerline is only available if fixed guidelines are on.
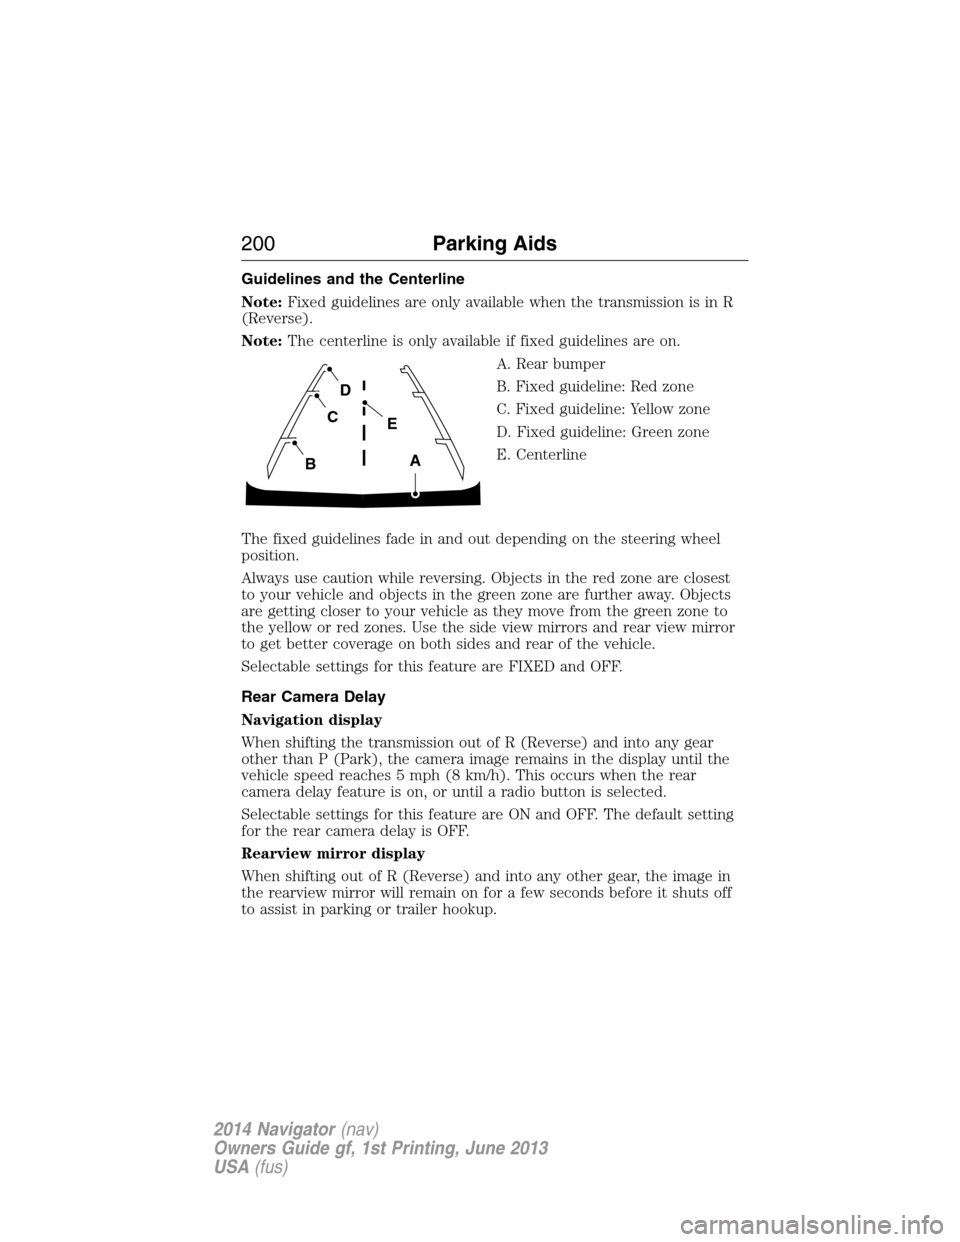
A. Rear bumper
B. Fixed guideline: Red zone
C. Fixed guideline: Yellow zone
D. Fixed guideline: Green zone
E. Centerline
The fixed guidelines fade in and out depending on the steering wheel
position.
Always use caution while reversing. Objects in the red zone are closest
to your vehicle and objects in the green zone are further away. Objects
are getting closer to your vehicle as they move from the green zone to
the yellow or red zones. Use the side view mirrors and rear view mirror
to get better coverage on both sides and rear of the vehicle.
Selectable settings for this feature are FIXED and OFF.
Rear Camera Delay
Navigation display
When shifting the transmission out of R (Reverse) and into any gear
other than P (Park), the camera image remains in the display until the
vehicle speed reaches 5 mph (8 km/h). This occurs when the rear
camera delay feature is on, or until a radio button is selected.
Selectable settings for this feature are ON and OFF. The default setting
for the rear camera delay is OFF.
Rearview mirror display
When shifting out of R (Reverse) and into any other gear, the image in
the rearview mirror will remain on for a few seconds before it shuts off
to assist in parking or trailer hookup.
A
E
D
C
B
200Parking Aids
2014 Navigator(nav)
Owners Guide gf, 1st Printing, June 2013
USA(fus)
Page 210 of 506
•Example only:
WARNING:Exceeding the Safety Compliance Certification Label
vehicle weight rating limits could result in substandard vehicle
handling or performance, engine, transmission and/or structural
damage, serious damage to the vehicle, loss of control and personal
injury.
Load Carrying209
2014 Navigator(nav)
Owners Guide gf, 1st Printing, June 2013
USA(fus)
Page 217 of 506

TOWING A TRAILER
WARNING:Do not exceed the GVWR or the GAWR specified on
the certification label.
WARNING:Towing trailers beyond the maximum recommended
gross trailer weight exceeds the limit of your vehicle and could
result in engine damage, transmission damage, structural damage, loss
of vehicle control, vehicle rollover and personal injury.
Note:For information on electrical items such as fuses or relays, see the
Fuseschapter.
Your vehicle’s load capacity designation is by weight, not by volume, so
you cannot necessarily use all available space when loading a vehicle.
Towing a trailer places an extra load on your vehicle’s engine,
transmission, axle, brakes, tires and suspension. Inspect these
components periodically during, and after, any towing operation.
Load Placement
To help minimize how trailer movement affects your vehicle when
driving:
•Load the heaviest items closest to the trailer floor.
•Load the heaviest items centered between the left and right side
trailer tires.
•Load the heaviest items above the trailer axles or just slightly forward
toward the trailer tongue. Do not allow the final trailer tongue weight
to go above or below 10–15% of the loaded trailer weight.
•Select a tow bar with the correct rise or drop. When both the loaded
vehicle and trailer are connected, the trailer frame should be level, or
slightly angled down toward your vehicle, when viewed from the side.
When driving with a trailer or payload, a slight takeoff vibration or
shudder may be present due to the increased payload weight. You can
find more information about proper trailer loading and setting your
vehicle up for towing underLoad limitin theLoad Carryingchapter
and in theRV & Trailer Towing Guide,available at an authorized
dealer.
216Towing
2014 Navigator(nav)
Owners Guide gf, 1st Printing, June 2013
USA(fus)
Page 222 of 506

Integrated Hitch Rating
WARNING:Towing trailers beyond the maximum tongue weight
exceeds the limit of the towing system and could result in vehicle
structural damage, loss of vehicle control and personal injury.
The standard integrated hitch has two ratings depending on mode of
operation:
•Weight-carrying mode requires a draw bar and hitch ball. The draw
bar supports all the vertical tongue load of the trailer.
•Weight-distributing mode requires an aftermarket weight-distributing
system, which includes draw bar, hitch ball, spring bars and snap-up
brackets. This system distributes the vertical tongue load of the trailer
between the truck and the trailer.
Mode Maximum trailer
weight - lb. (kg)Maximum tongue
weight - lb. (kg)
Weight-carrying 6000 (2721) 600 (272)
Weight-distributing 9000 (4082) 900 (408)
Note:These are hitch ratings only. Actual vehicle ratings are dependent
on engine, transmission and axle combinations.
Weight-distributing Hitch – Vehicles without Automatic Leveling
Suspension
WARNING:Do not adjust a weight-distributing hitch to any
position where the rear bumper of the vehicle is higher than it
was before attaching the trailer. Doing so will defeat the function of the
weight-distributing hitch, which may cause unpredictable handling, and
could result in serious personal injury.
When hooking-up a trailer using a weight-distributing hitch, always use
the following procedure:
1. Park your vehicle, without the trailer, on a level surface.
2. Measure the height of the top of your vehicle’s front wheel opening
on the fender. This is H1.
3. Attach the trailer to your vehicle without the weight-distributing bars
connected.
4. Measure the height of the top of your vehicle’s front wheel opening
on the fender a second time. This is H2.
Towing221
2014 Navigator(nav)
Owners Guide gf, 1st Printing, June 2013
USA(fus)
Page 225 of 506

The rating for the tow vehicle’s braking system operation is at
the gross vehicle weight rating, not the gross combined weight
rating.
Separate functioning brake systems are required for safe control
of towed vehicles and trailers weighing more than 1500 pounds
(680 kilograms) when loaded.
Trailer Lamps
WARNING:Never connect any trailer lamp wiring to the
vehicle’s tail lamp wiring; this may damage the electrical system
resulting in a fire. Contact an authorized dealer as soon as possible for
assistance in proper trailer tow wiring installation. Additional electrical
equipment may be required.
Trailer lamps are required on most towed vehicles. Make sure all running
lights, brake lights, turn signals and hazard lights are working.
Before Towing a Trailer
Practice turning, stopping and backing up to get the feel of your
vehicle-trailer combination before starting on a trip. When turning, make
wider turns so the trailer wheels clear curbs and other obstacles.
When Towing a Trailer
•Do not drive faster than 70 mph (113 km/h) during the first 500 miles
(800 kilometers).
•Do not make full-throttle starts.
•Check your hitch, electrical connections and trailer wheel lug nuts
thoroughly after you have traveled 50 miles (80 kilometers).
•When stopped in congested or heavy traffic during hot weather, place
the gearshift in positionPto aid engine and transmission cooling and
to help A/C performance.
•Turn off the speed control with heavy loads or in hilly terrain. The
speed control may turn off automatically when you are towing on
long, steep grades.
•Shift to a lower gear when driving down a long or steep hill. Do not
apply the brakes continuously, as they may overheat and become less
effective.
•If your transmission is equipped with a Grade Assist or Tow/Haul
feature, use this feature when towing. This provides engine braking
and helps eliminate excessive transmission shifting for optimum fuel
economy and transmission cooling.
224Towing
2014 Navigator(nav)
Owners Guide gf, 1st Printing, June 2013
USA(fus)