Page 356 of 404

356
2. SETUP
IS300h/250_Navi_EE
■UPDATING THE CONTACTS IN A
DIFFERENT WAY (FROM THE “Call
history” SCREEN)
1Display the telephone top screen.
(→P.329)
2Select “Call history” and select a con-
tact not yet registered in the contact list.
3Select “Update contact”.
4Select the desired contact.
5Select a telephone type for the tele-
phone number.
1Select “New contact”.
2Enter the name and select “OK”.
3Enter the telephone number and select
“OK”.
4Select the telephone type for the tele-
phone number.
5To add another number to this contact,
select “Yes”.
For PBAP compatible Bluetooth®
phones, this function is available when
“Automatic contact/history transfer” is
set to off. (→P.350)
REGISTERING A NEW
CONTACT TO THE CONTACT
LIST
New contact data can be registered.
Up to 4 numbers per person can be reg-
istered. For PBAP compatible
Bluetooth
® phones, this function is
available when “Automatic contact/his-
tory transfer” is set to off. (→P.350)
IS_Navi_EE_53C71E.book 356 ページ 2014年5月29日 木曜日 午前11時22分
Page 383 of 404
383
1. CONNECTED SERVICES
CONNECTED SERVICES
IS300h/250_Navi_EE
8
3Select “External points”.
4Check that a confirmation screen is dis-
played when the operation is complete.
1Press the button to release the lock and
lift the armrest.
2Open the cover and connect a USB
memory.
�zTurn on the power of the USB memory if it
is not turned on.
�zTo edit memory points and routes:
→P.1 5 6 , 1 6 0
INFORMATION
●
Setting “Automatic memory point down-
load” to “Yes” will automatically download
external points. (→P. 3 8 9 )
• If a screen related to a memory point is
changed to before automatic memory
point download begins, automatic
memory point download will be can-
celled.
●If memory points which have the same
name are already stored in the system,
the system may not update those mem-
ory points.
PROCEDURE FOR
DOWNLOADING MEMORY
POINTS AND ROUTES FROM
A USB MEMORY
IS_Navi_EE_53C71E.book 383 ページ 2014年5月29日 木曜日 午前11時22分
Page 384 of 404

384
1. CONNECTED SERVICES
IS300h/250_Navi_EE
3Close the console box.
4Display the “My memory” screen.
(→P.382)
5Select “Copy from USB”.
�zIf a password has already been set, enter
the password. For instructions on setting a
password: →P.1 6 8
�zIf there are multiple memory points stored
on the USB memory, select the memory
points and routes to be copied and select
“Start”.
6Check that a progress bar is being dis-
played while the data copy is in
progress.
�zTo cancel this function, select “Cancel”.
7Check that a confirmation screen is dis-
played when the operation is complete.
INFORMATION
●
Memory points that are located outside
of the map’s data range cannot be regis-
tered.
●A maximum of 500 memory points can
be registered.
●When there are 21 or more memory
points and routes stored on a USB mem-
ory, only 20 memory points and routes
will be displayed at a time.
●Memory points acquired from Lexus por-
tal site can only be registered with the
registered system at the time of acquire-
ment.
●In some cases, memory points and routes
may not be able to be imported. If this
occurs, “Unable to read memory point
data. (Device ID error)” will be displayed.
●If memory points and routes which have
the same name are already stored in the
system, the system may not update those
memory points and routes.
IS_Navi_EE_53C71E.book 384 ページ 2014年5月29日 木曜日 午前11時22分
Page 388 of 404

388
1. CONNECTED SERVICES
IS300h/250_Navi_EE
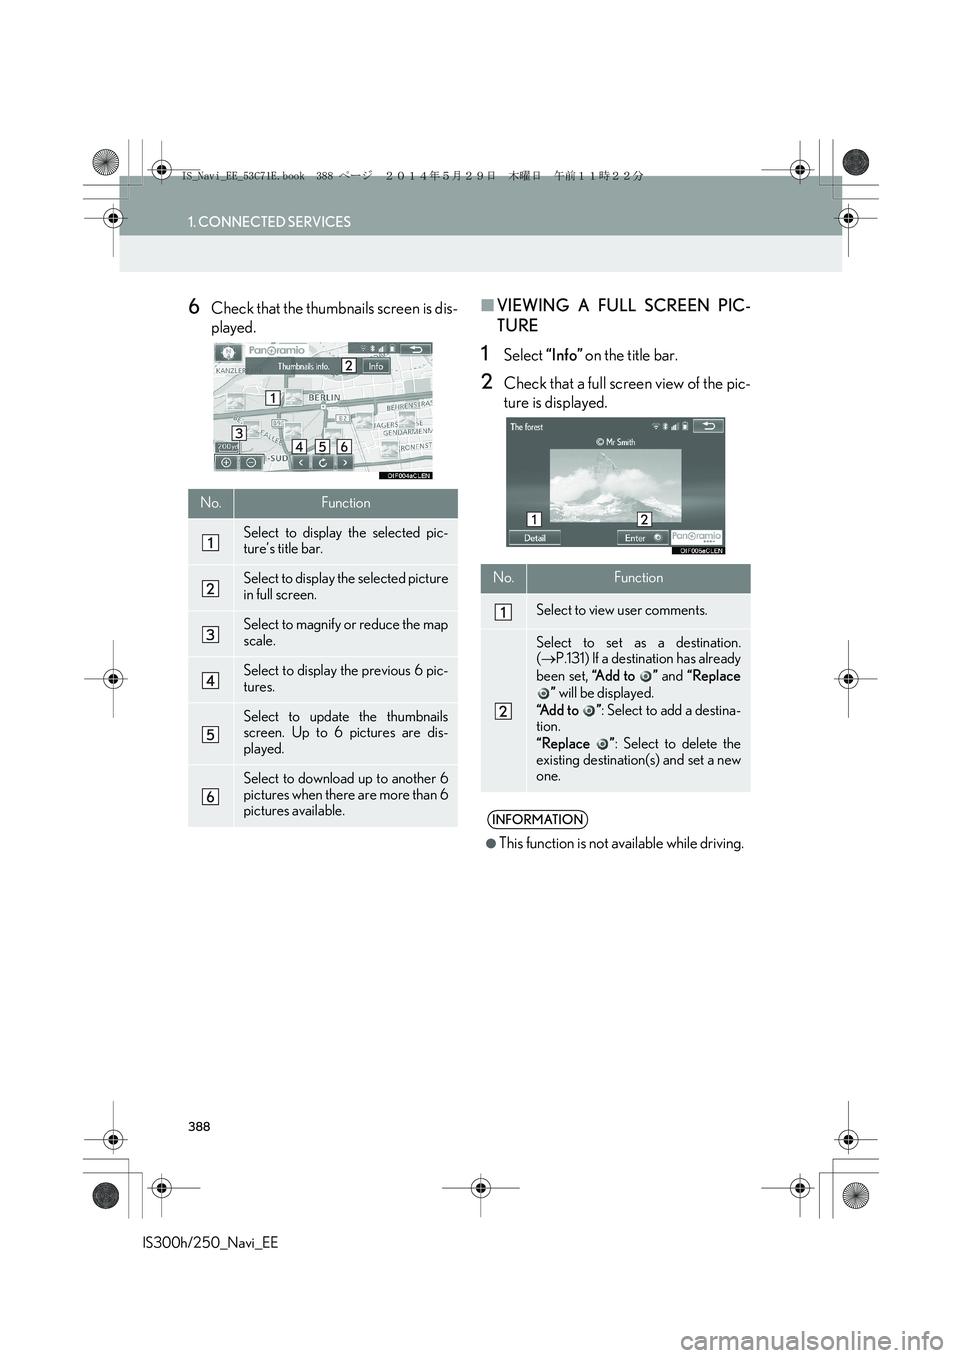
6Check that the thumbnails screen is dis-
played.■VIEWING A FULL SCREEN PIC-
TURE
1Select “Info” on the title bar.
2Check that a full screen view of the pic-
ture is displayed.
No.Function
Select to display the selected pic-
ture’s title bar.
Select to display the selected picture
in full screen.
Select to magnify or reduce the map
scale.
Select to display the previous 6 pic-
tures.
Select to update the thumbnails
screen. Up to 6 pictures are dis-
played.
Select to download up to another 6
pictures when there are more than 6
pictures available.
No.Function
Select to view user comments.
Select to set as a destination.
(→P.131) If a destination has already
been set, “A d d t o ” and “Replace
” will be displayed.
“Add to ”: Select to add a destina-
tion.
“Replace ”: Select to delete the
existing destination(s) and set a new
one.
INFORMATION
●
This function is not available while driving.
IS_Navi_EE_53C71E.book 388 ページ 2014年5月29日 木曜日 午前11時22分
Page 400 of 404
400
IS300h/250_Navi_EE
Map database information and updates
IS_Navi_EE_53C71E.book 400 ページ 2014年5月29日 木曜日 午前11時22分
Page:
< prev 1-8 9-16 17-24