Page 96 of 573

952. Instrument cluster
2
Instrument cluster
IS350/250_U (OM53758U)
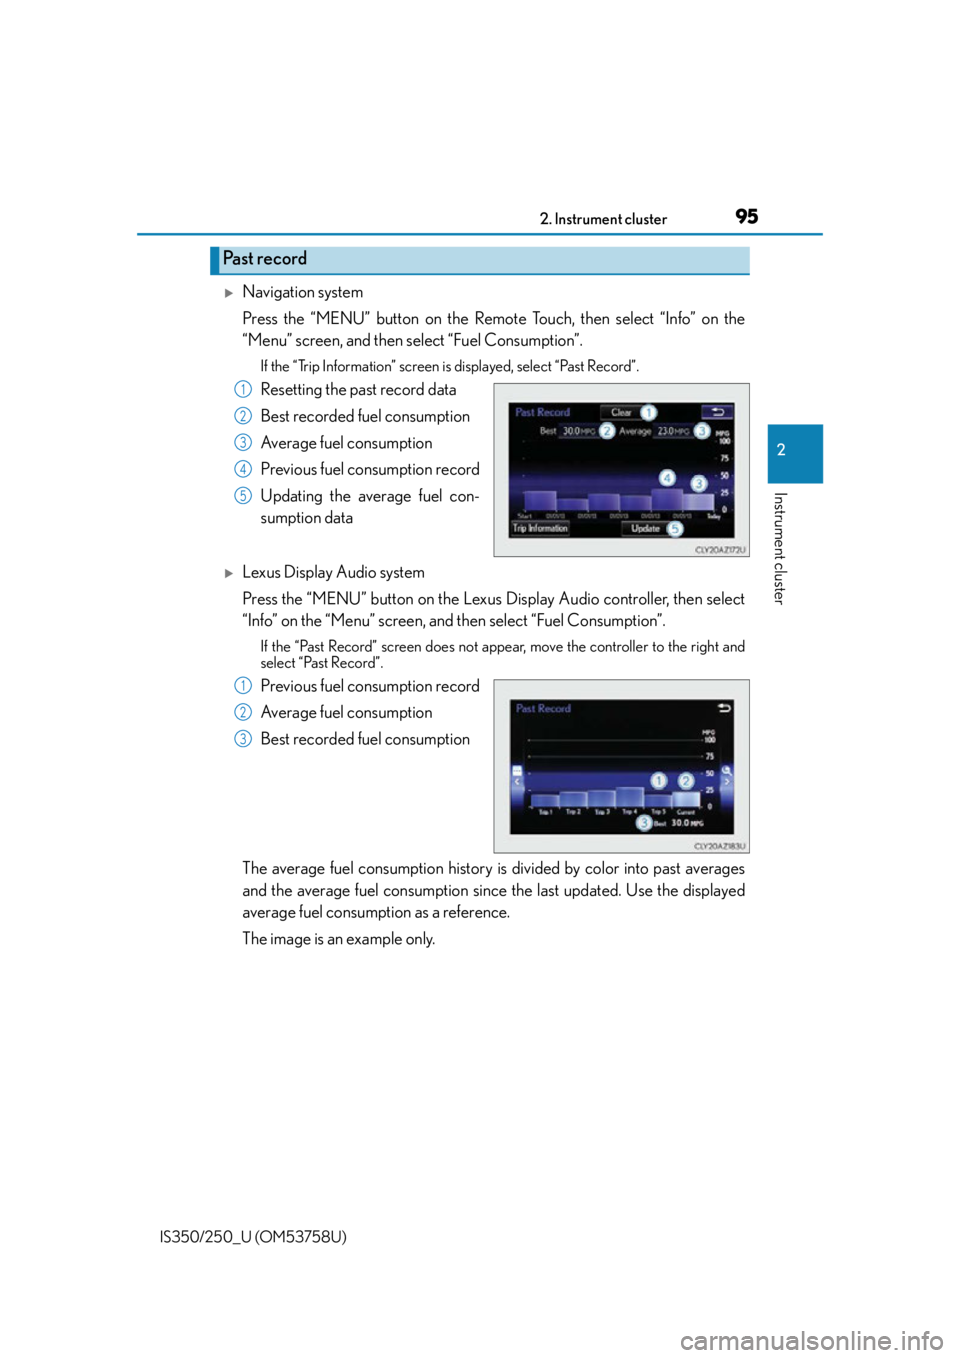
Navigation system
Press the “MENU” button on the Remote Touch, then select “Info” on the
“Menu” screen, and then select “Fuel Consumption”.
If the “Trip Information” screen is displayed, select “Past Record”.
Resetting the past record data
Best recorded fuel consumption
Average fuel consumption
Previous fuel consumption record
Updating the average fuel con-
sumption data
Lexus Display Audio system
Press the “MENU” button on the Lexus Display Audio controller, then select
“Info” on the “Menu” screen, and then select “Fuel Consumption”.
If the “Past Record” screen does not appe ar, move the controller to the right and
select “Past Record”.
Previous fuel consumption record
Average fuel consumption
Best recorded fuel consumption
The average fuel consumption history is divided by color into past averages
and the average fuel consumption since the last updated. Use the displayed
average fuel consumption as a reference.
The image is an example only.
Past record
1
2
3
4
5
1
2
3
Page 97 of 573
962. Instrument cluster
IS350/250_U (OM53758U)
■Updating the past record data
Navigation system
Update the average fuel consumption by selecting “Update” to measure the current fuel
consumption again.
Lexus Display Audio system
Update the average fuel consumption by moving the controller to the left and select
“Update” to measure the current fuel consumption again.
■Resetting the data
Navigation system
The fuel consumption data can be deleted by selecting “Clear”.
Lexus Display Audio system
The fuel consumption data can be deleted by moving the controller to the left and select
“Clear ”.
■Cruising range
Displays the estimated maximum distance that can be driven with the quantity of fuel
remaining.
This distance is computed based on your average fuel consumption.
As a result, the actual distance that can be driven may differ from that displayed.
Page 124 of 573

1233-3. Adjusting the seats
3
Operation of each component
IS350/250_U (OM53758U)
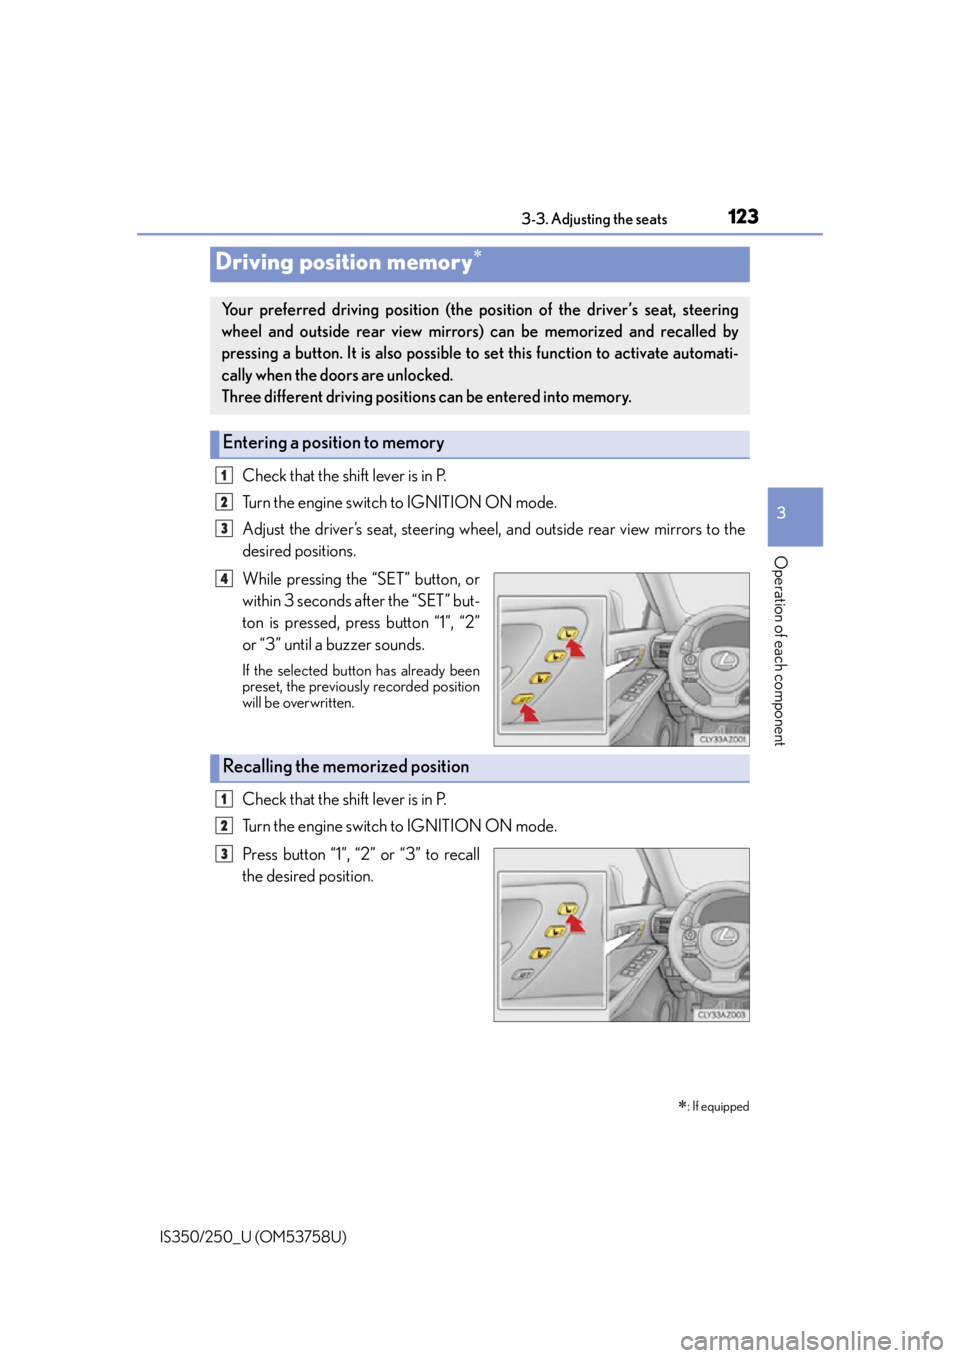
Check that the shift lever is in P.
Turn the engine switch to IGNITION ON mode.
Adjust the driver’s seat, steering wheel, and outside rear view mirrors to the
desired positions.
While pressing the “SET” button, or
within 3 seconds after the “SET” but-
ton is pressed, press button “1”, “2”
or “3” until a buzzer sounds.
If the selected button has already been
preset, the previously recorded position
will be overwritten.
Check that the shift lever is in P.
Turn the engine switch to IGNITION ON mode.
Press button “1”, “2” or “3” to recall
the desired position.
Driving position memory
: If equipped
Your preferred driving position (the position of the driver’s seat, steering
wheel and outside rear view mirrors) can be memorized and recalled by
pressing a button. It is also possible to set this function to activate automati-
cally when the doors are unlocked.
Three different driving positions can be entered into memory.
Entering a position to memory
1
2
3
4
Recalling the memorized position
1
2
3
Page 195 of 573

1944-5. Using the driving support systems
IS350/250_U (OM53758U)
■Cruise control can be set when
●The shift lever is in D.
●Range 4 or higher of D has been se lected by using the paddle shift.
●Vehicle speed is above approximately 25 mph (40 km/h).
■Accelerating after setting the vehicle speed
●The vehicle can be accelerated normally. After acceleration, the set speed resumes.
●Even without canceling the cruise control, the set speed can be increased by first accel-
erating the vehicle to the desired speed and then pushing the lever down to set the new
speed.
■Automatic cruise control cancelation
Cruise control will stop maintaining the vehicl e speed in any of the following situations.
●Actual vehicle speed falls more than approximately 10 mph (16 km/h) below the preset
vehicle speed.
At this time, the memorized set speed is not retained.
●Actual vehicle speed is below approximately 25 mph (40 km/h).
●VSC is activated.
●TRAC is activated for a period of time.
●When the VSC or TRAC system is turned off by pressing the VSC OFF switch.
■If the warning message for the cruise contro l is shown on the multi-information display
Press the “ON/OFF” button once to deactivate the system, and then press the button
again to reactivate the system.
If the cruise control speed cannot be set or if the cruise control cancels immediately after
being activated, there may be a malfunction in the cruise control system. Have the vehi-
cle inspected by your Lexus dealer.
Page 271 of 573
2705-2. Setup
IS350/250_U (OM53758U)
“Setup” “General” “Delete Personal Data”
Select “Delete”.
Check carefully beforehand, as data cannot be retrieved once deleted.
The following personal data will be deleted or changed to its default settings.
• Phonebook data
• Call history data
•Favorite data
•Bluetooth
® devices data
•Phone sound settings
• Detailed Bluetooth
® settings
• Audio/video setting
• Preset switch data
•Last used radio station
• Customized image data
•FM info setting
• iPod tagging information
• Software update history
• Software update detail information
•Phone disp lay setting
• Contact/call history setting
• Messaging setting
• Traffic information map
• Weather information
• Phonebook data for voice recognition
• Music data for voice recognition
NOTICE
■If the console box lid cannot be fully closed
P. 2 9 9
■To prevent damage to the USB me mory device or its terminals
P. 2 9 9
Deleting personal data
1
2
Page 276 of 573
2755-3. Using the audio system
5
Lexus Display Audio system
IS350/250_U (OM53758U)
Go to “Audio Settings”: “Setup” “Audio”
Change radio settings ( P. 2 7 5 )
Change iPod settings ( P. 2 76 )
Change A/V settings ( P. 2 76 )
Change the cover art settings
( P. 2 7 7 )
Change USB settings ( P. 2 7 7 )
To change radio settings, select “Radio Settings” on the “Audio Settings” screen
or radio menu screen. ( P. 2 7 8 )
Set the displaying RBDS text mes-
sage on/off
Change the number of radio presets
Audio settings
Screen for audio settings
1
2
3
4
5
Changing radio settings
1
2
Page 282 of 573

281
5
Lexus Display Audio system
IS350/250_U (OM53758U)5-4. Using the radio
Pressing the “RADIO” button displays the radio top screen from any screen of
the selected source.
■Menu screen
P. 2 7 8
Tune in to the desired station us ing one of the following methods.
■Seek tuning
Press and hold then release “” or “ ”.
The radio will begin seeking up or down for a station of the nearest frequency
and will stop when a station is found.
■Manual tuning
Turn the “TUNE/SCROLL” knob.
■Preset stations
Select the desired preset station by pressing “ ” or “ ” or controller.
■Station list
Move the controller to the right and selecting “Station List”.
AM radio: Selecting a desired station.
FM radio: Selecting a desired type of station and selecting a desired sta-
tion.
To refreshing the station list, select “R efresh”. Select “Source” on the refresh
screen, can be change to the other audio source while refreshing.
Radio operation
Select “AM”, “FM” or “SAT” on the audio source selection screen to begin lis-
tening to the radio.
Radio top screen
Selecting a station (AM or FM radio)
1
2
Page 283 of 573

2825-4. Using the radio
IS350/250_U (OM53758U)
Select in to the desired channel using one of the following methods.
■Tu r n i n g u p /d o w n t h e c h a n n e l
Press and hold “” or “ ” or turn the “TUNE/SCROLL” knob.
■Preset channels
Select the desired preset channel by pressing “ ” or “ ” or controller.
■Channel list
Move the controller to the right and selecting “Select a SAT Category”.
Selecting a desired category of chan nel and selecting a desired channel.
Search for desired stations or channel.
Select and hold one of the preset until you hear a beep.
■Display the song information
Move the controller to the right and selecting “Text”.
■Display the Additional information (AM, FM radio)
Move the controller to the right and selecting “Additional Information”.
When “HD Radio” is set to on, availabl e stations with HD radio channels are
marked with “HD”.
Select a station marked with “HD”.
Turn the “TUNE/SCROLL” knob to select an HD radio channel.
HD channels can also be selected by selecting “Multicast” on the menu screen.
( P. 2 7 8 )
Selecting a channel (XM Satellite Radio)
Setting presets
Display the text message
Selecting an HD radio channel
1
2
1
2
1
2