2014 Lexus GX460 ground
[x] Cancel search: groundPage 111 of 622

GX460_OM_OM60K80U_(U)
1113-2. Opening, closing and locking the doors and trunk
3
Operation of each component
■Note for the entry function
●Even when the electronic key is within the effective range (detection areas), the system
may not operate properly in the following cases:
• The electronic key is too close to the window or outside door handle, near the
ground, or in a high place when the doors are locked or unlocked.
• The electronic key is near the ground or in a high place, or too close to the rear
bumper center when the glass hatch is opened.
• The electronic key is on the instrument pa nel, luggage cover or floor, or in the door
pockets or glove box when the engine is started or engine switch modes are
changed.
●Do not leave the electronic key on top of th e instrument panel or near the door pockets
when exiting the vehicle. Depending on the radio wave reception conditions, it may be
detected by the antenna outside the cabin and the doors will become lockable from the
outside, possibly trapping the el ectronic key inside the vehicle.
●As long as the electronic key is within the effective range, the doors may be locked or
unlocked by anyone. However, only the door s detecting the electronic key can be used
to unlock the vehicle.
●Even if the electronic key is not inside the vehicle, it may be possible to start the engine
if the electronic key is near the window.
●The doors may lock or unlock if a large amou nt of water splashes on the door handle,
such as in the rain or in a car wash, when th e electronic key is within the effective range.
(The doors will automatically be locked after approximately 60 seconds if the doors
are not opened and closed.)
●If the wireless remote control is used to lo ck the doors when the electronic key is near
the vehicle, there is a possibility that the door may not be unlocked by the entry func-
tion. (Use the wireless remote control to unlock the doors.)
●Touching the door lock sensor while wearing gloves may prevent lock operation.
●If the door handle becomes wet while the el ectronic key is within the effective range,
the door may lock and unlock repeatedly. Plac e the electronic key in a location 6 ft. (2
m) or more away from the vehicle. (Take care to ensure that the key is not stolen.)
●If the electronic key is insi de the vehicle and a door handle becomes wet during a car
wash, a message may be shown on the multi-information display and a buzzer will
sound outside the vehicle. To turn off the alarm, lock all the doors.
●The lock sensor may not work properly if it comes into contact with ice, snow, mud, etc.
Clean the lock sensor and attempt to operate it again, or use the lock sensor on the
lower part of the door handle.
●Fingernails may scrape against the door during operation of the door handle.
Be careful not to injure fingernails or damage the surface of the door.
●A sudden approach to the effective range or door handle may prevent the doors from
being unlocked. In this case, return the door handle to the original position and check
that the doors unlock before pulling the door handle again.
●Unlocking the vehicle may take more time if another electronic key is within the effec-
tive range.
Page 127 of 622

GX460_OM_OM60K80U_(U)
1273-3. Adjusting the seats
3
Operation of each component
CAUTION
■When folding the seatbacks down
Observe the following precautions. Failure to do so may result in death or serious
injury.
●Do not fold the seatbacks down while driving.
●Stop the vehicle on level ground, set the parking brake and shift the shift lever to P.
●Do not allow anyone to sit on a folded seatback or in the luggage compartment while
driving.
●Do not allow children to enter the luggage compartment.
■Seat adjustment
Observe the following precautions. Failure to do so may result in death or serious
injury.
●To reduce the risk of sliding under the lap belt during a collision, do not recline the
seat more than necessary.
If the seat is too reclined, the lap belt may slide past the hips and apply restraint forces
directly to the abdomen, or your neck may contact the shoulder belt, increasing the
risk of death or serious injury in the event of an accident.
Adjustments should not be made while dr iving as the seat may unexpectedly move
and cause the driver to lose control of the vehicle.
●Be careful not to get hands or feet pinc hed between the rear console box and the
second seat when folding down the rear seatback.
■When stowing the third seats
Observe the following precautions. Failure to do so may result in death or serious
injury.
●Check that there is no luggage and that there are no other people around the seat
before stowing operation.
●Do not insert hands or feet into the moving parts of the seat.
●Do not allow children to operate the seat.
■After returning the seatbacks to the upright position
Observe the following precautions. Failure to do so may result in death or serious
injury.
●Make sure the seatback is securely locked by pushing it forward and rearward on the
top.
●Check that the seat belts are not twisted or caught in the seatback.
NOTICE
■When returning the third seat (vehicles with a luggage cover)
If the luggage cover is installed in the luggage compartment, make sure you remove it
before returning the third seat. ( P. 404) The luggage cover may be damaged by the
seat.
Page 140 of 622

1403-4. Adjusting the steering wheel and mirrors
GX460_OM_OM60K80U_(U)
Po w e r t y p e
Extends the mirrors
Folds the mirrors
■Mirror angle can be adjusted when
The engine switch is in ACCESSORY or IGNITION ON mode.
■When the mirrors are fogged up
Turn on the mirror defoggers to defog the mirrors. ( P. 3 8 1 )
■Linked mirror function when reversing
The outside rear view mirrors will automatically angle downwards when the vehicle is
reversing in order to give a better view of the ground. However, this function will not
operate when the mirror select switch is in the neutral position (between “L” and “R”).
■Automatic adjustment of the mirror angle
A desired mirror face angle can be entered to memory and recalled automatically by the
driving position memory. ( P. 1 2 8 )
■Auto anti-glare function
When the anti-glare inside rear view mirror is set to automatic mode, the outside rear
view mirrors will activate in conjunction with the anti-glare inside rear view mirror to
reduce reflected light. ( P. 1 3 7 )
1
2
Page 171 of 622

GX460_OM_OM60K80U_(U)
1714-1. Before driving
4
Driving
Stop your vehicle and a trailer in line and perform the following:
●Connecting a trailerSet the rear height control air suspension to N mode.
Turn off the engine switch or the rear height control air suspension.
Connect the trailer.
Turn on the switch that was turned off on step .
●Disconnecting a trailer Set the rear height control air suspension to N mode.
Turn off the rear height control air suspension.
Turn off the engine switch.
Set the supporting leg of the trailer on the ground and raise the hitch by
4 in. (100 mm)
Turn on the engine switch.
Turn on the rear height control air suspension.
Wait until vehicle height is stabilized.
Make sure the hitch is disconnected. If the hitch does not disconnect, raise the
hitch higher and repeat steps through .
Connecting and disconnecting a trailer
1
2
3
42
1
2
3
4
5
6
7
27
Page 180 of 622

180
GX460_OM_OM60K80U_(U)4-1. Before driving
Dinghy towing
Your vehicle is not designed to be ding
hy towed (with 4 wheels on the ground)
behind a motor home.
NOTICE
■To avoid serious damage to your vehicle
Do not tow your vehicle with four wheels on the ground.
Page 244 of 622

244
GX460_OM_OM60K80U_(U)4-5. Using the driving support systems
■Screen description
The rear view monitor system screen will be displayed if the shift lever is
shifted to R while the engine switch is in IGNITION ON mode.
Vehicle width extension guide line
The line indicates a guide path when the vehicle is being backed straight up.
The displayed width is wider than the actual vehicle width.
Vehicle center guide line
These lines indicate the estimated vehicle center on the ground.
Distance guide line (red)
The line shows distance behind the vehicle, a point approximately 1.5 ft. (0.5 m) from
the edge of the bumper.
Distance guide line (blue)
The line shows distance behind the vehicle,
a point approximately 3 ft. (1 m) from the
edge of the bumper.
Intuitive parking assist display (if equipped)
If an obstacle is detected wh ile the intuitive parking assist is on, a display is shown at
the top right corner of the screen.
Using the rear view monitor system
1
2
3
4
5
Page 247 of 622
GX460_OM_OM60K80U_(U)
2474-5. Using the driving support systems
4
Driving
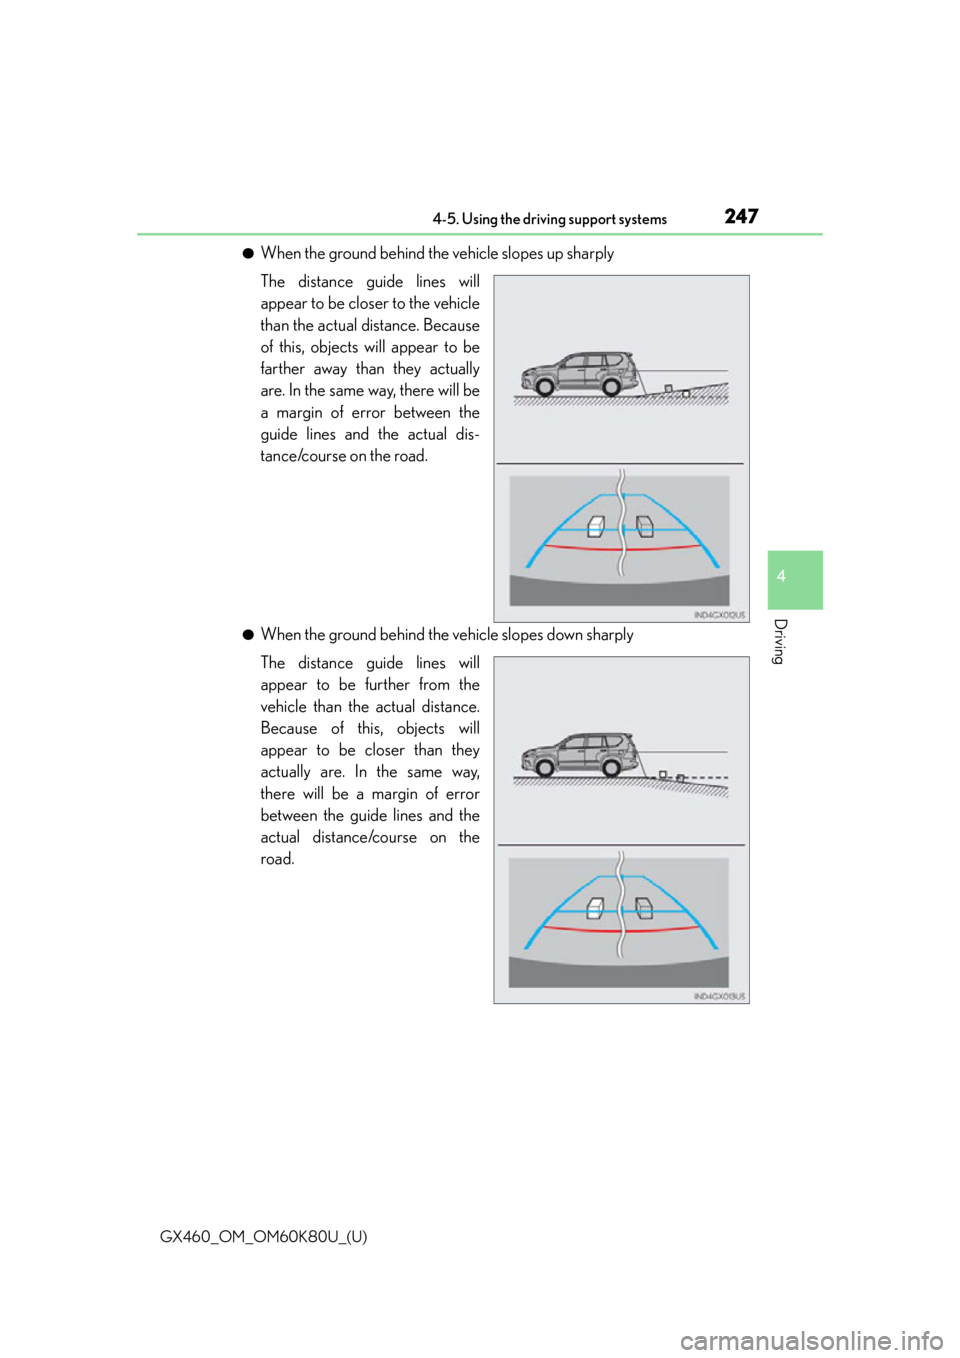
●When the ground behind the vehicle slopes up sharply
The distance guide lines will
appear to be closer to the vehicle
than the actual distance. Because
of this, objects will appear to be
farther away than they actually
are. In the same way, there will be
a margin of error between the
guide lines and the actual dis-
tance/course on the road.
●When the ground behind the vehicle slopes down sharply
The distance guide lines will
appear to be further from the
vehicle than the actual distance.
Because of this, objects will
appear to be closer than they
actually are. In the same way,
there will be a margin of error
between the guide lines and the
actual distance/course on the
road.
Page 271 of 622

GX460_OM_OM60K80U_(U)
2714-5. Using the driving support systems
4
Driving
●When the ground behind the vehicle slopes up sharply
The distance guide lines will
appear to be closer to the vehicle
than the actual distance. Because
of this, objects will appear to be
farther away than they actually
are. In the same way, there will be
a margin of error between the
guidelines and the actual dis-
tance/course on the road.
●When the ground behind the vehicle slopes down sharply
The distance guide lines will
appear to be further from the
vehicle than the actual distance.
Because of this, objects will
appear to be closer than they
actually are. In the same way,
there will be a margin of error
between the guidelines and the
actual distance/course on the
road.