Page 149 of 438
149
3. ROUTE GUIDANCE
GS_Navi+MM_OM30E40E_(EE)
14.07.24 15:56
NAVIGATION SYSTEM
31Display the “Route” screen. (→P.146)
2Select “Search condition” .
3Select the desired type and select “OK”.
1Display the “Route” screen. ( →P.146)
2Select “Detour” .
3Select the desired detour distance.
SETTING SEARCH
CONDITION
Road conditions of the route to the des-
tination can be set.
DETOUR SETTING
During the route guidance, the route
can be changed to detour around a sec-
tion of the route where a delay is caused
by road repairs, an accident, etc.
No.Function
Select to detour within 1 mile of the
current position.
Select to detour within 3 miles of the
current position.
Select to detour within 5 miles of the
current position.
GS_Navi+MM_OM30E40E_(EE).book Page 149 Thursday, July 24, 201 4 3:57 PM
Page 150 of 438

150
3. ROUTE GUIDANCE
GS_Navi+MM_OM30E40E_(EE)
14.07.24 15:56
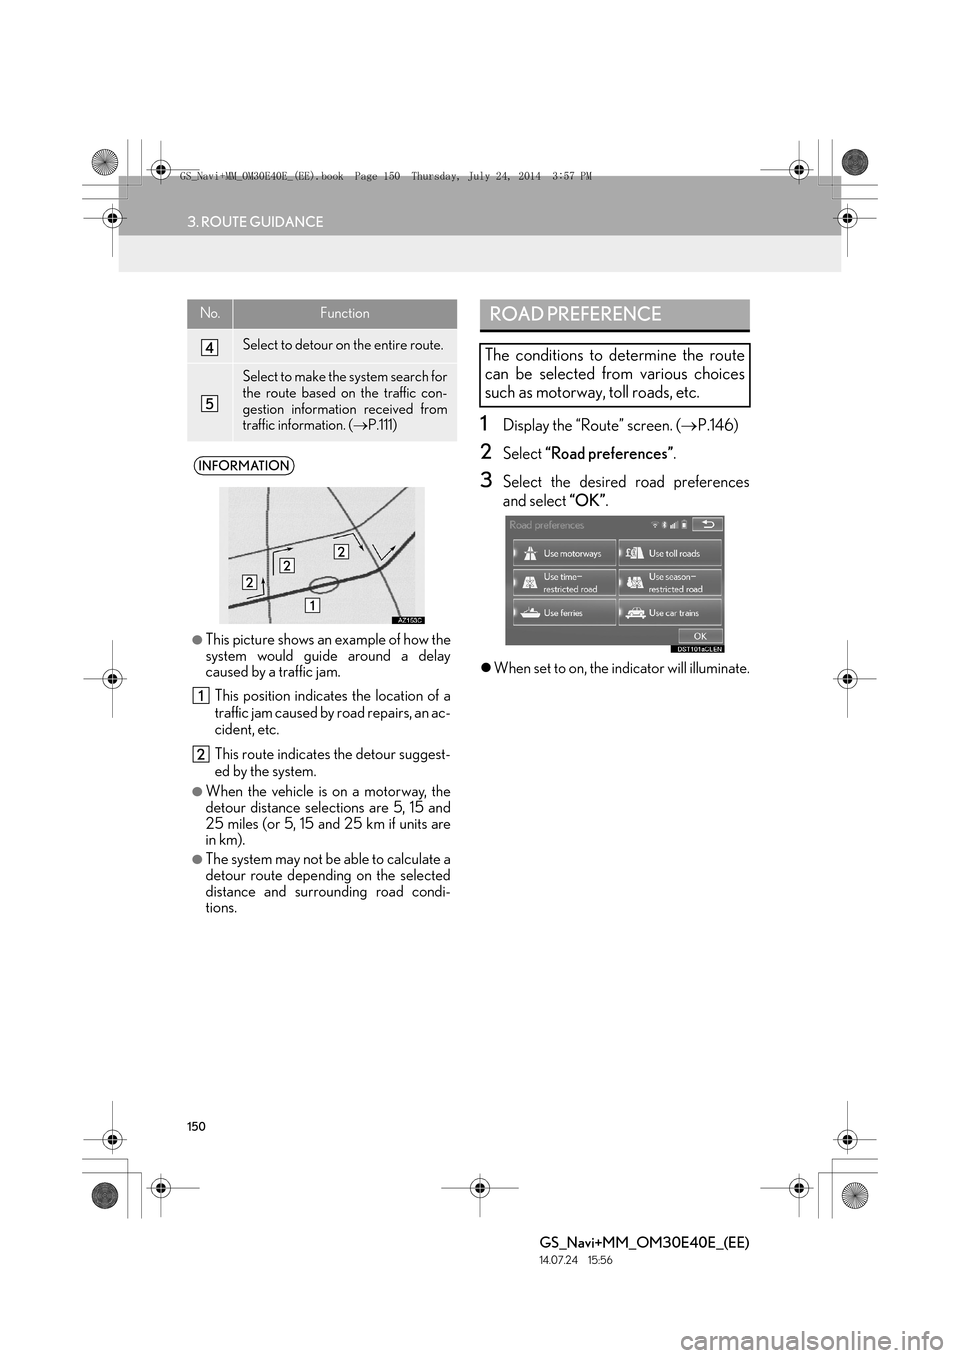
1Display the “Route” screen. (→P.146)
2Select “Road preferences” .
3Select the desired road preferences
and select “OK”.
�zWhen set to on, the indicator will illuminate.
Select to detour on the entire route.
Select to make the system search for
the route based on the traffic con-
gestion information received from
traffic information. ( →P.111)
INFORMATION
●
This picture shows an example of how the
system would guide around a delay
caused by a traffic jam. This position indicates the location of a
traffic jam caused by road repairs, an ac-
cident, etc.
This route indicates the detour suggest-
ed by the system.
●When the vehicle is on a motorway, the
detour distance selections are 5, 15 and
25 miles (or 5, 15 and 25 km if units are
in km).
●The system may not be able to calculate a
detour route depending on the selected
distance and surrounding road condi-
tions.
No.FunctionROAD PREFERENCE
The conditions to determine the route
can be selected from various choices
such as motorway, toll roads, etc.
GS_Navi+MM_OM30E40E_(EE).book Page 150 Thursday, July 24, 201 4 3:57 PM
Page 151 of 438

151
3. ROUTE GUIDANCE
GS_Navi+MM_OM30E40E_(EE)
14.07.24 15:56
NAVIGATION SYSTEM
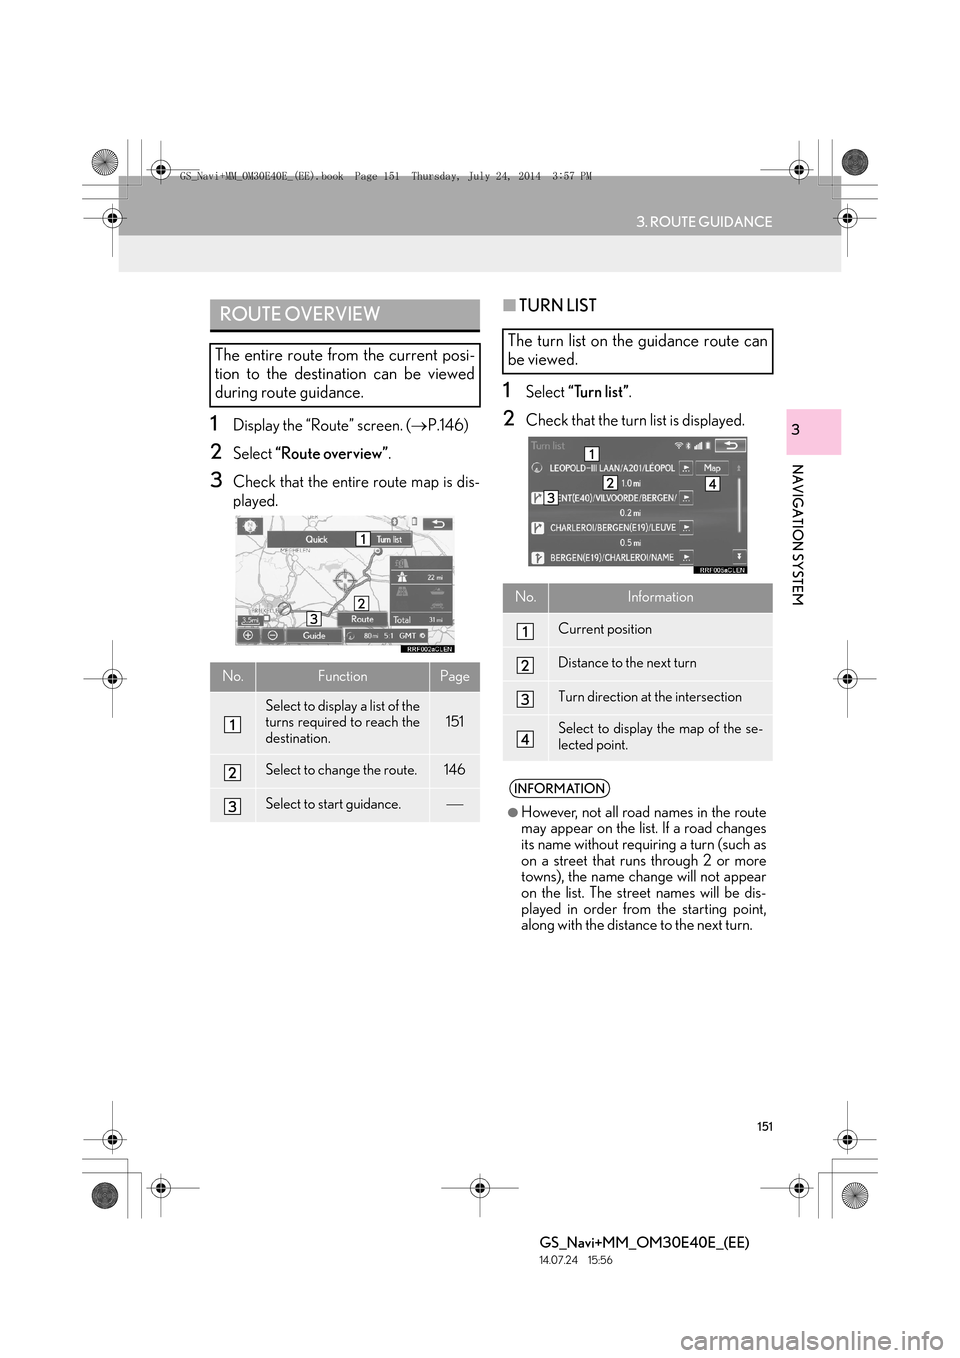
31Display the “Route” screen. (→P.146)
2Select “Route overview” .
3Check that the entire route map is dis-
played.
■TURN LIST
1Select “Turn list” .
2Check that the turn list is displayed.
ROUTE OVERVIEW
The entire route from the current posi-
tion to the destination can be viewed
during route guidance.
No.FunctionPage
Select to display a list of the
turns required to reach the
destination.151
Select to change the route.146
Select to start guidance.
The turn list on the guidance route can
be viewed.
No.Information
Current position
Distance to the next turn
Turn direction at the intersection
Select to display the map of the se-
lected point.
INFORMATION
●
However, not all road names in the route
may appear on the list. If a road changes
its name without requiring a turn (such as
on a street that runs through 2 or more
towns), the name change will not appear
on the list. The street names will be dis-
played in order from the starting point,
along with the distance to the next turn.
GS_Navi+MM_OM30E40E_(EE).book Page 151 Thursday, July 24, 201 4 3:57 PM
Page 153 of 438
153
4. MY MEMORY
GS_Navi+MM_OM30E40E_(EE)
14.07.24 15:56
NAVIGATION SYSTEM
3
1Display the “My memory” screen.
(→ P.152)
2Select “Home” .
3Select the desired item.
1Select “Register” .
2Select the desired item to search for the
location. (→P.118)
3Select “OK” when the editing home
screen appears. ( →P.154)
No.FunctionPage
Select to set home.153
Select to set the memory
points.157
Select to set quick access.155
Select to set areas to avoid.163
Select to set route traces.166
Select to copy from a USB
memory.170
Select to backup to a USB
memory.168
SETTING UP HOME
If a home has been registered, that infor-
mation can be recalled by selecting
“Home” on the “Destination” screen.
( → P.121)
No.FunctionPage
Select to register home.153
Select to edit home.154
Select to delete home.154
REGISTERING HOME
GS_Navi+MM_OM30E40E_(EE).book Page 153 Thursday, July 24, 201 4 3:57 PM
Page 154 of 438
154
4. MY MEMORY
GS_Navi+MM_OM30E40E_(EE)
14.07.24 15:56
1Select “Edit”.
2Select the desired item to be edited.
3Select “OK”.
1Select “Delete” .
2Select “Yes” when the confirmation
screen appears.
EDITING HOME
No.FunctionPage
Select to change the icon to
be displayed on the map
screen.158
Select to edit the home
name.159
Select to display the home
name on the map screen.
When set to on, the indica-
tor will illuminate.
Select to edit location infor-
mation.159
Select to edit the telephone
number.159
DELETING HOME
GS_Navi+MM_OM30E40E_(EE).book Page 154 Thursday, July 24, 201 4 3:57 PM
Page 155 of 438
155
4. MY MEMORY
GS_Navi+MM_OM30E40E_(EE)
14.07.24 15:56
NAVIGATION SYSTEM
31Display the “My memory” screen.
(→ P.152)
2Select “Quick access” .
3Select the desired item.
1Select “Register” .
2Select the desired item to search for the
location. (→P.118)
3Select a position for this quick access.
4Select “OK” when the editing quick ac-
cess screen appears. ( →P.156)
SETTING UP QUICK ACCESS
If quick access has been registered, that
information can be recalled by using the
quick access screen buttons on the
“Destination” screen. ( →P.122)
No.FunctionPage
Select to register quick ac-
cess.155
Select to edit quick access.156
Select to delete quick ac-
cess.156
REGISTERING QUICK
ACCESS
INFORMATION
●
Up to 5 preset destinations can be regis-
tered.
GS_Navi+MM_OM30E40E_(EE).book Page 155 Thursday, July 24, 201 4 3:57 PM
Page 156 of 438
156
4. MY MEMORY
GS_Navi+MM_OM30E40E_(EE)
14.07.24 15:56
1Select “Edit”.
2Select the desired quick access.
3Select the desired item to be edited.
4Select “OK”.
1Select “Delete” .
2Select the quick access to be deleted
and select “Delete”.
3Select “Yes” when the confirmation
screen appears.
EDITING QUICK ACCESS
No.FunctionPage
Select to change the icon to
be displayed on the map
screen.158
Select to edit the quick ac-
cess name.159
Select to display the quick
access name on the map
screen.
When set to on, the indica-
tor will illuminate.
Select to edit location infor-
mation.159
Select to edit the telephone
number.159
DELETING QUICK ACCESS
GS_Navi+MM_OM30E40E_(EE).book Page 156 Thursday, July 24, 201 4 3:57 PM
Page 157 of 438

157
4. MY MEMORY
GS_Navi+MM_OM30E40E_(EE)
14.07.24 15:56
NAVIGATION SYSTEM
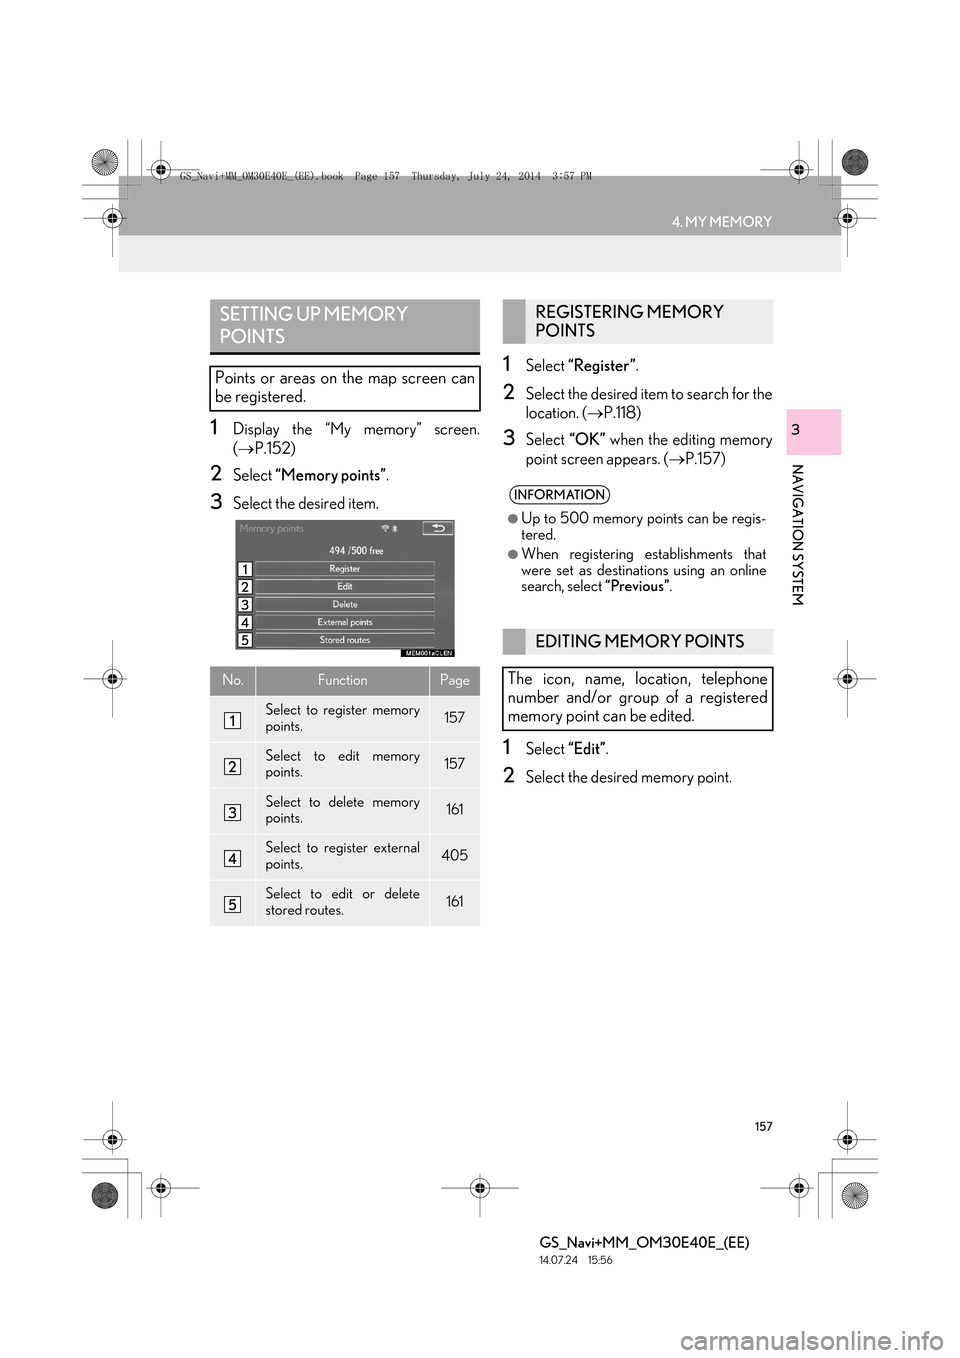
31Display the “My memory” screen.
(→ P.152)
2Select “Memory points” .
3Select the desired item.
1Select “Register” .
2Select the desired item to search for the
location. (→P.118)
3Select “OK” when the editing memory
point screen appears. ( →P.157)
1Select “Edit”.
2Select the desired memory point.
SETTING UP MEMORY
POINTS
Points or areas on the map screen can
be registered.
No.FunctionPage
Select to register memory
points.157
Select to edit memory
points.157
Select to delete memory
points.161
Select to register external
points.405
Select to edit or delete
stored routes.161
REGISTERING MEMORY
POINTS
INFORMATION
●
Up to 500 memory points can be regis-
tered.
●When registering establishments that
were set as destinat ions using an online
search, select “Previous”.
EDITING MEMORY POINTS
The icon, name, location, telephone
number and/or group of a registered
memory point can be edited.
GS_Navi+MM_OM30E40E_(EE).book Page 157 Thursday, July 24, 201 4 3:57 PM