Page 280 of 622

2805-5. Using an external device
CT200h_OM_OM76135E_(EE)
■Portable audio device holder (if equipped)
→P. 2 6 0
■About iPod
●Apple is not responsible for the operation of this device or its compliance with safety
and regulatory standards.
●iPod is a trademark of Apple, Inc., registered in the U.S. and other countries.
■iPod functions
●When an iPod is connected and the audio source is changed to iPod mode, the iPod will
resume play from the same point in which it was last used.
●Depending on the iPod that is connected to the system, certain functions may not be
available. Disconnecting the device and reconnecting it once again may resolve some
malfunctions.
■iPod problems
To resolve most problems encountered when using your iPod, disconnect your iPod from
the vehicle iPod connection and reset it.
For instructions on how to reset your iP od, refer to your iPod Owner’s Manual.
■Display
→P. 2 7 2
■Error messages
“ERROR”:
This indicates a problem in the iPod or its connection.
“NO MUSIC”:
This indicates that there is no music data in the iPod.
“EMPTY”:
This indicates that an empty playlist is selected.
“UPDATE”:
This indicates that the version of the iPod is not compatible. Upgrade your iPod software
to the latest version.
CT200h_OM_OM76135E_(EE).book Page 280 Friday, May 30, 2014 1 1:14 AM
Page 308 of 622
3085-7. Setup menu
CT200h_OM_OM76135E_(EE)
Select “Speed Dial” using the “TUNE•SEL” knob
Select the desired data using the knob.
Select the desired preset button, and register the data into speed dial by
either of the following methods:
a. Press the desired preset button, and select “Confirm” using the knob.
b. Press and hold the desired preset button.
Select “Delete Entry” using the “TUNE•SEL” knob
Select the desired data to be deleted using the knob.
Select “Del Spd Dial” using the “TUNE•SEL” knob.
Press the preset button to which the desired speed dial is registered after the
beep.
The name to be deleted will be heard.
Select “Confirm” using the knob.
■Adding an entry to the phonebook
Up to 20 names can be stored.
■Limitation of number of digits
A phone number that exceeds 24 digits cannot be registered.
Setting speed dials
Deleting the registered data
Deleting speed dials
1
2
3
1
2
1
2
3
CT200h_OM_OM76135E_(EE).book Page 308 Friday, May 30, 2014 1 1:14 AM
Page 311 of 622
311
5
5-9. Bluetooth
® Phone
Audio system
CT200h_OM_OM76135E_(EE)
Making a phone call
◆Making a phone call
●Dialing by inputting a name
“Dial by name”
●Speed dialing
●Dialing a number stored in the outgoing history memory
“Redial”
●Dialing a number stored in the incoming history memory
“Call back”
◆Using the call history memory
●Dialing
●Storing data in the phone book
●Deleting
Press the talk switch and say a registered name.
The desired name or number is displayed.
Dial by one of the following methods:
a. Press the off-hook switch.
b. Select “Dial” using the “TUNE•SEL” knob.
In step , if the pronounced name cannot be recognized, select the desired name
using the knob.
Press the off-hook switch.
Press the preset button in which the desired number is registered.
Press the off-hook switch.
Dialing by inputting a name
Speed dialing
1
2
1
1
2
3
CT200h_OM_OM76135E_(EE).book Page 311 Friday, May 30, 2014 1 1:14 AM
Page 333 of 622
3335-12. Setup (Lexus Display Audio System)
5
Audio system
CT200h_OM_OM76135E_(EE)
“MENU” button → “Setup” → “General” → “Delete personal data”
Select “Delete”.
Check carefully beforehand, as data cannot be retrieved once deleted.
The following personal data will be deleted or changed to its default settings.
•Phonebook data
•Voice tag
• Call history data
•Favorite data
• Bluetooth
® devices data
• Phone sound settings
• Detailed Bluetooth
® settings
• Audio/video setting
• Preset switch data
• Last used radio station
• Customized image data
•FM info setting
• iPod tagging information
• Software update history
• Software update detail information
• Phone display setting
• Contact/call history setting
• Messaging setting
NOTICE
■To prevent damage to the USB memory device or its terminals
→ P. 3 6 1
Deleting personal data
1
2
CT200h_OM_OM76135E_(EE).book Page 333 Friday, May 30, 2014 1 1:14 AM
Page 340 of 622

3405-13. Using the audio system (Lexus Display Audio System)
CT200h_OM_OM76135E_(EE)
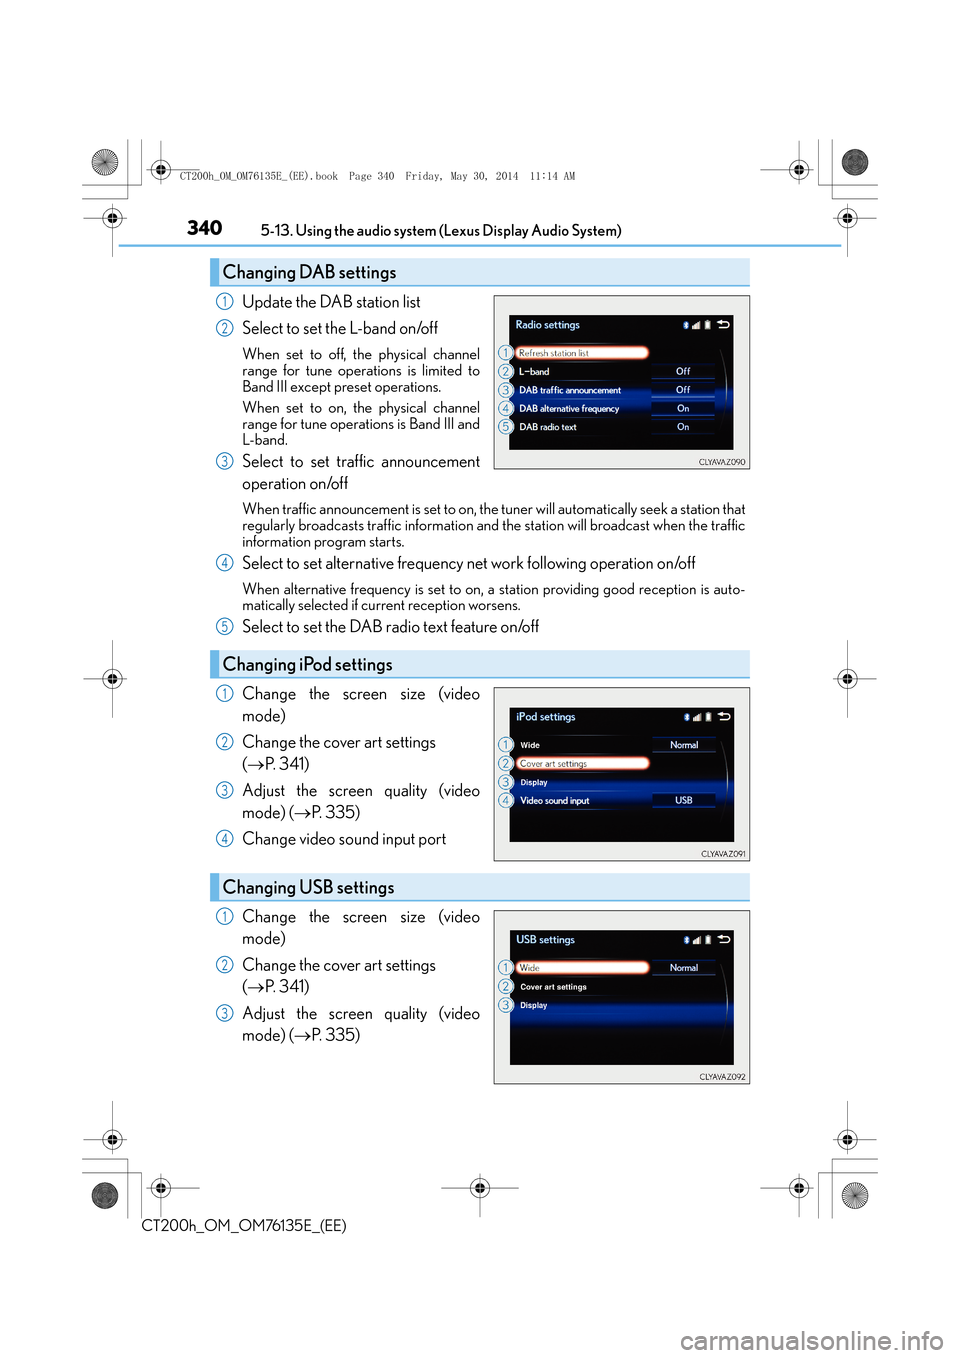
Update the DAB station list
Select to set the L-band on/off
When set to off, the physical channel
range for tune operations is limited to
Band III except preset operations.
When set to on, the physical channel
range for tune operations is Band III and
L-band.
Select to set traffic announcement
operation on/off
When traffic announcement is set to on, the tuner will automatically seek a station that
regularly broadcasts traffic information and the station will broadcast when the traffic
information program starts.
Select to set alternative frequency net work following operation on/off
When alternative frequency is set to on, a station providing good reception is auto-
matically selected if current reception worsens.
Select to set the DAB radio text feature on/off
Change the screen size (video
mode)
Change the cover art settings
( → P. 3 4 1 )
Adjust the screen quality (video
mode) ( →P. 3 3 5 )
Change video so und input port
Change the screen size (video
mode)
Change the cover art settings
( → P. 3 4 1 )
Adjust the screen quality (video
mode) ( →P. 3 3 5 )
Changing DAB settings
1
2
3
Changing iPod settings
4
5
1
2
3
4
Changing USB settings
1
2
3
CT200h_OM_OM76135E_(EE).book Page 340 Friday, May 30, 2014 1 1:14 AM
Page 345 of 622

345
5
5-14. Using the radio (Lexus Display Audio System)
Audio system
CT200h_OM_OM76135E_(EE)
Radio operation
Pressing the “RADIO” button displays the radio top screen from any screen of
the selected source.
■Menu screen
→
P. 3 4 2
Move the controller to the right to display the right menu screen. Change the radio top screen to the
preset selection screen.
Change the radio top screen to the
station list selection screen. (FM and
DAB)
Change the radio top screen to the
manual selection screen.
Change the radio top screen to the
time shift operation screen. (DAB)
(→ P. 3 4 6 )
Tune in to the desired station using one of the following methods.
■Seek tuning
Manual screen: Press or press and hold “ <” or “ >” button.
Preset or station list screen: Press and hold “ <” or “ >” button.
Seek turning can also be operated on the menu screen. ( →P. 3 4 2 )
The radio will begin seeking up or down for a station of the nearest frequency
and will stop when a station is found.
Select “AM”, “FM” or “DAB” on the “Source” screen to begin listening to the
radio.
Radio top screen
Changing the top screen mode
1
2
3
4
Selecting a station
CT200h_OM_OM76135E_(EE).book Page 345 Friday, May 30, 2014 1 1:14 AM
Page 346 of 622

3465-14. Using the radio (Lexus Display Audio System)
CT200h_OM_OM76135E_(EE)
■Manual tuning (manual screen)
Turn the “TUNE•SCROLL” knob or turn the controller.
■Station list (preset or station list screen)
Select the desired station by pressing “<” or “>”, turn the “TUNE•SCROLL”
knob or controller.
Radio stations can be preset. Search for desired stations.
Turn the controller to select one of the stations and then press the controller
until you hear a beep while on the preset selection screen.
The broadcast you are currently listening to can be re-listened to at any time. Move the controller to the right and then select “Time shift”.
Turn the “TUNE•SCROLL” knob to set the desired offset.
An offset playback time can also be set on the menu screen. ( →P. 3 4 2 )
To cancel the time shift operation while in time shift mode, move the controller to the
left and select “Time shift off”. If the time shift display is left showing “-0’ 00”” for 6
seconds without any operation, the time shift operation will be canceled.
■Reception sensitivity
●Maintaining perfect radio reception at all time s is difficult due to the continually chang-
ing position of the antenna, differences in si gnal strength and surrounding objects, such
as trains, transmitters, etc.
●The radio antenna is mounted inside the rear window. To maintain clear radio reception,
do not attach metallic window tinting or other metallic objects to the antenna wire
mounted inside the rear window.
■Traffic announcement operation
When traffic announcement is set to on, “TP” will appear on the screen and the radio will
begin seeking a TP station. If the radio s eeks out a TP station, the program name will
appear on the screen. If a traffic announcement station is received, the radio will be
switched to the traffic information program automatically. When the program ends, the
initial operation will resume.
Setting station presets (preset screen)
Time shift operation (DAB)
1
2
1
2
CT200h_OM_OM76135E_(EE).book Page 346 Friday, May 30, 2014 1 1:14 AM
Page 355 of 622

355
5
Audio system
CT200h_OM_OM76135E_(EE)5-16. Using an external device (Lexus Display Audio System)
■Error messages
If the following error messages appear on the screen, refer to the table and take the
appropriate measures. If the problem is not rectified, take the vehicle to any authorized
Lexus dealer or repairer, or another duly qualified and equipped professional.
■iPod problems
To resolve most problems encountered when using your iPod, disconnect your iPod from
the vehicle iPod connection and reset it. For instructions on how to reset your iPod, refer
to your iPod Owner’s Manual.
MessageCause/Correction procedures
“Connection error. Consult
your owner’s manual for
instructions on how to
reconnect the iPod.”
This indicates a problem in the iPod or its connection.
“There are no songs available
for playback. Add compatible
songs to your iPod.”
This indicates that there is no music data in the iPod.
“No items available.”This indicates that songs are not found in a selected
playlist.
“Check the iPod firmware
version.”This indicates that the software version is not com-
patible.
Please check the compatible models. ( →P. 3 5 6 )
“iPod authorization failed.”This indicates that the Lexus Display Audio system
failed to authorize the iPod.
Please check your iPod.
CT200h_OM_OM76135E_(EE).book Page 355 Friday, May 30, 2014 1 1:14 AM